Gimp
Содержание:
- Description
- Changing the Size (Dimensions) of an Image (Scale)
- How You Can Help
- Что представляет собой редактор Gimp
- Feature Prioritization
- Step 4
- Как пользоваться инструментами редактирования GIMP
- Multi-threading preferences now available from plug-ins
- Digital painting improvements
- Tools, Filters & Plug-ins
- Off-canvas point snapping
- Metadata support
- Добавляем надпись в GIMP
- GIMP for Unix-like systems
- OPTIONS
- FTP and Web Mirrors
- GIMP for Unix-like systems
Description
GIMP is the GNU Image Manipulation Program. It is used to edit and manipulate images. It can load and save a variety of image formats and can be used to convert between formats.
GIMP can also be used as a paint program. It features a set of drawing and painting tools such as airbrush, clone, pencil, and paint brush. Painting and drawing tools can be applied to an image with a variety of paint modes. It also offers an extensive array of selection tools like rectangle, ellipse, fuzzy select, bezier select, intelligent scissors, and select by color.
GIMP offers a variety of plug-ins that perform a variety of image manipulations. Examples include bumpmap, edge detect, gaussian blur, and many others. In addition, GIMP has several scripting extension which allow for advanced non-interactive processing and creation of images.
GIMP ships with a second binary called gimp-console. This binary is a console-only version and behaves as if gimp was called with the —no-interface command-line option.
On platforms with the D-Bus message bus system, GIMP will by default check if an instance is already running in this user session. If it detects that, it will pass all filenames given on the command-line to the already running GIMP instance and quit.
Changing the Size (Dimensions) of an Image (Scale)
This is a very simple task to accomplish in GIMP easily.
The image we’ll be using to illustrate this with is The Horsehead Nebula in Infrared.
When you first open your image in GIMP, chances are that the image will be zoomed so that the entire image fits in your canvas. The thing to notice for this example is that by default the window decoration at the top of GIMP will show you some information about the image.
![]()
View of the GIMP canvas, with information at the top of the window.
Notice that the information at the top of the window shows the current pixel dimensions of the image (in this case, the pixel size is 1225×1280).
To resize the image to new dimensions, we need only invoke the Scale Image dialog:
Image → Scale Image…
This will then open the Scale Image dialog:
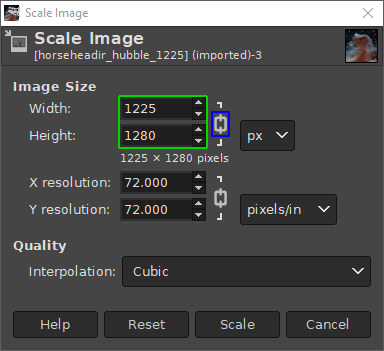
The Scale Image dialog.
In the Scale Image dialog, you’ll find a place to enter new values for Width and Height. If you know one of the new dimensions you’d like for the image, fill in the appropriate one here.
You’ll also notice a small chain just to the right of the Width and Height entry boxes. This icon shows that the Width and Height values are locked with respect to each other, meaning that changing one value will cause the other to change in order to keep the same aspect ratio (no strange compression or stretching in the image).
For example, if you knew that you wanted your image to have a new width of 600px, you can enter that value in the Width input, and the Height will automatically change to maintain the aspect ratio of the image:
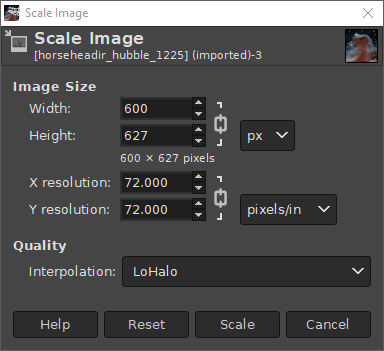
Changing the Width to 600px.
As you can see, entering 600px for the width automatically changes the height to 627px.
Also notice I have shown a different option under Quality → Interpolation. The default value for this is Cubic, but to retain the best quality it would better to use Sinc (Lanczos3).
If you want to specify a new size using a different type of value (other than Pixel size), you can change the type by clicking on the “px” spinner:
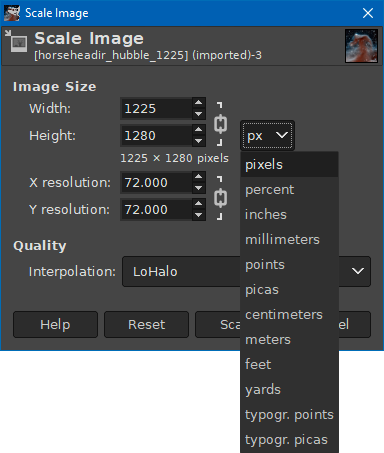
A common use for this could be if you wanted to specify a new size as a percentage of the old one. In this case you could change to “percent”, and then enter 50 in either field to scale the image in half.
Once you are done scaling the image, don’t forget to export the changes you’ve made:
File → Export…
to export as a new filename, or:
File → Overwrite {FILENAME}
to overwrite the original file (use caution).
For more detail about using Scale Image, you can see the documentation.
How You Can Help
GIMP is Free Software and a part of the GNU Project. In the free software world, there is generally no distinction between users and developers. As in a friendly neighbourhood, everybody pitches in to help their neighbors. Please consider the time you give in assistance to others as payment.
Ways in which you can help:
- program new features,
- report bugs (errors in the program),
- test existing features and provide feedback,
- add documentation,
- translate GIMP to your own language,
- translate the documentation,
- write tutorials,
- improve this website,
- make artwork for GIMP,
- let people know you used GIMP for your artwork,
- give away copies of GIMP,
- help others to learn to use GIMP, etc.
As you can see, anyone can help.
Development Status
The team is currently busy working on v3.0. This will be a port of GIMP to
GTK+3, much newer and better supported version of the user interface toolkit.
Most of GIMP’s source code is related to the user interface, so this port is a
major undertaking, especially since we shall break API and refactor numerious
parts of the program.
We still need to port more plugins to become GEGL operations. If you are willing
to help with that, please refer to the Porting filters to GEGL
page to see what you could work on.
To get a better understanding of where the project is heading to, which features
are planned etc., please visit the Roadmap page.
Bug Reports
GIMP is not a bug-free application nor is any other application so reporting the bugs that you will encounter is very important to the development, it helps the developers to make GIMP more stable and more bug free.
You don’t have to be a developer or a everyday user to report bugs. It can be hard to report a bug the first time you try it out but don’t just quit the whole bug report if you think it is hard. Instead, look at the bugs page you will find some very good help about this.
Web Development
Creating websites that contain useful information is very important. It is actually just as important as doing bug reports. A website contains a lot of information that is needed for the development to move on and it also contains information that will help the public to understand what the application is all about.
Что представляет собой редактор Gimp
Графический редактор Gimp появился на свет в 1995 году. Проект не имеет официальной компании, ответственной за выпуск новых версий и поддержку старых. Эти функции исполняет сообщество разработчиков, состоящее из группы добровольцев. В первые 10 лет своего существования проект не имел единого представления о том, каким он должен быть для конечного потребителя. Лишь в 2005 году был разработан единый стандарт и составлены принципы, которым разработчики стараются следовать и по сегодняшний день. Программа является полностью бесплатной и распространяется с открытой лицензией. Это означает, что при желании вы можете стать частью сообщества разработчиков и выпускать собственные модификации без нарушения авторских прав.

Feature Prioritization
This is roughly how the core GIMP development team prioritizes feature development. Note that this does not mean we are not interested in contributions in other areas, or contributions of low prio features. Contributions of any kind are always welcomed. But at the end of the day, it is better to have one feature 100% complete than two features 50% complete, which is why features should be prioritized and then worked on in order.
Starting with GIMP 2.10, features will be developed in isolation on feature branches and be merged to the main branch when they are ready.
The list below shows when coming features are expected to be ready, but that might change.
Step 4
In the last step, we’ll use a very handy function for applying a filter to multiple layers. This function is provided by GAP, the GIMP Animation Package. Please go to the “Using GAP” tutorial to learn more about the tool.
Before we can apply this effect, we need to create a new image out of the third frame. This is as simple as dragging the layer preview from the layers window to the toolbar. Now duplicate the image four times. With a rectangular select tool, draw a selction around the text. Now we’re ready to apply a gaussian blur filter on every layer using varying parameters. Use the function and select plug-in-gauss-rle2 from the list and press the apply varying button. The blur dialog pops up. Now we need to specify parameters for the lowest layer in the stack, ie. our first frame.
We want to blur the text away in time, so for the first frame, let’s specify a lower value. We’ll blur in horizontal direction only, so let’s make it v:0 h:2. After you click OK another dialog shows up. Here, choose continue and specify parameters for the last frame. We’ll go for 20 px horizontal blur. You can backup the progress, but for now we will make the filter apply on all layers inbetween by clicking on continue in the next dialog. All we need to do now is to drag the layers back to the original image.
Как пользоваться инструментами редактирования GIMP
Рассматриваемый графический редактор характеризуется набором полезных инструментов для профессионального редактирования и обработки фотографий и картинок.
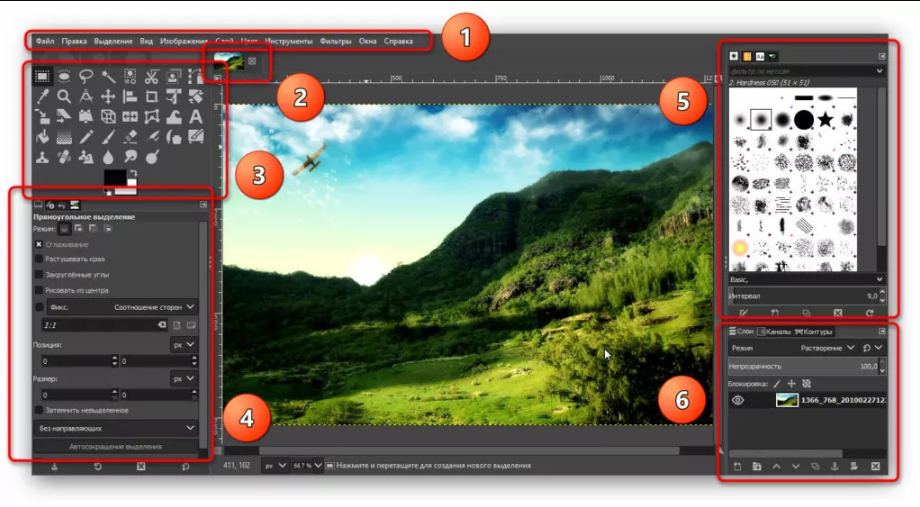
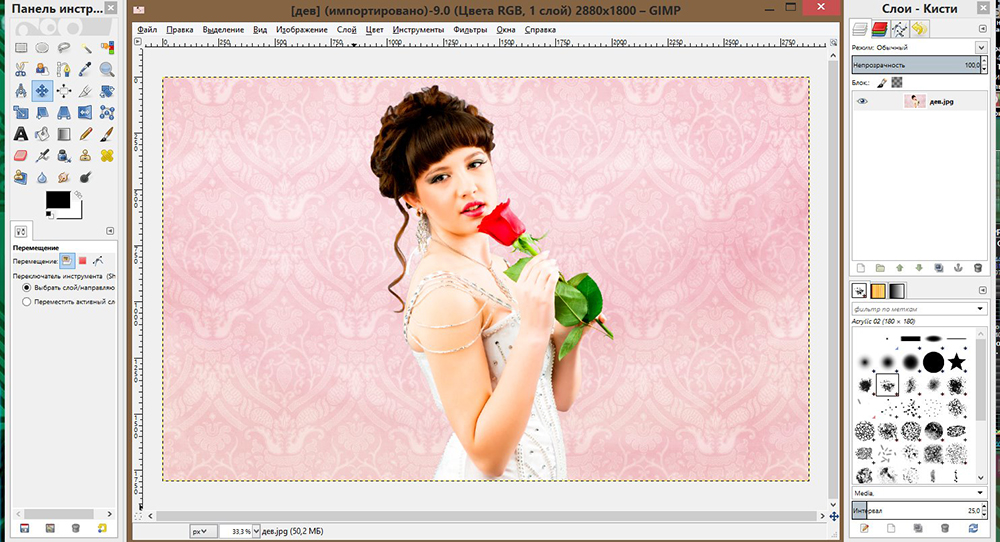
1. В главном меню доступно управлением изображением на глобальном уровне. Здесь переключаются окна, слои, цветовая гамма, фильтры – стандартные для работы инструменты.
2. С помощью следующего меню мастер переходит между фотографиями, который открыты в программе, для вставки или слияния.
3. Панель инструментов содержит полезный набор функций, чтобы выделить область, повернуть и увеличить изображение или текст, изменить цвет, закрасить отдельные элементы и так далее. Чтобы воспользоваться всплывающей подсказкой, наводим указатель мыши (курсор) на инструмент и ждем 1-2 секунды – программа отобразит наименование функции.
4. После выбора инструмента открывается соответствующее меню для настройки параметров выбранной функции. Для кисти – толщина, цвет, варианты закраски, для текста – шрифт, размер и так далее.
5. В правом верхнем меню также содержатся кисти, текстуры и шрифты.
6. Следующий раздел обрабатывает слои, цветовые каналы и выделенные контуры.
Multi-threading preferences now available from plug-ins
The Preferences dialog proposes a “Number of threads to use” setting,
allowing people to customize the thread usage (defaulting to system
threads detection). This was only used by core processing until now. We
now make this setting available to plug-ins too through the
API function, hence allowing plug-ins to
follow user preferences.
The HEIF/AVIF plug-in now uses this function (it was already
multi-threaded, yet was using system threads discovery with no way to
override the settings until now). The JPEG2000 loading code, which was
single-threaded until now, has been ported to use this new function,
hence decoding images much faster.
Digital painting improvements
GIMP 2.10 ships with a number of improvements requested by digital painters. One
of the most interesting new additions here is the MyPaint Brush tool that
first appeared in the GIMP-Painter fork.
The Smudge tool got updates specifically targeted in painting use case. The
new No erase effect option prevents the tools from changing alpha of pixels.
And the foreground color can now be blended into smudged pixels, controlled by
a new Flow slider, where 0 means no blending.
All painting tools now have explicit Hardness and Force sliders except for
the MyPaint Brush tool that only has the Hardness slider.
Most importantly, GIMP now supports canvas rotation and flipping to help
illustrators checking proportions and perspective.
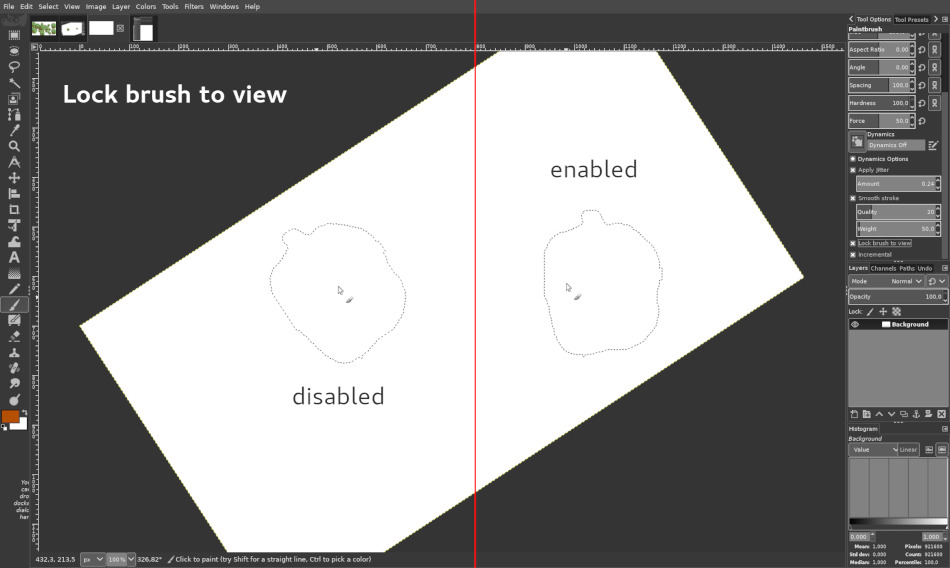
A new Brush lock to view option gives you a choice whether you want a brush
locked to a certain zoom level and rotation angle of the canvas. The option is
available for all painting tools that use a brush except for the MyPaint Brush tool.
New Symmetry Painting dockable dialog, enabled on per-image basis, allows to
use all painting tools with various symmetries (mirror, mandala, tiling…).
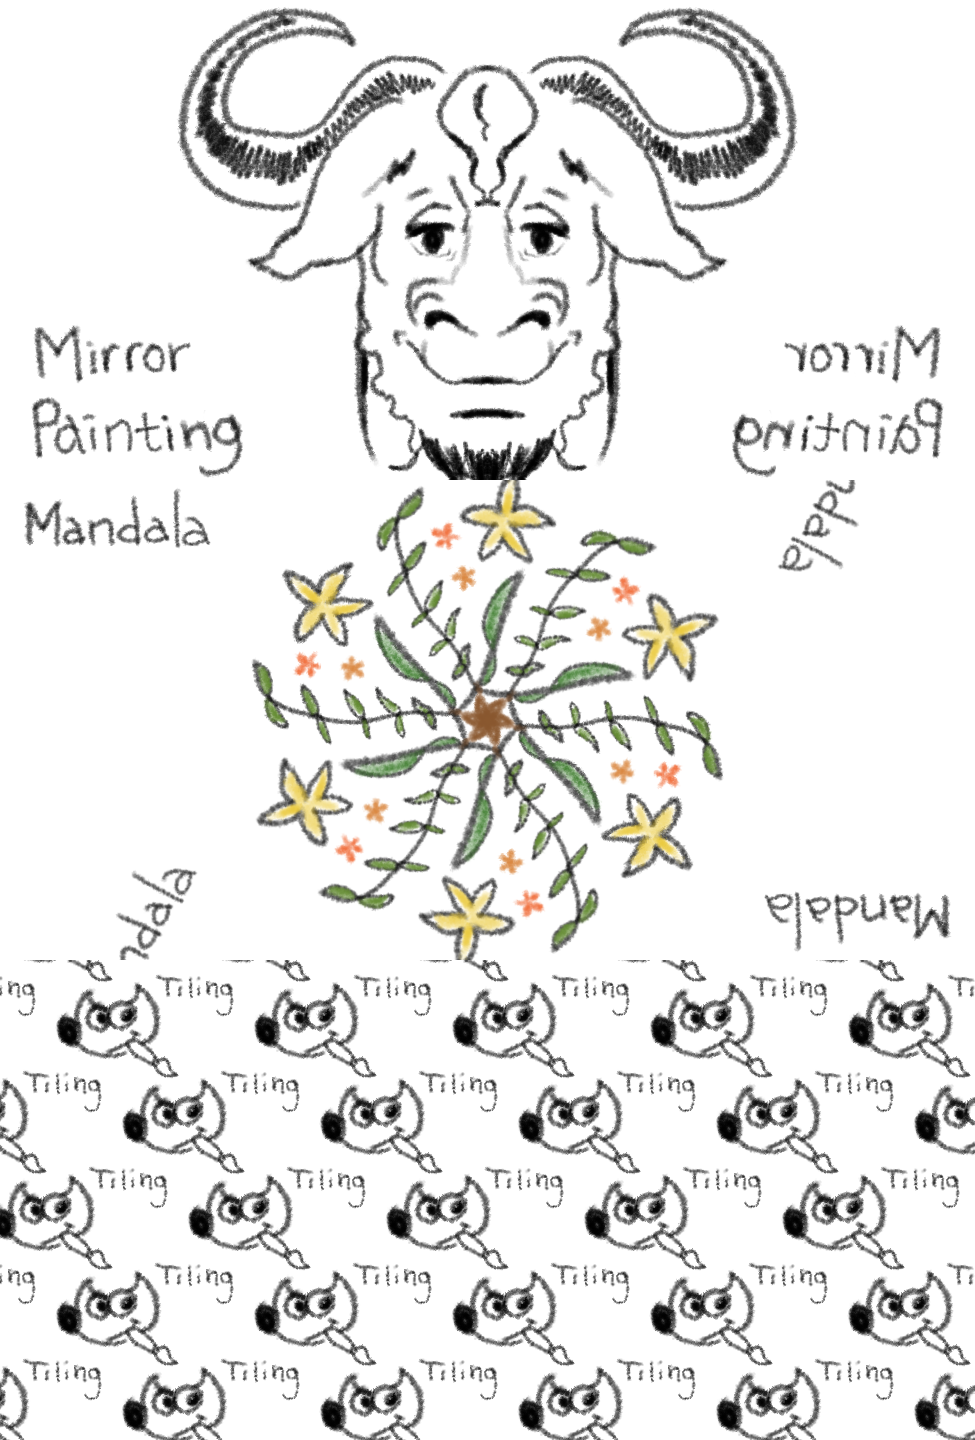
This new version of GIMP also ships with more new brushes available by default.
Contributors: Michael Natterer, Alexia Death, Daniel Sabo, shark0r, Jehan
Pagès, Ell, Jose Americo Gobbo, Aryeom Han…
Tools, Filters & Plug-ins
Improved Free Select Tool

The freehand select tool has been enhanced to support polygonal selections. It also allows mixing free hand segments with polygonal segments, editing of existing segments, applying angle-constraints to segments, and of course the normal selection tool operations like add and subtract. Altoghether this ends up making the Free Select Tool a very versatile, powerful and easy-to-use selection tool.
Brush Dynamics

Brush dynamics let you map different brush parameters, commonly at least size and opacity, to one or more of three input dynamics: pressure, velocity and random. Velocity and random are usable with a mouse. The Ink tool, that supported velocity before, has been overhauled and now handles velocity-dependent painting much better.
Brush dynamics have enabled a new feature in stroking paths. There is now a check box under the “paint tool” option, for emulating brush dynamics if you stroke using a paint tool. What this means is that when your stroke is being painted by GIMP, it tells the brush that its pressure and velocity are varying along the length of the stroke. Pressure starts with zero, ramps up to full pressure and then ramps down again to no pressure. Velocity starts from zero and ramps up to full speed by the end of the stroke.
Minor Changes

- Added a bounding box for the Text Tool that supports automatic wrapping of text within that bounding box.
- Move handles for rectangle based tools like Crop and Rectangle Select to the outside of the rectangle when the rectangle is narrow.
- Added motion constraints to the Move Tool.
- Improved event smoothing for paint tools.
- Mark the center of rectangles while they are moved, and snap the center to grid and rulers.
- Enable brush scaling for the Smudge tool.
- Added ability to save presets in all color tools for color adjustments you use frequently.
- Allow to transfer settings from Brightness-Contrast to Levels, and from Levels to Curves.
- Allow changing opacity on transform tool previews.
- The Screenshot plug-in has been given the ability to capture the mouse cursor (using Xfixes).
- Display aspect ratio of the Crop and Rectangle Select Tool rectangles in the status bar.
- Desaturate has been given an on-canvas preview.
- The Flame plug-in has been extended with 22 new variations.
- Data file folders like brush folders are searched recursively for files.
- Replaced the PSD import plug-in with a rewritten version that does what the old version did plus some other things, for example reading of ICC color profiles.
Off-canvas point snapping
Though there are various fixes in core code, this change is probably the
most worth mentionning. Ever since GIMP 2.10.14, we are now able to see
the .
Consequently, many features can now work outside the canvas, yet not all
features yet. This change is the continuation of this work, allowing you
to snap various tools to guides, grids or vectors, even outside the canvas.
 Snapping to guide/grid/vectors off-canvas made possible — GIMP 2.10.24
Metadata support
A lot of work has been going on in the metadata area, mostly
consolidating our support and fixing many issues.
The metadata viewer and editor also received a lot of love, making them
more robust to various edge cases, such as duplicate tags, but also
mapping equivalency between similar IPTC and XMP tags, better encoding
handling, and so on.
The GPS data is also handled a bit better with more precision, tooltips
and better formatting.
There are still a lot of improvements to be made in the metadata area
though we are probably on the right path. This part of the development
is not as visible as other, yet this is very time-consuming and
thankless groundwork while being useful to anyone who needs good
metadata support so we’d like to thank Jacob
Boerema who has worked tirelessly on
this for months.
Добавляем надпись в GIMP
Рассмотрим работу графического редактора на примере – добавим надпись на изображение. После загрузки фотографии или картинки создаем текстовый слой, кликнув по символу «А», который расположен на панели инструментов. Далее, выбираем часть фотографии, куда требуется нанести текст.
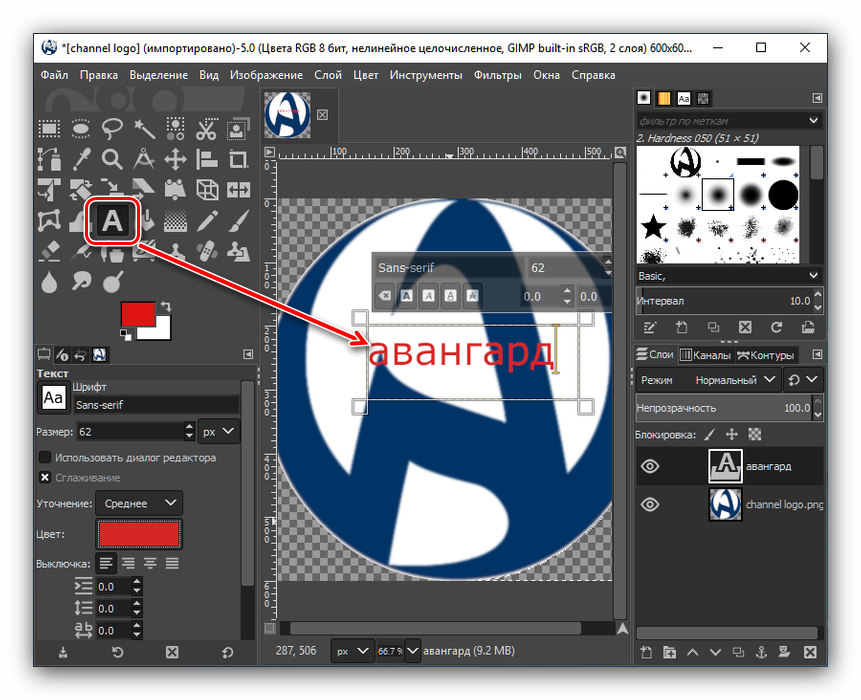
Регулируем размер и тип шрифта на отображаемой прозрачной панели. Также используем блок инструментов в левой нижней части программы. После подбора шрифта и редактирования параметров кликаем на свободное поле – текст готов и нанесен на изображение.
Чтобы воспользоваться функциями рисования рассмотрим левую панель инструментов. Здесь расположены кисти, карандаши разных параметров. Карандаш издает резкие штрихи, кисть – плавные мазки.
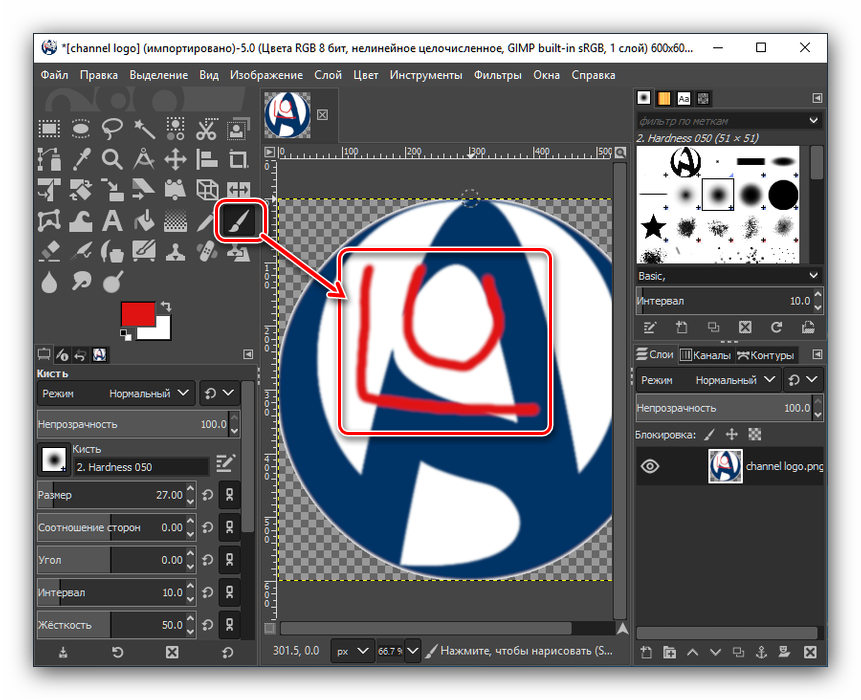
После того, как разобрали базовые функции панели инструментов, приступаем к продвинутым возможностям – функционал программы позволяет добиться максимальной обработки и редактирования.
GIMP for Unix-like systems
If available, the official package from your Unix-like
distribution is the recommended method of installing GIMP!
The flatpak build is new and has known limitations, though it
will likely provide faster updates, following GIMP releases
closely.
Therefore choose your installation medium according to your
needs.
Flatpak build available in: x86-64 and AArch64
(note: i386 and ARM-32 versions used to be published, yet
are now stuck at GIMP 2.10.14 and 2.10.22 respectively).
Flatpak additional instructions
The flatpak link above should open your software installer
and prompt you to install GIMP. Yet it may not work
out-of-the-box on some platforms since the flatpak technology is
new. If that is the case, ensure flatpak is
installed and if clicking the link still does not prompt to
install GIMP, then manually install by command line:
Once installed, it will be made available exactly the same way
as other applications (menus, desktop overview, or any specific
application launch process used by your desktop).
If this is not the case, we suggest to report a bug to your
desktop or distribution asking for proper support of flatpak. In
the meantime, you can still run it by command line (not as the
recommended method, only a workaround):
This installation will also provide regular update. You don’t
have to come back on this page and install again (it will not
work!) when a new version of GIMP is released. Instead if your
distribution and/or desktop has a good support for flatpak, it
should propose to perform updates.
Once again, if your distribution does not have proper support,
you can always fall back to using the following command line:
OPTIONS
gimp
- -h, —help
- Display a list of all commandline options.
- -v, —version
- Output the version info.
- —verbose
- Show startup messages.
- —no-shm
-
Do not use shared memory between GIMP and its plugins.
Instead of using shared memory, GIMP will send the data via pipe. This
will result in slower performance than using shared memory. - —no-cpu-accel
-
Do not use CPU accelerations such as MMX or SSE even if GIMP detects
that your CPU provides this functionality. - -d, —no-data
-
Do not load patterns, gradients, palettes, or brushes. Often useful
in non-interactive situations where startup time is to be minimized. - -f, —no-fonts
-
Do not load any fonts. No text functionality will be available if this
option is used. - -i, —no-interface
- Run without a user interface.
- —display display
- Use the designated X display.
- -s, —no-splash
- Do not show the splash screen.
- —session <name>
-
Use a different sessionrc for this GIMP session. The given session
name is appended to the default sessionrc filename. - -g, —gimprc <gimprc>
-
Use an alternative gimprc instead of the default one. Useful in
cases where plugins paths or machine specs may be different. - —system-gimprc <gimprc>
- Use an alternate system gimprc file.
- —dump-gimprc
- Output a gimprc file with default settings.
- —debug-handlers
- Enable debugging signal handlers.
- -c, —console-messages
-
Do not popup dialog boxes on errors or warnings. Print the messages on
the console instead. - —stack-trace-mode {never|query|always}
- If a stack-trace should be generated in case of fatal signals.
- —pdb-compat-mode {off|on|warn}
- If the PDB should provide aliases for deprecated functions.
- -b, —batch <commands>
-
Execute the set of <commands> non-interactively. The set
of <commands> is typically in the form of a script that
can be executed by one of the GIMP scripting extensions. When
<commands> is — the commands are read from standard
input.
FTP and Web Mirrors
We had a server move a while back that caused us to lose our existing mirrors (moved from physical to virtual server and to an environment that doesn’t allow FTP access).
On the plus side, we are now able to offer rsync access to download.gimp.org.
If you are running one of the existing GIMP mirrors, or want to create a new one, please contact us to get your rsync credentials.
- Canada
- https://mirror.klaus-uwe.me/gimp/gimp/
- ftp://mirror.klaus-uwe.me/gimp/
- rsync://mirror.klaus-uwe.me/gimp/
- Finland
- https://www.nic.funet.fi/pub/mirrors/ftp.gimp.org/
- ftp://ftp.funet.fi/pub/mirrors/ftp.gimp.org/
- rsync://rsync.nic.funet.fi/ftp/pub/mirrors/ftp.gimp.org/
- France
- http://ftp.iut-bm.univ-fcomte.fr/gimp/
- ftp://ftp.iut-bm.univ-fcomte.fr/gimp/
- rsync://ftp.iut-bm.univ-fcomte.fr/gimp/
- Germany
- https://ftp.fau.de/gimp/gimp/
- ftp://ftp.fau.de/gimp/gimp/
- rsync://ftp.fau.de/gimp/
- https://artfiles.org/gimp.org/pub/gimp/
- https://ftp.gwdg.de/pub/misc/grafik/gimp/
- ftp://ftp.gwdg.de/pub/misc/grafik/gimp/
- Greece
- https://ftp.cc.uoc.gr/mirrors/gimp/
- ftp://ftp.cc.uoc.gr/mirrors/gimp/
- Japan
- http://www.ring.gr.jp/pub/graphics/gimp/
- Netherlands
- https://ftp.snt.utwente.nl/pub/software/gimp/gimp/
- ftp://ftp.snt.utwente.nl/pub/software/gimp/gimp/
- Philippines
- http://mirror.rise.ph/gimp/
- ftp://mirror.rise.ph/gimp/
- Poland
- https://ftp.icm.edu.pl/pub/graphics/gimp/
- ftp://ftp.icm.edu.pl/pub/graphics/gimp/
- rsync://ftp.icm.edu.pl/pub/graphics/gimp/
- gopher://ftp.icm.edu.pl/1/pub/graphics/gimp/
- Sweden
- https://ftp.lysator.liu.se/pub/gimp/
- ftp://ftp.lysator.liu.se/pub/gimp
- rsync://ftp.lysator.liu.se/pub/gimp
- Ukraine
- https://gimp.ip-connect.info/gimp/
- rsync://gimp.ip-connect.info/gimp/
- ftp://gimp.ip-connect.info/mirror/gimp/
- United Kingdom
- https://www.mirrorservice.org/sites/ftp.gimp.org/pub/gimp/
- ftp://ftp.mirrorservice.org/sites/ftp.gimp.org/pub/gimp/
- rsync://rsync.mirrorservice.org/ftp.gimp.org/pub/gimp/
- https://mirrors.ukfast.co.uk/sites/gimp.org/pub/gimp/
- ftp://mirrors.ukfast.co.uk/gimp.org/pub/gimp/
- rsync://mirrors.ukfast.co.uk/gimp.org/pub/gimp/
- United States
- http://gimp.cp-dev.com/
- ftp://devhost.cp-dev.com/gimp
- rsync://gimp.cp-dev.com/gimp
- https://mirrors.dotsrc.org/gimp/gimp/
- ftp://mirrors.dotsrc.org/gimp/
- rsync://mirrors.dotsrc.org/gimp/
- https://mirrors.syringanetworks.net/gimp/gimp/
- ftp://mirrors.syringanetworks.net/gimp/
- rsync://mirrors.syringanetworks.net/gimp/
- https://mirror.jaleco.com/gimp/gimp/
- https://mirror.umd.edu/gimp/gimp/
- https://mirrors.xmission.com/gimp/gimp/
- ftp://mirrors.xmission.com/gimp/gimp/
GIMP for Unix-like systems
If available, the official package from your Unix-like
distribution is the recommended method of installing GIMP!
The flatpak build is new and has known limitations, though it
will likely provide faster updates, following GIMP releases
closely.
Therefore choose your installation medium according to your
needs.
Flatpak build available in: i386, x86-64, ARM and AArch64.
Flatpak additional instructions
The flatpak link above should open your software installer
and prompt you to install GIMP. Yet it may not work
out-of-the-box on some platforms since the flatpak technology is
new. If that is the case, ensure flatpak is
installed and if clicking the link still does not prompt to
install GIMP, then manually install by command line:
Once installed, it will be made available exactly the same way
as other applications (menus, desktop overview, or any specific
application launch process used by your desktop).
If this is not the case, we suggest to report a bug to your
desktop or distribution asking for proper support of flatpak. In
the meantime, you can still run it by command line (not as the
recommended method, only a workaround):
This installation will also provide regular update. You don’t
have to come back on this page and install again (it will not
work!) when a new version of GIMP is released. Instead if your
distribution and/or desktop has a good support for flatpak, it
should propose to perform updates.
Once again, if your distribution does not have proper support,
you can always fall back to using the following command line: