Hwinfo
Содержание:
Overview
hwinfo/libhd are used to probe for the hardware present in the system. It can be
used to generate a system overview log which can be later used for support.
To give you an idea what kind of information it provides, here’s the output it gives when asked about the graphcs card:
# hwinfo --gfxcard
27: PCI 200.0: 0300 VGA compatible controller (VGA)

  Unique ID: B35A.G9ppNwS+xM4
  Parent ID: _Znp.nMBktMhAWbC
  SysFS ID: /devices/pci0000:00/0000:00:02.0/0000:02:00.0
  SysFS BusID: 0000:02:00.0
  Hardware Class: graphics card
  Model: "nVidia GF119 "
  Vendor: pci 0x10de "nVidia Corporation"
  Device: pci 0x107d "GF119 "
  SubVendor: pci 0x10de "nVidia Corporation"
  SubDevice: pci 0x094e
  Revision: 0xa1
  Driver: "nvidia"
  Driver Modules: "nvidia"
  Memory Range: 0xfa000000-0xfaffffff (rw,non-prefetchable)
  Memory Range: 0xf0000000-0xf7ffffff (ro,non-prefetchable)
  Memory Range: 0xf8000000-0xf9ffffff (ro,non-prefetchable)
  I/O Ports: 0xe000-0xefff (rw)
  Memory Range: 0xfb000000-0xfb07ffff (ro,non-prefetchable,disabled)
  IRQ: 82 (3241635 events)
  I/O Ports: 0x3c0-0x3df (rw)
  Module Alias: "pci:v000010DEd0000107Dsv000010DEsd0000094Ebc03sc00i00"
  Driver Info #0:
    Driver Status: nouveau is not active
    Driver Activation Cmd: "modprobe nouveau"
  Driver Info #1:
    Driver Status: nvidia is active
    Driver Activation Cmd: "modprobe nvidia"
  Config Status: cfg=new, avail=yes, need=no, active=unknown
  Attached to: #9 (PCI bridge)

Primary display adapter: #27
If that’s a bit too much information, you can ask it also for an abbreviated form. For example:
# hwinfo --short --disk --cdrom
disk:
  /dev/sda             WDC WD10EARS-00Y
  /dev/sdb             ST2000DM001-1CH1
cdrom:
  /dev/sr0             PLDS DVD+-RW DS-8ABSH
You can influence libhd via the environment variable resp. the boot option.
This includes turning on or off
probing modules and also manually adding hardware devices (to some degree).
For example
export hwprobe=-bios
will turn off the probing module.
For details about look here.
For general usage instructions, see manual page.
Chipsets
- Intel 5-series/34×0 (Ibex Peak), X58/5500/5520 (Tylersburg), 7500 (Boxboro), Tigerpoint, SM35 (Whitney Point), Topcliff, 6-series (Cougar Point), C600/X79 (Patsburg), 7-series (Panther Point), 8-series (Lynx Point), 9-series (Broadwell PCH), C61x/X99 (Wellsburg), 10-series (Skylake PCH), Lewisburg, Kaby Lake PCH, Cannon Lake PCH, Kaby Lake PCH, Comet Lake PCH, Tiger Lake PCH, Rocket Lake PCH, Alder Lake PCH, Emmitsburg PCH
- AMD 780G/780V/M780/M780V/790GX/780E/760G/780G (RS780), SR5690/SR5670/SR5650 (RD890S/RD870S), 785G/M785/890GX (RS880), SP5100 (SB700/750), SB810/850 (Hudson-1), Hudson-2/3/4, Bolton, 3xx Promontory, 4xx Promontory-LP, 5xx series (Bixby)
- nVidia nForce 720i/730i/740i/760i SLI, GeForce 9xxx (MCP79/7A), ION, MCP89
- VIA P4M900, CN896, VN896, CX800/VX800/VX820, VX855/VX875, VX900(H), VN1000, VX11
Возможности
Утилита имеет следующие технические возможности и функции:
- Распознание всех видов микропроцессоров, точное определение их параметров и вычисление реальной частоты FSB.
- Мониторинг работы системы в режиме реального времени.
- Возможность узнать температуру аппаратной составляющей персонального компьютера.
- Предоставление подробных данных о BIOS, а также материнских платах.
- Идентификация с помощью DDC характеристики монитора, возможность узнать его реальную дату изготовления.
- Сохранение отчетов в виде графиков, текстовых документов, лог-файлов, таблиц и т.д.
- Полученные от приложения отчеты пользователи могут импортировать в форматы MHTML, EXT, CSV, XML, а также HTML.
- Обнаружение статуса
- Функция удаленного мониторинга нескольких персональных компьютеров.
- Приложение показывает оставшееся время работы аккумулятора в различных датчиках.
- Определение напряжения каждого компонента.
- Вся предоставленная о системе информация сохраняется в специальном журнале.
- В приложении предусмотрены тесты производительности процессора, видеокарты, дисковых устройств и оперативной памяти.
- Отображение степени загруженности компонентов.
- Список аппаратных компонентов системы удобно отображаются в виде иерархического дерева.
- Отключение периодического таймера для избегания конфликтов с операционной системой.
- Программа отлично работает с другими инструментами.
- Идентификация нескольких сотен видеоакселараторов.
- Считывание информации с SPD модулей памяти.
- Определение технических характеристик и состояния каждого компонента.

Some Notes and Tips
It might occur to you that «writing» to the Windows Registry every 2 seconds might be working your hard drive a bit. This really isn’t the case. Windows is very clever about how it manages the Registry and changes are actually just stored in a memory copy of the hive, and only written to the physical disk periodically, and / or when you shut down Windows. This approach is very easy indeed on your hard drive.
The old Rainmeter plugin for HWiNFO allowed you to obtain distinct values for «Current», «Minimum», «Maximum» and «Average» for each sensor element. Only the «current» value is possible with this interface. These values can just as easily be calculated in the skin, which I demonstate in the skin in the example .rmskin below.
This interface does not support monitoring «remote computers». If you need to have a computer monitor one or more other computers on a network, this is the kind of functionality that requires that you purchase the «Pro» version of HWiNFO.
Many of the sensor elements HWiNFO will monitor have really bizarre, mysterious, or otherwise incomprehensible names. As you are going through the list on the main Sensor Status dialog, holding your mouse over the element will provide a really nice tooltip explanation of what the sensor means.
Those names can be changed by you! Simply right click any sensor element in the Sensor Status dialog and «Rename» it to something that makes more sense to you. Those changes will be carried through into the interface and into your skins.
Windows 7 последняя версия 64 бит Максимальная
В этой ситуации можно скачать последнюю версию Windows 7 на русском в персональной сборке — с уже подготовленными к установке драйверами, программами и компонентами, необходимыми для начала работы за компьютером
Следует обратить внимание, что данная версия операционной системы рассчитана на 64-разрядные процессоры, и при этом оснащена встроенным активатором, готовым регулярно легализовать ее при каждом официальном обновлении (этому активатору не страшны антивирусы). Для того, чтобы установить Windows 7 64 последняя версия на свой ПК, потребуется сначала скачать предлагаемую сборку в виде образа с расширением .iso, после чего нужно будет записать его на носитель – лучше, если это будет USB-флешка, но и обычный DVD-диск может подойти
Windows 7 скачать торрент 64 bit 2020 rus оригинал активированная система русском версия на флешку.
Создать загрузочную флешку проще всего в популярной программе UltraISO: это бесплатно распространяемая утилита, рассчитанная именно на такие ситуации. Последовательность действий следующая:
· первым делом, UltraISO необходимо установить на компьютер или ноутбук; · к USB-порту подключается флеш-носитель – предварительно с него нужно скопировать все важные данные, так как в процессе записи они удалятся; · далее через диспетчер утилиты необходимо найти и выбрать скачанный образ Windows 7 Максимальная; · образ необходимо записать на флешку, создав из нее загрузочный носитель с автозапуском при помощи соответствующей опции.
Теперь все почти готово к установке Windows 7 последняя версия 64 бит, но следует помнить, что во время установки логический диск С будет полностью отформатирован, поэтому если на нем есть ценные документы или файлы, их нужно перенести на другой диск либо носитель.
Не вынимая флешку из порта, ПК необходимо перезагрузить, войдя при старте в BootMenu с помощью горячей клавиши – на разных устройствах эти клавиши могут разниться, но обычно верной кнопкой является F8, F9, F11 или F12 (реже – Esc). Приоритет в загрузочном меню необходимо переставить с жесткого диска на флешку с Windows 7, после чего настройки надо сохранить и снова уйти на перезагрузку.
Далее все просто, и достаточно следовать инструкциям: выбрать логический диск С для установки, форматировать его, продолжить установку вплоть до ее завершения, во время которого понадобится присвоить имя компьютеру и самому пользователю. Для того, чтобы наконец начать пользоваться новой системой в полном объеме, осталось только установить все необходимые драйверы – в этом поможет драйвер-пак Snappy Driver Installer последней версии, который предварительно также надо скачать.
Эта утилита SDI автоматически проанализирует имеющееся в ПК «железо», и сама инсталлирует все требуемые для работы драйверы. Последний шаг – снова перезагрузить компьютер, после чего можно приступать к установке любимых программ и приложений. Windows 7 Максимальная x64 последняя версия, предлагаемая к установке, весит 3,15 Гб, а при распаковке на флешку займет еще больше места – это следует учитывать при выборе носителя.
Хорошо то, что в ней уже предустановлен драйвер USB 3.0 на тот случай, если в портах компьютера пользователя отсутствует встроенная поддержка версии 2.0. Остается добавить, что создатель данной сборки Windows предварительно протестировал ее на различных конфигурациях с процессорами как AMD, так и Intel, убедившись в надежности ее установки и стабильности последующей работы. Скачать Windows 7 64 bit последняя версия
торрент можно в начале описания бесплатно. 125
Processors
- Intel Nehalem family: Bloomfield, Nehalem-EP/Gainestown, Nehalem-WS, Nehalem-EX/Beckton, Lynnfield, Clarksfield, Havendale, Auburndale, Jasper Forest
- Intel Westmere family: Clarkdale, Arrandale (+ECC), Westmere-EP, Westmere-WS, Core Gulftown, Westmere-EX (Eagleton)
- Intel Sandy Bridge (2nd Generation Core) family: Sandy Bridge-DT, Sandy Bridge-MB, Sandy Bridge-E, Sandy Bridge-EN, Sandy Bridge-EP/EP 4S (Jaketown)
- Intel Ivy Bridge (3rd Generation Core) family: Ivy Bridge-DT, Ivy Bridge-MB, Ivy Bridge EN/EP/EP 4S/EX (Ivytown)
- Intel Haswell (4th Generation Core) family: Haswell-DT/MB/ULT/Y, Haswell-EN/EP/EP 4S/EX
- Intel Broadwell (5th Generation Core) family: Broadwell-U, Broadwell-Y, Broadwell Halo (Brystalwell), Broadwell-DE, Broadwell-EN/EP/EP 4S/EX
… View all
Overview
As of version 7.0 of the HWiNFO hardware sensor monitoring tool, the software has changed to require purchasing a yearly «Pro» license in order to use the Shared Memory feature of the software that allowed it to interact with the HWiNFO plugin for Rainmeter. This would make distributing Rainmeter skins to end-users problematic at best.
Martin Malik, the author of HWiNFO, has graciously worked with us to find a solution that will allow the software to be used for personal, non-commercial use in Rainmeter without having to purchase a license, while keeping his ability to monetize his application when used by commercial entities.
The approach consists of tweaking a feature of HWiNFO that was implemented years ago to support using the software with the now long-dead Windows Sidebar gadgets. This allows you to output the current values of one or more sensors to the Windows Registry, where it can be easily accessed using the Registry measure in Rainmeter. A distinct HWiNFO plugin for Rainmeter is no longer required.
Using the values in a skin
The hard work is behind you! Using the values in a skin is actually really simple. What happens is that HWiNFO will output the current values for all of the sensor elements you selected to the Windows Registry. This will be done each time HWiNFO «polls» your sensors, which by default is every 2000ms or every 2 seconds. This can be changed in the settings for HWiNFO, but I don’t particularly recommend changing it. You don’t want HWiNFO using more resources than it needs to.
For each sensor element, four registry entries will be created and updated.
- SensorN : This will contain the name of the top level sensor.
- LabelN : This will contain the name of the individual sensor element.
-
ValueN : This will contain a formatted version of the number value.
Formatting will include commas for thousands separators, and the text value for the unit of measure.
Example: -
ValueRawN : This will contain a raw, unformatted version of the number value.
Example:
Now for those values for N. That will be that «Index» number that was assigned to each sensor element when you configured HWiNFO. Those numbers can be obtained by opening a Command Prompt, and typing in:That will produce a listing like this:
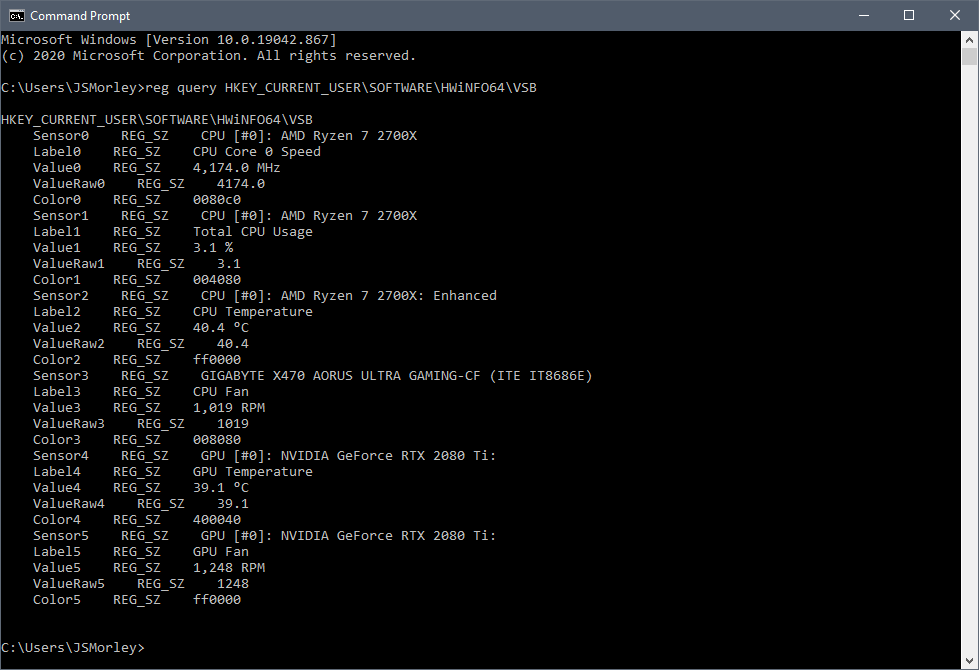
So all you need to do is create Registry measures to obtain each of those values you want to display in your skin.
The values are stored in the registry in .
Measure=RegistryRegHKey=HKEY_CURRENT_USERRegKey=SOFTWARE\HWiNFO64\VSBRegValue=Sensor0Measure=RegistryRegHKey=HKEY_CURRENT_USERRegKey=SOFTWARE\HWiNFO64\VSBRegValue=Label0Measure=RegistryRegHKey=HKEY_CURRENT_USERRegKey=SOFTWARE\HWiNFO64\VSBRegValue=Value0Measure=RegistryRegHKey=HKEY_CURRENT_USERRegKey=SOFTWARE\HWiNFO64\VSBRegValue=ValueRaw0 |
That’s really all there is to it! No plugin, no hideous and complicated hex numbers. Just go get the value you want.
openSUSE Development
To build the library, simply run . Install with .
Basically every new commit into the master branch of the repository will be auto-submitted
to all current SUSE products. No further action is needed except accepting the pull request.
For maintained branches, the package is submitted to a devel project but the final submission
must be triggered manually.
and version numbers are auto-generated from git commits, you don’t have to worry about this.
The current names of the devel projects for other branches can be seen in the jenkins logs.
Development happens mainly in the branch. The branch is used for all current products.
In rare cases branching was unavoidable:
- branch : SLE 11 SP4
- branch : SLE 12 (not SPx)
You can find more information about the changes auto-generation and the
tools used for jenkis submissions in the .
Setting up HWiNFO
The end-user of a skin will need to do some setup work with HWiNFO before using the skin. The first thing will be to get version 7.02 or later of the software from HWiNFO Home. Install the software and run it.
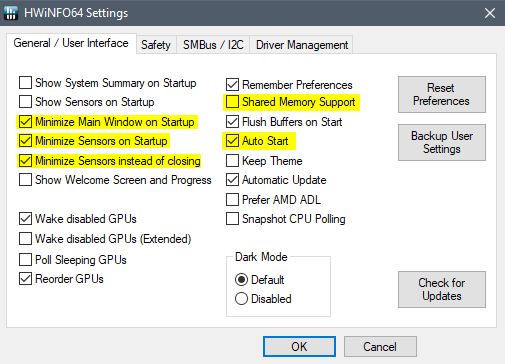
Then using the «Settings» option from the Windows Notification Area tray icon, configure HWiNFO with these recommended options. Note that Shared Memory Support is not required and should be left turned off:
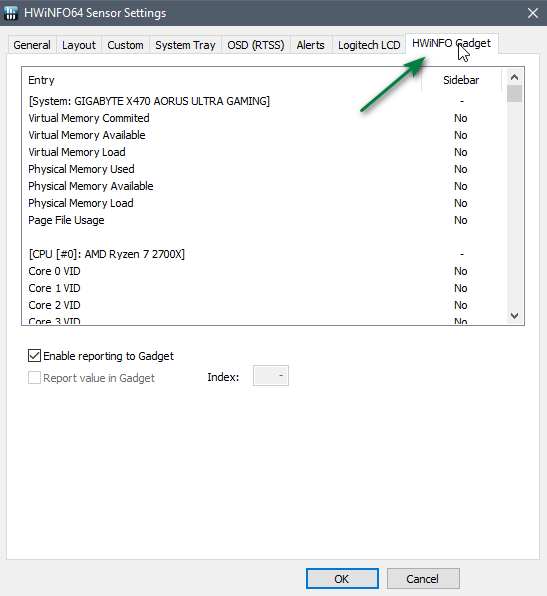
Close the Settings dialog, and again using the Windows Notification Area tray icon, select «Sensors», and then click on the «Configure Sensors» button at the bottom of the Sensor Status dialog.

Select the «HWiNFO Gadget» tab on the Sensor Settings dialog.
This will list all of the sensors that HWiNFO is monitoring for your hardware. What is on this list will obviously vary from computer to computer! Be sure the checkbox for «Enable reporting to Gadget» is selected.
Now scroll through the list, and one at a time, select the sensor elements you wish to output to Rainmeter. For each one, check the box «Report value in Gadget», and make a note of the «Index» value that is created for each. More on that in a minute…
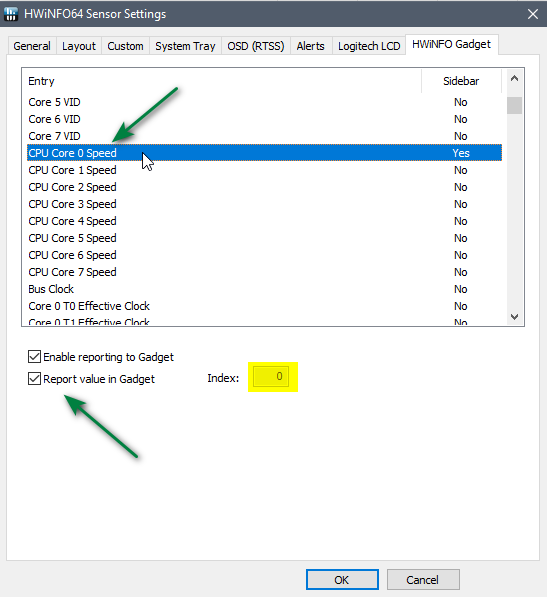
Click on «OK» and you are done! You can close the Sensor Status dialog. HWiNFO will minimize to the Windows Notification Area, and will continue to run in the background.
Альтернативы HWiNFO64
Если мы ищем инструмент, который помогает нам знать и контролировать все аппаратное обеспечение нашего компьютера, мы предлагаем некоторые альтернативы HWiNFO64, которые мы должны знать.
Быстрый процессор
Это программа, предназначенная для настройки и контроля всех характеристик CPU / ЦЕНТРАЛЬНЫЙ ПРОЦЕССОР характеристики нашего ПК. Он также заботится о других параметрах, таких как его производительность, температура, мощность, напряжение, ток и другие настройки. Он имеет индикатор графика производительности для каждого ядра и счетчик в реальном времени, который показывает количество активных ядер по сравнению с припаркованными ядрами. Мы можем скачать его бесплатно с этой ссылке.
CPU-Z
Перед нами бесплатное программное обеспечение, основная задача которого — собрать всю информацию о некоторых основных компонентах нашей системы. Сюда входят процессор, память и материнская плата. Он также включает небольшой тест, с помощью которого можно измерить производительность процессора, чтобы мы могли сравнить его с его базой данных, чтобы иметь возможность измерить указанную производительность. Можем скачать CPU-Z отсюда .
Диспетчер задач Windows
Если мы хотим подробно узнать какие-либо компоненты нашего ПК, такие как ЦП, ОЗУ, видеокарта или жесткий диск, мы можем использовать интегрированный в Windows инструмент, называемый Диспетчером задач. Из него мы можем узнать о запущенных приложениях и различных способах их использования на нашем компьютере.
HWiNFO Review
Introduction
HWiNFO is one of the best system profiler(s) for Windows. If you need detailed information about the hardware that’s installed and present on your PC, you have to try this.
Which version to choose?
The program is available in 3 versions:
— HWiNFO (runs only on DOS operating system and you can download it here as we don’t have this version listed on this page).
— HWiNFO32 (it will run on all 32-bit Windows versions) is available as an installer, portable and beta files.
— HWiNFO64 (it will run on all 64-bit Windows versions) is available as an installer, portable and beta files.
What does it do?
This application covers nearly everything you need to know about every aspect of your computer hardware so, let’s detail some of the major features ( an example is given with hardware data from my laptop):
General System Information
— computer name, brand name, operating system version, and username.
CPU (Processor)
— General Processor Information (name, frequency, CPU ID, brand name, vendor, stepping, code name, S-Spec, thermal design power (TDP), type, platform, microcode update revision, the number of CPU cores and logical CPUs).
— Operating Points (CPU LFM, HFM, current and Bus type).
— Cache and TLB (L1 Cache, L2 Cache, instruction and data TLB).
— Standard Feature Flags (FPU on Chip, Enhanced Virtual-86 Mode, I/O Breakpoints, Page Size Extensions, Time Stamp Counter, etc.)
— Extended Feature Flags (64-bit Extensions, 1 GB large page support, No Execute, etc.)
— Enhanced Features (Thermal Monitor, Enhanced Intel SpeedStep, Hardware Prefetcher, etc.)
— Memory Ranges (Maximum Physical and Virtual Address Size)
— MTRRs (Range and Type)
Motherboard
— General Motherboard Information (model, chipset, slots, PCI Express and USB supported versions)
— (G)MCH Features (Integrated TVout, Render Core Frequency, Serial Digital Video Out, Internal Graphics, Concurrent PCI-E and SDVO, DDR2 Frequency Support)
— ICH7 Features (Intel Active Management Technology (iAMT), Intel Quick Resume Technology (Energy Lake), SATA AHCI, etc.)
— BIOS (Manufacturer, Date, Version, etc.)
— etc.
Memory
— total memory size
— maximum supported memory clock
— current memory clock
— current timing
— etc.
Bus
— detailed information about each PCI Local Bus (too many to list them here).
Video Adapter
— video chipset (including codename) and memory size
— video card type, video Bus, video RAMDAC, video BIOS version
— video performance (processor clock, hardware ID)
— driver information (manufacturer, description, provider, version, date)
etc.
Monitor
— monitor name, serial number, date of manufacture, hardware ID, horizontal and vertical frequency (including maximum pixel clock).
— supported video modes and advanced parameters
— etc.
Drives
— floppy drives
— (S)ATA/ATAPI drives (drive controller, model, revision, serial number, capacity, rotation rate etc.)
— etc.
Audio
— audio adapter manufacturer (including hardware ID)
— used audio codec (including hardware ID)
— driver information (manufacturer, description, provider, version etc.)
Network
— general information about your network card (vendor, MAC Address, capabilities, driver information, etc.)
Ports
— general info about serial ports
— general info about parallel ports
— general info about USB
Smart Battery (if you use a laptop/notebook/netbook)
— detailed info about batteries from mobile devices.
Additional Features
— «Summary» provides detailed information about current processor state, motherboard, BIOS, RAM memory, current timing and many other areas.
— «Save Report» button allow you to choose from many available formats.
— «Benchmarks» ( graphical representation included so that you can easily compare the results).
— «Sensors Monitoring» will provide all kind of details about current temperature of RAM memory, CPU, HDD, battery voltage and much more.
— «Driver Update» will take you to a third party website that can scan your computer for desired drivers (I didn’t use this feature).
— «Bios Update» once again it will take you to a third party website (I didn’t use this feature).
Conclusion
HWiNFO is a small software packed with a lot of features and an incredible amount of information about the hardware of your computer. HWiNFO is used by novice users (who look for basic info) and experienced users (for a deeper investigation) alike. Finally, it’s one of the best system utilities that I recently discovered.
Система ⇒ HWiNFO 7.02 build 4430 + Portable
| Оцените новость / программу! 4.9 из 5, всего оценок — 17 |
Новая версия HWiNFO – программы, информирующей пользователя об оборудовании, установленном на компьютере. Выдаются довольно подробные данные о процессоре, материнской плате, памяти, жестких дисках, CD-ROM, видео/аудио/сетевой картах, мониторе, портах и т.д.

Кроме этого, HWiNFO умеет снимать информацию с установленных на материнской плате сенсорных датчиков (температура, напряжение и т.п.), а также проводить эталонные тесты CPU, FPU, MMX и дисков.
Изменения в версии:
— Enhanced sensor monitoring on ASRock Z590 OC Formula and Z590 Phantom Gaming-ITX. — Fixed unintentional waking up of some NVIDIA dGPUs disabled by Optimus technology. — Added reporting of PCI Express Resizable BAR capability and status for all devices. — Enhanced sensor monitoring on MSI Z590 PLUS, MEG Z590 UNIFY and B560M PRO WIFI. — Enhanced monitoring of AMD Navi14. — Restored monitoring of AMD Navi21 with Radeon Adrenalin 21.3.1. — Fixed monitoring of Vcore and VDIMM on ASUS PRIME Z590-A and STRIX Z590 series. — Added ability to collapse sensor groups. — Aggregated some sensor values into nodes (collapsed by default) to reduce amount of information on the screen. — Improved GUI responsiveness in some situations. — Enhanced sensor monitoring on EVGA Z590 FTW and Z590 DARK. — Improved support of Intel Rocket Lake. — Fixed reporting of Core Performance Order on AMD Raven, Renoir and Cezanne. — Updated for proper support of AGESA 1.2.0.1 Patch A. — Improved detection of AMD ThreadRipper PRO and next generation ThreadRipper. — Improved reporting of Intel Integrated GPU clock. — Enhanced sensor monitoring on ASUS ROG CROSSHAIR VIII EXTREME. — Added monitoring of Global Frequency Limit on AMD Zen2/3 CPUs. — Added monitoring of DRAM Read/Write Bandwidth on AMD Zen2/3 CPUs.
ОС:
Windows 10 / 8.1 / 8 / 7 / Vista / XP
Скачать программу HWiNFO 7.02 Build 4430 (8,65 МБ):
с Официального сайта
|Oxy.cloudСкачать программу HWiNFO 7.05 Build 4430 Portable (8,73 МБ):
с Официального сайта
|Oxy.cloud Подписаться на новость HWiNFO 7.02 build 4430 + Portable
Подписаться
Уже подписались: 20
Сказали спасибо: 141
bird
, pavelmuse, vik225577, Bruin, GenaIv, pandrom, sav.71, deserteagle55, vil1958, Anatoliy_66, Kaysen, duchka52, GWP, IGORkin, lukich77, bacila-LAI, Andy68, Alexey-1989, Whisky73, Stavros68, Belkadub, ArtFree, woloshin,sermed , ELINKPIZAP, Gai1945, smirnov9299, slavik_h, Alley, mxm.bh.by, fompro, wid8, Alter-Ego, Aldan2010, vkrev45, apin47,rm1508 , rostovdon161, joker.jx, oknebuz, vvi70, NaumVlad19881980, Stas159, asacha, ame-n,Oleh Brevus , tazika, edtechnician, genrykorn, open1950, shvv53, agb_2007, sergdvr, nayusn, Taptun, ya.lvs2018, andron757, XavieR-XIII, vidio, вовава, Serzhio73, LuisAlberto, vlad81, maksimus0021, mamvit, White1, rgcinema, Viso Schizo, mirzagulow, asusa7, Metalist_Pavlenko, nickolay22, mindzhurna, Vinkolin36, vovik80, shieldandsword, bonyen, josef_, Tyrannos, FRoGgER, Sonic_111, konstanzhoglo, Ringnes, Krauzer_Extaz, SVD, I.v.a.n., CheiVi, sotorobles, ALESSANDRO777,LipkinKS , sa5cha581, Vladimiruser, volodybbk, anatoly-52, Vicci, sashook, Spectruma, bioloniks, LorsMQ, VASICO, igmec, ingvar959, vozmik, VovaLyub, xXx_MAXIMUS_xXx, НЮИ, FIRE, sever-015, Urmant, huwer, serge.zp, levani, NIKSON, BETEPAH, himkovvg, FAS500124,bomb_ , Barzanin, B-ebd_Catod, Tigor68, adwokat-08-48, aleks1965, Eddileo, Boyzard10, neryanov, kopa, Sergey Che, alexander.k1958, Mostafa.Ghaly, AXN, webley, clo49, Roa, Buhadid, mbl800, val38, Mostafa Ghaly, dizel-1066, amenofis, elb, AlliSo44ka
Graphics
- AMD Northern Islands: Cayman, Antilles, Blackcomb, Barts, Whistler, Onega, Turks, Seymour, Caicos, Caspian.
- AMD Southern Islands/London: Tahiti, New Zealand, Pitcairn/Wimbledon, Cape Verde/Heathrow/Chelsea/Tropo, Thames/Lombok, Oland/Mars/Opal/Litho/Samoa, Hainan/Sun/Jet/Exo/Banks.
- AMD Sea Islands: Bonaire/Saturn/Emerald/Strato, Curacao/Neptune/Trinidad, Tobago, Hawaii/Vesuvius/Grenada.
- AMD Volcanic Islands/Crystal: Iceland/Topaz/Meso/Weston, Tonga/Amethyst/Antigua.
- AMD Pirate Islands: Fiji (Radeon Fury X, Nano), Bermuda, Treasure.
- AMD Polaris: Radeon RX 480/580, RX 470/570, Pro WX (Polaris 10/20/Ellesmere), RX 460/560 (Polaris 11/21/Baffin), RX 550 (Polaris 12/Lexa).
… View all
Description
HWiNFO (for DOS operating system), HWiNFO32 and HWiNFO64 (for both 32-bit and 64-bit Windows versions) is a collection of professional hardware information and diagnostic tools supporting latest components, industry technologies, and standards.
These tools are designed to collect and show the maximum amount of information about your PC/laptop hardware. Therefore, this software is useful for those who need to search for driver updates, computer manufacturers, system integrator and technical experts as well. The information retrieved by this program is presented in a logical and easily understandable form and can be exported (saved) in several various types of reports such as Text, HTML or XML format.
Trademark Note 1: Microsoft, Windows and other product names are either registered trademarks or trademarks of Microsoft Corporation in the United States and/or other countries.
Features
— comprehensive hardware information of your computer
— system health monitoring (Thermal, Voltage, Fan, Power)
— table, Logfile, Graph, Tray, Gadget, LG LCD reporting
— text, CSV, XML, HTML, MHTML report formats
— frequent updates
— available as SDK (custom client)
— 3rd party add-ons (Rainmeter plug-in, Samurize plug-in, Sidebar Gadget to display any sensor value, LCDHost plug-in, Mini WebServer, RivaTuner/MSI Afterburner/EVGA Precision On-Screen Display, HWiNFOMonitor Sidebar Gadget including graphs, bars, etc.)
Выводы
Из этой статьи вы узнали как пользоваться Hwinfo64, а также как настроить утилиту для более удобного использования. Как видите, это очень удобная утилита, которая позволяет посмотреть намного больше, чем другие программы.
Если вы нашли ошибку, пожалуйста, выделите фрагмент текста и нажмите Ctrl+Enter.
No related photos.
(6 оценок, среднее: 4,67 из 5)
Tweet Pin It
Об авторе
admin Администратор te4h.ru, интересуюсь новыми технологиями, криптовалютой, искусственным интеллектом, свободным программным обеспечением и Linux.
- Александр 01.07.2019 Ответить Что означает — auxiliary? переводится как другой… Мат.плата msi g46 970a. Температура меняется с 45 до 72 градусов. Гуглил, но не нашел…
Андрей 02.05.2020 ОтветитьНа моей матери MSI 970A-G46 auxiliary показывает температуру цепей питания. Определил это дуя вентилятором на радиатор на цепях питания. Подуйте на радиаторы на матери и определите за что отвечает ваша температура auxiliary.
- Максим 21.08.2020 Ответить
Подскажите, пожалуйста, как в HWiNFO64 записывать показатели температурных датчиков в лог-файл так, чтобы они записывались без дополнительных показателей? Объясню поподробнее: в настройках программы (Шестеренка внизу или если кнопки в виде текста — «Configure Sensors») во вкладке Layout оставил только значения с температурой ( с остальных показателей убрал галочки в значениях «Monitoring» и «Show»). В следующей вкладке «Custom» имеются только эти значения из вкладки «Layout» и на всех них стоят значения «Yes» в столбце «Logged», однако при записи и сохранения лога и уже последующем его прочтении в Excel показываются ВСЕ значения. Помогите разобраться с программой пожалуйста!
- Дмитрий 31.10.2020 Ответить
Как из маленького окошка с общими данными переключиться на подробные данные о компьютере? Скачал последнюю версию 6.33 и не нашёл такой «кнопки». На экране только два окошка — с общими данными и с нагрузкой на процессор. Такой «красоты» как у Вас на заднем плане — нет. Может потому, что версия портативная?
- Дмитрий 31.10.2020 Ответить
Нет, портативность на функционал не влияет. Скачал установщик — та же история. Два маленьких окошка. «Лыжи» всё же не «едут»…
- admin 01.11.2020 Ответить
На первом шаге, там где запуск программы, снимите галочки Summary only и Sensors only.
Ламер 28.04.2021 Ответить
а в современных реалиях PCH(Южный мост) и System(Чипсет) не одно и то же?