Using gcc with mingw
Содержание:
- Dependency Walker
- SWIG
- Unsorted complementary list
- Switchable 32- and 64-bit modes
- Компилятор GCC. Первая программа на Windows
- Microsoft Windows
- Usage tips
- Как создать def файл для dll
- Setup Python for compilation of extensions
- Pre-built toolchains and packages
- Step through the code
- Qt-builds
- .profile
- Step 5
- MSYS
- Step 2
Dependency Walker
- Unpack the .exe and .dll files into the directory c:\mingw\64\bin, for the 64-bit version and/or c:\mingw\32\bin for the 32-bit version. By utting the files here you will automatically get access to the correct version of depends corresponding to the 32- or 64-bit mode you are running via /etc/fstab
- Test that it’s working by typing into MSYS the command depends /mingw/bin/gcc.exe. A window should pop up showing the DLLs that your GCC compiler depends on.
TODO check that two versions of depends.exe are actually required! Perhaps they’re not both needed, in which case we could install to c:\mingw\msys\bin.
SWIG
- Create a folder c:\mingw\msys\opt using Windows Explorer, then copy the ‘swigwin-2.0.10’ folder out of the Zip archive and into the new location c:\mingw\msys\opt\swigwin-2.0.10
- In MSYS, type gedit ~/.profile, then add the SWIG directory to your PATH in your profile, by adding the following line at the bottom of that file:
- Close your MSYS window and reopen it, so that the ~/.profile will be re-read.
- Test that SWIG is accessible by typing swig -version. You should see the version number and some other information output.
As SWIG is a code pre-processor, it doesn’t matter whether it’s 32-bit or 64-bit, they will be perfectly equivalent. That is the reason that we install SWIG under msys rather than in mingw\32 or mingw\64. Note that SWIG version 2.0.5 was known to cause problems with MinGW-w64.
Unsorted complementary list
Darwin/Mac OS X
The existing Darwin binaries have been built through buildbot in 2013 and links
to them can be found on the dedicated
page.
Rubenvb
Rubenvb has built a number of toolchains including some for less common setups.
They are split into two categories: toolchains targeting
Win32
or
Win64.
GCC with the MCF thread model
GCC with the MCF thread model is a series of x86
and x64 native toolchains built by LH_Mouse. The MCF thread model involves the
mcfgthread library to provide minimum
yet complete C++11 thread support. Disregarding POSIX or Windows XP
compatibility, it implements (hopefully the most) efficient mutexes and
condition variables that are competitive with even native slim reader/write
(SRW) locks and condition variables since Windows Vista.
Store of binaries on SourceForge
A very large number of other binaries and sources are hosted in the File
Release System on Sourceforge which
might have what you are after.
Switchable 32- and 64-bit modes
Our setup will be a bit of a hack of the standard MinGW environment. We use the official MinGW project to provide the MSYS environment, but then we use the MinGW-w64 project (as below) to provide the actual compiler, since we want 64-bit support. Our file structure will be
- c:\
- mingw\ (we install everything under this single top-level directory)
- 64\ (the 64-bit compiler and all our 64-bit compiled-and-installed libraries will live here)
- 32\ (the mingw-get binary will already be inside here, as well as the 32-bit compiler if we install it later)
- msys\ (the MSYS environment, and loads of useful non-compiler tools can be installed here, but they shouldn’t have any binary dependencies in c:\mingw\64 or c:\mingw\32, or things will get broken!)
- mingw\ (we install everything under this single top-level directory)
In principle, all we need to do to switch between the 64-bit and 32-bit build environments is to edit the text file /etc/fstab (changing ’32’ to ’64’ or vice versa), then reload MSYS. In other words, if you want to now switch to 64-bit mode, you would modify /etc/fstab to read
c:/mingw/64 /mingw
After making this change, be sure to close and re-open your MinGW/MSYS command window (re-open it using the MSYS icon that you created on your desktop).
Компилятор GCC. Первая программа на Windows
Последнее обновление: 18.05.2017
Для создания программ на Си необходим текстовый редактор, с помощью которого можно набрать исходный код. И также необходим компилятор,
который принимает файл с исходным кодом на Си и компилирует его в исполняемый файл.
При запуске установщика откроется следующее окно:
Нажмем на кнопку Next > и перейдем к следующему шагу:
Если версия ОС 64-битная, то в поле следует выбрать пункт x86_64. Остальные настройки
оставим по умолчанию и нажмем на кнопку Next >. На следующем шаге укажем путь, по которому будет устанавливаться пакет:
Можно оставить настройки по умолчанию. И после перехода к следующему шагу собственно начнется установка.
После завершения установки на жестком диске по пути, которое было выбрано для установки, появятся все необходимые файлы компиляторов.
В моем случае они находятся по пути C:\Program Files (x86)\mingw-w64\i686-7.1.0-posix-dwarf-rt_v5-rev0\mingw32\bin:
В зависимости от версии пакета точный путь может отличаться, но в любом случае все файлы будут располагаться по тому пути, который был указан на шаге установки.
В частности, файл gcc.exe как раз и будет представлять компилятор для языка Си.
Далее для упрощения запуска компилятора мы можем добавить путь к нему в Переменные среды. Для этого перейдем к окну
Система -> Дополнительные параметры системы -> Переменные среды:
И добавим путь к компилятору:
Итак, компилятор установлен, и теперь мы можем написать первую программу. Для этого потребуется любой текстовый редактор для набора исходного кода.
Можно взять распространенный редактор Notepad++ или даже обычный встроенный Блокнот.
Итак, создадим на жестком диске папку для исходных файлов. А в этой папке создадим новый файл, который назовем hello.c.
В моем случае файл hello.c находится в папке C:\c.
Теперь определим в файле hello.c простейший код, который будет выводить строку на консоль:
#include <stdio.h>		// подключаем заголовочный файл stdio.h
int main(void)					// определяем функцию main
{								// начало функции
	printf("Hello World! \n");	// выводим строку на консоль
	return 0;					// выходим из функции
}								// конец функции
Для вывода строки на консоль необходимо подключить нужный функционал. Для этого в начале файла идет строка
#include <stdio.h>
Директива include подключает заголовочный файл stdio.h, который содержит определение функции printf, которая нужна для вывода строки на консоль.
Далее идет определение функции int main(void). Функция main должна присутствовать в любой программе на Си, с нее собственно и начинается
выполнение приложения.
Ключевое слово int в определении функции говорит о том, что функция возвращает целое число.
А слово void в скобках указывает, что функция не принимает параметров.
Тело функции main заключено в фигурные скобки {}. В теле функции происходит вывод строки на консоль с помощью функции printf, в которую передается выводимая строка «Hello world!».
В конце осуществляем выход из функции с помощью оператора return. Так как функция должна возвращать целое число, то после return указывается число 0.
Ноль используется в качестве индикатора успешного завершения программы.
После каждого действия в функции ставятся точка с запятой.
Теперь скомпилируем этот файл. Для этого откроем командную строку Windows и вначале с помощью команды cd перейдем к папке с исходным файлом:
cd C:\c
Чтобы скомпилировать исходный код, необходимо компилятору gcc передать в качестве параметра файл hello.c:
gcc hello.c
После этого будет скомпилирован исполняемый файл, который в Windows по умолчанию называется a.exe. И мы можем обратиться к этому файлу, и в этом случае консоль выведет
строку «Hello World!», собственно как и прописано в коде.
НазадВперед
Microsoft Windows
| File | Download from |
|---|---|
| codeblocks-20.03-setup.exe | FossHUB or Sourceforge.net |
| codeblocks-20.03-setup-nonadmin.exe | FossHUB or Sourceforge.net |
| codeblocks-20.03-nosetup.zip | FossHUB or Sourceforge.net |
| codeblocks-20.03mingw-setup.exe | FossHUB or Sourceforge.net |
| codeblocks-20.03mingw-nosetup.zip | FossHUB or Sourceforge.net |
| codeblocks-20.03-32bit-setup.exe | FossHUB or Sourceforge.net |
| codeblocks-20.03-32bit-setup-nonadmin.exe | FossHUB or Sourceforge.net |
| codeblocks-20.03-32bit-nosetup.zip | FossHUB or Sourceforge.net |
| codeblocks-20.03mingw-32bit-setup.exe | FossHUB or Sourceforge.net |
| codeblocks-20.03mingw-32bit-nosetup.zip | FossHUB or Sourceforge.net |
NOTE: The codeblocks-20.03-setup.exe file includes Code::Blocks with all plugins. The codeblocks-20.03-setup-nonadmin.exe file is provided for convenience to users that do not have administrator rights on their machine(s).
NOTE: The codeblocks-20.03mingw-setup.exe file includes additionally the GCC/G++/GFortran compiler and GDB debugger from MinGW-W64 project (version 8.1.0, 32/64 bit, SEH).
NOTE: The codeblocks-20.03(mingw)-nosetup.zip files are provided for convenience to users that are allergic against installers. However, it will not allow to select plugins / features to install (it includes everything) and not create any menu shortcuts. For the “installation” you are on your own.
If unsure, please use codeblocks-20.03mingw-setup.exe!
Usage tips
All done! You may wish to make a backup of your directory c:\mingw, which contains your complete MSYS and MinGW setup, for easy reinstallation later. You would still in that case need to install SlikSVN, GTK+, Python, Scons, Gedit, NSIS, 7zip, but all of the manual fiddling about would be avoided.
When building software on this platform using GNU AutoTools, (ie, the typical ‘./configure && make && make install’ instructions), you should specify --prefix=/mingw to ensure files are installed in a path that corresponds to the 32- or 64-bit version of your compiler. This will make library linking much easier, at least while you stay within MSYS. Also, you may need to specify your build environment using the --build flag. For example,
./configure
make
make install
This will have the result that libraries and new tools will be installed into c:\mingw\64.
If you ever want to switch building 32-bit code, recall the instructions above about . This re-routes «/mingw» to your 64-bit or 32-bit compiler and libraries according to which setting to you choose. Then, the ‘if’ statement in the .profile file above takes care of replacing 64-bit stuff with the 32-bit alternatives. This approach also has the result that, when running ./configure scripts, there is usually no need to add the --build flag to specify the 32- or 64-bit build architecture, as only one compiler will be visible/accessible at any one time, anyway.
Как создать def файл для dll
- Первый, с помощью утилиты pexports, которая предоставляется с пакетом MinGW (mingw-utils). Смотрите на сайте mingw. Если ваша dll используемыет stdcall функции, вам нужно использовать -o флаг.
- Другой, с помошью утилиты impdef. Множество инструкций о том как создать def файл из dll, скопировать impdef и множество информации о ее использовании доступно на сайте Колина Петерса (Colin Peters). Смотрите раздел .
- Третий, использование nm, которая также поставляется с пакетом MinGW. Этот метод работает не со всеми dll файлами, проблемы могут быть с dll, которые не импортируют функций или скомпилированы как 16 битные. Для использования данной технологии вам понадобится фильтр вывода из nm для создания def файла. Это может быть сделано вручную в редакторе или автоматизировано с помощью таких инструментов как Perl (Practical Extraction and Report Language) или grep (global regular expression print) и sed (stream editor). Даже автоматизировав процесс, может понадобиться сделать некоторыми изменениями вручную, если в dll используется stdcall. Для более детального ознакомления смотрите сайт Колина Питерса (Colin Peters). (Версии sed и grep доступны на различных сайтах содержащих архивы. Версия ActiveState Perl хорошо работает на платформах Win32.) Вот — примеры возможных методов фильтрования.
- Этот пример использует grep и sed. Если у Вас есть файл file.dll, для которого вы хотите создать файл file.def, сделайте следующее:
echo EXPORTS > file.def
nm file.dll | grep ' T _' | sed 's/.* T _//' >> file.def
Для создания файла file.a из dll и def файлов, нужно:
- В этом примере используется Perl. Скопируйте данный скрипт в файл dll.pl и запустите его.
open (OUTFILE,">dll.def");
print OUTFILE "EXPORTS\n";
open (INFILE,"dll.fil");
while(<INFILE>)
{
      if ($_ =~ T _)
      {
         $line = $_;
         $line =~ s.* T _//;
         print OUTFILE $line;
      }
}
close (INFILE);
close (OUTFILE);
Если у Вас есть файл file.dll. Запустите команду:
nm file.dll > dll.fil
perl dll.pl
Создастся def файл названный dll.def. Вы можете его переименовать как хотите. Можно также удалить dll.fil.
- Этот пример использует grep и sed. Если у Вас есть файл file.dll, для которого вы хотите создать файл file.def, сделайте следующее:
- Если Вы не имеете ни одного из этих инструментов, то можете воспольщоваться nm, чтобы создать def файл и редактировать его вручную через редактор. Например:
nm file.dll > dll.fil
find " T _" dll.fil > dll.def
Replace the line at the top of dll.def that was created by the find program and shows a file name with a line that says EXPORTS. Set your editor to search for T _ and erase it and anything on the line before it, leaving only the routine names in the file.
- Если предыдущие варианты не работают, Вы можете все еще попробовать создать def файл, используя objdump ( из пакета MinGW). Вот — пример.
objdump -p file.dll > dll.fil
Вы найдете в файле dll.fil таблицу [Ordinal/Name Pointer] со списком экспортируемых вами функций, чтобы создать ваш def файл.
Ищите [Ordinal/Name Pointer] таблица в dll.fil и используйте полученный список для создания вашего def файла.
Setup Python for compilation of extensions
Note: This section is only required if you want to build 64-bit Python extensions. No actions are required here if you are going to build 32-bit Python extensions.
Before you can built any Python extensions using MinGW-w64 (which includes via SWIG), some preparation is required. One C header file, pyconfig.h has to be patched, and linker definitions for python27.dll have to be prepared for the compiler. Follow these instructions to sort it out.
First download, build, and install a utility called ‘gendef’ which builds library *.def files that MinGW-w64 can use when linhing to DLLs. This is because the python27.lib file distributed with Python doesn’t work with MinGW-w64. In your MSYS shell, type
Now prepare a new python27.def file from the installed copy of python27.dll in c:\windows\system32:
- Using Windows Explorer, copy the file c:\windows\system32\python27.dll into the folder c:\Python27\Libs
- Using MSYS, enter the following:
cd /c/Python27/libs
mv python27.lib old-python27.lib
gendef python27.dll
If this works OK, you should have a new file c:\Python27\Libs\python27.def.
Next, patch the c:\Python27\include\pyconfig.h file:
- Open the file c:\Python27\include\pyconfig.h using gedit
- Search for the text #ifdef _WIN64, which in our copy of this file was at line 141, and cut out the following three lines:
#ifdef _WIN64
#define MS_WIN64
#endif
Search for the text #ifdef _MSC_VER, which in our copy of this file was at line 107. Paste in the cut-out lines, ABOVE the #ifdef _MSC_VER. Alternatively, if you don’t want to do this last step, you could just make sure you define MS_WIN64 before you #include «Python.h» in your source code.
We are finding that the above steps give correct behaviour on Windows 7. If future releases cause problems, the following may be useful for testing:
- swigtest.tar.gz (900 byte tarball)
- pytest.tar.gz (test of building Python bindings without SWIG, 1.1k tarball)
Pre-built toolchains and packages
| Version | Host | GCC / Mingw-w64 Version | Languages | Additional Software in Package Manager | |
|---|---|---|---|---|---|
| Arch Linux | Ada, C, C++, Fortran, Obj-C, Obj-C++ | many | |||
| Rolling | Windows | 5.4.0/5.0.2 | Ada, C, C++, Fortran, Obj-C | 5 (bzip2, libgcrypt, libgpg-error, minizip, xz, zlib) | |
| Debian 7 (Wheezy) | 4.6.3/2.0.3 | Ada, C, C++, Fortran, Obj-C, Obj-C++, OCaml | 2 (gdb, nsis) | ||
| Debian 8 (Jessie) | 4.9.1/3.2.0 | ||||
| Debian 9 (Stretch) | 6.3.0/5.0.0 | 9 (gdb, libassuan, libgcrypt, libgpg-error, libksba, libnpth, nsis, win-iconv, zlib) | |||
| Debian 10 (Buster) | 8.3.0/6.0.0 | ||||
| Fedora 19 | 4.8.1/? | Ada, C, C++, Fortran, Obj-C, Obj-C++ | 149+ | ||
| 20210423 | Windows, Linux | LLVM 12.0.0/trunk | C, C++ | make | |
| Rolling | macOS | C, C++, Fortran, Obj-C, Obj-C++ | 1 (nsis) | ||
| Rolling | Windows | 7.2.0/5.0.3 | C, C++, Fortran | 4 (gdb, libiconf, python, zlib) | |
| Rolling | Windows | Ada, C, C++, Fortran, Obj-C, Obj-C++, OCaml | many | ||
| 12.04 Precise Pangolin | 4.6.3/2.0.1 | Ada, C, C++, Fortran, Obj-C, Obj-C++, OCaml | 2 (nsis, gdb) | ||
| 14.04 Trusty Tahr | 4.8.2/3.1.0 | ||||
| 14.10 Utopic Unicorn | 4.9.1/3.1.0 | ||||
| 15.04 Vivid Vervet | 4.9.2/3.2.0 | ||||
| 15.10 Wily Werewolf | 4.9.2/4.0.2 | ||||
| 16.04 Xenial Xerus | 5.3.1/4.0.4 | 3 (nsis, gdb, zlib) | |||
| 1.5 | Windows, Linux | 4.8.3/3.3.0 | C, C++ | 91+ |
Installation:
- Community repository (toolchain)
- AUR repository (additional packages)
Cygwin
Cygwin is a Unix-like environment and command-line
interface for Microsoft Windows. Its core is the cygwin1.dll library which
provides POSIX functionality on top of the Win32 API. It can be used as a build
environment which targets Windows directly and for which output doesn’t depend
on cygwin1.dll.
Installation is done through cygwin’s package manager:
setup.exe.
As part of the numerous packages in cygwin, there are cross-compilation
toolchains which target both 32 bits and 64 bits; their names start with
“mingw64-”.
Once they are installed, they should be used according to the general
cross-compilation approach.
LLVM-MinGW
LLVM-MinGW is a toolchain built with Clang, LLD, libc++, targeting
i686, x86_64, arm and aarch64 (ARM64), with releases both for running
as a cross compiler from Linux and for running on Windows. It supports
Address Sanitizer, Undefined Behaviour Sanitizer, and generating debug
info in PDB format.
MacPorts
To install just the 32-bit or just 64-bit compiler with dependencies, use:
A shortcut to install both:
Here is the list of Mingw-w64 packages on MacPorts.
Win-Builds
Win-builds is a cross-platform project that makes building for Windows easy. It
supports building from both Windows and Linux systems and provides many
pre-built libraries which can be installed through a graphical package manager.
It aims for stability while still providing recent versions of software
packages.
Installation: http://win-builds.org.
Step through the code
Now you’re ready to start stepping through the code.
-
Click or press the Step over icon in the debugging control panel.
This will advance program execution to the first line of the for loop, and skip over all the internal function calls within the and classes that are invoked when the variable is created and initialized. Notice the change in the Variables window on the left.
In this case, the errors are expected because, although the variable names for the loop are now visible to the debugger, the statement has not executed yet, so there is nothing to read at this point. The contents of are visible, however, because that statement has completed.
-
Press Step over again to advance to the next statement in this program (skipping over all the internal code that is executed to initialize the loop). Now, the Variables window shows information about the loop variables.
-
Press Step over again to execute the statement. (Note that as of the March 2019 release, the C++ extension does not print any output to the Debug Console until the loop exits.)
-
If you like, you can keep pressing Step over until all the words in the vector have been printed to the console. But if you are curious, try pressing the Step Into button to step through source code in the C++ standard library!
To return to your own code, one way is to keep pressing Step over. Another way is to set a breakpoint in your code by switching to the tab in the code editor, putting the insertion point somewhere on the statement inside the loop, and pressing F9. A red dot appears in the gutter on the left to indicate that a breakpoint has been set on this line.
Then press F5 to start execution from the current line in the standard library header. Execution will break on . If you like, you can press F9 again to toggle off the breakpoint.
When the loop has completed, you can see the output in the Integrated Terminal, along with some other diagnostic information that is output by GDB.
Qt-builds
Notes
This is the set of scripts to build Qt : either with «MinGW-builds» based toolchains under MSYS, or, to build Qt : with
MSYS2 repo (also based on «MinGW-builds») based toolchains under MSYS2.
- If you want to use pre-compiled or pre-built Qt & QtCreator binary files, then follow one of these:
- The «MSYS2» based Qt binary builds (pre-built) can be downloaded from
Prerequisites
To build Qt, these are required:
- Internet connection
- Either use MSYS or MSYS2. Do not use both, (unless you know what you are doing).
Initial Setup
- Either use MSYS, or MSYS2. Do not use both, (unless you know what you are doing).
- If you are going to use MSYS: extract or install MSYS into C:directory
- If you are going to use MSYS2: extract or install MSYS2 into C:2 directory
- Prepare MSYS or MSYS2 for development environment: pre-install build related required dependencies & components.
- Run MSYS (or MSYS2)
- run git checkout scripts:
Building Qt
Now scripts provide building Qt-4.8.4, Qt-5.0.0, Qt-5.0.1, Qt-5.0.2, Qt5 from git with latest release of QtCreator, qbs(from git). Buildinq Qt is simple by run:
For example,
build 32-bit Qt-5.0.0 with QtCreator-2.7.0 and install them into C:/QtSDK/Qt32-5.0.0, Qt dependencies and prerequisites will be installed into C:/QtSDK/ported32.
For building Qt5 from git you need specify branch what you want to build. If you don’t specify branch then by default building stable branch.
This command download qt5 from git stable branch and try to build 32-bit version of Qt5.
Note: If you want to move Qt directory elsewhere than after moving you need to execute from QTDIR:
Other useful options are:
Notes: Do not use (or try to avoid using) different type of toolchains for building different sub-components for the same/main project, when targeted for same platform/OS. If you are using MinGW-w64 based toolchains from MSYS2\mingw32 or MSYS2\mingw64, then for all sub-components build and for main project build, use same MSYS2 toolchains. If you are using MinGW toolchain, then for all of your sub-components & main project build, use same MinGW toolchain. If you are using MinGW-w64 toolchains from «MinGW-builds», then for all sub-components and for main project build, use same MinGW-builds toolchains.
.profile
At the end of these steps, the .profile file (c:\mingw\msys\home\yourusername\.profile) will contain the following.
/* Highlighting theme: Kwrite Editor */
body.hl { background-color:#e0eaee; }
pre.hl { color:#000000; background-color:#e0eaee; font-size:10pt; font-family:’Courier New’;}
.hl.num { color:#b07e00; }
.hl.esc { color:#ff00ff; }
.hl.str { color:#bf0303; }
.hl.pps { color:#818100; }
.hl.slc { color:#838183; font-style:italic; }
.hl.com { color:#838183; font-style:italic; }
.hl.ppc { color:#008200; }
.hl.opt { color:#000000; }
.hl.lin { color:#555555; }
.hl.kwa { color:#000000; font-weight:bold; }
.hl.kwb { color:#0057ae; }
.hl.kwc { color:#000000; font-weight:bold; }
.hl.kwd { color:#010181; }
/*]]>*/
#!/bin/bash
# we use the reported architecture of the 'gcc' in our path to
# determine which Python and other utilities we will be using.
_arch=`gcc -dumpmachine`
#echo "ARCH=$_arch"
if grep "^x86_64-" <<< "$_arch" >/devnull ; then
	echo "MINGW 64 BIT BUILD ENVIRONMENT"
	_pydir="/c/Python27"
	export PATH=$PATH:/cProgram\ FilesGTK+-2.22bin
else
	echo "MINGW 32 BIT BUILD ENVIRONMENT"
	_pydir="/c/Python27_32"
	export PATH=$PATH:/cProgram\ Files\ \(x86\)/GTK+-2.22bin
fi

export PATH=$PATH$_pydir$_pydirScripts

# note that mingw-get will still install all its stuff to c:\mingw\32 and c:\mingw\msys.
# because of the contents of its profile.xml file. it is not affected by the content of /etc/fstab.
alias mingw-get="/c/mingw/32/bin/mingw-get"

export PATH=$PATH:/optswigwin-2.0.10
export PATH=$PATH:/cProgram\ FilesSlikSvnbin
Step 5
Write a program
Fig: C++ code
Now once you have the code copied. It’s time to test the installation. Remember to change the image location to your target image. Make sure you do that otherwise empty Mat will be created.
Fig:
Double check that the include ,lib and bin folder of the install folder are targeted by your g++ compilation command.
If your command worked with no error. If there are linker errors then would advice to check whether linked dll are existing in the folder included by the command.
Fig: Phew !!! That worked.
So hopefully you got a similar out put of size of the image currently being used.
Hope this tutorial helps you start your journey into the rabbit hole of C++ and Computer Vision. For more such content to follow this blog and if you found this helpful maybe a few claps. ….
Hopefully in the next version we will try to support cuda for Opencv DNN module.
MSYS
MinGW is a minimal GNU/GCC environment for Windows. MSYS is a command-line environment based on MinGW that mimics the Linux environment sufficiently well to allow a large portion of Linux-compatible software to also be compilable under Windows. There are many different combinations of ways to set up this environment. And things are made quite a bit more complicated by the fact that the official MinGW project does not support the 64-bit fork MinGW-w64, and as yet (Aug 2013) there is no nicely-integrated environment that supports installing everything automatically. Based on our experience in particular with difficulties in building recent versions of IPOPT, this is therefore our current preferred approach:
Screenshot of MinGW-get-setup showing selected installation options
Open gedit and edit the file c:\mingw\32\var\lib\mingw-get\data\profile.xml and replace the entire contents of the file with the following text:
/* Highlighting theme: Kwrite Editor */
body.hl { background-color:#e0eaee; }
pre.hl { color:#000000; background-color:#e0eaee; font-size:10pt; font-family:’Courier New’;}
.hl.num { color:#b07e00; }
.hl.esc { color:#ff00ff; }
.hl.str { color:#bf0303; }
.hl.pps { color:#818100; }
.hl.slc { color:#838183; font-style:italic; }
.hl.com { color:#838183; font-style:italic; }
.hl.ppc { color:#008200; }
.hl.opt { color:#000000; }
.hl.lin { color:#555555; }
.hl.kwa { color:#000000; font-weight:bold; }
.hl.kwb { color:#0057ae; }
.hl.kwc { color:#000000; font-weight:bold; }
.hl.kwd { color:#010181; }
/*]]>*/
<?xml version="1.0" encoding="UTF-8" standalone="yes"?>
<profile project="MinGW" application="mingw-get">
  <repository uri="http://prdownloads.sourceforge.net/mingw/%F.xml.lzma?download"/>
  <system-map id="default">
    <sysroot subsystem="mingw32" path="%R" />
    <sysroot subsystem="MSYS" path="%R/../msys" />
  </system-map>
</profile>
From the Windows ‘Start’ menu open a command prompt window and run the following, which will take a few minutes:
c:\mingw\32\bin\mingw-get install msys-core msys-base msys-vim msys-wget msys-patch msys-flex msys-bison
Using gedit, create the file c:\mingw\msys\etc\fstab with the following content:
c:/mingw/32 /mingw
- Using Windows Explorer, create a shortcut to the file c:\mingw\msys\msys.bat and place the shortcut on the desktop. You may wish to set the icon of the shortcut to the icon file c:\mingw\msys\msys.ico.
- Double-click your new desktop shortcut to msys.bat. You should see a console window as follows:
Step 2
Setup Mingw-w64. In case you had trouble finding the link. Look here . Go for the link that says Online Installer for MinGW-GW64. Direct link , may break in future.
- Install MinGW-GW64 with the following setting
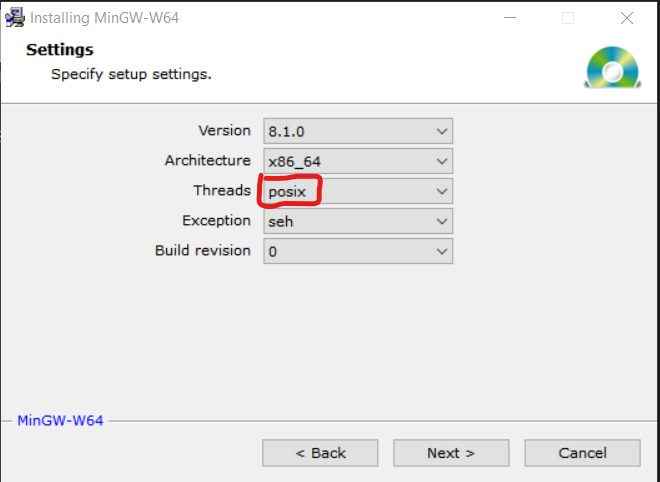
Fig: Posix thread must be chosen. MUST BE.
Make sure posix is selected. Otherwise the OpenCV installation will fail with unable to find mutex error. Which is part of pthreads library and specs. Architecture can be x86(32/64 bit machin) or x86_64(64bit machine) based on your working system.
2. Click next configure path of installation and let the binaries install.
3. After installation make sure to include MinGW bin folder in your path. It should be inside “..basePath/x86_64–8.1.0-posix***/mingw64/bin”
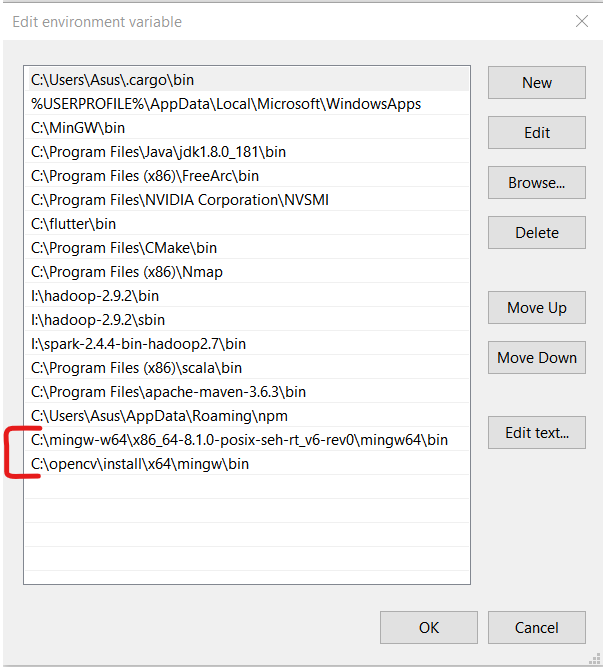
Fig: The path is based on your installation folder so do accordingly.
After this just test the installation by opening a terminal and type command “g++ — version”. If it says command not found. It could not get the path ,path was not set right, restart terminal or the machine. It should work! Google for the same !