Сборка mingw в windows своими руками
Содержание:
- A note about msys vs mingw64 repos
- Installing macOS Developer Tools
- Install Cygwin
- Intro
- После установки
- Downloading SDCC
- Установка
- Past news
- 3 GCC Command Options
- C/C++ configurations
- Install C on Windows
- Quick Start: Windows
- GCC 9.4
- 3.1 Конфигурации Поддерживаемые GNU CC
- Pre-built toolchains and packages
- Install C on MAC
- C++14 Language Features
- Installing other packages with pacman
- Using vcpkg with CMake
- Tab-Completion/Auto-Completion
- Examples
- Contributing
- Telemetry
A note about msys vs mingw64 repos
Some things are only available in the msys/ repo like vim and git, and will only be available in \usr\bin\. Some things like gcc are available in msys\, mingw32\, and mingw64\ repos and can potentially end up being installed in both \usr\bin\ and \mingw64\bin\. This is where you have to be careful about how you set up your PATH environment variable. If you add \usr\bin\ in order to make vim or git available, you will also add everything in that directory, which may conflict with something if you also add the \mingw64\bin\ directory to your path. If you only want the toolchain without as much extra stuff, use the mingw64 packages. Then you can add only the \mingw64\bin directory to your PATH if desired. The mingw64 repository generally has more libraries available for install that are unavailable in the general msys repo (e.g. SDL, exif, freeglut). The msys packages are intended to be used inside the msys shell, and the mingw packages are intended to be used outside of msys2.
Installing macOS Developer Tools
On macOS 10.15, the only thing you should need to do is run the following in your terminal:
$ xcode-select --install
Then follow along with the prompts in the windows that comes up.
On macOS 10.14 and previous, you’ll also need to install g++ from homebrew;
follow the instructions in the following section.
Installing GCC for macOS before 10.15
This will only be necessary if you’re using a macOS version from before 10.15.
Installing homebrew should be very easy; check out <brew.sh> for more information,
but at its simplest, run the following command:
$ /bin/bash -c "$(curl -fsSL https://raw.githubusercontent.com/Homebrew/install/master/install.sh)"
Then, in order to grab an up-to-date version of gcc, run the following:
$ brew install gcc
You’ll then be able to bootstrap vcpkg along with the
Install Cygwin
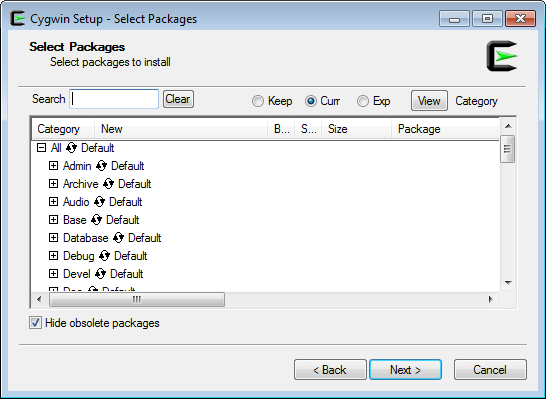
First, download and run either the 32- or 64-bit version of the Cygwin installer, depending on your version of Windows. Cygwin’s setup wizard will walk you through a series of steps. If your machine is located behind a proxy server, make sure to check “Use Internet Explorer Proxy Settings” when you get to the “Select Your Internet Connection” step.
When you reach the “Select Packages” step (shown below), don’t bother selecting any packages yet. Just go ahead and click Next. We’ll add additional packages from the command line later.
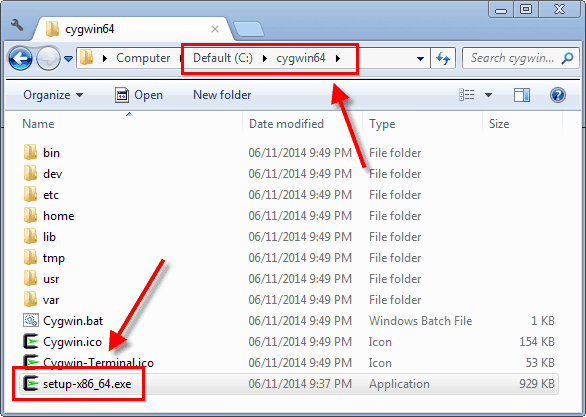
After the Cygwin installer completes, it’s very important to keep the installer around. The installer is an executable named either or , and you’ll need it to add or remove Cygwin packages in the future. I suggest moving the installer to the same folder where you installed Cygwin itself; typically or .
If you already have Cygwin installed, it’s a good idea to re-run the installer to make sure it has the latest available packages. Alternatively, you can install a new instance of Cygwin in a different folder.
Intro
There are a variety of toolchains you can install on Windows for compiling C and C++ applications. Microsoft provides Visual Studio Community for free, and is a great IDE and toolchain. If you are developing exclusively for Windows, that is the tool I would recommend. For those who need or prefer the cross-platform GNU toolchain, you can install it using MSYS2. We will cover how to install gcc using MSYS2.
Another option for using gcc in Windows is to download Code::Blocks. They provide binary releases that come with the Mingw toolchain. For example, http://www.codeblocks.org/downloads/.
Qt Creator is another free IDE that optionally comes with the mingw toolchain. Check out https://www.qt.io/download and https://www.qt.io/qt-features-libraries-apis-tools-and-ide/ for more information.
If you do not need to target Windows specifically, but you are just looking to learn and play with the GNU toolchain and you have a windows machine, I recommend installing Ubuntu or Suse on Windows through the Microsoft Store. This will provide a Linux environment in Windows for you to work with. Alternatively you could install a distribution like Ubuntu inside a VirtualBox or VMWare Player virtual machine.
После установки
Итак, Вы установили MinGW написали простейшую программу 3.cpp, компилируете с помощью gcc
gcc 3.cpp
А в ответ
c:/mingw/bin/../lib/gcc/x86_64-w64-mingw32/9.2.0/../../../../x86_64-w64-mingw32/bin/ld.exe: C:\Users\Andrei\AppData\Local\Temp\ccuoNssB.o:3.cpp:(.text+0x28): undefined reference to `std::ios_base::Init::~Init()’
c:/mingw/bin/../lib/gcc/x86_64-w64-mingw32/9.2.0/../../../../x86_64-w64-mingw32/bin/ld.exe: C:\Users\Andrei\AppData\Local\Temp\ccuoNssB.o:3.cpp:(.text+0x58): undefined reference to `std::ios_base::Init::Init()’
collect2.exe: error: ld returned 1 exit status
Мой совет — попробуйте g++
g++ 3.cpp
Если Вы планируете писать софт, который должен будет работать под
UNIX-подобными ОС, например
Linux
или
OpenBSD
то устанавливать MinGW не стоит.
Попробуйте добавить в Ваш Windows подсистему для Linux и установить gcc там.
Downloading SDCC
See the
Sourceforge download page for the last released version including source and
binary packages for Linux — x86, Microsoft Windows — x86,
Microsoft Windows — x86_64 and Mac OS X — ppc and i386.
Major Linux distributions take care of SDCC installation packages themselves
and you will find SDCC in their repositories. Unfortunately SDCC packages included
in Linux disributions are often outdated. In this case users are encouraged to compile
the latest official SDCC release or a recent snapshot build by themselves or download
the pre-compiled binaries from
Sourceforge download page.
SDCC is known to compile from the source code also on the following platforms:
- Linux — x86_64
- Linux — Alpha
- Linux — IBM Power5
- NetBSD — i386
- NetBSD — Sparc64
- FreeBSD — i386
- SUN Solaris — i386
- SUN Solaris — Sparc
- Rasbian (Debian for Raspberry Pi) — ARMv6
- Debian — ARMv7-a
SDCC is always under active development. Please consider
downloading one of the snapshot builds
if you have run across a bug, or if the above release is more than two months old.
The latest development source code can be accessed using Subversion. The following
will fetch the latest sources:
… will create the sdcc directory in your current directory and place all
downloaded code there. You can browse the Subversion repository
here.
Before reporting a bug, please check your SDCC version and build
date using the -v option, and be sure to include the full version string in your bug report. For example:
Установка
Далее действуйте по инструкции
Двойной клик на mingw-17.1.exe


После установки нужно добавить C:\MinGW\bin в системную переменную среды PATH.
Если Вы не знаете как это сделать, прочитайте мою статью
Теперь команда gcc —version должна возвращать версию компилятора.
gcc —version
Microsoft Windows
(c) 2019 Microsoft Corporation. All rights reserved.
C:\Users\Andrei>gcc —version
gcc (GCC) 9.2.0
Copyright (C) 2019 Free Software Foundation, Inc.
This is free software; see the source for copying conditions. There is NO
warranty; not even for MERCHANTABILITY or FITNESS FOR A PARTICULAR PURPOSE.
Если этого не происходит — перезапустите консоль. Если не помогло — перезапустите
Windows.
Past news
Jan 27th, 2021: SDCC 4.1.0 RC1 released.
SDCC 4.1.0 Release Candidate 1 source, doc and binary packages for amd64 GNU/Linux, 32 and 64 bit Windows and amd64 macOS are available in corresponding folders at:
http://sourceforge.net/projects/sdcc/files/.
Jan 30th, 2020: SDCC 4.0.0 released.
A new release of SDCC, the portable optimizing compiler for 8051, DS390, Z80, Z180, Rabbit 2000, GBZ80, eZ80, TLCS-90,
HC08, STM8, Padauk and PIC microprocessors is now available
(http://sdcc.sourceforge.net).
Sources, documentation and binaries for GNU/Linux amd64, Windows amd64, macOS amd64 and Windows x86 are available.
SDCC 4.0.0 New Feature List:
- The pdk15 backend now passes the regression tests (both with and without —stack-auto), and is thus considered stable.
- New in-development pdk13 backend for Padauk µC with 13-bit wide program memory.
- C2X memccpy(), strdup(), strndup().
- Better tail call optimization.
- Many fixes in the pic14 backend.
- C2X u8 character constants.
- C2X bool, static_assert, alignof, alignas.
- C2X attributes on statements.
- C2X attribute declarations.
- Support for extended ASCII characters in sdas, sdld.
- Compiler support for UCNs and non-ASCII utf8 in identifiers.
Numerous other new features and bug fixes are included as well.
You can download the release from:https://sourceforge.net/projects/sdcc/files/
Jan 24th, 2020: SDCC 4.0.0 RC1 released.
SDCC 4.0.0 Release Candidate 1 source, doc and binary packages for amd64 GNU/Linux, 32 and 64 bit Windows and amd64 macOS are available in corresponding folders at:
http://sourceforge.net/projects/sdcc/files/.
Apr 15th, 2019: SDCC 3.9.0 released.
A new release of SDCC, the portable optimizing compiler for 8051, DS390, Z80, Z180, Rabbit 2000, GBZ80, eZ80, TLCS-90,
HC08, STM8, Padauk and PIC microprocessors is now available
(http://sdcc.sourceforge.net).
Sources, documentation and binaries for GNU/Linux amd64, Windows amd64, macOS amd64 and Windows x86 are available.
SDCC 3.9.0 Feature List:
- Support for struct / union assignment.
- Optimizations in the stm8 backend relevant to soft float increase Whetstone score by two thirds.
- Improvements in rematerialization in the stm8 backend improve code generation for struct, union and arrays.
- New stack allocator reduces stack space usage for the stm8, z80, z180, gbz80, r2k, r3ka, tlcs90 backends.
- New ez80_z80 backend for eZ80 in Z80 mode.
- Removed deprecated sdcclib utility.
- New pdk14 backend for Padauk µC with 14-bit wide program memory.
- New in-development pdk15 backend for Padauk µC with 15-bit wide program memory.
Numerous other new features and bug fixes are included as well.
You can download the release from:https://sourceforge.net/projects/sdcc/files/
Apr 8th, 2019: SDCC 3.9.0 RC1 released.
SDCC 3.9.0 Release Candidate 1 source, doc and binary packages for amd64 GNU/Linux, 32 and 64 bit Windows and amd64 macOS are available in corresponding folders at:
http://sourceforge.net/projects/sdcc/files/.
| This site is hosted by | |
| Webmaster |
Last updated: |
3 GCC Command Options
When you invoke GCC, it normally does preprocessing, compilation,
assembly and linking. The “overall options” allow you to stop this
process at an intermediate stage. For example, the -c option
says not to run the linker. Then the output consists of object files
output by the assembler.
See .
Other options are passed on to one or more stages of processing. Some options
control the preprocessor and others the compiler itself. Yet other
options control the assembler and linker; most of these are not
documented here, since you rarely need to use any of them.
Most of the command-line options that you can use with GCC are useful
for C programs; when an option is only useful with another language
(usually C++), the explanation says so explicitly. If the description
for a particular option does not mention a source language, you can use
that option with all supported languages.
The usual way to run GCC is to run the executable called , or
when cross-compiling, or
to run a specific version of GCC.
When you compile C++ programs, you should invoke GCC as
instead. See ,
for information about the differences in behavior between
and when compiling C++ programs.
The program accepts options and file names as operands. Many
options have multi-letter names; therefore multiple single-letter options
may not be grouped: -dv is very different from ‘-d -v’.
You can mix options and other arguments. For the most part, the order
you use doesn’t matter. Order does matter when you use several
options of the same kind; for example, if you specify -L more
than once, the directories are searched in the order specified. Also,
the placement of the -l option is significant.
Many options have long names starting with ‘-f’ or with
‘-W’—for example,
-fmove-loop-invariants, -Wformat and so on. Most of
these have both positive and negative forms; the negative form of
-ffoo is -fno-foo. This manual documents
only one of these two forms, whichever one is not the default.
Some options take one or more arguments typically separated either
by a space or by the equals sign (‘=’) from the option name.
Unless documented otherwise, an argument can be either numeric or
a string. Numeric arguments must typically be small unsigned decimal
or hexadecimal integers. Hexadecimal arguments must begin with
the ‘0x’ prefix. Arguments to options that specify a size
threshold of some sort may be arbitrarily large decimal or hexadecimal
integers followed by a byte size suffix designating a multiple of bytes
such as and for kilobyte and kibibyte, respectively,
and for megabyte and mebibyte, and
for gigabyte and gigibyte, and so on. Such arguments are
designated by byte-size in the following text. Refer to the NIST,
IEC, and other relevant national and international standards for the full
listing and explanation of the binary and decimal byte size prefixes.
See , for an index to GCC’s options.
| • : | Brief list of all options, without explanations. | |
| • : | Controlling the kind of output: an executable, object files, assembler files, or preprocessed source. |
|
| • : | Compiling C++ programs. | |
| • : | Controlling the variant of C language compiled. | |
| • : | Variations on C++. | |
| • : | Variations on Objective-C and Objective-C++. |
|
| • : | Controlling how diagnostics should be formatted. |
|
| • : | How picky should the compiler be? | |
| • : | More expensive warnings. | |
| • : | Producing debuggable code. | |
| • : | How much optimization? | |
| • : | Enabling profiling and extra run-time error checking. | |
| • : | Controlling header files and macro definitions. Also, getting dependency information for Make. |
|
| • : | Passing options to the assembler. | |
| • : | Specifying libraries and so on. | |
| • : | Where to find header files and libraries. Where to find the compiler executable files. |
|
| • : | Specifying conventions for function calls, data layout and register usage. |
|
| • : | Printing GCC configuration info, statistics, and debugging dumps. |
|
| • : | Target-specific options, such as compiling for a specific processor variant. |
|
| • : | How to pass switches to sub-processes. | |
| • : | Env vars that affect GCC. | |
| • : | Compiling a header once, and using it many times. | |
| • : | Experimental C++20 module system. |
Next: , Previous: , Up: [][]
C/C++ configurations
If you want more control over the C/C++ extension, you can create a file, which will allow you to change settings such as the path to the compiler, include paths, C++ standard (default is C++17), and more.
You can view the C/C++ configuration UI by running the command C/C++: Edit Configurations (UI) from the Command Palette (⇧⌘P (Windows, Linux Ctrl+Shift+P)).

This opens the C/C++ Configurations page. When you make changes here, VS Code writes them to a file called in the folder.
Here, we’ve changed the Configuration name to GCC, set the Compiler path dropdown to the g++ compiler, and the IntelliSense mode to match the compiler (gcc-x64)

Visual Studio Code places these settings in . If you open that file directly, it should look something like this:
You only need to add to the Include path array setting if your program includes header files that are not in your workspace or in the standard library path.
Compiler path
The extension uses the setting to infer the path to the C++ standard library header files. When the extension knows where to find those files, it can provide features like smart completions and Go to Definition navigation.
The C/C++ extension attempts to populate with the default compiler location based on what it finds on your system. The extension looks in several common compiler locations.
The search order is:
- First check for the Microsoft Visual C++ compiler
- Then look for g++ on Windows Subsystem for Linux (WSL)
- Then g++ for Mingw-w64.
If you have Visual Studio or WSL installed, you may need to change to match the preferred compiler for your project. For example, if you installed Mingw-w64 version 8.1.0 using the i686 architecture, Win32 threading, and sjlj exception handling install options, the path would look like this: .
Install C on Windows
We will use an open-source Integrated Development environment named Code::Blocks which bundles a compiler (named gcc offered by Free Software Foundation GNU), editor and debugger in a neat package.
Step 1) Download Binary release
Go to http://www.codeblocks.org/downloads and click Binary Release.

Step 2) Select the installer with GCC for Windows compiler
Choose the installer with GCC Compiler, e.g., codeblocks-17.12mingw-setup.exe which includes MinGW’s GNU GCC compiler download and GNU GDB debugger with Code::Blocks source files.

Step 3) Start installation
Run the downloaded installer and accept the default options to install GCC Windows file.

Step 4) Accept the terms and conditions
Accept the Agreement

Step 5) Keep default component selection
Keep the component selection default and click Next.

Step 6) Locate the installation path
You may change the installation folder and click Next.

Step 7) Find and double-click on the CodeBlocks icon
To launch Code::Blocks double click on the icon.
Step 8) Let it detect the compiler itself
It will detect the GCC compiler for Windows automatically, set it as default.

Associate C/C++ files with code::blocks
Step 9) Open the IDE and start using
You will see the IDE Home screen.

Quick Start: Windows
Prerequisites:
- Windows 7 or newer
First, download and bootstrap vcpkg itself; it can be installed anywhere,
but generally we recommend using vcpkg as a submodule for CMake projects,
and installing it globally for Visual Studio projects.
We recommend somewhere like or ,
since otherwise you may run into path issues for some port build systems.
> git clone https://github.com/microsoft/vcpkg
> .\vcpkg\bootstrap-vcpkg.bat
To install the libraries for your project, run:
> .\vcpkg\vcpkg install
Note: This will install x86 libraries by default. To install x64, run:
> .\vcpkg\vcpkg install :x64-windows
Or
> .\vcpkg\vcpkg install --triplet=x64-windows
You can also search for the libraries you need with the subcommand:
> .\vcpkg\vcpkg search
In order to use vcpkg with Visual Studio,
run the following command (may require administrator elevation):
> .\vcpkg\vcpkg integrate install
After this, you can now create a New non-CMake Project (or open an existing one).
All installed libraries are immediately ready to be ‘d and used
in your project without additional configuration.
If you’re using CMake with Visual Studio,
continue .
In order to use vcpkg with CMake outside of an IDE,
you can use the toolchain file:
> cmake -B  -S . -DCMAKE_TOOLCHAIN_FILE=/scripts/buildsystems/vcpkg.cmake
> cmake --build
With CMake, you will still need to and the like to use the libraries.
Check out the for more information,
including on using CMake with an IDE.
For any other tools, including Visual Studio Code,
check out the integration guide.
GCC 9.4
This is the list
of problem reports (PRs) from GCC’s bug tracking system that are
known to be fixed in the 9.4 release. This list might not be
complete (that is, it is possible that some PRs that have been fixed
are not listed here).
AArch64
-
The option has been added to aid
deployment of the Large System Extensions (LSE) on GNU/Linux systems built
with a baseline architecture targeting Armv8-A. When the option is
specified code is emitted to detect the presence of LSE instructions at
run time and use them for standard atomic operations.
For more information please refer to the documentation. - GCC now supports the Fujitsu A64FX. The associated
and options are and
respectively. In particular,
generates code for Armv8.2-A with SVE and
tunes the code for the A64FX. This includes tuning the SVE code,
although by default the code is still length-agnostic and so works for
all SVE implementations. Adding
makes the code specific to 512-bit SVE.
3.1 Конфигурации Поддерживаемые GNU CC
Ниже перечислены возможный типы центральных процессоров:
Имя компании имеет значение только для разрешения
неоднозначностей, когда остальной указанной информации недостаточно.
Вы можете опускать его, записывая только `процессор-система’, если оно
не необходимо. Например, `vax-ultrix4.2′ эквивалентно
`vax-dec-ultrix4.2′.
Ниже расположен список типов систем:
Вы можете опустить тип системы, тогда `configure’ догадывается об
операционной системе из процессора и компании.
Вы можете добавлять номер версии к типу системы; это может или не
может давать различие. Например, вы можете писать `bsd4.3′ или
`bsd4.4′, чтобы отличать версии BSD. Практически, номер версии
наиболее необходим для `sysv3′ и `sysv4′, которые часто обрабатываются
по-разному.
Если вы определяете невозможную комбинацию типа `i860-dg-vms’, вы
можете получить сообщение об ошибке от `configure’, или же он может
игнорировать часть информации и сделать лучшее, что возможно с
остальным. `configure’ всегда печатает каноническиое имя для варианта,
который он использовал. GNU CC не обеспечивает все возможные варианты.
Часто индивидуальная модель машины имеет имя. Многие машинные
имена распознаются как псевдонимы для комбинаций процессор/компания.
Имеется таблица известных машинных имен:
Таким образом, если вы указываете `m68k-local’, конфигурация
использует файлы `m68k.md’, `local.h’, `m68k.c’, `xm-local.h’,
`t-local’ и `x-local’, все в каталоге `config/m68k’.
Pre-built toolchains and packages
| Version | Host | GCC / Mingw-w64 Version | Languages | Additional Software in Package Manager | |
|---|---|---|---|---|---|
| Arch Linux | Ada, C, C++, Fortran, Obj-C, Obj-C++ | many | |||
| Rolling | Windows | 5.4.0/5.0.2 | Ada, C, C++, Fortran, Obj-C | 5 (bzip2, libgcrypt, libgpg-error, minizip, xz, zlib) | |
| Debian 7 (Wheezy) | 4.6.3/2.0.3 | Ada, C, C++, Fortran, Obj-C, Obj-C++, OCaml | 2 (gdb, nsis) | ||
| Debian 8 (Jessie) | 4.9.1/3.2.0 | ||||
| Debian 9 (Stretch) | 6.3.0/5.0.0 | 9 (gdb, libassuan, libgcrypt, libgpg-error, libksba, libnpth, nsis, win-iconv, zlib) | |||
| Debian 10 (Buster) | 8.3.0/6.0.0 | ||||
| Fedora 19 | 4.8.1/? | Ada, C, C++, Fortran, Obj-C, Obj-C++ | 149+ | ||
| 20210423 | Windows, Linux | LLVM 12.0.0/trunk | C, C++ | make | |
| Rolling | macOS | C, C++, Fortran, Obj-C, Obj-C++ | 1 (nsis) | ||
| Rolling | Windows | 7.2.0/5.0.3 | C, C++, Fortran | 4 (gdb, libiconf, python, zlib) | |
| Rolling | Windows | Ada, C, C++, Fortran, Obj-C, Obj-C++, OCaml | many | ||
| 12.04 Precise Pangolin | 4.6.3/2.0.1 | Ada, C, C++, Fortran, Obj-C, Obj-C++, OCaml | 2 (nsis, gdb) | ||
| 14.04 Trusty Tahr | 4.8.2/3.1.0 | ||||
| 14.10 Utopic Unicorn | 4.9.1/3.1.0 | ||||
| 15.04 Vivid Vervet | 4.9.2/3.2.0 | ||||
| 15.10 Wily Werewolf | 4.9.2/4.0.2 | ||||
| 16.04 Xenial Xerus | 5.3.1/4.0.4 | 3 (nsis, gdb, zlib) | |||
| 1.5 | Windows, Linux | 4.8.3/3.3.0 | C, C++ | 91+ |
Installation:
- Community repository (toolchain)
- AUR repository (additional packages)
Cygwin
Cygwin is a Unix-like environment and command-line
interface for Microsoft Windows. Its core is the cygwin1.dll library which
provides POSIX functionality on top of the Win32 API. It can be used as a build
environment which targets Windows directly and for which output doesn’t depend
on cygwin1.dll.
Installation is done through cygwin’s package manager:
setup.exe.
As part of the numerous packages in cygwin, there are cross-compilation
toolchains which target both 32 bits and 64 bits; their names start with
“mingw64-”.
Once they are installed, they should be used according to the general
cross-compilation approach.
LLVM-MinGW
LLVM-MinGW is a toolchain built with Clang, LLD, libc++, targeting
i686, x86_64, arm and aarch64 (ARM64), with releases both for running
as a cross compiler from Linux and for running on Windows. It supports
Address Sanitizer, Undefined Behaviour Sanitizer, and generating debug
info in PDB format.
MacPorts
To install just the 32-bit or just 64-bit compiler with dependencies, use:
A shortcut to install both:
Here is the list of Mingw-w64 packages on MacPorts.
Win-Builds
Win-builds is a cross-platform project that makes building for Windows easy. It
supports building from both Windows and Linux systems and provides many
pre-built libraries which can be installed through a graphical package manager.
It aims for stability while still providing recent versions of software
packages.
Installation: http://win-builds.org.
Install C on MAC
To set up a ‘C’ programming environment on MAC operating system, follow the given steps:
1. Visit the given link https://developer.apple.com/downloads/index.action and download. You will need an Apple developer ID
“Command Line Tools for X-Code,” pick any version (latest version is always recommended) and download the .dmg file.
2. After the file is being downloaded on the machine, double click and follow the wizard and install the file. Always keep the default settings as suggested by the installation wizard.
3. After the installation process, open a terminal and run gcc -v command to check if everything is successfully installed.
C++14 Language Features
The following table lists new language features that are part of
the C++14 standard. The «Proposal» column
provides a link to the ISO C++ committee proposal that describes the
feature, while the «Available in GCC?» column indicates the first
version of GCC that contains an implementation of this feature.
| Language Feature | Proposal | Available in GCC? | SD-6 Feature Test |
|---|---|---|---|
| Tweak to certain C++ contextual conversions | N3323 | ||
| Binary literals | N3472 |
(GNU) (N3472) |
__cpp_binary_literals >= 201304 |
| Return type deduction for normal functions | N3638 |
(N3386) (N3638) |
__cpp_decltype_auto >= 201304 |
| Generalized lambda capture (init-capture) | N3648 |
(partial) (N3648) |
__cpp_init_captures >= 201304 |
| Generic (polymorphic) lambda expressions | N3649 | __cpp_generic_lambdas >= 201304 | |
| Variable templates | N3651 | __cpp_variable_templates >= 201304 | |
| Relaxing requirements on constexpr functions | N3652 | __cpp_constexpr >= 201304 | |
| Member initializers and aggregates | N3653 | __cpp_aggregate_nsdmi >= 201304 | |
| Clarifying memory allocation | N3664 | N/A | |
| Sized deallocation | N3778 | __cpp_sized_deallocation >= 201309 | |
| `deprecated` attribute | N3760 | (N3797) | __has_cpp_attribute(deprecated) >= 201309 |
| Single-quotation-mark as a digit separator | N3781 | (N3797) | __cpp_digit_separator >= 201309 |
This feature was briefly part of the C++14 working paper, but was not
part of the published standard; as a result, it has been removed from
the compiler.
| Language Feature | Proposal | Available in GCC? | SD-6 Feature Test |
|---|---|---|---|
| Runtime-sized arrays with automatic storage duration (Removed from the standard) |
N3639 | ?.? (GNU VLAs) (N3639) (GNU VLAs) |
__cpp_runtime_arrays >= 198712 |
Installing other packages with pacman
If you want to compile an SSL program that links to libssl and libcrypto with -lssl -lcrypto you will need to install openssl-devel as shown below. There are many other devel packages. For example, libbz2-devel, libelf-devel, libunrar-devel, and libyaml-devel. The environment is rather limited, but it can be useful for learning.
Packages included in «development» group:
You also have a ton of other packages available via the pacman package manager. View the full list of options at https://github.com/msys2/msys2/wiki/Packages, or use the command below to search
Packages prefixed with msys/ will be installed to the C:\msys64\usr\ environment. Some packages are prefixed with mingw64. Those are installed to C:\msys64\mingw64\ environment.
Using vcpkg with CMake
If you’re using vcpkg with CMake, the following may help!
Visual Studio Code with CMake Tools
Adding the following to your workspace will make
CMake Tools automatically use vcpkg for libraries:
{
  "cmake.configureSettings": {
    "CMAKE_TOOLCHAIN_FILE": "/scripts/buildsystems/vcpkg.cmake"
  }
}
Vcpkg with CLion
Open the Toolchains settings
(File > Settings on Windows and Linux, CLion > Preferences on macOS),
and go to the CMake settings (Build, Execution, Deployment > CMake).
Finally, in , add the following line:
Unfortunately, you’ll have to add this to each profile.
Vcpkg as a Submodule
When using vcpkg as a submodule of your project,
you can add the following to your CMakeLists.txt before the first call,
instead of passing to the cmake invocation.
set(CMAKE_TOOLCHAIN_FILE ${CMAKE_CURRENT_SOURCE_DIR}/vcpkg/scripts/buildsystems/vcpkg.cmake
  CACHE STRING "Vcpkg toolchain file")
This will still allow people to not use vcpkg,
by passing the directly,
but it will make the configure-build step slightly easier.
Tab-Completion/Auto-Completion
supports auto-completion of commands, package names,
and options in both powershell and bash.
To enable tab-completion in the shell of your choice, run:
> .\vcpkg integrate powershell
or
$ ./vcpkg integrate bash
depending on the shell you use, then restart your console.
Examples
See the documentation for specific walkthroughs,
including installing and using a package,
adding a new package from a zipfile,
and adding a new package from a GitHub repo.
Contributing
Vcpkg is an open source project, and is thus built with your contributions.
Here are some ways you can contribute:
- Submit Issues in vcpkg or existing packages
- Submit Fixes and New Packages
Please refer to our Contributing Guide for more details.
Telemetry
vcpkg collects usage data in order to help us improve your experience.
The data collected by Microsoft is anonymous.
You can opt-out of telemetry by re-running the bootstrap-vcpkg script with -disableMetrics,
passing —disable-metrics to vcpkg on the command line,
or by setting the VCPKG_DISABLE_METRICS environment variable.
Read more about vcpkg telemetry at docs/about/privacy.md