Synaptics hid touchpad driver v.19.0.25.10 windows 8.1 / 10 64 bits
Содержание:
- Достоинства и недостатки
- Adjust Touchpad Sensitivity
- Introduction
- Enabling SHMConfig in order to get synclient debug output
- Загрузка и установка
- Есть ли смысл в установке драйверов для сенсорной панели (тачпада) Synaptics для ноутбука? Какие дополнительные функции можно получить установив этот драйвер?
- Installing a Driver via the Device Manager
- Откатить драйвер
- What is Synaptics Driver?
- Touchpad not working after login
- Control touchpad features using synclient
- Touchpad Driver
- Synaptics
- Synaptics Touchpad Driver for Dell. Характеристики драйвера
Достоинства и недостатки
Можно выделить несколько очевидных плюсов от использования рассматриваемого программного обеспечения:
- Добавление огромного количества функций, которые не поддерживаются стандартным драйвером.
- Поддержка работы с тачпадами на большинстве существующих моделей ноутбуков от различных производителей.
- Корректная работа с мультикасаниями.
- Увеличение чувствительности сенсорной панели, что позволяет повысить точность позиционирования.
- Адаптация под работу в различных приложениях.
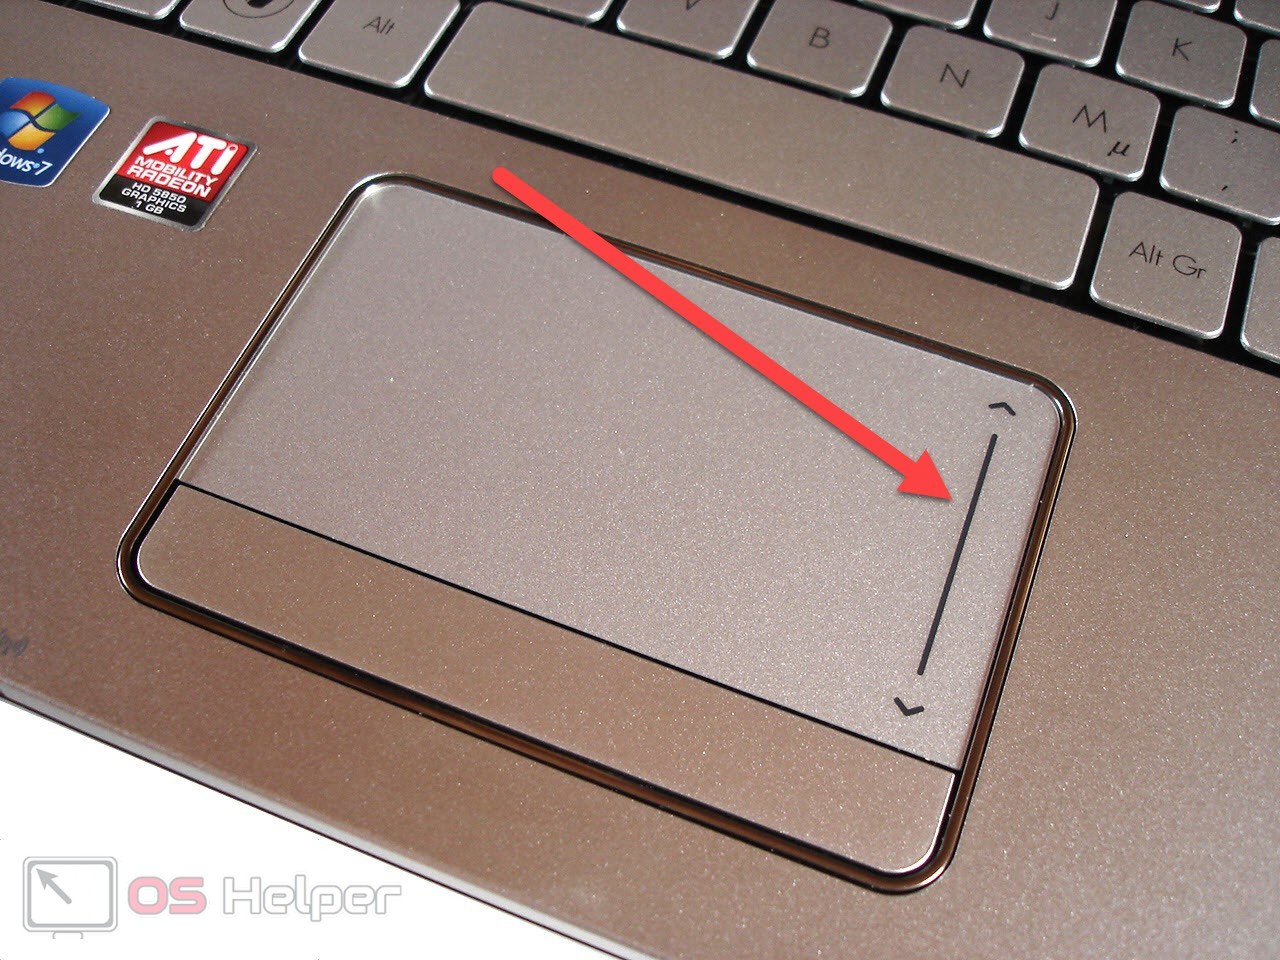
Среди недостатков наиболее значимым является один – создание помех прокрутке страниц при помощи соответствующего выделенного поля на тачпаде.
Поскольку скачать Synaptics TouchPad Driver может любой желающий абсолютно бесплатно, о его недостатках можно забыть – к тому же, альтернатив этому драйверу практически не существует.
Adjust Touchpad Sensitivity
Determine device number (see above)
xinput list
Open a separate terminal to watch emitted events:
Replace with the number of your touchpad from ‘xinput list’. It will probably be one of the devices under «Virtual core pointer».
This step is not mandatory but it can help to track problems:
xinput --test
If text flies by as you move your mouse pointer using the touchpad, you know that you got the correct device number.
Open another terminal to see current settings: (Again this step can be omitted but is helpful to see available options. Watch for «Synaptics Finger». It will change as soon as you apply the next command.)
xinput --watch-props
Set sensitivity:
xinput --set-prop "Synaptics Finger" 50 80 257
The terminal running ‘xinput —watch-props’ should now display
Property 'Synaptics Finger' changed.
        Synaptics Finger (267): 50, 80, 257
The higher you set the numbers the more force is needed to make an event fire. And the less sensitive the touchpad get.
Introduction
There have been numerous Touchpad issues with the release of Windows 8.x and Windows 10 primarily due to drivers…
Microsoft have addressed many of these issues and going forward Microsoft will natively support new Touchpads, so called «Precision Touchpads» which should alleviate any OEM driver issues.
For older Dell Systems (<2016 Hardware) however:
- Windows 10 will install a generic driver from 2006 which will in most cases give the Touchpad limited functionality.
- Although the Windows Vista/Windows 7 driver for the Touchpad is customised for the Touchpad, it often won’t install properly with Windows 10 rejecting the driver and preferring its own generic one.
- Newer driver releases, in many cases the last iteration of Windows 10 Touchpad drivers released often work with older Touchpads although they are not designed for the specific Touchpad in question.
- In most cases the installer will reject the hardware, therefore one has to force install the Driver via the Device Manager.
This is an unofficial guide and covers a large range of hardware so unfortunately finding the best driver it is quite «experimental». Fortunately however this unofficial guide is well-reached and many Dell customers have tested and reported the best driver for their system. Please read instructions on how to forcefully install a driver via the device manager and then look below to see if a driver has been tested on your model. If your model hasn’t been tested then you need to be experimental (you want to find the newest driver that works for your model).
Please comment on your findings so I can update the list at the bottom which is populated by other people’s testing on their models.
Table of contents
Enabling SHMConfig in order to get synclient debug output
Online, the most commonly found procedure for doing this involves using HAL. However, since HAL hasn’t been present in Ubuntu since 10.04, you will have to do it the other way — by editing xorg.conf.
sudo gedit /etc/X11/xorg.conf
Paste this into the document:
Section "InputClass"
        Identifier "enable synaptics SHMConfig"
        MatchIsTouchpad "on"
        MatchDevicePath "/dev/input/event*"
        Option "SHMConfig" "on"
EndSection
If it’s not empty, put it at the end. Save, close the file and reboot.
Now you should be able to see what kind of input your touchpad detects by running
synclient -m 100
The synclient manpage will explain what the numbers you see onscreen mean.
Загрузка и установка
Воспользоваться утилитой может любой пользователь, чей ноутбук оснащён сенсорной панелью от Synaptics или Elan – к счастью, тачпады от этих производителей установлены на подавляющем большинстве устройств.
Проверить, соответствует ли панель вашего ноутбука поставленным требованиям, можно по следующей инструкции:
- Прожимаем комбинацию клавиш Win+R.
- В открывшемся окне «Выполнить» вводим команду «main.cpl», исполняем её.
- Нажимаем на кнопку «Дополнительные настройки» и узнаём, оснащён ли ноутбук панелью от Elan или Synaptics.
Если все условия выполнены, можно переходить к загрузке и установке программного обеспечения:
- Извлекаем файлы из архива на рабочий стол (можно распаковать в любую удобную папку, к которой в будущем можно быстро получить доступ).
- Переходим в «Диспетчер устройств» (правой кнопкой по «Пуску», выбор соответствующего пункта), раскрываем блок «Мыши и иные…», кликаем правой клавишей мыши по «Указывающие устройства Synaptics», жмём на «Обновить драйвер».
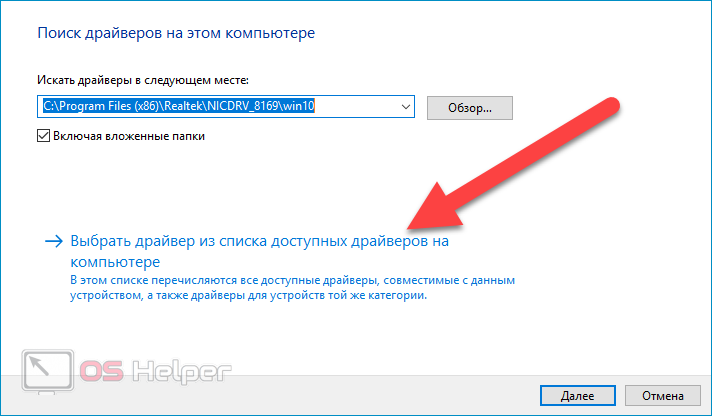
- Выбираем поиск файлов на компьютере, соглашаемся на выбор драйверов из списка доступных на компьютере.
- Кликаем по кнопке «Установить с диска», перемещаемся в ту папку, в которую был распакован архив, выбираем файл «Autorun.inf», жмём на «ОК».
- Соглашаемся внести изменения.
Есть ли смысл в установке драйверов для сенсорной панели (тачпада) Synaptics для ноутбука? Какие дополнительные функции можно получить установив этот драйвер?
Многие владельцы ноутбуков не всегда ясно представляют для чего нужно устанавливать тот или иной драйвер в ноутбуке.
Например системным администраторам известно, что:
- если в ноутбуке после переустановки Windows оставить стандартный VGA драйвер видео (драйвер будет отображаться как стандартное устройство), то не сможет запуститься ни одна из игр, кроме самых простых;
- если же Windows правильно определит видеокарту и установит драйвер видео из собственного дистрибутива (без обновления через интернет), то игры начнут запускаться, но не все. Часть функционала будет урезана: могут быть недоступны улучшенное сглаживание и анизотропная фильтрация, что повлияет на качество картинки. Также в таком драйвере не будет предустановленных профилей игр, что может привести к падению производительности;
- если установить дискретный драйвер для видео, предварительно скачав его с сайта производителя, видеопроцессор (GPU) покажет всю заявленную производительность. К тому же через панель управления драйвера появится возможность выбирать профили, управлять подключаемыми устройствами, такими как телевизор, через HDMI.
Таким образом видеодрайвер напрямую влияет как на производительность, так и на функционал видеокарты.
О драйвере для сенсорной панели Synaptics
Каким образом драйвер Synaptics для тачпада ноутбука влияет на производительность и функционал?
Действительно, зачем искать и устанавливать драйвер тачпада, который ни на что не влияет?
Попробуем разобраться в самых полезных функциях этого драйвера, поиск которого лучше всего производить на сайте поставщика конкретной марки ноутбука. Например, если вы владелец ноутбука Lenovo, то и искать драйвер Synaptics для тачпада стоит именно на официальном сайте Lenovo в разделе «Драйвера для Lenovo«, выбрать конкретное устройство и необходимый драйвер.
Где скачивать драйвера для сенсорной панели нашли, теперь функции. Тем более, что основная функция чаще всего доступна и без установки дискретного драйвера производителя — указатель курсора повторяет движения пальца по сенсорной панели.
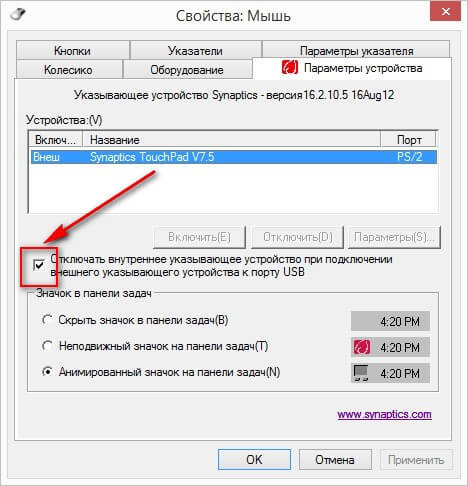
Автоматическое отключения тачпада при подключении мыши
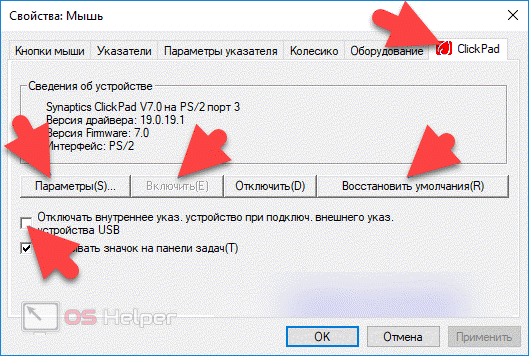
На мой взгляд, самая полезная функция драйвера тачпада — это функция автоматического отключения сенсорной панели при подключении мышки к любому из USB портов ноутбука. Прежде чем найти эту очевидную возможность я некоторое время постоянно отключал тачпад вручную при пользовании мышкой. Сейчас всё по-другому: как только подключается мышь, драйвер рапортует об обнаружении устройства и отключает сенсорную панель.
Активировать её можно так: находим возле часов (правый нижний угол рабочего стола Windows) в трее значок сенсорной панели Pointing Device фирмы Synaptic (именно так она отображается при наведении курсора), открываем двойным щелчком. Переходим в закладку Параметры устройства и ставим чекбокс напротив Отключать внутреннее указывающее устройство при подключении внешнего указывающего устройства к порту USB. Функция активирована.
Узнать о других полезных и не очень функциях драйвера Synaptics можно перейдя в меню Параметры устройства и далее Параметры. Необходимо помнить, что многие из функций в списке будут доступны лишь при установленном дискретном драйвере с сайта производителя.
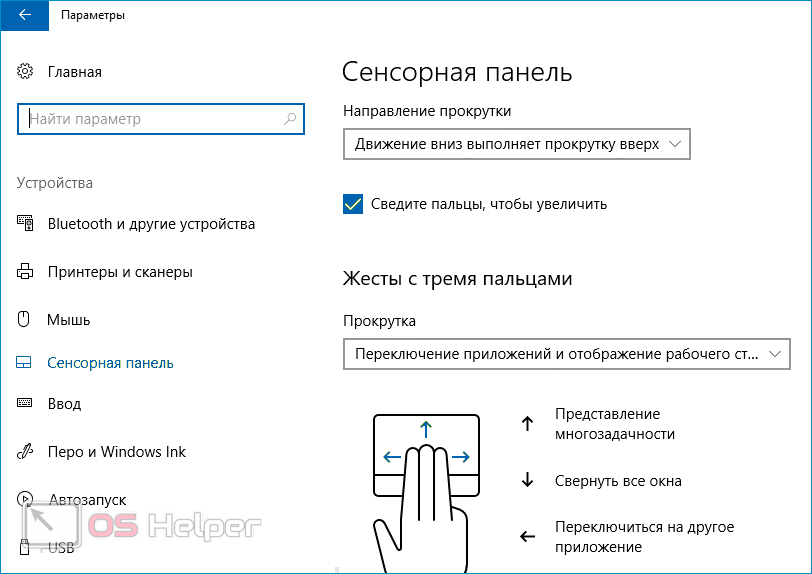
- Касание легким ударом пальца
- Щелчки
- Перетаскивание с фиксацией
- Функция вертикальной прокрутки
- Функция горизонтальной прокрутки
- Функция ChiralScrolling
- Масштабирование щипком
- Прокрутка двумя пальцами
- Вращение
- Перелистывание тремя пальцами
- Перемещение границы при прокрутке
Более подробно о каждой функции можно прочесть здесь.
- Чем профессиональная установка Windows лучше любительской
- Правильная организация работы сервера и его окружения
- Синий экран смерти Windows (BSOD). Коды ошибок BSOD
- Антивирус Касперского 365 бесплатно
- Устанавливать пиратскую Windows опасно
- Ошибка 0xc00000e9 в Windows
- Отличия лицензионной Windows и пиратской копии
Installing a Driver via the Device Manager
List of Dell Touchpad Driver Versions (by Vendor) Alps, Synaptics, Cypress and ElanTech. Alps and Synaptics are the most common vendors.
Extract the Driver
Download the suggested driver (if no driver is suggested then look at your Drivers and Downloads page and determine if the driver is Synaptics or Alps and try the latest version).
Extraction of the Driver depends on the Driver Package. For the Newer Driver Packages you should use the .exe to Extract the Driver to a specified folder. For the Older Driver Packages it is often better to use 7zip to extract the driver.
Variant A (Newer Driver Package)
Double click the driver:

Accept the User Account Control:

Select Extract:

Select Downloads and make a new folder, call it Touchpad:


Select ok and then close:

Go to the Downloads folder and select the extracted Touchpad folder:

Look for the 64 Bit folder (assuming you’re using 64 Bit Windows 10):

Select the address of the Download location and right click it then left click copy:

Variant B (Older Driver Package)
Note if you do not see a separate x64 or x86 and only see a .exe after extracting. You may have to further extract using a utility like 7zip (I advise 7zip version 9.20 because it works better in my testing):

Then you can look in the extracted folder:

To find the x64 folder with the drivers:


You can then copy this address like before:

Force Install the Driver via the Device Manager
For best results remove any USB mouse attached to the system.
Right click the Start Button and Select Device Manager:

Expand Mice and other Pointing Devices

Select «PS/2 Compatible mouse» or «Dell Touchpad» or any other similar devices and then right click and select properties:

Select the Driver tab

You will be told the driver version and date. In this case the generic 2006 Microsoft driver is used.
You can attempt to install the driver normally and then recheck the version in the Device Manager. In a large number of cases the driver will not be installed and Windows 10 will still continue to use its generic driver.
To amend this select update driver…

Select Browse my computer for driver software:

Select let me pick from a list of device drivers on my computer:

Select Have Disk:

Paste in the 64 Bit extracted location then select open:

Select ok:

Left click the Dell Touchpad and select next:

Accept yes at the warning:

The driver will install:

Select close:

Select yes to restart:

Right click the Start Button and Select Device Manager:
Expand Mice and other Pointing Devices and look for Dell Touchpad. Look for an ! mark.
If no ! is present right click it and select Properties:


Select Driver. You will see the driver version of the Touchpad has now been updated:

If there is an ! then the driver has not taken and must be uninstalled. If the Touchpad is not-responsive or erratic you may need to plug in a USB mouse to do this.

Right click Dell Touchpad and select Uninstall:

Ensure to check «Delete the Driver Software for this Device» then select Uninstall:

Retry with an older version of the driver.
Test the Touchpad!
Right click the Start Button and select Settings:

Select Devices:

Select Touchpad:

Amend the settings to your preferences and play around with your Touchpad to see how it works and how stable it is…
I would appreciate it if you left feedback in the comments on what Touchpad driver works best for you in your system.
Откатить драйвер
Иногда проблема связана с ошибкой в обновленной версии самого драйвера. Итак, если обновление недоступно, попробуйте откат драйвера к предыдущей версии,
Есть два способа откатиться назад.
Способ 1: использование опции отката
Для этого сначала запустите диспетчер устройств. Затем щелкните правой кнопкой мыши драйвер Synaptics в разделе «Мыши и другие указывающие устройства». и перейдите в Свойства.

В появившемся окне перейдите на вкладку «Драйвер» и выберите «Откатить драйвер».

Вам будет предложено перезагрузить компьютер. После перезагрузки перейдите в Панель управления> Мышь. Надеемся, что теперь доступны настройки Synaptics TouchPad или ClickPad.

Также на Guiding Tech
#исправление проблем
Способ 2: вручную выберите предыдущую версию
Вышеуказанный метод автоматически откатится к одной из предыдущих версий. Чтобы вручную выбрать версию, выполните следующие действия:
Шаг 1: Перейдите в Диспетчер устройств> Мыши и другие указывающие устройства. Щелкните правой кнопкой мыши на опции Synaptics и перейдите в Свойства.

Шаг 2: Перейдите на вкладку «Драйвер» и запишите версию драйвера (19.5.10.75 для моего ноутбука).

Шаг 3: Нажмите на Обновить драйвер.

Шаг 4: Нажмите & lsquo; найдите на моем компьютере программное обеспечение для драйвера. & Rsquo;

Шаг 5: Нажмите & lsquo; Позвольте мне выбрать из списка доступных драйверов на моем компьютере. & Rsquo;

Шаг 6: Теперь выберите версию меньше той, которую вы отметили выше. В моем случае это версия 19.5.10.69. Нажмите Далее, и вам будет предложено перезагрузить компьютер.

После входа снова откройте панель управления и перейдите в настройки мыши. Вкладка Synaptics будет счастливо сидеть там. Нажмите на нее, чтобы изменить настройки TouchPad / ClickPad и включить прокрутку.
What is Synaptics Driver?
Synaptics created a free software program that allows the touchpad to connect and communicate with the laptop’s or computer’s system. This programming device is known as Synaptics Driver. You will not perform actions with Synaptics touchpad downloaded on your device in the absence of this software.
It is known to be an easy-to-use program as it includes a control panel. That allows you to adjust the trackpad’s settings that contain gestures and sensitivity settings. Recently, they developed a new version of the Synaptics Touchpad device that works very well with Windows 7, 8, and 10.
This device can be downloaded on all three Windows, 7, 8, and 10, with a streamlined installer. To allow this device to function correctly and detect all the linked drivers, you need to restart the computer or laptop.
Touchpad not working after login
This usually happens when you disable your touchpad and then suspend your computer. To fix this just run this command:
gconftool-2 --set --type boolean /desktop/gnome/peripherals/touchpad/touchpad_enabled true
If nothing else works, please see the official Ubuntu touchpad debugging article.
Control touchpad features using synclient
synclient is a commandline utility to query and modify Synaptics driver options. This would allow one to adjust touchpad features that may not be exposed via the GUI. One would adjust parameters via a terminal:
synclient PARAMETER=#
where PARAMETER is as listed below, and # is a number. While the formal definition of each parameter may be found in the synaptics manpage, here is a more user friendly description of each of the parameters:
LeftEdge

RightEdge

TopEdge

BottomEdge

FingerLow

FingerHigh

MaxTapTime

MaxTapMove

MaxDoubleTapTime

SingleTapTimeout

ClickTime

EmulateMidButtonTime

EmulateTwoFingerMinZ

EmulateTwoFingerMinW

VertScrollDelta - Controls the speed and direction of vertical scrolling. The fastest natural direction scroll speed is 1. Larger positive values decrease the scroll speed. The fastest reverse direction scroll speed is -1, with larger negative values decreasing the scroll speed.

HorizScrollDelta - Controls the speed and direction of horizontal scrolling. The fastest natural direction scroll speed is 1. Larger positive values decrease the scroll speed. The fastest reverse direction scroll speed is -1, with larger negative values decrease the scroll speed.

VertEdgeScroll - Enables=1/Disables=0 vertical scrolling when dragging across the right edge of the touchpad.

HorizEdgeScroll - Enables=1/Disables=0 vertical scrolling when dragging across the right edge of the touchpad.

CornerCoasting

VertTwoFingerScroll - Enables=1/Disables=0 vertical scrolling when using two fingers anywhere on the touchpad.

HorizTwoFingerScroll - Enables=1/Disables=0 horizontal scrolling when using two fingers anywhere on the touchpad.

MinSpeed - Adjusts the minimum speed of your touchpad cursor. Lowest is 0.

MaxSpeed - Adjusts the maximum speed of your touchpad cursor. Lowest is 0.

AccelFactor - Adjust the rate of speed increment at which the touchpad cursor increases from MinSpeed to MaxSpeed. Lowest is 0.

TouchpadOff - Enables=1/Disables=0 the touchpad entirely.

LockedDrags

LockedDragTimeout

RTCornerButton - Disables=0 click when one taps the right top corner of the touchpad.

RBCornerButton - Disables=0 click when one taps the right bottom corner of the touchpad.

LTCornerButton - Disables=0 click when one taps the left top corner of the touchpad.

LBCornerButton - Disables=0 click when one taps the left bottom corner of the touchpad.

TapButton1

TapButton2

TapButton3

ClickFinger1

ClickFinger2

ClickFinger3

CircularScrolling

CircScrollDelta

CircScrollTrigger

PalmDetect

PalmMinWidth

PalmMinZ

CoastingSpeed

CoastingFriction

PressureMotionMinZ

PressureMotionMaxZ

PressureMotionMinFactor

PressureMotionMaxFactor

ResolutionDetect

GrabEventDevice

TapAndDragGesture

AreaLeftEdge

AreaRightEdge

AreaTopEdge

AreaBottomEdge

HorizHysteresis

VertHysteresis

ClickPad
Touchpad Driver
When you have installed the correct and latest version of the touchpad driver on your device according to your Windows system. And the driver has started running, you can quickly discover the new and advanced features of this device.
It is included in its default settings that the touchpad connected with this driver can efficiently detect and identify single touch of a finger and handle screen apps with only two-finger movements.
Apart from this, the most important and modern option in this device is that. It allows continuous movement for scrolling with a two-way circular design. Other standard features include swipe controls from right, left, and top edges and additional support. When you need to use a touchpad as a drawing board.
Synaptics
Synaptics has provided an innovative touchpad driver technology and worked persistently to improve market leadership by creating and developing groundbreaking technology products like biometric security and navigation by force.
The Synaptics Driver is a conventional solution for Windows and laptop users, specially designed for those with touchpad hardware that was declared unusable; this can happen because of the touchpad’s corrupted software driver of the user.
As compared to many other hardware devices of touchpads created for Microsoft Windows. This particular driver provides users with an easy method to re-establish the proper functioning of their touchpad. It also offers many additional features that are hard for other driver manufacturers to support and give solutions.
The Synaptic Driver is created and customized so that it meets all the requirements of any device developer. You just need to download the Synaptics device from your system’s manufacturer’s website to ensure that you get the correct driver for your system.
Synaptics Touchpad Driver for Dell. Характеристики драйвера
Драйверы версии 19.2.17.59 для тачпадов фирмы Synaptics в ноутбуках Dell. Предназначен для автоматической установки на Windows 7, Windows 8, Windows 8.1, Windows 10.
Для установки необходимо распаковать файл и запустить — Setup.exe.
Поддерживаемые устройства (ID оборудований):
| HID\VID_06CB&PID_2819 | Dell Touchpad |
| HID\VID_06CB&PID_75BF | Dell Touchpad |
| HID\VID_06CB&PID_75DD | Dell Touchpad |
| ACPI\DLL054C | |
| ACPI\DLL054D | |
| ACPI\DLL054E | |
| ACPI\DLL054F | |
| ACPI\DLL057E | |
| ACPI\DLL0584 | |
| ACPI\DLL0589 | |
| ACPI\DLL058F | |
| ACPI\DLL0591 | |
| ACPI\DLL0592 | |
| ACPI\DLL0593 | |
| ACPI\DLL0594 | |
| ACPI\DLL0595 | |
| ACPI\DLL0596 | |
| ACPI\DLL0597 | |
| ACPI\DLL0598 | |
| ACPI\DLL0599 | |
| ACPI\DLL059A | |
| ACPI\DLL059B | |
| ACPI\DLL059C | |
| ACPI\DLL059D | |
| ACPI\DLL059E | |
| ACPI\DLL059F | |
| ACPI\DLL05A0 | |
| ACPI\DLL05A3 | |
| ACPI\DLL05B8 | |
| ACPI\DLL05B9 | |
| ACPI\DLL05BA | |
| ACPI\DLL05BB | |
| ACPI\DLL05C4 | |
| ACPI\DLL05C5 | |
| ACPI\DLL05C6 | |
| ACPI\DLL05C8 | |
| ACPI\DLL05C9 | |
| ACPI\DLL05E9 | |
| ACPI\DLL05EB | |
| ACPI\DLL05EC | |
| ACPI\DLL05EE | |
| ACPI\DLL05F3 | |
| ACPI\DLL05F8 | |
| ACPI\DLL05F9 | |
| ACPI\DLL05FA | |
| ACPI\DLL05FB | |
| ACPI\DLL05FC | |
| ACPI\DLL05FD | |
| ACPI\DLL05FE | |
| ACPI\DLL0606 | |
| ACPI\DLL0607 | |
| ACPI\DLL0608 | |
| ACPI\DLL0609 | |
| ACPI\DLL060D | |
| ACPI\DLL0613 | |
| ACPI\DLL0614 | |
| ACPI\DLL0621 | |
| ACPI\DLL0629 | |
| ACPI\DLL0631 | |
| ACPI\DLL0632 | |
| ACPI\DLL063F | |
| ACPI\DLL0642 | |
| ACPI\DLL0657 | |
| ACPI\DLL0658 | |
| ACPI\DLL065F | |
| ACPI\DLL0664 | |
| ACPI\DLL0665 | |
| ACPI\DLL0667 | |
| ACPI\DLL066C | |
| ACPI\DLL066D | |
| ACPI\DLL066E | |
| ACPI\DLL066F | |
| ACPI\DLL067F | |
| ACPI\DLL0680 | |
| ACPI\DLL0681 | |
| ACPI\DLL0682 | |
| ACPI\DLL0683 | |
| ACPI\DLL0685 | |
| ACPI\DLL0686 | |
| ACPI\DLL0687 | |
| ACPI\DLL0688 | |
| ACPI\DLL0689 | |
| ACPI\DLL068A | |
| ACPI\DLL068C | |
| ACPI\DLL068F | |
| ACPI\DLL069C | |
| ACPI\DLL06A3 | |
| ACPI\DLL06A8 | |
| ACPI\DLL06AB | |
| ACPI\DLL06AC | |
| ACPI\DLL06AD | |
| ACPI\DLL06AE | |
| ACPI\DLL06AF | |
| ACPI\DLL06B0 | |
| ACPI\DLL06B1 | |
| ACPI\DLL06B2 | |
| ACPI\DLL06BD | |
| ACPI\DLL06BF | |
| ACPI\DLL06C0 | |
| ACPI\DLL06C1 | |
| ACPI\DLL06C2 | |
| ACPI\DLL06D7 | |
| ACPI\DLL06D8 | |
| ACPI\DLL06E4 | |
| ACPI\DLL06E5 | |
| ACPI\DLL0704 | |
| ACPI\DLL0705 | |
| ACPI\DLL0706 | |
| ACPI\DLL0708 | |
| ACPI\DLL0709 | |
| ACPI\DLL070B | |
| ACPI\DLL0719 | |
| ACPI\DLL0725 | |
| ACPI\DLL0726 | |
| ACPI\DLL0731 | |
| ACPI\DLL0732 | |
| ACPI\DLL076D | |
| ACPI\DLL076F | |
| ACPI\DLL0771 | |
| ACPI\DLL0773 | |
| ACPI\DLL0779 | |
| ACPI\DLL077B | |
| ACPI\DLL077F | |
| ACPI\DLL0780 | |
| ACPI\DLL0781 | |
| ACPI\DLL0782 | |
| ACPI\DLL0783 | |
| ACPI\DLL0784 | |
| ACPI\DLL0785 | |
| ACPI\DLL0786 | |
| ACPI\DLL0791 | |
| ACPI\DLL0792 | |
| ACPI\DLL0793 | |
| ACPI\DLL0794 | |
| ACPI\DLL0797 | |
| ACPI\DLL07B7 | |
| ACPI\DLL07B8 | |
| ACPI\DLL07BF | |
| ACPI\DLLA707 | |
| ACPI\DLLB6AD | |
| ACPI\DLLB6AE | |
| ACPI\DLLB6B2 | |
| ACPI\DLLB6BD | |
| ACPI\DLLB6BF | |
| ACPI\DLLB6C0 | |
| ACPI\DLLB6C1 | |
| ACPI\DLLB6C2 | |
| ACPI\DLLB6D7 | |
| ACPI\DLLB6D8 | |
| ACPI\DLLB70A | |
| ACPI\DLLD6AD | |
| ACPI\DLLD6AE | |
| ACPI\DLLD6B2 | |
| ACPI\SYN0002 | |
| ACPI\SYN0600 | |
| ACPI\SYN0601 | |
| ACPI\SYN0608 | |
| ACPI\SYN0609 | |
| ACPI\SYN060A | |
| ACPI\SYN060B | |
| ACPI\SYN060D | |
| *DLL05D5 | |
| *DLL05D6 |