Sfml.net
Содержание:
- The TextEntered event
- Installing SFML
- Sending and receiving data
- What is a socket ?
- Installing SFML
- Connecting a TCP socket
- Drawing from threads
- Простая программа с библиотекой SFML
- Non-blocking sockets
- Connecting a TCP socket
- The KeyPressed and KeyReleased events
- Installing SFML
- Installing SFML
- Non-blocking sockets
- Архитектура программного обеспечения
- Installing dependencies
- Blocking on a group of sockets
- Using a UDP socket
- Вступление
- Освоим прямоугольники (rectangles) и повороты (rotation)
- Fixed-size primitive types
- Installing SFML
- Introduction
- The drawing window
- Installing SFML
- ◆ setLoopPoints()
The TextEntered event
The event is triggered when a character is typed. This must not be confused with the
event: interprets the user input and produces the appropriate printable character. For example, pressing ‘^’ then ‘e’
on a French keyboard will produce two events, but a single event containing the ‘ê’ character.
It works with all the input methods provided by the operating system, even the most specific or complex ones.
This event is typically used to catch user input in a text field.
The member associated with this event is , it contains the Unicode value of the entered character. You can either put it
directly in a , or cast it to a after making sure that it is in the ASCII range (0 — 127).
Note that, since they are part of the Unicode standard, some non-printable characters such as backspace are generated by this event.
In most cases you’ll need to filter them out.
Many programmers use the event to get user input, and start to implement crazy algorithms that try to interpret all
the possible key combinations to produce correct characters. Don’t do that!
Installing SFML
There are different approaches to the installation of SFML on Linux:
- Install it directly from your distribution’s package repository
- Get the source code, build it and install it
- Download the precompiled SDK and manually copy the files
Option 1 is the preferred one; if the version of SFML that you want to install is available in the official repository, then install it using your
package manager. For example, on Debian you would do:
Option 2 requires more work: you need to ensure all of SFML’s dependencies including their development headers are available, make sure CMake is installed, and manually
execute some commands. This will result in a package which is tailored to your system.
If you want to go this way, there’s a dedicated tutorial on
building SFML yourself.
Finally, option 3 is a good choice for quick installation if SFML is not available as an official package. Download the SDK
from the download page, unpack it and copy the files to your
preferred location: either a separate path in your personal folder (like /home/me/sfml), or a standard path (like /usr/local).
If you already had an older version of SFML installed, make sure that it won’t conflict with the new version!
Sending and receiving data
Sending and receiving data is done in the same way for both types of sockets. The only difference is that UDP has two extra arguments: the address and port of the sender/recipient.
There are two different functions for each operation: the low-level one, that sends/receives a raw array of bytes, and the higher-level one, which uses the
class. See the tutorial on packets for more details about this
class. In this tutorial, we’ll only explain the low-level functions.
To send data, you must call the function with a pointer to the data that you want to send, and the number of bytes to send.
The functions take a pointer, so you can pass the address of anything. However, it is generally a bad idea to send something other than
an array of bytes because native types with a size larger than 1 byte are not guaranteed to be the same on every machine: Types such as int or long may have a different size,
and/or a different endianness. Therefore, such types cannot be exchanged reliably across different systems. This problem is explained (and solved) in the
tutorial on packets.
With UDP you can broadcast a message to an entire sub-network in a single call: to do so you can use the special address .
There’s another thing to keep in mind with UDP: Since data is sent in datagrams and the size of these datagrams has a limit, you are not allowed to exceed it.
Every call to must send less that bytes — which is a little less than 2^16 (65536) bytes.
To receive data, you must call the function:
It is important to keep in mind that if the socket is in blocking mode, will wait until something is received, blocking the thread that called it
(and thus possibly the whole program).
The first two arguments specify the buffer to which the received bytes are to be copied, along with its maximum size. The third argument is a variable that will contain the actual
number of bytes received after the function returns.
With UDP sockets, the last two arguments will contain the address and port of the sender after the function returns. They can be used later if you want to send a response.
These functions are low-level, and you should use them only if you have a very good reason to do so. A more robust and flexible approach involves using
packets.
What is a socket ?
For those who are new to network programming, sockets are the most important thing to know. Almost
everything (at a low level) relies on sockets. A sockets can be seen as a pipe between two computers,
and once you’ve setup such a pipe, you can start exchanging data.
A lot of protocols exist to communicate on the network, and each protocol has several types of sockets.
But all you have to know is the internet protocol (IP), with TCP and UDP types of sockets ; this is
what almost every network software uses, and this is what SFML uses in its network package.
TCP and UDP sockets are quite different, here is why :
- TCP sockets make sure that data will arrive with no error and in the same order as it was sent
- UDP sockets offer absolutely no guarantee of delivery ; data can be lost, duplicated, or arrive in another order
- TCP sockets must be connected ; once you are connected, all data you send and receive are from / to the same destination
- UDP sockets don’t need to be connected ; you must give the destination address each time you send or receive
To sum up, TCP sockets are safer but slower. There are only a few cases that require UDP sockets :
intensive real-time applications like RPG/FPS/RTS games, or broadcasting (sending data to
every computer of a sub-network).
Installing SFML
First, you must download the SFML SDK from the download page.
You must download the package that matches your version of Visual C++. Indeed, a library compiled with VC++ 10 (Visual Studio 2010)
won’t be compatible with VC++ 12 (Visual Studio 2013) for example. If there’s no SFML package compiled for your version of Visual C++, you will have to
build SFML yourself.
You can then unpack the SFML archive wherever you like. Copying headers and libraries to your installation of Visual Studio is not recommended, it’s better
to keep libraries in their own separate location, especially if you intend to use several versions of the same library, or several compilers.
Connecting a TCP socket
As you can guess, this part is specific to TCP sockets. There are two sides to a connection: the one that waits for the incoming connection (let’s call it the server),
and the one that triggers it (let’s call it the client).
On client side, things are simple: the user just needs to have a and call its function to start the connection attempt.
The first argument is the address of the host to connect to. It is an , which can represent any valid address: a URL, an IP address, or a
network host name. See its documentation for more details.
The second argument is the port to connect to on the remote machine. The connection will succeed only if the server is accepting connections on that port.
There’s an optional third argument, a time out value. If set, and the connection attempt doesn’t succeed before the time out is over, the function returns an error. If not specified,
the default operating system time out is used.
Once connected, you can retrieve the address and port of the remote computer if needed, with the and
functions.
All functions of socket classes are blocking by default. This means that your program (more specifically the thread that contains the function call) will be stuck until the
operation is complete. This is important because some functions may take very long: For example, trying to connect to an unreachable host will only return after a few seconds,
receiving will wait until there’s data available, etc.
You can change this behavior and make all functions non-blocking by using the function of the socket. See the next chapters for more details.
On the server side, a few more things have to be done. Multiple sockets are required: One that listens for incoming connections, and one for each connected client.
To listen for connections, you must use the special class. Its only role is to wait for incoming connection attempts on a given port, it can’t
send or receive data.
The function blocks until a connection attempt arrives (unless the socket is configured as non-blocking). When it happens, it initializes the given socket
and returns. The socket can now be used to communicate with the new client, and the listener can go back to waiting for another connection attempt.
After a successful call to (on client side) and (on server side), the communication is established and both sockets are ready
to exchange data.
Drawing from threads
SFML supports multi-threaded drawing, and you don’t even have to do anything to make it work. The only thing to remember is to deactivate a window before using it in
another thread. That’s because a window (more precisely its OpenGL context) cannot be active in more than one thread at the same time.
As you can see, you don’t even need to bother with the activation of the window in the rendering thread, SFML does it automatically for you whenever it needs to be done.
Remember to always create the window and handle its events in the main thread for maximum portability. This is explained in the
window tutorial.
Простая программа с библиотекой SFML
Создать графическую программу немногим сложнее, чем консольную, благодаря SFML. SFML состоит из множества модулей, и нам нужны три модуля:
- SFML system, потому что его используют остальные два модуля
- SFML window, чтобы создать окно программы
- SFML graphics, чтобы нарисовать хотя бы что-то в этом окне
Для начала создайте каталог , и в нём создайте файл , сохраните в нём текст:
Теперь создайте в каталоге файл , и аккуратно перепишите в него код:
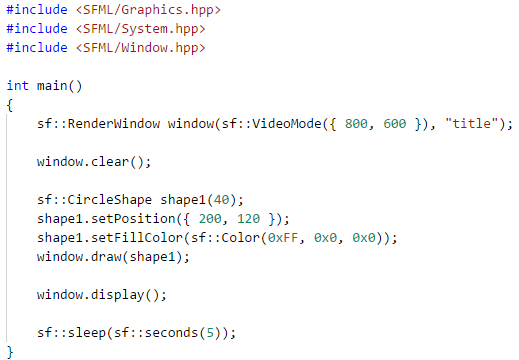
Теперь вернитесь к основному файлу и добавьте строку , чтобы он выглядел так:
После этого снова запустите CMake:
Если сборка была успешной, запустите программу . На 5 секунд появится окно, а затем оно исчезнет.
Давайте разберём, что выполняет код:
- Инструкция объявляет переменную window, которая имеет тип “графическое окно”, размеры 800×600 px и незамысловатый заголовок “title”.
- Вызов метода очищает окно, а вызов выводит на экран то, что было нарисовано после очистки.
- Инструкция объявляет переменную shape1 — круг размером 40px.
- Вызовы и задают позицию круга в пикселях и цвет в виде RGB-компонентов (Red, Green, Blue).
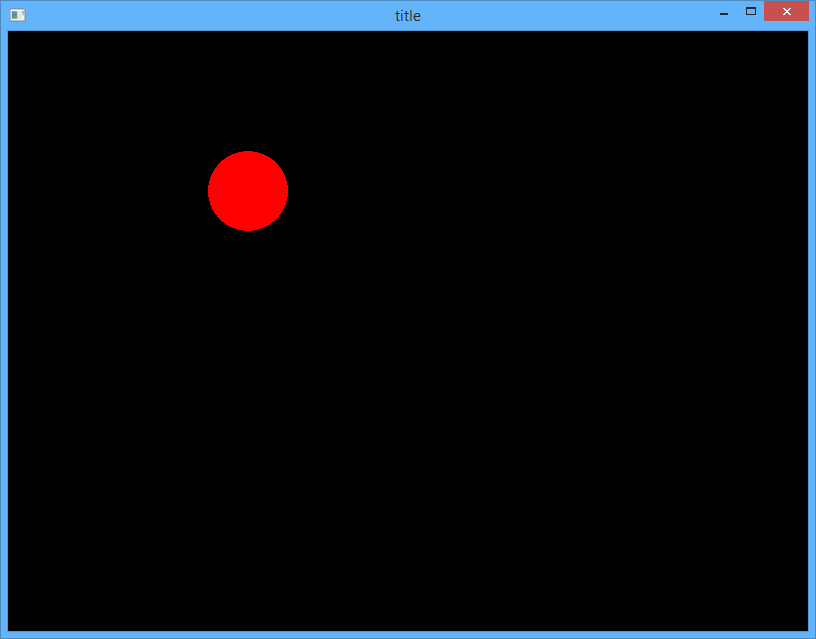
Теперь добавьте больше фигур:
Запустите CMake, а затем программу:
У вас должно получиться что-то такое:
Non-blocking sockets
All sockets are blocking by default, but you can change this behaviour at any time with the function.
Once a socket is set as non-blocking, all of its functions always return immediately. For example, will return with status
if there’s no data available. Or, will return immediately, with the same status, if there’s no pending connection.
Non-blocking sockets are the easiest solution if you already have a main loop that runs at a constant rate. You can simply check if something happened on your sockets
in every iteration, without having to block program execution.
When using in non-blocking mode, calls to are not guaranteed to actually send all the data you pass to it, whether it be
as a or as raw data. Starting from SFML 2.3, when sending raw data over a non-blocking , always make sure to use the
overload which returns the number of bytes actually sent in the reference
parameter after the function returns. Regardless of whether you send s or raw data, if only a part of the data was sent in the call, the return
status will be to indicate a partial send. If is returned, you must make sure to handle the partial
send properly or else data corruption will occur. When sending raw data, you must reattempt sending the raw data at the byte offset where the previous
call stopped. When sending s, the byte offset is saved within the itself. In this case, you must make sure to keep
attempting to send the exact same unmodified object over and over until a status other than is returned.
Constructing a new object and filling it with the same data will not work, it must be the same object that was previously sent.
Connecting a TCP socket
As you can guess, this part is specific to TCP sockets. There are two sides to a connection: the one that waits for the incoming connection (let’s call it the server),
and the one that triggers it (let’s call it the client).
On client side, things are simple: the user just needs to have a and call its function to start the connection attempt.
The first argument is the address of the host to connect to. It is an , which can represent any valid address: a URL, an IP address, or a
network host name. See its documentation for more details.
The second argument is the port to connect to on the remote machine. The connection will succeed only if the server is accepting connections on that port.
There’s an optional third argument, a time out value. If set, and the connection attempt doesn’t succeed before the time out is over, the function returns an error. If not specified,
the default operating system time out is used.
Once connected, you can retrieve the address and port of the remote computer if needed, with the and
functions.
All functions of socket classes are blocking by default. This means that your program (more specifically the thread that contains the function call) will be stuck until the
operation is complete. This is important because some functions may take very long: For example, trying to connect to an unreachable host will only return after a few seconds,
receiving will wait until there’s data available, etc.
You can change this behavior and make all functions non-blocking by using the function of the socket. See the next chapters for more details.
On the server side, a few more things have to be done. Multiple sockets are required: One that listens for incoming connections, and one for each connected client.
To listen for connections, you must use the special class. Its only role is to wait for incoming connection attempts on a given port, it can’t
send or receive data.
The function blocks until a connection attempt arrives (unless the socket is configured as non-blocking). When it happens, it initializes the given socket
and returns. The socket can now be used to communicate with the new client, and the listener can go back to waiting for another connection attempt.
After a successful call to (on client side) and (on server side), the communication is established and both sockets are ready
to exchange data.
The KeyPressed and KeyReleased events
The and events are triggered when a keyboard key is pressed/released.
If a key is held, multiple events will be generated, at the default operating system delay (ie. the same delay that applies when you hold
a letter in a text editor). To disable repeated events, you can call .
On the flip side, it is obvious that events can never be repeated.
This event is the one to use if you want to trigger an action exactly once when a key is pressed or released, like making a character jump with
space, or exiting something with escape.
Sometimes, people try to react to events directly to implement smooth movement. Doing so will not produce the expected effect,
because when you hold a key you only get a few events (remember, the repeat delay). To achieve smooth movement with events, you must use a boolean that you set
on and clear on ; you can then move (independently of events) as long as the boolean is set.
The other (easier) solution to produce smooth movement is to use real-time keyboard input with (see the
dedicated tutorial).
The member associated with these events is , it contains the code of the pressed/released key, as well as the current state of
the modifier keys (alt, control, shift, system).
Note that some keys have a special meaning for the operating system, and will lead to unexpected behavior. An example is the F10 key on Windows, which «steals»
the focus, or the F12 key which starts the debugger when using Visual Studio. This will probably be solved in a future version of SFML.
Installing SFML
First, you must download the SFML SDK from the download page.
There are multiple variants of GCC for Windows, which are incompatible with each other (different exception management,
threading model, etc.). Make sure you select the package which corresponds to the version that you use. If you are unsure, check which of
the libgcc_s_sjlj-1.dll or libgcc_s_dw2-1.dll files is present in your MinGW/bin folder. If MinGW was installed along with Code::Blocks,
you probably have an SJLJ version.
If you feel like your version of GCC can’t work with the precompiled SFML libraries, don’t hesitate to
build SFML yourself, it’s not complicated.
You can then unpack the SFML archive wherever you like. Copying headers and libraries to your installation of MinGW is not recommended, it’s better
to keep libraries in their own separate location, especially if you intend to use several versions of the same library, or several compilers.
Installing SFML
First of all you need to download the SFML SDK which is available on the download page.
Then, in order to start developing SFML applications, you have to install the following items:
-
Header files and libraries
SFML is available either as dylibs or as frameworks.
Only one type of binary is required although both can be installed simultaneously on the same system.
We recommend using the frameworks.-
frameworks
Copy the content of Frameworks to /Library/Frameworks. -
dylib
Copy the content of lib to /usr/local/lib and copy the content of include to /usr/local/include.
-
frameworks
-
SFML dependencies
SFML depends on a few external libraries on macOS. Copy the content of extlibs to /Library/Frameworks. -
Xcode templates
This feature is optional but we strongly recommend that you install it.
Copy the SFML directory from templates to ~/Library/Developer/Xcode/Templates (create the folders if they don’t exist yet).
Non-blocking sockets
All sockets are blocking by default, but you can change this behaviour at any time with the function.
Once a socket is set as non-blocking, all of its functions always return immediately. For example, will return with status
if there’s no data available. Or, will return immediately, with the same status, if there’s no pending connection.
Non-blocking sockets are the easiest solution if you already have a main loop that runs at a constant rate. You can simply check if something happened on your sockets
in every iteration, without having to block program execution.
When using in non-blocking mode, calls to are not guaranteed to actually send all the data you pass to it, whether it be
as a or as raw data. Starting from SFML 2.3, when sending raw data over a non-blocking , always make sure to use the
overload which returns the number of bytes actually sent in the reference
parameter after the function returns. Regardless of whether you send s or raw data, if only a part of the data was sent in the call, the return
status will be to indicate a partial send. If is returned, you must make sure to handle the partial
send properly or else data corruption will occur. When sending raw data, you must reattempt sending the raw data at the byte offset where the previous
call stopped. When sending s, the byte offset is saved within the itself. In this case, you must make sure to keep
attempting to send the exact same unmodified object over and over until a status other than is returned.
Constructing a new object and filling it with the same data will not work, it must be the same object that was previously sent.
Архитектура программного обеспечения
Модули
SFML состоит из различных модулей:
- Система — векторные и строковые классы Unicode , переносимые средства многопоточности и таймера
- Окно — управление окнами и устройствами ввода, включая поддержку джойстиков , управление контекстом OpenGL
- Графика — аппаратное ускорение 2D-графики, включая спрайты , многоугольники и рендеринг текста.
- Аудио — пространственное воспроизведение и запись звука с аппаратным ускорением
- Сеть — сетевые сокеты TCP и UDP , средства инкапсуляции данных, классы HTTP и FTP.
Хотя графический модуль является одной из основных функций SFML, разработчики, которые заинтересованы только в создании среды для программирования непосредственно в OpenGL, могут сделать это, используя модуль Window отдельно без графического модуля. Точно так же другие модули также могут использоваться независимо друг от друга, за исключением системного модуля, который используется всеми модулями.
Языковые привязки
SFML написан на C ++ и предоставляет интерфейс C ++. Существует несколько языковых привязок, которые позволяют использовать SFML в других языках программирования.
В этой таблице перечислены поддерживаемые привязки для SFML по состоянию на 2017 год.
| Имя | Язык | Поддерживаемая версия |
|---|---|---|
| C | 2,5 | |
| .СЕТЬ | 2,5 | |
| 2,5 | ||
| D | 2,4 | |
| D | 2.1 | |
| Эйфория | 2,4 | |
| Свободный Паскаль | 2.4.0 | |
| Идти | 2.0 | |
| Haskell | 2.3.2 | |
| Джава | 2.2 | |
| Юлия | 2.5.1 | |
| Ним | 2.3 | |
| OCaml | 2.3 | |
| OCaml | 2.0 | |
| Паскаль | 2,4 | |
| Python | 2.3.2 | |
| Рубин | 2.3.2 | |
| Ржавчина | 2,4 | |
| Зиг | 2.3.2 |
1 Официальные привязки
Неофициальные дополнения
SFML предоставляет основные функции, на которых может быть построено программное обеспечение более высокого уровня . Существуют дополнительные библиотеки, которые обеспечивают дополнительную поддержку графических пользовательских интерфейсов (GUI), 2D- освещения , систем частиц и анимации , воспроизведения видео и тайловых карт .
Installing dependencies
SFML depends on a few other libraries, so before starting to configure you must have their development files installed.
On Windows and Mac OS X, all the required dependencies are provided alongside SFML so you won’t have to download/install anything else.
Building will work out of the box.
On Linux however, nothing is provided. SFML relies on you to install all of its dependencies on your own. Here is a list of what you need
to install before building SFML:
- freetype
- jpeg
- x11
- xrandr
- xcb
- x11-xcb
- xcb-randr
- xcb-image
- opengl
- flac
- ogg
- vorbis
- vorbisenc
- vorbisfile
- openal
- pthread
The exact name of the packages may vary from distribution to distribution. Once those packages are installed, don’t forget to install their development headers as well.
Blocking on a group of sockets
Blocking on a single socket can quickly become annoying, because you will most likely have to handle more than one client. You most likely don’t want socket A to block
your program while socket B has received something that could be processed. What you would like is to block on multiple sockets at once, i.e. waiting until
any of them has received something. This is possible with socket selectors, represented by the class.
A selector can monitor all types of sockets: , , and . To add
a socket to a selector, use its function:
A selector is not a socket container. It only references (points to) the sockets that you add, it doesn’t store them. There is no way to retrieve or count the
sockets that you put inside. Instead, it is up to you to have your own separate socket storage (like a or a ).
Once you have filled the selector with all the sockets that you want to monitor, you must call its function to wait until any one of them has received
something (or has triggered an error). You can also pass an optional time out value, so that the function will fail if nothing has been received after a certain period of time — this
avoids staying stuck forever if nothing happens.
If the function returns , it means that one or more socket(s) have received something, and you can safely call
on the socket(s) with pending data without having them block. If the socket is a , it means that an incoming connection is ready to be accepted and that you
can call its function without having it block.
Since the selector is not a socket container, it cannot return the sockets that are ready to receive. Instead, you must test each candidate socket with the
function:
You can have a look at the API documentation of the class for a working example of how to use a selector to handle connections
and messages from multiple clients.
As a bonus, the time out capability of allows you to implement a receive-with-timeout function, which is not directly available in the
socket classes, very easily:
Using a UDP socket
UDP sockets are connectionless, so they are the easiest ones to use. No connection is needed,
all you have to do is sending and receiving data. The only step required is to bind the socket to a port before
receiving data.
SFML sockets allow sending raw data, defined by a pointer to a byte array and its size :
Here, we send our byte array (containing «Hi guys !») to the computer which IP address is 192.168.0.2,
on port 4567. The second parameter is a , so you could as well
use a network name, a broadcast address or whatever type of address.
If you don’t want to use a specific port, you can just take any free port number between 1024 and
65535 (ports less than 1024 are reserved). And of course, make sure that your firewall is not
blocking this port !
The function, as well as all other functions that can block,
returns a socket status (see ) which can be :
- : the operation has been completed with success
- : in non-blocking mode only, returned when the socket is not yet ready to complete the task
- : the socket has been disconnected
- : an unexpected error happened
Receiving data is exactly the same, except you first need to bind the socket to a port before
receiving data from this port.
Then you can receive a byte array, its size, and the address / port of the sender.
Please note that is blocking, meaning that it won’t return
until it has received something if the socket is in blocking mode (which is the default).
When you don’t need the socket anymore, you have to close it (the destructor won’t do it for you !) :
Вступление
«Что же из себя представляет SFML?» — спросите вы.
SFML (сокр. от «Simple and Fast Multimedia Library» = «Простая и быстрая мультимедийная библиотека») — это свободная кроссплатформенная мультимедийная библиотека, написанная на языке C++. Она также доступна и для других языков: C, C#, .Net, D, Java, Python, Ruby, OCaml, Go и Rust. Представляет собой объектно-ориентированный аналог SDL.
С её помощью можно легко и непринужденно создавать любую 2D-графику: начиная от простейших одиночных геометрических фигур (типа треугольника) и заканчивая полноценными играми-платформерами.
Исходный код библиотеки предоставляется под лицензией zlib/png, а скачать SFML можно с оф. сайта разработчика www.sfml-dev.org.
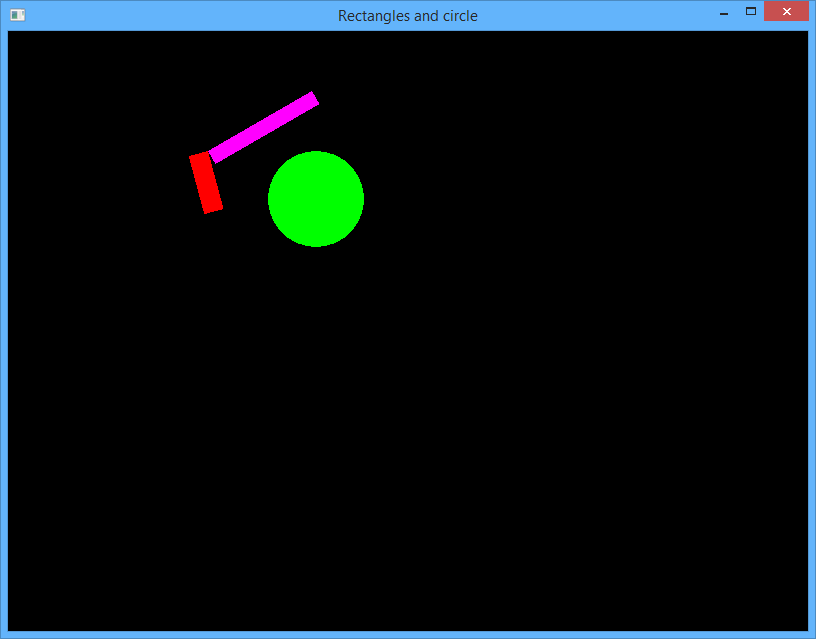
Освоим прямоугольники (rectangles) и повороты (rotation)
SFML позволяет рисовать разные типы фигур, в том числе прямоугольники. Прямоугольным фигурам соответствует класс sf::RectangleShape.
Создайте каталог , и в нём создайте файл и сохраните текст:
Теперь создайте в каталоге файл , и аккуратно перепишите в него код. Посмотрите на код: определите, где создаются два прямоугольника (rectangle) и где устанавливается поворот в градусах (rotation).

Теперь вернитесь к основному файлу и добавьте строку , чтобы он выглядел так:
Соберите через CMake и запустите . Результат будет таким:
Теперь вам надо зафиксировать успех! В терминале выполните команды:
Введите команду . Она покажет вам журнал изменений; этот журнал показывает все ранее зафиксированные версии. Выйти из просмотра лога можно с помощью горячей клавиши .
Задание sfml1.1
Нарисуйте с помощью кругов и прямоугольников светофор такого вида:
- Перед тем, как написать код, нарисуйте светофор на клетчатой бумаге — так вы сможете измерить координаты, на которых должны располагаться фигуры.
- Светофор должен быть нарисован ровно, без явных искажений.
- Размер окна должен быть немного больше размера светофора (отступ 10-20px)
- Когда вы сделаете задание, зафиксируйте его с помощью git.
Задание sfml1.2
Нарисуйте фигурами свои инициалы в английской транскрипции.
- Например, если вас зовут “Fadeev Victor Andreevich”, напишите фигурами три буквы: .
- Перед тем, как написать код, нарисуйте эти буквы на клетчатой бумаге — так вы сможете измерить координаты, на которых должны располагаться буквы, и примерно оценить углы поворота.
- Нарисованные инициалы должны быть читаемые и аккуратные.
- Когда вы сделаете задание, зафиксируйте его с помощью git.
Fixed-size primitive types
Since primitive types cannot be exchanged reliably on a network, the solution is simple: don’t use them. SFML provides fixed-size types for data exchange:
, etc. These types are just typedefs to primitive types, but they are mapped to the type which has the expected size according
to the platform. So they can (and must!) be used safely when you want to exchange data between two computers.
SFML only provides fixed-size integer types. Floating-point types should normally have their fixed-size equivalent too, but in practice this is not needed
(at least on platforms where SFML runs), and types always have the same size, 32 bits and 64 bits respectively.
Installing SFML
First, you must download the SFML SDK from the download page.
You must download the package that matches your version of Visual C++. Indeed, a library compiled with VC++ 10 (Visual Studio 2010)
won’t be compatible with VC++ 12 (Visual Studio 2013) for example. If there’s no SFML package compiled for your version of Visual C++, you will have to
build SFML yourself.
You can then unpack the SFML archive wherever you like. Copying headers and libraries to your installation of Visual Studio is not recommended, it’s better
to keep libraries in their own separate location, especially if you intend to use several versions of the same library, or several compilers.
Introduction
This is the first tutorial you should read if you’re using SFML with Xcode — and more generally if you are developing applications for macOS. It will show you how
to install SFML, set up your IDE and compile a basic SFML program. More importantly, it will also show you how to make your applications ready «out of the box» for the end users.
You will see several external links in this document. They are meant for further reading on specific topics for those who are curious; reading them isn’t necessary to follow this tutorial.
System requirements
All you need to create an SFML application is:
- A 64-bit Intel Mac with Lion or later (10.7+)
- Xcode (versions 4 or above of the IDE, which is available on the App Store, are supported).
- Clang and libc++ (which are shipped by default with Xcode).
With recent versions of Xcode you also need to install the Command Line Tools from Xcode > Preferences > Downloads > Components. If you can’t find the CLT there use in a Terminal and follow on-screen instructions.
Binaries: dylib vs framework
SFML is available in two formats on macOS. You have the dylib libraries on the one hand and the framework bundles on the other.
-
Dylib stands for dynamic library; this format is like .so libraries on Linux. You can find more details in
. -
Frameworks are fundamentally the same as dylibs, except that they can encapsulate external resources. Here is
.
There is only one slight difference between these two kinds of libraries that you should be aware of while developing SFML applications:
if you build SFML yourself, you can get dylib in both release and debug configurations. However, frameworks are only available in the release configuration.
In either case, it shouldn’t be an issue since you should be using the release version of SFML when you release your application anyway. That’s why the OS X binaries
on the download page are only available in the release configuration.
Xcode templates
SFML is provided with two templates for Xcode 4+ which allow you to create new application projects very quickly and easily:
you can select which modules your application requires, whether you want to use SFML as dylib or as frameworks and whether to
create an application bundle containing all its resources (making the installation process of your applications as easy as a simple drag-and-drop) or a classic binary.
See below for more details.
Be aware that these templates are not compatible with Xcode 3. If you are still using this version of the IDE and you don’t consider updating it, you
can still create SFML applications. A guide on doing that is beyond the scope of this tutorial. Please refer to Apple’s documentation about Xcode 3 and
how to add a library to your project.
The drawing window
To draw the entities provided by the graphics module, you must use a specialized window class: . This class is derived
from , and inherits all its functions. Everything that you’ve learnt about (creation, event handling,
controlling the framerate, mixing with OpenGL, etc.) is applicable to as well.
On top of that, adds high-level functions to help you draw things easily. In this tutorial we’ll focus on two
of these functions: and . They are as simple as their name implies: clears the whole window with
the chosen color, and draws whatever object you pass to it.
Here is what a typical main loop looks like with a render window:
Calling before drawing anything is mandatory, otherwise the contents from previous frames will be present behind anything you draw. The only exception is
when you cover the entire window with what you draw, so that no pixel is not drawn to. In this case you can avoid calling (although
it won’t have a noticeable impact on performance).
Calling is also mandatory, it takes what was drawn since the last call to and displays it on the window.
Indeed, things are not drawn directly to the window, but to a hidden buffer. This buffer is then copied to the window when you call
— this is called double-buffering.
This clear/draw/display cycle is the only good way to draw things. Don’t try other strategies, such as keeping pixels from the previous frame,
«erasing» pixels, or drawing once and calling display multiple times. You’ll get strange results due to double-buffering.
Modern graphics hardware and APIs are really made for repeated clear/draw/display cycles where everything is completely refreshed at each iteration of
the main loop. Don’t be scared to draw 1000 sprites 60 times per second, you’re far below the millions of triangles that your computer can handle.
Installing SFML
First, you must download the SFML SDK from the download page.
You must download the package that matches your version of Visual C++. Indeed, a library compiled with VC++ 10 (Visual Studio 2010)
won’t be compatible with VC++ 12 (Visual Studio 2013) for example. If there’s no SFML package compiled for your version of Visual C++, you will have to
build SFML yourself.
You can then unpack the SFML archive wherever you like. Copying headers and libraries to your installation of Visual Studio is not recommended, it’s better
to keep libraries in their own separate location, especially if you intend to use several versions of the same library, or several compilers.
◆ setLoopPoints()
| void sf::Music::setLoopPoints | ( | TimeSpan | timePoints | ) |
Sets the beginning and end of the sound’s looping sequence using sf::Time.
Loop points allow one to specify a pair of positions such that, when the music is enabled for looping, it will seamlessly seek to the beginning whenever it encounters the end. Valid ranges for timePoints.offset and timePoints.length are respectively, where Dur is the value returned by . Note that the EOF «loop point» from the end to the beginning of the stream is still honored, in case the caller seeks to a point after the end of the loop range. This function can be safely called at any point after a stream is opened, and will be applied to a playing sound without affecting the current playing offset.
- Warning
- Setting the loop points while the stream’s status is Paused will set its status to Stopped. The playing offset will be unaffected.
- Parameters
-
timePoints The definition of the loop. Can be any time points within the sound’s length
- See also