Установка windows powershell
Содержание:
- CompatiblePSEditionsПоле манифеста модуля
- Что способствовало появлению Windows PowerShell?
- Обновление существующей версии Windows PowerShell
- Совместимость выпусков для модулей, поставляемых в составе Windows
- Installing the ZIP package
- Как пользоваться
- Installing the MSI package
- Installing the ZIP package
- Как удалить PowerShell в Windows 10
- 7.2.0-preview.6 — 2021-05-27
- Long description
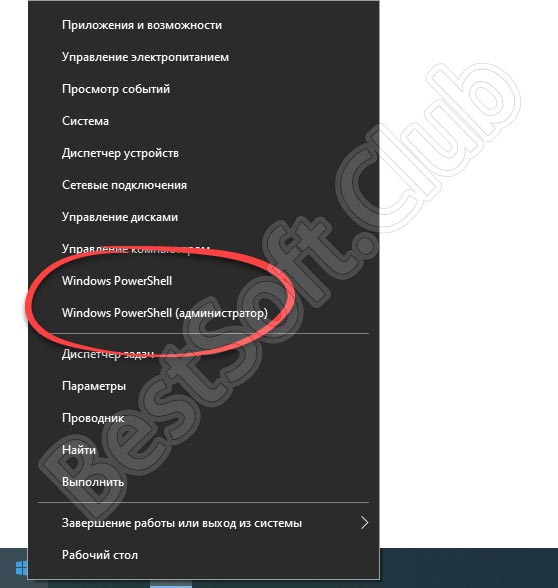
- Запуск 32-разрядной версии Windows PowerShell
- Installing from the Microsoft Store
- Требования к операционной системе
- Что такое Windows PowerShell
- Installation of latest preview release via Homebrew on macOS 10.13 or higher
CompatiblePSEditionsПоле манифеста модуля
Модули PowerShell могут объявлять, какие выпуски PowerShell совместимы с, используя поле манифеста модуля.
Например, манифест модуля, объявляющий совместимость с и с выпусками PowerShell:
Пример манифеста модуля только с совместимостью:
Пропуск поля из манифеста модуля приведет к тому же результату, что и установка , так как модули, созданные до этого поля, были неявно написаны для этого выпуска.
для модулей, не поставляемых в составе Windows (т. е. модулей, которые вы пишете или устанавливаете из коллекции), это поле является информационным. PowerShell не изменяет поведение на основе поля, но предоставляет его для объекта (возвращаемого ) для собственной логики:
Примечание
Поле Module совместимо только с PowerShell 5,1 и более поздних версий.
Включение этого поля приведет к тому, что модуль будет несовместим с PowerShell 4 и ниже.
Поскольку поле является исключительно информационным, его можно спокойно опустить в последующих версиях PowerShell.
В PowerShell 6,1 модуль форматирования был обновлен для просмотра совместимости каждого модуля с выпуском:
Что способствовало появлению Windows PowerShell?
До появления PowerShell существовали (и существуют) следующие инструменты для автоматизации и администрирования сервисов: командная строка Windows и Windows Script Host. Но у этих технологий есть недостатки.
У командной строки Windows есть и возможность выполнять какие-то административные задачи и возможность записать алгоритм действий, сохранив его в виде скрипта (bat-файла), при этом можно использовать некие элементы программирования, например, использовать переменные, условные конструкции и даже что-то вроде циклов.
Большинство программных продуктов имеет консольный интерфейс, т.е. мы можем управлять программой, используя командную строку, при этом экономя ресурсы за счет отсутствия затрат на работу графического интерфейса. Компания Microsoft для серверной операционной системы Windows Server даже выпускает редакции без графического интерфейса (Server Core, в Windows Server 2019), но всего этого недостаточно, так как возможности командной строки ограничены, т.е. написать какую-то сложную логику для автоматизации чего-либо мы не сможем, а если и сможем, то на это нам потребуется время и знания.
Также недостатком командной строки является то, что для полноценного управления сервером мы используем различные консольные утилиты программных продуктов, и поэтому использовать командную строку для администрирования на самом деле сложно, с точки зрения того, что у всех этих утилит разный синтаксис, параметры, методы использования и для того чтобы выполнять типовые задачи, т.е. каждодневные, приходиться держать все это в памяти, а для выполнения нетиповых задач приходиться сначала почитать справку или документацию.
Технология Windows Script Host позволяет выполнять все административные задачи, что и командная строка, включая их автоматизацию путем написания WSH скриптов, но здесь мы уже можем использовать полноценные языки программирования (VBScript и JScript), т.е. можно реализовывать сложную логику и алгоритмы. К тому же с помощью WSH мы управляем программными продуктами через объектный интерфейс, другими словами Windows Script Host намного «круче» чем командная строка. Но данная технология также не стала тем идеальным инструментом администрирования и автоматизации этого администрирования для системных администраторов, так как Windows Script Host требовал знаний вышеперечисленных языков программирования, что для системных администраторов на самом деле лишнее. Администраторам нужно всего лишь простой инструмент администрирования с возможностью запрограммировать какие-то действия, а углубляться в объектные модели программных продуктов на языках программирования VBScript и JScript им не хочется.
В итоге компании Microsoft необходимо было разработать такой инструмент администрирования для системных администраторов, который бы на 100 процентов удовлетворял все потребности сисадминов как в плане возможностей администрирования и автоматизации, так и в плане удобства и простоты использования, таким образом, появился Windows PowerShell.
Обновление существующей версии Windows PowerShell
В пакет установки для PowerShell входит установщик WMF. Версия установщика WMF совпадает с версией PowerShell. Для Windows PowerShell нет отдельного установщика.
Если вам нужно обновить существующую версию PowerShell, в Windows используйте следующую таблицу, чтобы найти установщик для нужной версии PowerShell.
| Windows | PS 3.0 | PS 4.0 | PS 5.0 | PS 5.1 |
|---|---|---|---|---|
| Windows 10 (см. примечание 1)Windows Server 2016 | — | — | — | установлено |
| Windows 8.1Windows Server 2012 R2 | — | установлено | WMF 5.0 | WMF 5.1 |
| Windows 8Windows Server 2012 | установлено | WMF 4.0 | WMF 5.0 | WMF 5.1 |
| Windows 7 с пакетом обновления 1 (SP1)Windows Server 2008 R2 с пакетом обновления 1 (SP1) | WMF 3.0 | WMF 4.0 | WMF 5.0 | WMF 5.1 |
Примечание
Если в начальном выпуске Windows 10 включены автоматические обновления, PowerShell обновляется с версии 5.0 до 5.1. Если оригинальная версия Windows 10 не обновлена в Центре обновления Windows, версия PowerShell будет 5.0.
Совместимость выпусков для модулей, поставляемых в составе Windows
для модулей, которые входят в состав Windows (или устанавливаются как часть роли или компонента), PowerShell 6,1 и выше обрабатывают поле по- разному. такие модули находятся в каталоге Windows PowerShell системных модулей ( ).
Для модулей, загруженных из этого каталога или найденных в этом каталоге, в PowerShell 6,1 и более поздних версий используется поле, чтобы определить, будет ли модуль совместимым с текущим сеансом и работать соответствующим образом.
Если используется, модуль без импорта не будет импортирован, и отобразится сообщение об ошибке:
Когда используется, модули без в не будут отображаться:
В обоих случаях параметр switch можно использовать для переопределения этого поведения:
Предупреждение
может показаться успешным для модуля, но использование этого модуля вызывает риск возникновения несовместимости позже; При первоначальной загрузке модуля команда может впоследствии вызвать несовместимый API и завершиться неудачно.
Installing the ZIP package
PowerShell binary ZIP archives are provided to enable advanced deployment scenarios. Download one of
the following ZIP archives from the releases page.
- PowerShell-7.1.4-win-x64.zip
- PowerShell-7.1.4-win-x86.zip
- PowerShell-7.1.4-win-arm64.zip
- PowerShell-7.1.4-win-arm32.zip
Depending on how you download the file you may need to unblock the file using the
cmdlet. Unzip the contents to the location of your choice and run from there. Unlike
installing the MSI packages, installing the ZIP archive doesn’t check for prerequisites. For
remoting over WSMan to work properly, ensure that you’ve met the .
Use this method to install the ARM-based version of PowerShell on computers like the Microsoft
Surface Pro X. For best results, install PowerShell to the to
folder.
Note
You can use this method to install any version of PowerShell including the latest:
- Stable release: https://aka.ms/powershell-release?tag=stable
- Preview release: https://aka.ms/powershell-release?tag=preview
- LTS release: https://aka.ms/powershell-release?tag=lts
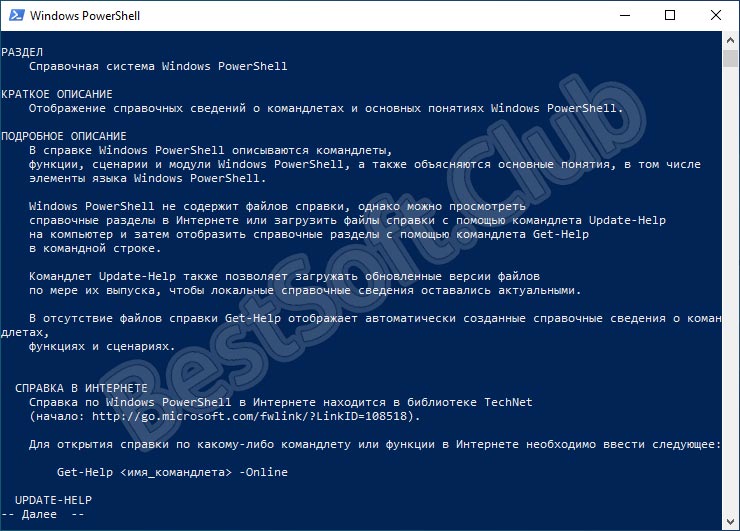
Как пользоваться
Теперь, когда мы разобрались с тем, что же это за программа, давайте идти дальше и смотреть, как ее скачать, а также бесплатно установить для вашего ПК или ноутбука.
Загрузка и установка
Первое, что нужно сделать, это загрузить установочный файл Windows PowerShell. Для любой операционной системы, включая Windows 10, это делается одинаково. А именно:
- Сначала мы переходим к самой конец этой странички и при помощи кнопки, которая там находится, загружаем архив с нужным файлом. После этого распаковываем установочный дистрибутив.
- Запускаем полученный объект и, руководствуясь подсказками, производим установку нашей программы.
- Дожидаемся завершения процесса установки и закрываем инсталлятор.
На этом инструкция по установке улучшенной версии командной строки в Windows 10 завершена. Нам остается лишь кратко рассмотреть, как пользоваться такой программой.
Инструкция по работе
Если вы однажды работали с командной строкой в операционной системе от Microsoft, то понимаете, что весь процесс ее использования сводится к вводу команд и отслеживанию реакции операционной системы на них. Тут все делается точно так же. Алгоритм использования Windows PowerShell выглядит примерно следующим образом:
- Мы запускаем окно программы и вводим ту команду, которую хотим.
- Подтверждаем ввод нажатием кнопки Enter на клавиатуре.
- Дожидаемся завершения процесса, который только что запустили.
- Если нужно, вводим вторую команду и так далее.
Installing the MSI package
The MSI file looks like . For example:
Once downloaded, double-click the installer and follow the prompts.
The installer creates a shortcut in the Windows Start Menu.
- By default the package is installed to
- You can launch PowerShell via the Start Menu or
Note
PowerShell 7.1 installs to a new directory and runs side-by-side with Windows PowerShell 5.1.
PowerShell 7.1 is an in-place upgrade that replaces PowerShell 6.x. or PowerShell 7.0.
- PowerShell 7.1 is installed to
- The folder is added to
- The folder is deleted
If you need to run PowerShell 7.1 side-by-side with other versions, use the
method to install the other version to a different folder.
Administrative install from the command line
MSI packages can be installed from the command line allowing administrators to deploy packages
without user interaction. The MSI package includes the following properties to control the
installation options:
-
ADD_EXPLORER_CONTEXT_MENU_OPENPOWERSHELL — This property controls the option for adding the
Open PowerShell item to the context menu in Windows Explorer. -
ADD_FILE_CONTEXT_MENU_RUNPOWERSHELL — This property controls the option for adding the
Run with PowerShell item to the context menu in Windows Explorer. -
ENABLE_PSREMOTING — This property controls the option for enabling PowerShell remoting during
installation. -
REGISTER_MANIFEST — This property controls the option for registering the Windows Event
Logging manifest.
The following example shows how to silently install PowerShell with all the install options enabled.
For a full list of command-line options for , see
Command line options.
Registry keys created during installation
Beginning in PowerShell 7.1, the MSI package creates registry keys that store the installation
location and version of PowerShell. These values are located in
. The value of
is unique for each build type (release or preview), major version, and architecture.
| Release | Architecture | Registry Key |
|---|---|---|
| 7.1.x Release | x86 | |
| 7.1.x Release | x64 | |
| 7.1.x Preview | x86 | |
| 7.1.x Preview | x64 |
This can be used by administrators and developers to find the path to PowerShell. The
values are the same for all preview and minor version releases. The
values are changed for each major release.
Installing the ZIP package
PowerShell binary ZIP archives are provided to enable advanced deployment scenarios. Download one of
the following ZIP archives from the releases page.
- PowerShell-7.1.4-win-x64.zip
- PowerShell-7.1.4-win-x86.zip
- PowerShell-7.1.4-win-arm64.zip
- PowerShell-7.1.4-win-arm32.zip
Depending on how you download the file you may need to unblock the file using the
cmdlet. Unzip the contents to the location of your choice and run from there. Unlike
installing the MSI packages, installing the ZIP archive doesn’t check for prerequisites. For
remoting over WSMan to work properly, ensure that you’ve met the .
Use this method to install the ARM-based version of PowerShell on computers like the Microsoft
Surface Pro X. For best results, install PowerShell to the to
folder.
Note
You can use this method to install any version of PowerShell including the latest:
- Stable release: https://aka.ms/powershell-release?tag=stable
- Preview release: https://aka.ms/powershell-release?tag=preview
- LTS release: https://aka.ms/powershell-release?tag=lts
Как удалить PowerShell в Windows 10
PowerShell – это функция, которую Windows устанавливает поверх обычной установки. Поэтому, если вы решите удалить его любым из этих методов, он ничего не сломает в Windows 10.
- Удалите как любое другое приложение
- Удалить с помощью функций Windows
- Отключить PowerShell с помощью DISM
Вы можете использовать любой из этих методов для удаления PowerShell.
1]Удалите его, как любое другое приложение.
Как и другие программы, PowerShell можно легко удалить.
Введите PowerShell в поле поиска меню «Пуск». Он покажет все версии PowerShell, то есть PowerShell (x86), PowerShell, PowerShell 7 и другие. Щелкните правой кнопкой мыши любой из них и выберите Удалить. Вы также можете развернуть меню и удалить его.
Единственная версия, которую нельзя удалить, – это PowerShell ISE, также известная как интегрированная среда сценариев Windows PowerShell. Это полезно для разработчиков, которые могут запускать команды и писать, тестировать и отлаживать сценарии в едином графическом пользовательском интерфейсе на основе Windows.
2]Удаление с помощью программы и функций
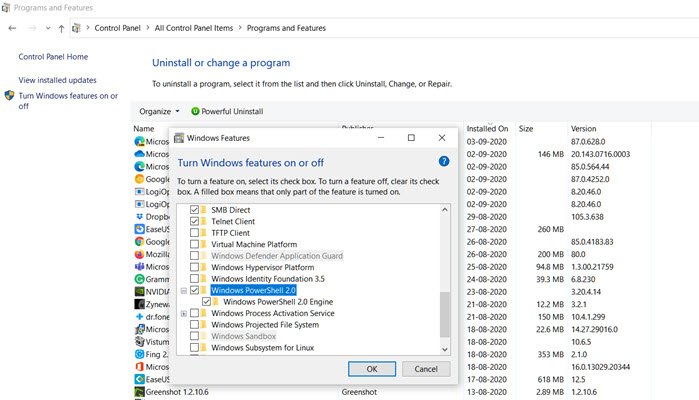
- Тип Контроль в командной строке (Win + R) и нажмите клавишу Enter.
- Найдите и нажмите «Программы и компоненты».
- Затем нажмите ссылку «Включить или отключить функцию Windows» на левой панели.
- Найдите и снимите флажок PowerShell 2.0 в раскрывающемся списке программ.
- Нажмите ОК и дайте программе завершить процесс удаления PowerShell.
3]Отключить PowerShell с помощью DISM
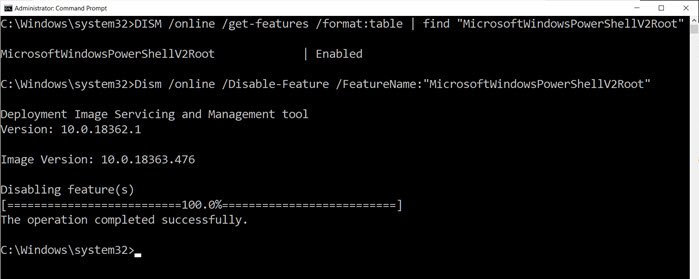
Откройте командную строку с повышенными привилегиями, набрав CMD в строке «Выполнить» (Win + R), а затем нажав Shift + Enter. После запуска введите и выполните команду для проверки.
DISM /online /get-features /format:table | find "MicrosoftWindowsPowerShellV2Root"
Если там написано «Включить», введите следующую команду, чтобы отключить его.
Dism /online /Disable-Feature /FeatureName:"MicrosoftWindowsPowerShellV2Root"
Если вы передумали, вы можете выполнить следующую команду, чтобы снова включить его.
Dism /online /Enable-Feature /FeatureName:"MicrosoftWindowsPowerShellV2Root"
Вот и все.
Пока PowerShell может оставаться сам по себе, и удалять его совсем не обязательно. На самом деле, если вы его оставите, он может когда-нибудь пригодиться. Это инструмент, который вам понадобится для удаления предустановленных приложений. Так что вы можете оставить его себе.
Надеюсь, этот пост помог вам удалить PowerShell с вашего ПК с Windows 10.
Теги: PowerShell, Удалить
7.2.0-preview.6 — 2021-05-27
Note:
- Known issue about some filesystem cmdlets do not work correctly with long paths, such as , and . For details see:
- PSReadLine 2.2.0-beta1 and 2.2.0-beta2 do not work with this preview of PowerShell due to breaking changes in the prediction interface. The upcoming PSReadLine 2.2.0-beta3 release will resolve this. Use PSReadLine 2.1.0 as the temporary workaround.
Performance
- Avoid collecting logs in buffer if a pipeline execution event is not going to be logged ()
- Avoid allocation in () (Thanks @xtqqczze!)
- Replace with to avoid array allocations () (Thanks @xtqqczze!)
- Use instead of () (Thanks @xtqqczze!)
General Cmdlet Updates and Fixes
- Use before initializing CLR to ensure codepage is correct for WinRM remoting () (Thanks @jborean93!)
- Add completions for statements () (Thanks @MartinGC94!)
- Add completions for comment-based help keywords () (Thanks @MartinGC94!)
- Move cross platform DSC code to a PowerShell engine subsystem ()
- Fix progress view to handle activity that is longer than console width ()
- Handle exception if ConsoleHost tries to set cursor out of bounds because screen buffer changed ()
- Fix in DSC ()
- Update to handle colon as a virtual terminal parameter separator ()
- Update the summary comment for () (Thanks @dbaileyut!)
- Remove the unusable alias for the parameter from () (Thanks @kvprasoon!)
- Fix tab completion for un-localized topics () (Thanks @MartinGC94!)
- Remove the unneeded SSH stdio handle workaround ()
- Add API to load assemblies from memory in a native PowerShell host () (Thanks @awakecoding!)
- Re-implement OneDrive support () (Thanks @iSazonov!)
- Kill native processes in pipeline when pipeline is disposed on Unix ()
- Default to MTA on Windows platforms where STA is not supported ()
Code Cleanup
We thank the following contributors!
@xtqqczze, @powercode, @bcwood
- Enable in some classes (, , , , , , , , , , , , ) (Thanks @powercode!)
- Annotate with attribute () (Thanks @powercode!)
- Use for nullable () (Thanks @bcwood!)
- Enable : Opening parenthesis should be spaced correctly () (Thanks @xtqqczze!)
Tests
- Enable cross-runtime benchmarking to compare different .NET runtimes () (Thanks @adamsitnik!)
- Add the performance benchmark project for PowerShell performance testing ()
Build and Packaging Improvements
Update .NET to version
- Suppress prompting when uploading the package to blob ()
- Update to .NET preview 4 SDK ()
- Update with newer OS version to allow PowerShell installed from Windows Store to make system-level changes ()
- Ensure the build works when module is pulled in from PSGallery ()
- Make sure daily release tag does not change when retrying failures ()
- Improve messages and behavior when there’s a problem in finding zip files ()
Long description
The statement (also known as a loop) is a language construct you
can use to create a loop that runs commands in a command block while a
specified condition evaluates to .
A typical use of the loop is to iterate an array of values and to operate
on a subset of these values. In most cases, if you want to iterate all the
values in an array, consider using a statement.
Syntax
The following shows the statement syntax.
The Init placeholder represents one or more commands that are run before
the loop begins. You typically use the Init portion of the statement to
create and initialize a variable with a starting value.
This variable will then be the basis for the condition to be tested in the next
portion of the statement.
The Condition placeholder represents the portion of the statement
that resolves to a or Boolean value. PowerShell evaluates
the condition each time the loop runs. If the statement is , the
commands in the command block run, and the statement is evaluated again. If the
condition is still , the commands in the Statement list run again.
The loop is repeated until the condition becomes .
The Repeat placeholder represents one or more commands, separated by
commas, that are executed each time the loop repeats. Typically, this is used
to modify a variable that is tested inside the Condition part of the
statement.
The Statement list placeholder represents a set of one or more commands
that are run each time the loop is entered or repeated. The contents of the
Statement list are surrounded by braces.
Support for multiple operations
The following syntaxes are supported for multiple assignment operations in the
Init statement:
The following syntaxes are supported for multiple assignment operations in the
Repeat statement:
Note
Operations other than pre or post increment may not work with all syntaxes.
For multiple Conditions use logical operators as demonstrated by the
following example.
For more information, see about_Logical_Operators.
Examples
At a minimum, a statement requires the parenthesis surrounding the
Init, Condition, and Repeat part of the statement and a command
surrounded by braces in the Statement list part of the statement.
Note that the upcoming examples intentionally show code outside the
statement. In later examples, code is integrated into the statement.
For example, the following statement continually displays the value of
the variable until you manually break out of the command by pressing
CTRL+C.
You can add additional commands to the statement list so that the value of
is incremented by 1 each time the loop is run, as the following example shows.
Until you break out of the command by pressing CTRL+C, this statement will
continually display the value of the variable as it is incremented by 1
each time the loop is run.
Rather than change the value of the variable in the statement list part of the
statement, you can use the Repeat portion of the statement
instead, as follows.
This statement will still repeat indefinitely until you break out of the
command by pressing CTRL+C.
You can terminate the loop using a condition. You can place a
condition using the Condition portion of the statement. The
loop terminates when the condition evaluates to .
In the following example, the loop runs while the value of is less
than or equal to 10.
Instead of creating and initializing the variable outside the statement,
you can perform this task inside the loop by using the Init portion
of the statement.
You can use carriage returns instead of semicolons to delimit the Init,
Condition, and Repeat portions of the statement. The following
example shows a that uses this alternative syntax.
This alternative form of the statement works in PowerShell script files
and at the PowerShell command prompt. However, it is easier to use the
statement syntax with semicolons when you enter interactive commands at the
command prompt.
The loop is more flexible than the loop because it allows you
to increment values in an array or collection by using patterns. In the
following example, the variable is incremented by 2 in the Repeat
portion of the statement.
The loop can also be written on one line as in the following example.
Запуск 32-разрядной версии Windows PowerShell
При установке Windows PowerShell на 64-разрядном компьютере в дополнение к 64-разрядной версии устанавливается Windows PowerShell (x86) — 32-разрядная версия Windows PowerShell. При открытии Windows PowerShell по умолчанию запускается 64-разрядная версия.
Однако в некоторых случаях нужно запустить Windows PowerShell (x86), например при использовании модуля, которому требуется 32-разрядная версия, или при удаленном подключении к 32-разрядному компьютеру.
Для запуска 32-разрядной версии Windows PowerShell воспользуйтесь любой из следующих процедур.
В Windows Server 2012 R2
- На экране Пуск щелкните Windows PowerShell (x86). Щелкните плитку Windows PowerShell x86.
- Выберите пункт Windows PowerShell (x86) в меню Сервис****диспетчера сервера.
- На рабочем столе переместите курсор в правый верхний угол, щелкните элемент Поиск, введите PowerShell x86 и выберите Windows PowerShell (x86) .
- В командной строке введите следующее:
В Windows Server 2012
- На экране Пуск введите PowerShell и выберите Windows PowerShell (x86).
- Выберите пункт Windows PowerShell (x86) в меню Сервис****диспетчера сервера.
- На рабочем столе переместите курсор в правый верхний угол, щелкните элемент Поиск, введите PowerShell и выберите Windows PowerShell (x86) .
- В командной строке введите следующее:
- На экране Пуск щелкните Windows PowerShell (x86). Щелкните плитку Windows PowerShell x86.
- Если вы используете средства удаленного администрирования сервера для Windows 8.1, можно также открыть Windows PowerShell x86 из меню Сервис диспетчера сервера. Выберите Windows PowerShell (x86).
- На рабочем столе переместите курсор в правый верхний угол, щелкните элемент Поиск, введите PowerShell x86 и выберите Windows PowerShell (x86) .
- В командной строке введите следующее:
Installing from the Microsoft Store
PowerShell 7.1 has been published to the Microsoft Store. You can find the PowerShell release on the
Microsoft Store website or in the
Store application in Windows.
Benefits of the Microsoft Store package:
- Automatic updates built right into Windows 10
- Integrates with other software distribution mechanisms like Intune and SCCM
Limitations:
Windows Store packages run in an application sandbox that virtualizes access to some filesystem and
registry locations.
- All registry changes under HKEY_CURRENT_USER are copied on write to a private, per-user, per-app
location. Therefore, those values are not available to other applications. - Any system-level configuration settings stored in cannot be modified. This includes the
WSMAN configuration. This prevents remote sessions from connecting to Store-based installs of
PowerShell. User-level configurations and SSH remoting are supported.
For more information, see
Understanding how packaged desktop apps run on Windows.
Требования к операционной системе
Windows PowerShell 5.1
Windows PowerShell 5.1 выполняется в следующих версиях Windows: Для запуска Windows PowerShell 5.1 установите Windows Management Framework 5.1. Дополнительные сведения см. в статье Установка и настройка WMF 5.1.
| Версия Windows | Требования к системе |
|---|---|
| Windows Server 2019 | Устанавливается по умолчанию |
| Windows Server 2016 | Устанавливается по умолчанию |
| Windows Server 2012 R2 | Установите Windows Management Framework 5.1 |
| Windows Server 2012 | Установите Windows Management Framework 5.1 |
| Windows Server 2008 R2 с пакетом обновления 1 (SP1) | Установите Windows Management Framework 5.1 |
| Windows 10 версии 1607 и выше | Устанавливается по умолчанию |
| Windows 10 версии 1507, 1511 | Установите Windows Management Framework 5.1 |
| Windows 8.1 | Установите Windows Management Framework 5.1 |
| Windows 7 с пакетом обновления 1 (SP1) | Установите Windows Management Framework 5.1 |
Windows PowerShell 5.0
Windows PowerShell 5.0 работает в следующих версиях Windows. Для запуска Windows PowerShell 5.0 установите Windows Management Framework 5.1. Дополнительные сведения см. в статье Установка и настройка WMF 5.1. Windows Management Framework 5.1 заменяет Windows Management Framework 5.0.
| Версия Windows | Требования к системе |
|---|---|
| Windows Server 2019 | Более поздняя версия устанавливается по умолчанию |
| Windows Server 2016 | Более поздняя версия устанавливается по умолчанию |
| Windows Server 2012 R2 | Установите Windows Management Framework 5.1 |
| Windows Server 2012 | Установите Windows Management Framework 5.1 |
| Windows Server 2008 R2 с пакетом обновления 1 (SP1) | Установите Windows Management Framework 5.1 |
| Windows 10 версии 1607 и выше | Более поздняя версия устанавливается по умолчанию |
| Windows 10 версии 1507, 1511 | Устанавливается по умолчанию |
| Windows 8.1 | Установите Windows Management Framework 5.1 |
| Windows 7 с пакетом обновления 1 (SP1) | Установите Windows Management Framework 5.1 |
Windows PowerShell 4.0
Windows PowerShell 4.0 выполняется в следующих версиях Windows: Чтобы запустить Windows PowerShell 4.0, установите указанную версию Windows Management Framework для вашей операционной системы.
| Версия Windows | Требования к системе |
|---|---|
| Windows 8.1 | Устанавливается по умолчанию |
| Windows Server 2012 R2 | Устанавливается по умолчанию |
| Windows 7 с пакетом обновления 1 (SP1) | Установите Windows Management Framework 4.0 |
| Windows Server 2008 R2 с пакетом обновления 1 (SP1) | Установите Windows Management Framework 4.0 |
Windows PowerShell 3.0
Windows PowerShell 3.0 выполняется в следующих версиях Windows: Чтобы запустить Windows PowerShell 3.0, установите указанную версию Windows Management Framework для вашей операционной системы.
| Версия Windows | Требования к системе |
|---|---|
| Windows 8 | Устанавливается по умолчанию |
| Windows Server 2012 | Устанавливается по умолчанию |
| Windows 7 с пакетом обновления 1 (SP1) | Установите Windows Management Framework 3.0 |
| Windows Server 2008 R2 с пакетом обновления 1 (SP1) | Установите Windows Management Framework 3.0 |
| Windows Server 2008 с пакетом обновления 2 (SP2) | Установите Windows Management Framework 3.0 |
Что такое Windows PowerShell
Как следует из названия, Windows PowerShell – это оболочка командной строки. Она была разработана специально для использования системными администраторами и может использоваться для выполнения всех команд cmd.exe.
PowerShell позволяет вам взаимодействовать с операционной системой, используя преимущества инструментов, доступных из командной строки, и используя возможности программирования сценариев для автоматизации рутинной работы.
Давайте подробно рассмотрим, какие функции и преимущества предлагает эта оболочка от Microsoft:
- Интеграция с Microsoft .NET Framework. NET Framework – это среда управляемого выполнения для Windows, предоставляющая широкий спектр сервисов для запуска приложений. Команды сценариев PowerShell имеют доступ к ресурсам .NET Framework.
- Объектно-ориентированный. В отличие от большинства оболочек, которые принимают и возвращают чистый текст, все команды PowerShell, генерирующие выходные данные, возвращают объекты .NET Framework, устраняя необходимость разбора текста в случае, если выходные данные команды нужны для последующей команды.
- Command-Let. Windows PowerShell представляет концепцию command-let или cmdlet, инструмента командной строки с единственной функцией, встроенной в оболочку. Доступно более ста системных командлетов. Кроме того, вы можете писать собственные командлеты и делиться ими с другими пользователями. Каждый командлет может использоваться отдельно или в сочетании с другими для выполнения сложных задач.
- Предназначен для системных администраторов. PowerShell включает функции, предназначенные для системных администраторов, такие как возможность работы на удаленных компьютерах, доступ к реестру Windows и запуск или остановка служб.
Installation of latest preview release via Homebrew on macOS 10.13 or higher
After you’ve installed Homebrew, you can install PowerShell. First, install the Cask-Versions
package that lets you install alternative versions of cask packages:
Now, you can install PowerShell:
Finally, verify that your install is working properly:
When new versions of PowerShell are released, update Homebrew’s formulae and upgrade PowerShell:
Note
The commands above can be called from within a PowerShell (pwsh) host,
but then the PowerShell shell must be exited and restarted to complete the upgrade.
and refresh the values shown in .
Installing PowerShell using the Homebrew tap method is also supported for stable and LTS versions.
You can now verify your install
When new versions of PowerShell are released, simply run the following command.
Note
Whether you use the cask or the tap method, when updating to a newer version of PowerShell, use
the same method you used to initially install PowerShell. If you use a different method, opening a
new pwsh session will continue to use the older version of PowerShell.
If you do decide to use different methods, there are ways to correct the issue using the
.