Geek uninstaller
Содержание:
- How to Download and Install the Clash of Clans Mod APK?
- Download Geek Uninstaller
- Как обновить прошивку Андроид самостоятельно
- GeekUninstaller
- Clash of Clans Mod APK Features & Installation Review:
- Удаление программ в GeekUninstaller
- Plans and pricing
- Geek Uninstaller для удаления ненужных программ
- Final verdict
- Possible problems when you uninstall Geek Uninstaller
- Interface and in use
- Method 1: Uninstall Geek Uninstaller via Programs and Features.
- Geek Uninstaller
- How to Uninstall Geek Uninstaller Completley?
- Method 1: Uninstall Geek Uninstaller via Programs and Features.
- Method 2: Uninstall Geek Uninstaller with its uninstaller.exe.
- Method 3: Uninstall Geek Uninstaller via System Restore.
- Method 4: Uninstall Geek Uninstaller with Antivirus.
- Method 5: Reinstall Geek Uninstaller to Uninstall.
- Method 6: Use the Uninstall Command Displayed in the Registry.
- Features of MOD APK Clash of Clans
How to Download and Install the Clash of Clans Mod APK?
Since this mod requires no root, the set up process can be reasonably easy. However, there are nonetheless individuals who don’t learn about putting in them so here’s a process concerned:
- Get the Free Clash of Clans Mod APK from our web site.
- Make positive your Android OS is updated.
- Now, open the settings in your telephone after which the safety settings.
- Enable the unknown supply choice.
- Uninstall the earlier model of Clash of Clans out of your telephone.
- Now set up this mod and luxuriate in a complete new expertise!
If you wish to have another heavier mods to reinforce the graphics, gameplay, and personal server efficiency, you will want to get different mods. Those mods, nonetheless, require your telephone to be rooted. Here is an easy technique utilizing which you’ll merely root your telephone.
- Make positive that you’ve backed up all of your knowledge.
- There should a minimum of be 30% battery backup in your telephone.
- The finest one-touch root app is King Root so obtain it
- After putting in the app, open it and begin the rooting course of.
- This will take some minutes and your telephone shall be rooted.
- After the telephone has began, now you can set up the mod.
Overall, all of these mods carry a easy expertise. Also, while you’re getting all of the assets without cost, this protects rather a lot of your time. These issues exist and we let you know about them in any other case, we help solely the correct method of taking part in a recreation as a result of solely then you’ll be able to benefit from the true expertise which Clash of Clans has the potential to carry.
Download Geek Uninstaller
Geek Uninstaller is a simple tool to effectively remove from Windows installed programs, games, drivers, and Windows Store Apps. Moreover, Geek Uninstaller scans your system for files and registry entries left behind by the built-in uninstaller.
Geek Uninstaller displays a list of all installed components in your system. It is packed with a very useful search function and allows you to sort items according to categories like program name, size, and date of installation.
In addition, the uninstall program displays the sum of all the installed programs and the amount of space used by them on the hard disk. You can also export the list of software installed on the system to HTML format. You can also Uninstall Windows Store apps on Windows 8/8.1/10 using Geek Uninstaller.
Performs deep and fast scanning and removes all leftovers. GeekUninstaller offers also the option to remove the software from the list without actually uninstalling the position from the system.
Geek Uninstaller can search and display the system registry entries associated with the indicated item, open the folder where the application is installed and search for information concerning selected program on the Internet. There is also a list of recently installed and modified programs.
Use Force Removal for stubborn and broken programs. Geek Uninstaller allows you to run the default method to uninstall the applications, as well as use forced removal option of specified items. Standard removal program leaves tons of leftovers on your PC.
Geek Uninstaller performs deep and fast scanning afterward and removes all leftovers. You can also uninstall Windows Store apps. Use View menu or Ctrl+Tab to switch between desktop and store apps.
This is my favorite tool to uninstall software on Windows. It offers basic features but, in my opinion, the option it offers are good enough for most users. Geek Uninstaller works extremely fast, and you can run default uninstaller that comes with an app. After the uninstallation will complete, Geek Uninstaller will run it’s algorithms to find files, folders, and registry leftovers.
You can then decide what to delete. GeekUninstaller can also help you to remove Windows Store Apps bundled with systems like Paint 3D, Skype, Maps, People, Calculator, Camera, Microsoft Store, etc. GeekUninstaller download contains a portable version that doesn’t require installation. It works with Windows 32- and 64-bit.
Clean Removal, Force Removal
Standard removal program leaves tons of leftovers in the system. GeekUninstaller performs deep and fast scanning to delete all leftovers. You can use the Uninstall option or Force Removal. Start with the Uninstall option and GeekUninstaller will use the built-in uninstaller and next it will search for leftovers on disk and registry.
Uninstall Windows Store Apps
To uninstall Windows Store Apps from Windows 8, Windows 8.1, or Windows 10 navigate to View menu in GeekUninstaller and select Windows Store Apps. You can switch between store apps, and desktop using keyboard shortcut Ctrl+Tab.
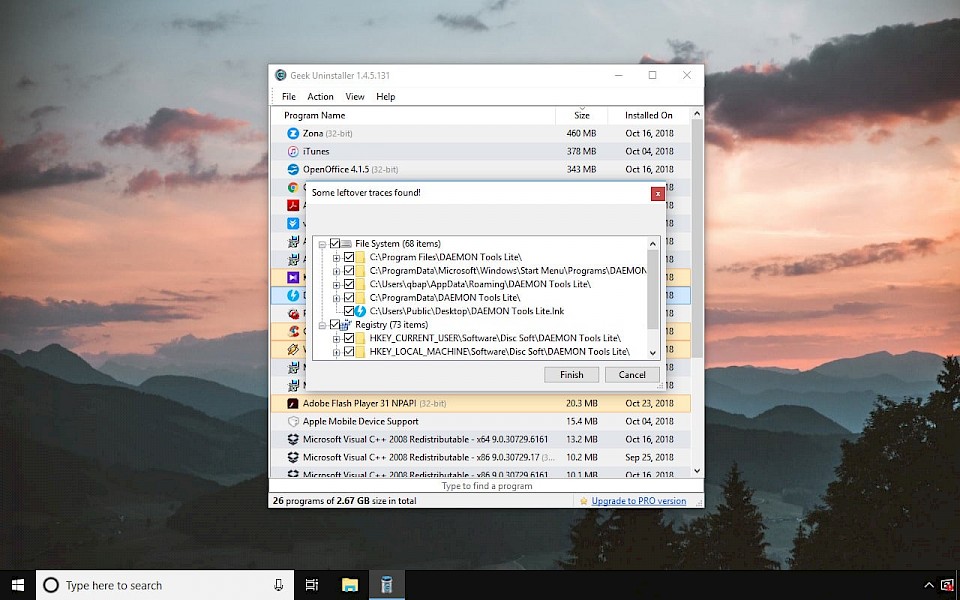
How to remove programs with Geek Uninstaller
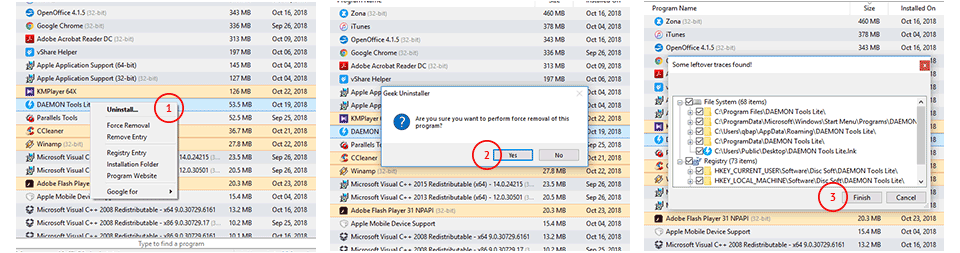
Step 1. Select a program to uninstall by right mouse click on the name, and click Uninstall.
Step 2. Proceed with procedures displayed on the screen.
Step 3. Review detected file and registry items leftovers and click Finish.
Как обновить прошивку Андроид самостоятельно
Автоматическая переустановка
Настроить автоматическую оптимизацию прошивки ОС получится самостоятельно, следуя следующим пунктам инструкции:
- Проверить подключение к интернету, зайти в раздел «Настройки», на пункте автообновление установить галочку.
- Чтобы ОС мобильного телефона обновлялось в автоматическом режиме и не через трафик оператора, а по каналу беспроводной связи Wi-Fi, следует активировать этот пункт в настройках.
Обновление вручную через компьютер
Более трудоемкий и требующий серьезного подхода к процессу – это обновление вручную с использованием ноутбука или компьютера. Пользователь должен хорошо разбираться в этом вопросе, ведь от этого зависит дальнейшая работа мобильного телефона, поскольку не исключен вариант, что он просто не включиться. Для тех, кто уверен в своих силах, стоит придерживаться следующего алгоритма:
- Проверить ваш гаджет на возможности обновления, поскольку есть вероятность, что это вообще недоступно, как для устройств на основе Андроид версии 2.3.
- Скачать прошивку, которая подходит для конкретного телефона, с официального сайта либо в Play Market’е (плей маркет) на компьютер.
- Открыть на ПК программу обновления, и, следуя инструкции, запустить ее.
- Подключить мобильное устройство к компьютеру с помощью USB-провода, согласиться с запросом на установку обновлений.
- По ее завершению произвести перезагрузку телефона, чтобы полностью выполнить обновление вручную.
GeekUninstaller
GeekUninstaller — это очень удобная, небольшая, а главное эффективная утилита для корректной деинсталляции программ в среде ОС Windows. Данная утилита распространяется в виде переносной версии и не требует установки в систему. GeekUninstaller будет оптимальным решением для быстрого, а главного правильного удаления программ. Почему же стоит лучше воспользоваться этой утилитой, а не скажем, к примеру, стандартным средством удаления программ Windows или не воспользоваться для этих целей утилитами по очистке и настройке системы, такими как CCleaner или Glary Utilities, имеющими инструменты для деинсталляции приложений.
Тут надо отметить, что после установки игр и любого софта (если конечно это не portable-версии программ, не требующие установки), операционная система подвергается различным изменениям, а именно: с каждой установленной программой создаются новые файлы и папки приложений, появляются новые записи в системном реестре Windows и так далее.
Часто мы устанавливаем и удаляем компьютерные игры и софт, не задумываясь о том, как может сказаться частая установка\удаление на производительность ПК в целом. Наверное, каждый пользователь замечал, что на новом компьютере или сразу после установки (переустановки) Windows, ноутбук или компьютер работают особенно хорошо, быстро, в общем, без нареканий, а вот со временем ПК ведет себя все хуже и хуже, начинает тормозить, глючить и доставляет прочие неудобства.
Как уже отмечалось выше, в процессе установки, создаются новые файлы и папки, вносятся данные в реестр и так далее, а после того как мы что-то удалили, на самом деле остается достаточно много хвостов от казалось бы удаленной программы. Это в свою очередь приводит к захламлению жесткого диска, и сказывается не в лучшую сторону на работе компьютера.
Деинсталляция приложений даже инструментами, которые имеются в специальных программах, не говоря уже о стандартных средствах windows, не будет в этом случае тем решением, которое позволит полностью избавиться от остающегося мусора при удалении. А вот небольшая утилита GeekUninstaller, как раз предназначена для удаления программ, не оставляя хвостов, тем самым позволяя поддерживать производительность системы на должном высоком уровне.
Запускается geekuninstaller практически мгновенно, быстро и на отлично справляется со своим предназначением по деинсталляции программ, имеет русский интерфейс и ко всему прочему не требует установки.
Скачать GeekUninstaller бесплатно, без регистрации.
Clash of Clans Mod APK Features & Installation Review:
There are tens of millions on the market who love the Clash of Clans. While it’s been years because the launch of the sport, it’s nonetheless joined by tens of millions of gamers. The recreation wants you to begin from the scrap, collect your assets, and construct up a clan to combat billions of others. Also, you is usually a half of some greater clans within the recreation to develop a lot quicker than you may do alone. While gathering the assets and constructing all the pieces takes time, a Clash of Clans mod can save your time by bringing all of these things without cost.
Yes, there are lots of mods which you may get for Clash of Clans utilizing which you may get rather a lot of assets without cost. The assets that are current within the recreation and also you want for constructing issues up embody gold, elixir, and gems. Now whereas these assets may be mined within the recreation, it takes rather a lot of time and thus utilizing the mods makes the stuff simpler. You can their rapidly improve your troops and buildings to progress quicker within the recreation.
The benefit of most of the mods is that they’re fully innocent and don’t carry any unfavourable change to the gameplay. In reality, utilizing these mods can open up the world of utilizing non-public servers which many of the gamers need. Playing on the non-public servers has its advantages and if you end up additionally powered by the mods, destroying the opposite conflict shall be a lot simpler. You shall be much more highly effective and solely slightly technique shall be required.
The gameplay of the Clash of Clans stays in the end the identical. In reality, there are some mods which might make the expertise smoother. The Clash of Clans Mod APK we’re bringing doesn’t carry any important change within the gameplay or graphics. But, additionally it is true that it requires no root to run easily in your gadget. There are many mods which might change the graphics and gameplay rather a lot however then these have some particular necessities.
We shall now enlist some of the highest options on our newest Clash of Clans mod:
- This mod is approaching to your gadgets for fully free.
- The bugs current within the earlier model have been fastened.
- It smoothens the gameplay rather a lot and even non-public server expertise.
- All the assets together with the elixir, gems, and gold are free.
- Not simply free however you might be getting a limiteless provide of them.
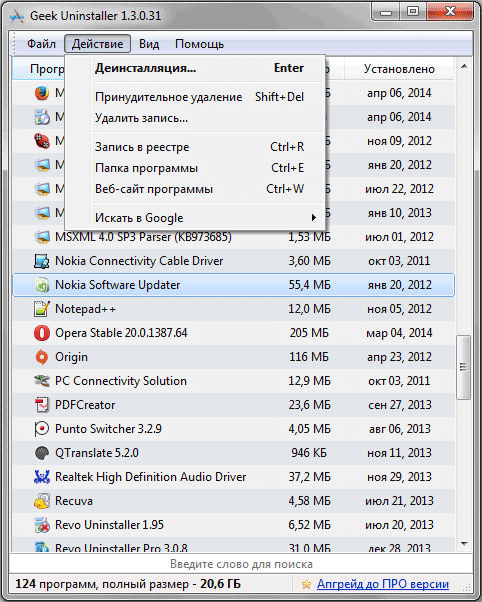
Удаление программ в GeekUninstaller
Для запуска процесса удаления какой-либо программы, сначала необходимо будет выделить данную удаляемую программу в списке программ. После этого, нужно будет войти в меню «Действие», а затем выбрать пункт контекстного меню «Деинсталляция…», или нажать для запуска процесса удаления на кнопку клавиатуры «Enter».
Открывать контекстное меню можно также при помощи правой кнопки мыши. При удалении некоторых программ, в контекстном меню может появиться еще один дополнительный пункт «Изменить…».
В программе Geek Uninstaller, в этом случае, будет два режима удаления:
- «Деинсталляция…» — программа будет удалена при помощи установщика Windows.
- «Изменить…» — программа будет удалена при помощи штатного деинсталлятора.
Далее запускается встроенный деинсталлятор удаляемой программы. У разных программ встроенный интерфейс деинсталлятора имеет свой собственный, отличающейся от других, вид, и в зависимости от программы, язык интерфейса может быть не только на русском, но и на английском языке.
После запуска, встроенный в удаляемую программу штатный деинсталлятор удаляет программу с компьютера.
После завершения процесса удаления, Geek Uninstaller просканирует систему на наличие оставшихся на компьютере данных от удаленной программы.
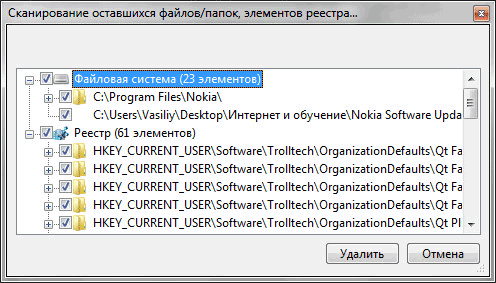
Далее будет открыто окно «Сканирование оставшихся файлов/папок, элементов реестра…». В этом окне будут отображены найденные программой данные. Для удаления найденных данных с компьютера, нажмите на кнопку «Удалить».
Затем откроется окно «Все остатки программы удалены», с сообщение об удалении остатков программы. Нажмите в этом окне на кнопку «Закрыть».
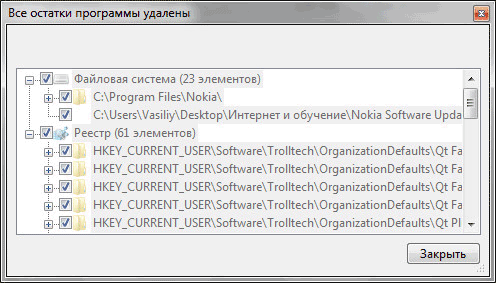
Все, данная программа была полностью удалена с вашего компьютера.
Кроме того, в программе деинсталляторе Geek Uninstaller есть другие дополнительные инструменты для выполнения других необходимых действий. К этим дополнительным возможностям можно получить доступ из меню «Действие».
Дополнительные функции контекстного меню программы GeekUninstaller:
- «Принудительная деинсталляция» — в таком режиме удаляется программа, если не получается удалить программу обычным способом.
- «Удалить запись…» — удаляется запись о программе, сама программа не удаляется с компьютера.
- «Запись в реестре» — можно будет посмотреть на запись в реестре, которая относится к этой программе.
- «Папка программы» — будет открыта папка с программой.
- «Веб-сайт программы» — вы можете посетить веб-сайт программы.
- «Искать в Google» — вы можете поискать информацию о программе в поисковой системе Google.
Эти действия также можно будет совершать при помощи соответствующих клавиш на клавиатуре.
Вам также может быть интересно:
- Лучшие деинсталляторы — программы для удаления программ
- Uninstall Tool — удаление ненужных программ
Plans and pricing
As mentioned, you don’t have to spend any money to use Geek Uninstaller. The platform is completely free for personal use and supports Windows 10, along with Windows 7, 8, 8.1, Vista, XP, 2003, and 2008. That said, free users don’t get access to any tech support.
If you want to get more out of the application, you can pay a one-time fee for a lifetime license. Licenses cost $24.95 for a single user and a single device or $39.95 for a portable license that covers a single user on multiple devices. If you upgrade to Pro, you can monitor installations in real time, access batch removal and “thorough and complete” removal, manage startup programs, and take advantage of an updated interface.
You can activate the program with a flash drive, so users with portable licenses can utilize Geek Uninstaller on multiple devices at the same time. Minor updates are completely free, while major updates come with a 50% discount for existing customers.
Geek makes uninstalling simple by automatically checking for native uninstall tools (Image credit: Geek Uninstaller)
Geek Uninstaller для удаления ненужных программ
Бесплатная программа Geek Uninstaller предназначена для деинсталляции других установленных программ с компьютера пользователя. Программа имеет небольшой размер и быстро выполняет свои непосредственные функции.
Одной из особенностей этой программы, является то, что программа Geek Uninstaller не требует установки на компьютер. GeekUninstaller — переносная (portable) программа, она может запускаться с любого удобного места.
Вы может поместить папку с программой в удобное для вас место, например, на флешку, а потом запустить оттуда программу деинсталлятор.
У бесплатной программы Geek Uninstaller есть платная версия Geek Uninstaller Pro, которая, на самом деле, является программой Uninstall Tool.
Программа GeekUninstaller работает в операционной системе Windows. В программе поддерживается разрядность операционных систем x86 и x64. В Geek Uninstaller реализована поддержка большого количества языков, в том числе и русского.
Скачать Geek Uninstaller
После скачивания архива на компьютер, вам нужно будет распаковать его архиватором. После открытия папки с программой, запускаете файл «geek» для открытия программы.
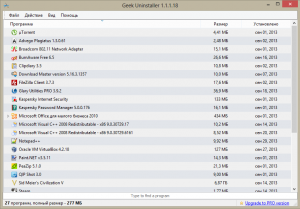
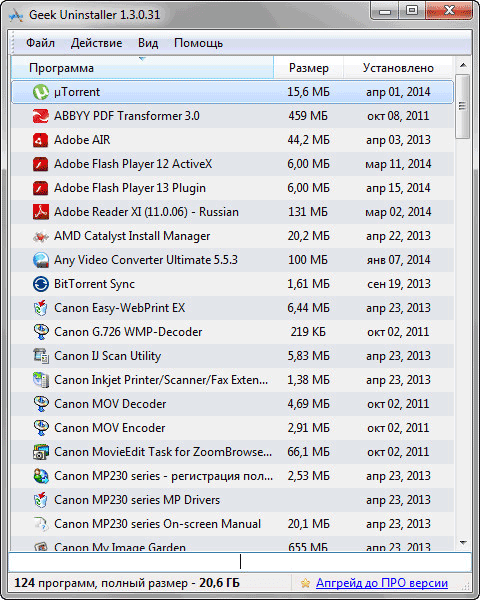
Далее откроется главное окно «Geek Uninstaller». Сама программа имеет лаконичный интерфейс. Сверху находится панель меню, а ниже располагается список программ, с данными об их названии, размере на диске, и времени установки на компьютер.
Далее расположено поле «поиск», с помощью которого можно будет осуществлять поиск программ.
В нижней части окна находится информацию о том, сколько программ, в данный момент, установлено на компьютере, а также занимаемый установленными программами размер места на диске.
Final verdict
Geek Uninstaller is a relatively basic app, but it has everything you need to uninstall programs on Windows 10 or an earlier release, such as XP, Vista, 7, or 8. You can always upgrade to Pro if you need more features, but you’re likely better off looking for applications like Bulk Crap Uninstaller that offer the same tools for free.
With that in mind, we can confidently recommend Geek Uninstaller to any Windows user. With a download size of just 2.5 MB, it’s a convenient and reliable option that’s accessible enough for novices, experienced users, and everyone in between.
Synopsis: In our Geek Uninstaller review, we examine the pros and cons of the application and how it compares to other top Windows uninstallers.
We’ve also highlighted the best free software uninstallers
Possible problems when you uninstall Geek Uninstaller
* Geek Uninstaller is not listed in Programs and Features.
* You do not have sufficient access to uninstall Geek Uninstaller.
* A file required for this uninstallation to complete could not be run.
* An error has occurred. Not all of the files were successfully uninstalled.
* Another process that is using the file stops Geek Uninstaller being uninstalled.
* Files and folders of Geek Uninstaller can be found in the hard disk after the uninstallation.
Geek Uninstaller cannot be uninstalled due to many other problems. An incomplete uninstallation of Geek Uninstaller may also cause many problems. So, it’s really important to completely uninstall Geek Uninstaller and remove all of its files.
Interface and in use
Once you download, install, and open the program, you’ll be shown a list of apps that are currently installed on your computer. Geek’s design looks similar to many Windows apps, so it should fit well with any other platforms that you’ve installed. It looks a little basic at first, but it has everything you need to uninstall applications and complete certain additional actions.
After right-clicking on a particular application, you’ll have the choice to uninstall it or simply remove its entry from the Geek list of programs. If the basic uninstall option doesn’t work as intended, you can also click Force Removal to ensure that the platform is completely wiped from your device.
Other options in the drop-down menu include viewing the entry in the Windows Registry, opening its installation folder, visiting its website, or entering the name into Google. All things considered, Geek is extremely easy to use and compares favorably with other popular uninstallers.
Even clicking “help” in the application simply leads to the platform’s home page (Image credit: Geek Uninstaller)
Method 1: Uninstall Geek Uninstaller via Programs and Features.
When a new piece of program is installed on your system, that program is added to the list in Programs and Features. When you want to uninstall the program, you can go to the Programs and Features to uninstall it. So when you want to uninstall Geek Uninstaller, the first solution is to uninstall it via Programs and Features.
Steps:
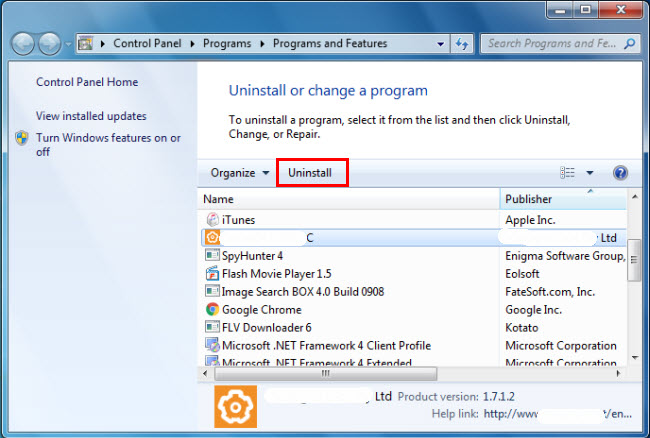
a. Open Programs and Features.
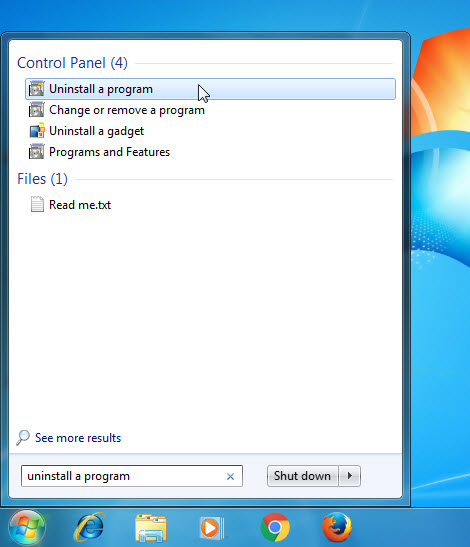
Windows Vista and Windows 7
Click Start, type uninstall a program in the Search programs and files box and then click the result.
Windows 8, Windows 8.1 and Windows 10
Open WinX menu by holding Windows and X keys together, and then click Programs and Features.
Geek Uninstaller
Geek Uninstaller — несложный инструмент для полного удаления сторонних программ, установленных в операционной системе Windows
От стандартного способа удаления, программа отличается повышенным вниманием к файлам, которые остаются после удаления. Это могут быть как части самой программы, так и различные журналы событий и прочие остатки деятельности приложения
Позволяет удалять программы, сканируя систему на наличие остатков, которые могут оставаться после удаления. Важным достоинством является возможность удаления программ в сложных случаях. Это, например, принудительное удаление тех программ, разработчики которых специально затрудняют деинсталляцию своих приложений, желая насильно привязать пользователей к своему софту. Также удаляются программы, удаление которых просто-напросто сломалось — например, после неудачной попытки удаления или в сложных ситуациях, когда софт устанавливает в систему сложные драйверы, которые, впоследствии, были каким то образом утрачены.
Geek Uninstaller разделен на 2 раздела: удаление обычных программ и приложений, установленных из Windows Store. Это еще одно удобство, которое понравится многим пользователям.
Программа отличается очень простым интерфейсом и высокой скоростью работы. Там нет никаких сложных функций и опций, которые могут нагрузить систему или запутать пользователя — все просто, быстро и наглядно. А еще, Geek Uninstaller работает без необходимости установки в системе и может работать с флэшки.
How to Uninstall Geek Uninstaller Completley?
Method 1: Uninstall Geek Uninstaller via Programs and Features.
When a new piece of program is installed on your system, that program is added to the list in Programs and Features. When you want to uninstall the program, you can go to the Programs and Features to uninstall it. So when you want to uninstall Geek Uninstaller, the first solution is to uninstall it via Programs and Features.
Steps:
a. Open Programs and Features.
Windows Vista and Windows 7
Click Start, type uninstall a program in the Search programs and files box and then click the result.
Windows 8, Windows 8.1 and Windows 10
Open WinX menu by holding Windows and X keys together, and then click Programs and Features.
Method 2: Uninstall Geek Uninstaller with its uninstaller.exe.
Most of computer programs have an executable file named uninst000.exe or uninstall.exe or something along these lines. You can find this files in the installation folder of Geek Uninstaller.
Steps:
c. Double click on its uninstaller and follow the wizard to uninstall Geek Uninstaller.
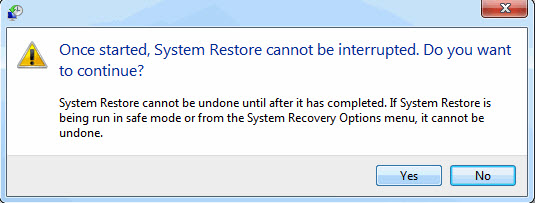
Method 3: Uninstall Geek Uninstaller via System Restore.
System Restore is a utility which comes with Windows operating systems and helps computer users restore the system to a previous state and remove programs interfering with the operation of the computer. If you have created a system restore point prior to installing a program, then you can use System Restore to restore your system and completely eradicate the unwanted programs like Geek Uninstaller. You should backup your personal files and data before doing a System Restore.
Steps:
h. Click Yes to confirm again.
Method 4: Uninstall Geek Uninstaller with Antivirus.
Nowadays, computer malware appear like common computer applications but they are much more difficult to remove from the computer. Such malware get into the computer with the help of Trojans and spyware. Other computer malware like adware programs or potentially unwanted programs are also very difficult to remove. They usually get installed on your system by bundling with freeware software like video recording, games or PDF convertors. They can easily bypass the detection of the antivirus programs on your system. If you cannot remove Geek Uninstaller like other programs, then it’s worth checking whether it’s a malware or not. Click and download this malware detect tool for a free scan.
Method 5: Reinstall Geek Uninstaller to Uninstall.
When the file required to uninstall Geek Uninstaller is corrupted or missing, it will not be able to uninstall the program. In such circumstance, reinstalling Geek Uninstaller may do the trick. Run the installer either in the original disk or the download file to reinstall the program again. Sometimes, the installer may allow you to repair or uninstall the program as well.
Method 6: Use the Uninstall Command Displayed in the Registry.
When a program is installed on the computer, Windows will save its settings and information in the registry, including the uninstall command to uninstall the program. You can try this method to uninstall Geek Uninstaller. Please carefully edit the registry, because any mistake there may make your system crash.
Steps:
e. Follow the wizard to uninstall Geek Uninstaller.
The manual uninstallation of Geek Uninstaller requires computer know-how and patience to accomplish. And no one can promise the manual uninstallation will completely uninstall Geek Uninstaller and remove all of its files. And an incomplete uninstallation will many useless and invalid items in the registry and affect your computer performance in a bad way. Too many useless files also occupy the free space of your hard disk and slow down your PC speed. So, it’s recommended that you uninstall Geek Uninstaller with a trusted third-party uninstaller which can scan your system, identify all files of Geek Uninstaller and completely remove them. Download this powerful third-party uninstaller below.
Features of MOD APK Clash of Clans
- You can be part of the opposite participant’s clans or make your personal one if you wish to.
- You May play the multiplayer of the sport.
- Enjoy a limiteless provide of Gems.
- Unlimited provide of the Elixir.
- With the assistance of a limiteless provide of gold, you might be allowed to take the entire management of the sport.
- You can play this recreation on-line in some of the servers if you’re utilizing this Lollipop android model. But not examined on the Marshmallow.
- You can construct many Extraordinary items. Defend your base and items by rather a lot of towers, mortars, bombs, partitions in addition to the traps.