Tftpd(8) — linux man page
Содержание:
- Data structures
- Function list
- The best macOS TFTP server
- TFTP Download/Upload File
- Security
- What is TFTP?
- Starting new transfer
- Test Windows TFTP Client on Windows 10 or any Other Versions
- TFTP Server Configuration
- Проверка работоспособности TFTP сервера
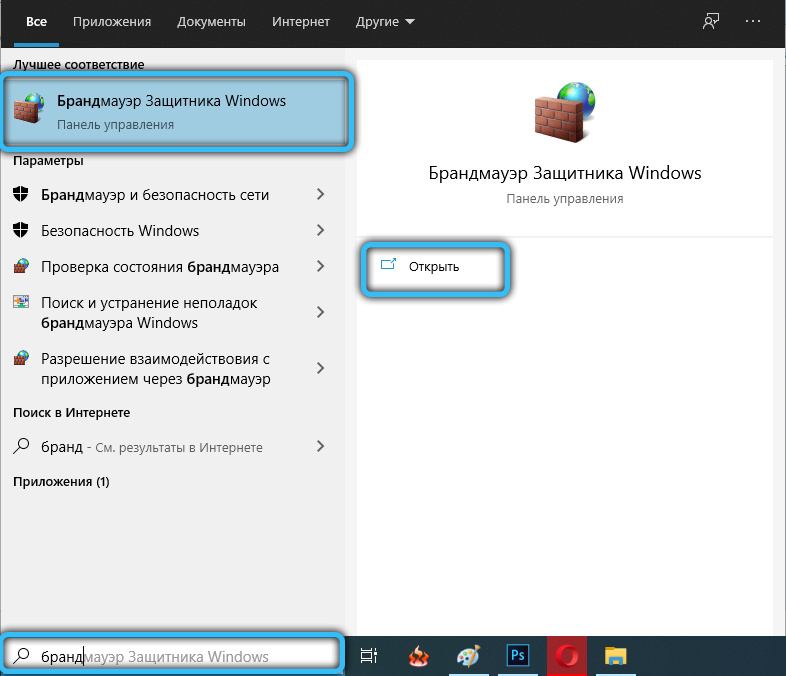
- Как установить TFTP-сервер на Windows
- Как передавать файлы в сети TFTP
- Опции TFTP [ править | править код ]
- Continuing existing transfer
- [edit] General
- Настройка TFTP от Microsoft
- Install TFTP Client on Windows 10
- Настройка TFTP сервера
Data structures
Error pack
All error packages are predefined globals which are ready to use given the address info and fd required to send.
typedef struct
{
    uint16_t opcode;
    uint16_t error_code;
    char message;
    size_t size;
} error_pack;
Client value
Client value is the value out of the (key, value) pair in the client pool dictionary. The key being the address.
typedef struct
{
    FILE* file_fd;
    char buffer;
    size_t buffer_size;
    uint16_t block_number;
    uint16_t resends;
    mode md;
    char temp_char;
    time_t last_action;
} client_value;
Server info
Server info holds various variables for receiving and sending and is mostly to avoid bloated parameter list.
typedef struct
{
    int32_t fd;
    sockaddr_in address;
    sockaddr_in received_from;
    char input;
} server_info;
Function list
int32_t main(int32_t argc, char **argv);
void int_handler(int32_t signal);
void exit_error(const char* str);
void start_server(server_info* server, char** argv);
void init_server(const char* port, server_info* server);
uint16_t convert_port(const char* port_string);
bool some_waiting(server_info* server);
gboolean timed_out(gpointer key, gpointer value, gpointer user_data);
guint client_hash(const void* key);
gboolean client_equals(const void* lhs, const void* rhs);
sockaddr_in* sockaddr_cpy(sockaddr_in* src);
void socket_listener(server_info* server);
void ip_message(sockaddr_in* client, bool greeting);
void send_error(server_info* server, error_code err);
void start_new_transfer(GHashTable* clients, server_info* server, char* root);
void continue_existing_transfer(GHashTable* clients, server_info* server);
void read_to_buffer(client_value* client);
size_t construct_full_path(char* dest, const char* root, const char* file_name);
int32_t get_mode(char* str);
void destroy_value(gpointer data);
client_value* init_client(mode m);
The best macOS TFTP server
1. macOS TFTP server
macOS has a built-in TFTP server that won’t be loaded by default. The easiest way to get it running is to simply type:
Then, provide your password when prompted. You can use something like netstat to confirm it is running:
$ netstat -n | grep *.69
 udp4 0 .69 .*
 udp6 0 .69 .*
The TFTP server is now running on port 69 waiting for connections. You can use any TFTP client to connect to the server and upload or download files. To shut down the TFTP server, simply use the command:
Pros:
- Already part of the macOS, just needs to be loaded
- Easy setup, only takes a minute or two
- Runs incredibly lean, using few resources
Cons:
Configuration options might be difficult to find
Key Features:
- Native to Macs’ operating system
- Command line
- Free TFTP server for macOS
TFTP Download/Upload File
I created the following text file in “/srv/tftp”:

Linux-based network monitoring for your network.
Try it Now
netbeez.net$ cat hello_server.txt
Hello world from TFTP server!
|
1 2 |
netbeez.net$cat hello_server.txt Hello world from TFTP server! |
On the client side I start a tftp interactive session and I download it as follows:
netbeez.net$ tftp
tftp> connect 172.31.0.154
tftp> get hello_server.txt
Received 31 bytes in 0.0 seconds
tftp> quit
netbeez.net$ cat hello_server.txt
Hello world from TFTP server!
|
1 2 3 4 5 6 7 |
netbeez.net$tftp tftp>connect172.31.0.154 tftp>get hello_server.txt Received31bytes in0.0seconds tftp>quit netbeez.net$cat hello_server.txt Hello world from TFTP server! |
On the client side, I can upload a file with the following commands:
netbeez.net$ tftp
tftp> connect 172.31.0.154
tftp> put hello_client.txt
Sent 31 bytes in 0.0 seconds
tftp> quit
|
1 2 3 4 5 |
netbeez.net$tftp tftp>connect172.31.0.154 tftp>put hello_client.txt Sent31bytes in0.0seconds tftp>quit |
If you get the following error when uploading:
tftp> put hello_client.txt
Error code 1: File not found
|
1 2 |
tftp>put hello_client.txt Error code1File notfound |
It can mean one of the following:
- The file “hello_client.txt” doesn’t exist on the servers “/srv/tftp” directory
- The “- -create” option is not enabled on the server (see above)
- The file “hello_client.txt” exists on the server but it’s not publicly writable
TFTP is a handy and lightweight server which is useful to upload and download files, but it comes with some important limitations that you have to keep in mind. You may have used TFTP if you’ve ever remotely booted a machine with PXE or BOOTP.
Security
The use of TFTP services does not require an account or password on the server system. Due to the lack of authentication information, tftpd will
allow only publicly readable files (o+r) to be accessed, unless the —permissive option is specified. Files may be written only if they already exist
and are publicly writable, unless the —create option is specified. Note that this extends the concept of »public» to include all users on all hosts
that can be reached through the network; this may not be appropriate on all systems, and its implications should be considered before enabling TFTP service.
Typically, some kind of firewall or packet-filter solution should be employed. If appropriately compiled (see the output of in.tftpd —version)
tftpd will query the hosts_access(5) database for access control information. This may be slow; sites requiring maximum performance may want to
compile without this option and rely on firewalling or kernel-based packet filters instead.
The server should be set to run as the user with the lowest possible privilege; please see the —user flag. It is probably a good idea to set up a
specific user account for tftpd, rather than letting it run as «nobody», to guard against privilege leaks between applications.
Access to files can, and should, be restricted by invoking tftpd with a list of directories by including pathnames as server program arguments on the
command line. In this case access is restricted to files whole names are prefixed by one of the given directories. If possible, it is recommended that the
—secure flag is used to set up a chroot() environment for the server to run in once a connection has been set up.
Finally, the filename remapping (—mapfile flag) support can be used to provide a limited amount of additional access control.
What is TFTP?
Current FTP sessions support a lot of different commands. While logged in to an FTP server, users can usually list, delete, rename, upload, or download files and change directories. In contrast, TFTP offers only the ability to upload or download a file and uses UDP over IP instead of the more standard TCP/IP stack.
The protocol is not capable of allowing more advanced functionality but compensates by using the lockstep method of fault-tolerance that makes it extremely reliable. Due to this limited functionality, TFTP servers can have an extremely small footprint on the disk as well as in memory, making it ideal for use in embedded network devices.
Linux is far and away the most common operating system on the type of devices where you’re likely to encounter a TFTP server. But, there is also a rich ecosystem of Windows and macOS devices that run device firmware (think Apple TVs and Microsoft Surface for a few examples).
See also:
- Best SCP servers
- Best SFTP servers
Starting new transfer
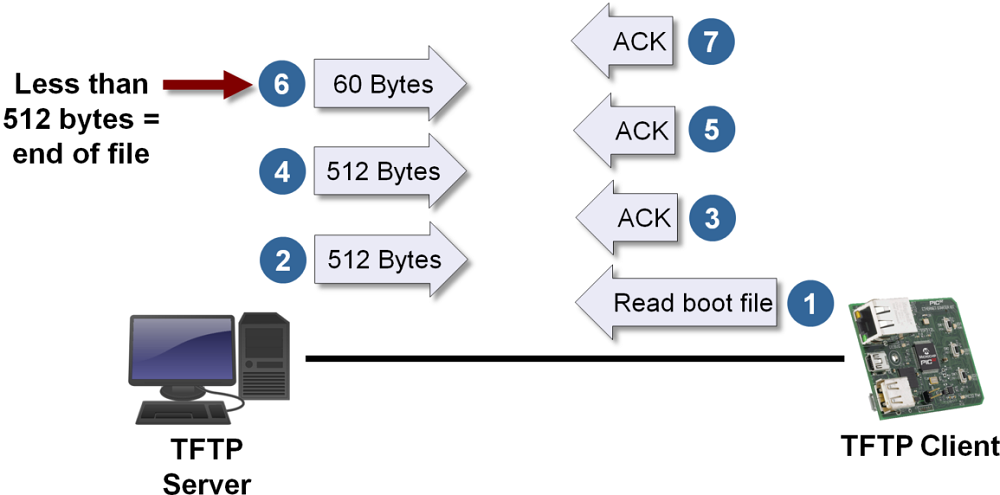
Assuming client does not already exist, we check if his filename contains two dots for parent directory access and if request file exists. Also we validate the transfer mode and only allow netascii and octet. Failure in any of these will result in an error package sent and the client won’t be added to our pool of clients. Otherwise, we read the next 512 bytes from the file and send the first package and also add him to the client pool (dictionary).
If he already exists he generally should not be sending more RRQ. If he does and clients block number is still at 1, we resend the first package up to some amount of resends. If they are reached we send an error and remove the client.
Test Windows TFTP Client on Windows 10 or any Other Versions
Let’s assume that the TFTP server setup appropriately is done and files are available at the correct location. Before you download a file from the TFTP server, you must know the right file name with the extension.
In this example, I’m going to download a file called ‘tftp.zip’ from the TFTP server 192.168.1.244.
Type the below command in command prompt (you must have a working network communication with the server, the ping command is handy to confirm the connectivity)
Tftp -i GET
The below message indicates that the file transfer is successful. The file will be downloaded at the location where you are executing the command. In this case, it is C:\Users\Dinesh folder.
To upload a file using the TFTP tool, use the following command.
Tftp -i PUT
The below command shows the successful file upload to the TFTP server by Windows TFTP client. The file will be uploaded to the root of the TFTP settings on the server. We do not have any option to select the location.
As I’m using the Solarwind TFTP server in this example, the above command uploaded the file to this root location.
There you go, we learned how to install the Windows built-in TFTP client on Windows 10 and how to ensure that is working fine. We showed the simple steps to upload and download a file using the TFTP client. By the way, this method is applicable for Windows 8.1 and server versions also.
TFTP Server Configuration
Once you install the TFTP server, it will start running as a daemon and ready to receive and send files. By default the TFTP uses port 69. tftpd-hpa uses the directory “/srv/tftp” for uploading and downloading. To change that, you must edit the following configuration file:
netbeez.net$ cat /etc/default/tftpd-hpa
# /etc/default/tftpd-hpa
TFTP_USERNAME=»tftp»
TFTP_DIRECTORY=»/srv/tftp»
TFTP_ADDRESS=»0.0.0.0:69″
TFTP_OPTIONS=»—secure»
|
1 2 3 4 5 6 7 |
netbeez.net$catetcdefaulttftpd-hpa # /etc/default/tftpd-hpa TFTP_USERNAME=»tftp» TFTP_DIRECTORY=»/srv/tftp» TFTP_ADDRESS=»0.0.0.0:69″ TFTP_OPTIONS=»—secure» |
The “- -secure” option adds security to TFTP by limiting all transactions in the TFTP_DIRECTORY. In addition, files can be uploaded in “/srv/tftp” only if they already exist in that directory and are publicly writable. If you want to allow TFTP clients to upload new files in “/srv/tftp” then you need to add the “- -create” option like this: TFTP_OPTIONS=”- -secure – -create”. After you edit “/etc/default/tftpd-hpa”, restart the tftp server with “service tftpd-hpa restart”.
Проверка работоспособности TFTP сервера
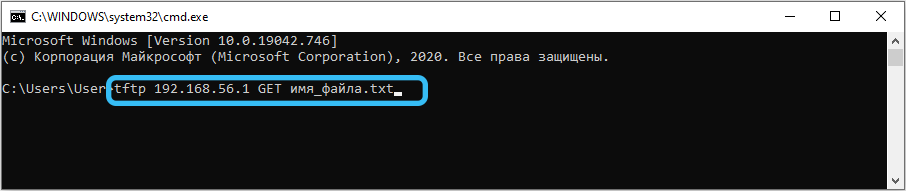
Чтобы проверить, работает ли TFTP сервер, необходимо просто выполнить копирование файла с сервера на клиентское оборудование.
Для этого нужно запустить консоль на клиенте, а затем выполнить команду tftp 192.168.1.35 GET <имя копируемого файла>. Если всё настроено правильно, после паузы, во время которой и происходит передача данных, указанный файл должен появиться на клиентском оборудовании.
Отметим, что копирование будет производиться в каталог, в котором запускалась консоль, если в настройках программы не указан другой путь. Но не все утилиты имеют такие настройки. Например, если вы используете WinAGents TFTP Server, вам нужно будет выполнить последовательно две команды:
- cd <путь назначения>;
- tftp168.1.35 GET <имя копируемого файла>.
В этом случае копирование будет производиться в указанную вами директорию.
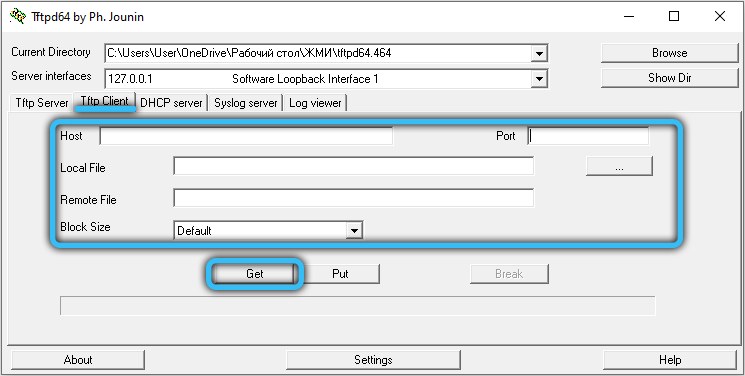
В утилите TFTPD32 копирование будет выглядеть несколько иначе. На клиентской машине следует запустить приложение, открыть в нём вкладку TFTPClient, а затем указать IP-адрес сервера, а затем имя файла, который мы намереваемся скачать. Сохранить его можно и под другим именем, указав его в соответствующей строке настроек. Завершив все приготовления, жмём кнопку GET и дожидаемся результатов операции.
Как видим, использование TFTP сервера не ставит перед пользователем неразрешимых задач, за исключением случаев, когда требуется доступ за пределы локальной сети. Но для этих случаев существуют другие, более защищённые и безопасные сетевые протоколы.
Как установить TFTP-сервер на Windows
Протокол Trivial FTP, как вы уже знаете, является очень простым в реализации, и если говорить о низкоуровневой передаче файлов, при условии отсутствия жёстких требований по безопасности, то он был и остаётся весьма востребованным.
Кроме загрузки ОС на рабочие станции, он широко используется для загрузки и модификации конфигураций множества встроенных устройств, являющихся частью домашних сетей и системы «Умный дом».
В частности, этот протокол нередко можно встретить на маршрутизаторах, в мобильных телефонах, в популярных медиа-стримерах. Он используется для передачи единичных файлов на относительно небольшие расстояния. А вот в глобальных сетях, том же интернете, использование TFTP недопустимо из-за низкой защищённости. Там царствует FTP, а если требуются повышенные требования к безопасности, то SFTP.
Если при помощи FTP, требующего ввода логина/пароля, можно осуществлять целый спектр операций с файлами (передача в обоих направлениях, переименование, удаление, просмотр), то в TFTP вы можете файлы только скачивать, и только по одному. Зато здесь используется стек UDP, отличающийся простотой кода, в отличие от распространённого, но достаточно сложного TCP/IP.

У протокола TFTP низкая функциональность компенсируется надёжностью, поэтому серверная часть кода протокола занимает на диске или в памяти очень мало места, что делает его идеальным кандидатом для использования во встроенных устройствах, у которых дефицит памяти – привычное явление.
Итак, если суммировать, для чего нужен клиент TFTP, то можно утверждать, что главное преимущество протокола – простота реализации его клиентской части.
ВНИМАНИЕ. Протокол не предусматривает наличие учётных записей пользователей, поэтому всегда существует риск подключения к TFTP серверу или клиенту других лиц, в том числе и со злонамеренными целями
Поэтому использовать его нужно, если сеть защищена другим способом, например, файерволом.
Хотя TFTP-сервер чаще всего можно встретить в ОС Linux, существует немало решений, предназначенных для Windows и даже для macOS (TFTPD32/64, haneWIN, WhatsUp, WinAGents и др.).
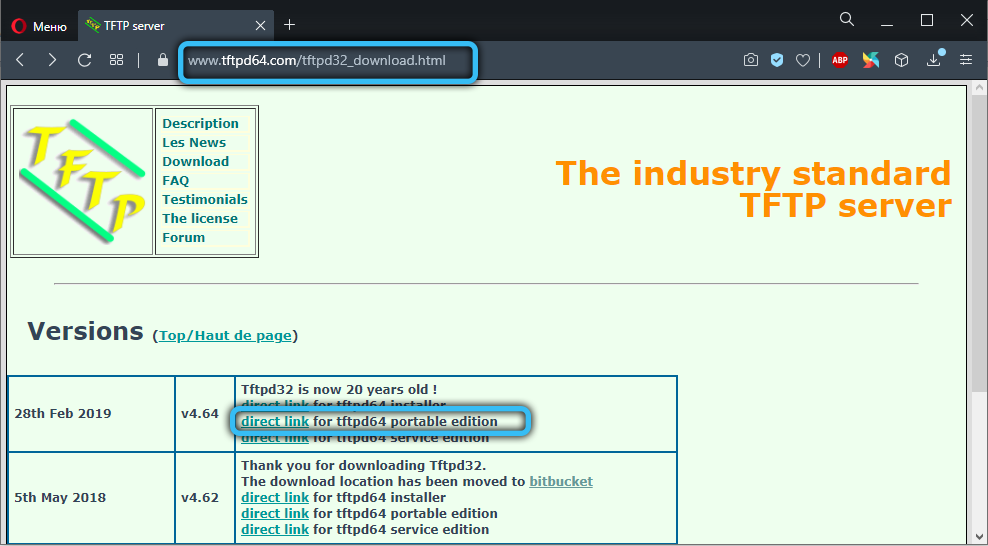
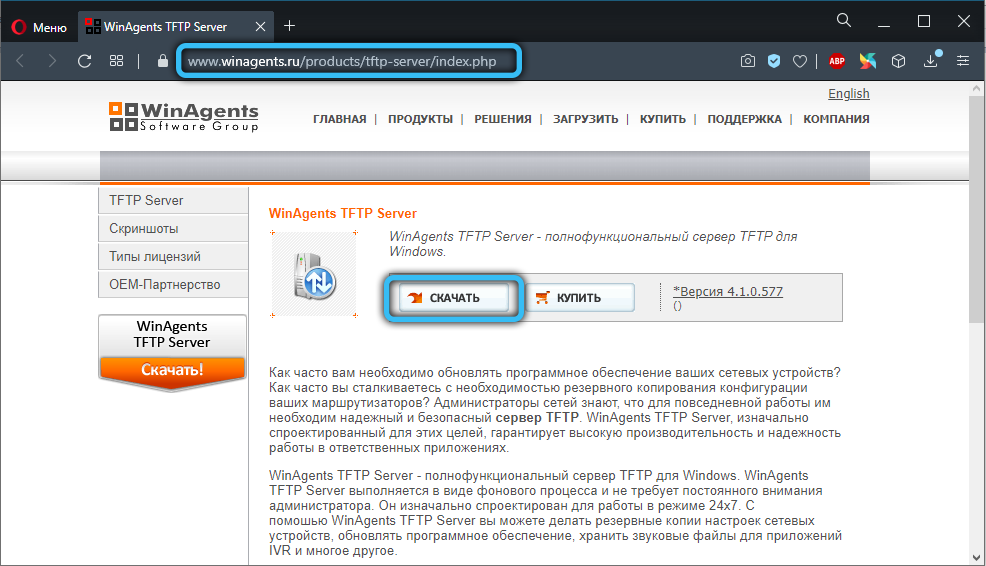
Рассмотрим процедуру установки TFTP-сервера на примере весьма популярной утилиты TFTPD32, созданной на условиях открытого исходного кода. Кроме собственно TFTP-сервера, она включает и другие серверные протоколы (DHCP, DNS, SNTP) и позволяет управлять пулом IP-адресов. Разумеется, ситуации, когда требуется наличие всех перечисленных функций, сложно придумать даже теоретически, но дополнение TFTP одной из них вполне может оказаться полезным.
При скачивании программы можно выбрать portable-версию, если не хотите возиться с инсталляцией.
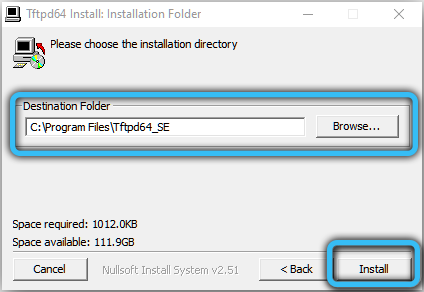
При запуске утилиты нужно будет указать пару параметров:
- каталог, куда будут скачиваться файлы (дефолтный путь – место установки программы);
- IP-адрес сервера, на который нужно будет обращаться клиентам.
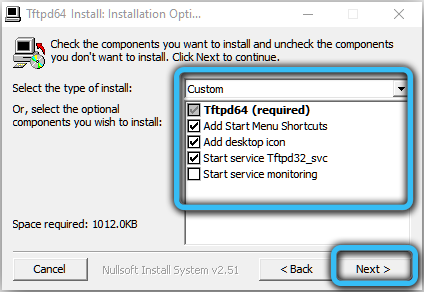
Для выполнения простейших операций этого будет достаточно. Но в ряде случаев потребуется дополнительная настройка программы.
Как передавать файлы в сети TFTP
После установки клиента и перенаправления порта перейдем к передаче файлов. Убедитесь, что сервер запущен, затем следуйте инструкциям:
Нажмите Win + R, в диалоговом окне наберите cmd для вызова командной строки. Перенесите или скопируйте файлы, которые хотите передать, в корневой каталог сервера.
Для отправки файлов нужно использовать параметр PUT, при получении GET. Синтаксис команды выглядит следующим образом:
Tftp -i
Например, для передачи используйте команду:
Tftp -i 192.168.10.3 put E:\file.txt 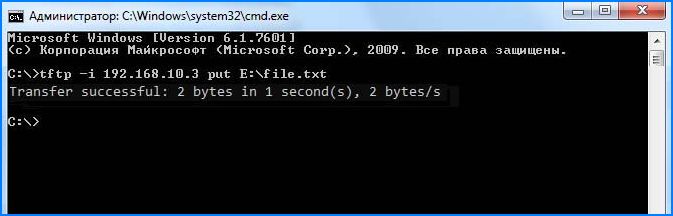
Если хотите получить файл, то команда будет выглядеть:
Tftp -i 192.168.10.3 get file.txt
Если хотите переслать на удаленное устройство за пределами сети, нужно указать публичный IP-адрес в командной строке, а затем порт. Примером может быть:
Tftp -i 39.43.126.2:69 put E:\file.txt
Опции TFTP [ править | править код ]
В RFC 2347 был предусмотрен формат опций, которые можно присоединять к окончанию RRQ-пакета и WRQ-пакета:
| Код опции | 0x00 (конец строки) | Значение опции | 0x00 (конец строки) |
|---|---|---|---|
| строка в ASCII | 1 байт | строка в ASCII | 1 байт |
Опций может быть несколько. Тогда они будут следовать друг за другом. Порядок опций не важен.
В ответ на RRQ (или WRQ) с опциями, сервер должен прислать OACK со списком опций, которые сервер принял. Наиболее распространённые опции:
| Название | Определена в | Код опции | |
|---|---|---|---|
| Размер блока | RFC 2348 | blksize | В качестве значения опции идёт число, принимающее значение от 8 до 65464, обозначающее размер блока. |
| Интервал повторной передачи (Timeout) | RFC 2349 | timeout | В качестве значения опции идёт число, принимающее значение от 1 до 255, обозначающее время ожидания перед повторной передачей блока в секундах. |
| Размер файла | RFC 2349 | tsize | В качестве значения опции идёт число, обозначающее размер передаваемого файла в байтах. |
Continuing existing transfer
First we check if client exists in our pool. If not, he has no business sending acks so we respond with a error pack. If he does exists we check if block numbers match and if not, we resend the last package up to a resend quota, which upon reaching we send an error pack and remove the client from the pool.
If the block numbers do match, we check if the package size was not full which would mark the end of this transfer and the removal of this client from our pool. If we sent a full package we reset the ressend counter variable to 0, increment the block number (if at max value, set to 1), read the next 512 bytes from file and send them.
[edit] General
This article describes how to do an initial flash or a TFTP recovery flash for your device.
- Unplug the router, get a for the PC, and connect it via network cable to a router LAN port
- Set a fixed IP address on the PC with the same network as your router, e.g. Router: 192.168.1.1, PC: 192.168.1.2
- Setup the TFTP client, then start a continuous ping (-t switch is needed for this in Windows) to the router
- Plug in the router and start the TFTP client as soon as there is a TTL=100 ping response. The client should show transfer.
- TTL=64 means application code has been reached. If the router isn’t responding, it is soft-bricked (use OEM firmware)
- Read about timing problems below:
Special Asus TFTP Flashing Procedures
Some routers like the Asus WL-500xx series (WL-500G, WL-500G Premium, WL-500W, WL-500G Deluxe), need additional steps to perform a complete and proper initial flash. See this wiki page: Asus TFTP Flash
Special for Vista, Win7 and Win 2008
In order to catch the narrow window for TFTP flash, you should use platforms with simple TCP/IP implementations that don’t have CTCP implemented: Windows XP or Linux are reported to work, but some have reported significant problems with Vista, Windows 7 or Windows 2008.
For more information see this posting
Edit: While some may have reported problems, CTCP is definitely not the issue, because it is disabled by default in Windows Vista and Windows 7. So unless people are specifically turning it on, it isn’t running. I personally just used TFTP on my router with no difficulties, although mine is a Netgear WNDR3700 that was waiting for a TFTP flash and didn’t have this race condition at boot as some of these routers seem to. But again, even if you have an issue it’s not CTCP. Check out the wikipedia article on CTCP for information on how to check if it is running and how to disable it (both are simple command line entries).
If having issues, try connecting a separate network switch between the PC and router, so the PC network port sees a connection before the router port is up. This should allow for a faster ping reply. Then follow the instructions as normal.
Special for Linksys WRT54GL Users
If the router seems to be bricked so that the power light is constantly blinking and pinging the router results in TLL=100 continuously, then there is still a great chance that tftp can help.
Firstly you must flash the router with the original firmware available at Linksys homepage www.linksys.com, since flashing it with DD-WRT probably won’t give any result at all. Then do a 30/30/30 and after that you can flash with DD-WRT Mini. The initial flashing can be done with only the mini version, perhaps later you can move on to bigger versions of it.
Настройка TFTP от Microsoft
Как это не странно, но в дистрибутиве Windows нет нормального TFTP сервера. TFTP сервер встроен в службу RIS (Remote Installation Services).
RIS является громоздкой и достаточно сложной в настройке.
Если Вы хотите использовать RIS по прямому назначению (для удаленной установки Windows) и загружать терминалы WTPRO, то Вам сюда.
В противном случае необходимо:
Внимание!
Не конфигурируйте эту службу. regedit.exeHKLM\System\CurrentControlSet\Services\Tftpd\Parameters\DirectoryREG_SZC:\ElinuxTкорнем tftp-сервераи на сайте MicrosoftTrivial FTP Daemon
Настройка TFTPD для UNIX
Рассмотрим установку на Fedora Core 4. Желающие могут скачать и установить tftp сервер самостоятельно с сайта http://www.kernel.org/pub/software/network/tftp/.
Пошаговая установка:
tftp-server # rpm -ivh tftp-server-0.40-6.i386.rpm
предупреждение: tftp-server-0.40-6.i386.rpm: Заголовок подпись DSA V3: NOKEY, key ID 4f2a6fd2
Подготовка… ###########################################
1:tftp-server ########################################### # ntsysv Корневым каталогом/tftpboot
Установка WTPRO на TFTP сервер
Для Windows можно запустить файл setup.cmd с компакт диска, который установит WTPRO в c:\ElinuxT\ (путь к папке можно задать в самом скрипте)
Для Unix можно запустить файл setup с компакт диска, который установит WTPRO в /tftpboot/ (путь к папке можно задать в самом скрипте)
WTPRObootPXELINUX.CFGElinuxTElinuxTconfhddkeyspkgtermsКонфигурационные файлыElinuxT\confЛицензионные ключиElinuxT\keysWTPRO
Настройка параметров для сетевой загрузки
После загрузки логотипа доступны дополнительные параметры.
Для того чтобы ограничить доступ к некоторым из них при сетевой загрузке надо.
pxelinux.cfg\default
prompt 1timeout 50default elinuxt
FONT ElinuxT/hdd/koi
DISPLAY ElinuxT/hdd/msg
label elinuxt
kernel ElinuxT/hdd/sys
append net=y ramdisk_size=632 quiet initrd=ElinuxT/terms root=/dev/ram
label debug
kernel ElinuxT/hdd/sys
append debug=y net=y ramdisk_size=632 quiet initrd=ElinuxT/terms root=/dev/ram
label setup
kernel ElinuxT/hdd/sys
append net=y setup=y ramdisk_size=748 quiet initrd=ElinuxT/hdd/term root=/dev/ram
label mkfloppy
kernel ElinuxT/hdd/sys
append net=y setup=y floppy=y ramdisk_size=748 quiet initrd=ElinuxT/hdd/term root=/dev/ram
label update
kernel ElinuxT/hdd/sys
append net=y setup=y ramdisk_size=748 quiet initrd=ElinuxT/hdd/term root=/dev/ram
# label uninstall
# kernel ElinuxT/hdd/sys
# append net=y setup=y remove=y ramdisk_size=748 quiet initrd=ElinuxT/hdd/term root=/dev/ram
# label memtest
# kernel ElinuxT/hdd/memtest
label local
LOCALBOOT 0
timeoutdefaultelinuxtlabelappendkernel #uninstallmemtest
Install TFTP Client on Windows 10
1) Make sure that you have administrative access to enable the feature.
2) Go to Control panel and click on ‘Programs & Features’
3) Click on ‘Turn Windows features on or off’ then tick the ‘TFTP Client’ as shown below.
4) Press OK and wait for the installation to complete.
How to Verify that Windows TFTP Client Installed Successfully?
TFTP client is like telnet client when the feature has not installed the commands will return unknown command error.
For example, before installing the TFTP client, if you open a command prompt and type ‘tftp’, it will return the below message.
When it is installed, the same command will give the below output.
That was the clear indication that Windows TFTP client is installed on your computer.
Настройка TFTP сервера
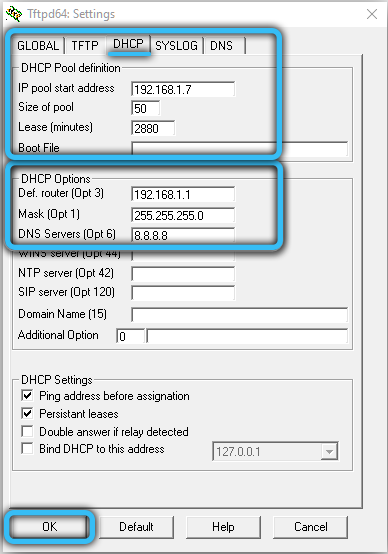
Если требуется использование DHCP сервера, например, для выдачи динамических айпишников в пределах малой сети, необходимо зайти в раздел Setting и выбрать вкладку DHCP.

Здесь нам нужно указать:
- исходный IP адрес (получаемый на маршрутизаторе);
- диапазон выдаваемых клиентам адресов;
- указание шлюза сети не является обязательным;
- четвёртый параметр – маска подсети.
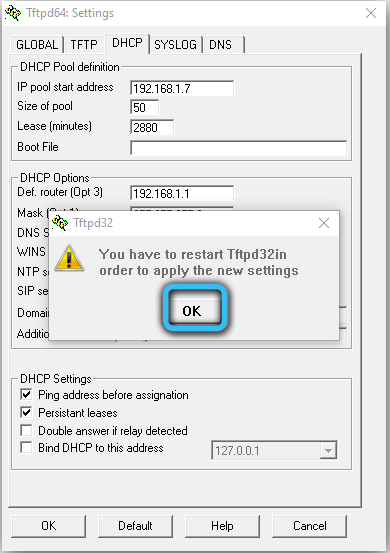
Подтверждаем внесение изменений нажатием ОК.
Поскольку в основе TFTP лежит использование транспортного протокола нижнего уровня UDP, в котором установление соединения не предусмотрено, задача эмуляции соединения становится прерогативой внешнего протокола, в нашем случае – TFTP. Проблема в том, что межсетевые экраны в большинстве случаев не умеют идентифицировать соединения, инициированные протоколом TFTP, так что этот тип трафика он пропускать не в состоянии.
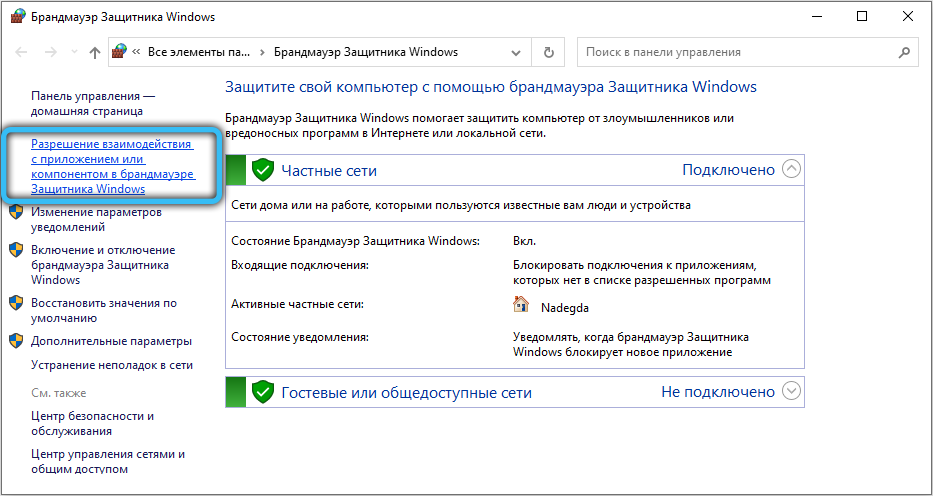
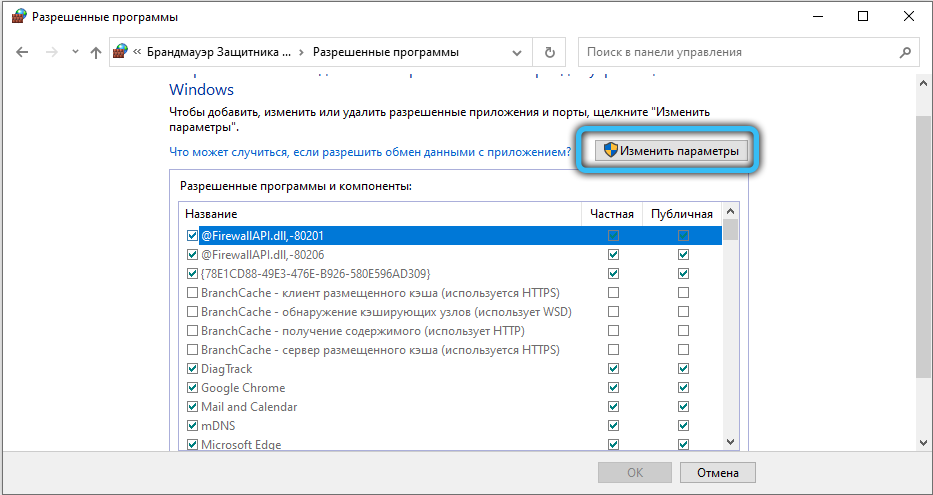
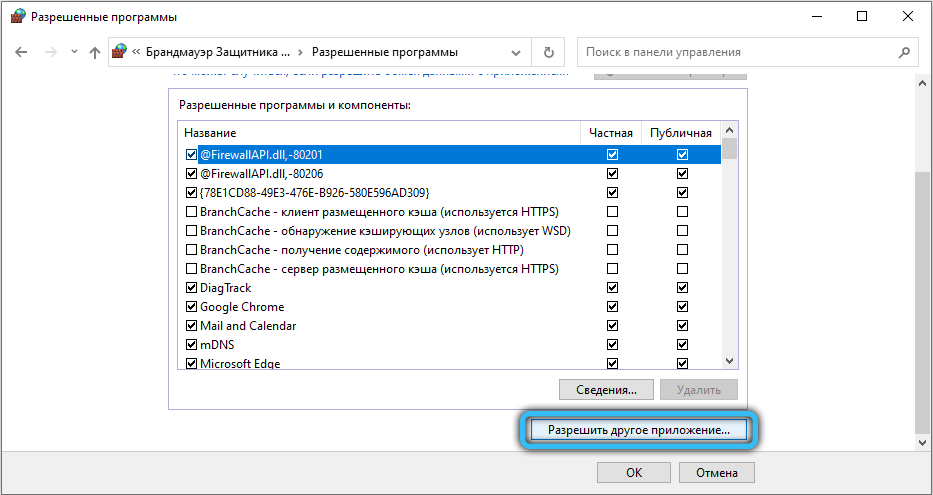
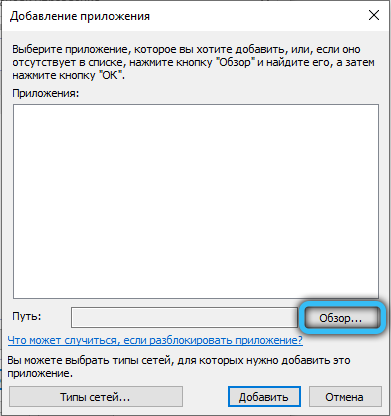
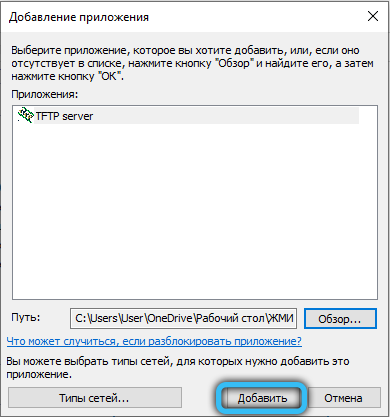
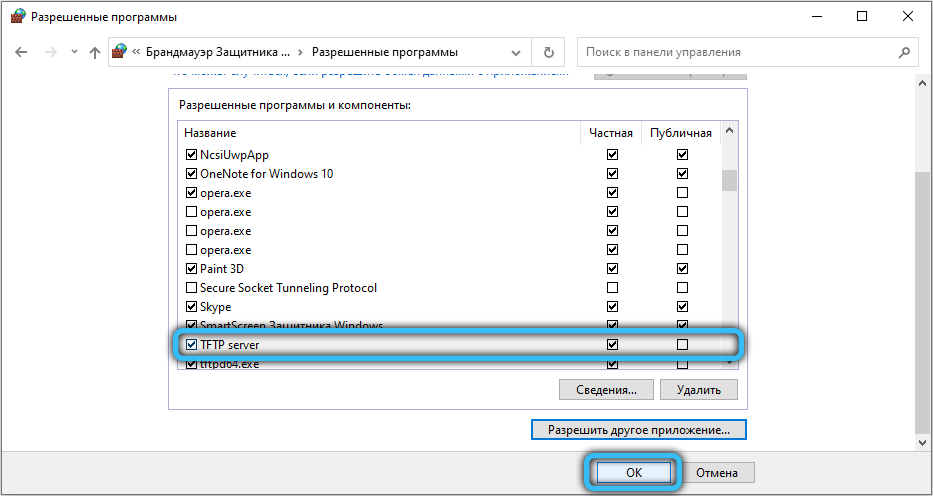
Но если TFTP-сервер располагается в пределах защищённой сети, а клиентские устройства – перед файерволом, то проблем быть не должно, но потребуется внесение изменений в настройки файервола:
- нужно добавить правило транспортировки пакетов данных из внешнего айпишника на адрес сервера TFTP, указанный в конфигурации программы (через порт 69 TFTP сервера);
- разрешить перенаправление трафика из внутренней сети на внешний IP-адрес.
В большинстве маршрутизаторов при передаче данных с более защищённой сети в менее защищённую проблем не возникает, но, когда требуется выполнить противоположную задачу, как раз и потребуется выполнение перечисленных выше действий.
Проблема в том, что не все сетевые роутеры/маршрутизаторы позволяют выполнить такие настройки. Но многие из них оснащены функцией просмотра трафика, направляемого с использованием протокола TFTP, при этом они в состоянии динамически изменять таблицу трансляции, позволяя пропускать пакеты извне, идущие в локальную сеть. Так, чтобы настроить файервол маршрутизатора Cisco PIX, необходимо выполнить команду fixup protocol tftp.

Существует альтернативный способ решения проблемы: можно обязать сервер TFTP задействовать порт 69 в двух направлениях, не только для приема запросов, идущих от клиентов, но и для пересылки им ответов. Тогда файервол сможет корректно обрабатывать оба типа запросов, руководствуясь записями, имеющимися в таблице трансляций.
Так, чтобы настроить WinAGents TFTP Server подобным образом, необходимо в настройках программы установить галочку напротив опции Enable firewall support.