Как установить tesseract ocr для windows
Содержание:
- Распознавание текста tesseract-ocr (интерфейс Python)
- I. введение в тессеракт-окр
- Во-вторых, конфигурация среды tesseract-ocr
- В-четвертых, обучение в библиотеке Тессеракт
- Provide ground truth
- Использование Tesseract OCR с PDF-файлами
- Let’s create a simple Java Project in IntelliJ IDEA
- Usage within Python
- 4.0 with LSTM
- 5.0.0.x
- Limits on the Application of Frequency-based Language Models to OCR
- Usage
- Expose the Required APIs — Writing a Wrapper
- Создаем Searchable PDF с помощью Tesseract OCR
- Первый этап
- Второй этап
- Результаты OCR
- Traineddata Installation
- Adapting the Tesseract Open Source OCR Engine for Multilingual OCR
- Summary
- Использование разных языков
- 5. Пользовательские параметры
- OCR with Nanonets
- Improving Book OCR by Adaptive Language and Image Models
- Usage within Selenium
- 1. Установите Tesseract в вашей системе
Распознавание текста tesseract-ocr (интерфейс Python)
http-equiv=»Content-Type» content=»text/html;charset=UTF-8″>yle=»margin-bottom:5px;»>Теги: python tesseract
I. введение в тессеракт-окр
Механизм Tesseract-ocr был впервые разработан HP Labs в 1985 году, а к 1995 году он стал одним из трех самых точных механизмов распознавания в индустрии оптического распознавания текста. В 2005 году Tesseract был получен Институтом информационных технологий Невады и попросил Google улучшить Tesseract, устранить ошибки и оптимизировать работу. В настоящее время Tesseract доступен как проект с открытым исходным кодом в Google Project.
Во-вторых, конфигурация среды tesseract-ocr
Операционная среда: Win7 + python3 + tesseract 4.0.0-beta.1, эта статья основана на:https://www.cnblogs.com/vipstone/p/8894145.html 。
2. Установите инструмент pytesseract-ocr.
Библиотека pytesseract является библиотекой функций python, которая зависит от работы инструмента tesseract-ocr, поэтому вам необходимо загрузить и установить tesseract-ocr и установить его вместе с библиотекой pytesseract.
Адрес загрузки инструмента pytesseract-ocr:https://github.com/UB-Mannheim/tesseract/wikiНажмите «tesseract-ocr-w64-setup-v4.0.0-beta.1.20180414.exe» / «tesseract-ocr-w32-setup-v4.0.0-beta.1.20180414.exe», чтобы загрузить и установить его.Примечание:Китайский пакет должен быть выбран во время установки!
3. Параметры настройки связи
В пути установки pytesseract (обычно это путь: «… / lib / site-packages \ pytesseract \ pytesseract.py») найдите файл pytesseract.py, откройте файл и измените следующую инструкцию:

Вышеуказанный путь — это путь установки инструмента pytesseract-ocr.
Операционные результаты следующие:

В-четвертых, обучение в библиотеке Тессеракт
Являясь отличной библиотекой распознавания Ocr, tesseract, конечно, может обучать свою собственную модель данных, поэтому для достижения цели, которую я использую, в следующем тексте будет рассказано, как обучить свою собственную библиотеку распознавания текста.
Интеллектуальная рекомендация
Наша страна — большая страна с далеко зашедшей винной культурой. Еще во времена династии Сун мы варили вкусные и мягкие спиртные напитки. Мы часто слышим, как старшие поколения говорят, что с возрасто…
1. Предположим, что вы tomcat6 и добавили библиотеку драйверов mysql в D: \ Program Files \ Apache Software Foundation \ Tomcat 6.0 \ lib 2. Добавьте в «Tomcat 6.0 \ conf \ context.xml&ra…
…
4. Условное суждение После выполнения условного тестового выражения обычно возвращается «истина» или «ложь», так же как возвращаемое значение после выполнения команды равно 0 д…
1. Что такое куча? Стек: особый видПолное двоичное деревоструктура. Большая корневая куча: полное двоичное дерево, удовлетворяющее тому, что любой узел больше, чем его дочерний узел.Большой; Неболь…
Вам также может понравиться
1. Введение Аполлон (Аполлон) — это НИОКР в Ctrip Framework SectorРаспределенный Центр конфигурацииМожно централизовать управление для управления различными средами, разными кластерами. После настройк…
…
Список может быть изменен, но иногда вам необходимо создать серию немодифицируемых элементов, а кортеж может удовлетворить эти потребности. Значение, которое не может быть изменено в Python, называетс…
тема: код показан ниже: Ожидание является обратной величиной вероятности. Накопите все ожидаемые значения, чтобы получить: N + N / 2 +… + 1, и положите N, чтобы получить: N (1 + 1/2 +… +…
1. Ролевое управление фоновым менеджментом 1.1 Определение ролевой формы для управления ролями Определите форму роли в файле forms.py в каталоге администратора приложения. 1.2 Список всех ролей в упра…
Provide ground truth
Place ground truth consisting of line images and transcriptions in the folder
. This list of files will be split into training and
evaluation data, the ratio is defined by the variable.
Images must be TIFF and have the extension or PNG and have the
extension , or .
Transcriptions must be single-line plain text and have the same name as the
line image but with the image extension replaced by .
The repository contains a ZIP archive with sample ground truth, see
ocrd-testset.zip. Extract it to and run
.
NOTE: If you want to generate line images for transcription from a full
page, see tips in issue 7 and
in particular .
Использование Tesseract OCR с PDF-файлами
Команда предназначена для работы с файлами изображений, но она не может читать PDF-файлы. Однако, если вам нужно извлечь текст из PDF, вы можете сначала использовать другую утилиту для генерации набора изображений. Одно изображение будет представлять одну страницу PDF.
утилита вам нужна должен быть уже установлен на вашем компьютере с Linux. PDF-файл, который мы будем использовать в нашем примере, является копией оригинальной статьи Алана Тьюринга по искусственному интеллекту «Компьютерная техника и интеллект».

Мы используем возможность указать, что мы хотим создавать файлы PNG. Имя файла нашего PDF — «turing.pdf». Мы будем называть наши файлы изображений «turing-01.png», «turing-02.png» и так далее:
pdftoppm -png turing.pdf turing

Бежать для каждого файла изображения с помощью одной команды, мы должны использовать для цикла, Для каждого из нашихпп.png, »файлы, которые мы запускаем и создайте текстовый файл с именем «text-» плюс «turing-»пп»Как часть имени файла изображения:
for i in turing-??.png; do tesseract "$i" "text-$i" -l eng; done;

Чтобы объединить все текстовые файлы в один, мы можем использовать :
cat text-turing* > complete.txt

Вертикальный водяной знак был расшифрован как линия тарабарщины внизу страницы. Текст был слишком мал для чтения точно, но было бы достаточно легко найти и удалить его. Худшим результатом были бы случайные символы в конце каждой строки.
Любопытно, что отдельные буквы в начале списка вопросов и ответов на второй странице были проигнорированы. Раздел из PDF показан ниже.

Как вы можете видеть ниже, вопросы остаются, но «Q» и «A» в начале каждой строки были потеряны.

Диаграммы также не будут правильно расшифрованы. Давайте посмотрим, что происходит, когда мы пытаемся извлечь приведенный ниже пример из PDF-файла Тьюринга.

Как вы можете видеть в нашем результате ниже, символы были прочитаны, но формат диаграммы был утерян.

Очередной раз, боролись с небольшим размером подписчиков, и они были отображены неправильно.
Справедливости ради, тем не менее, это был еще хороший результат. Мы не смогли извлечь простой текст, но тогда этот пример был сознательно выбран, потому что он представлял проблему.
Let’s create a simple Java Project in IntelliJ IDEA
Create a new project based on Maven and create an empty class. After creating the class my folder structure will be like this.
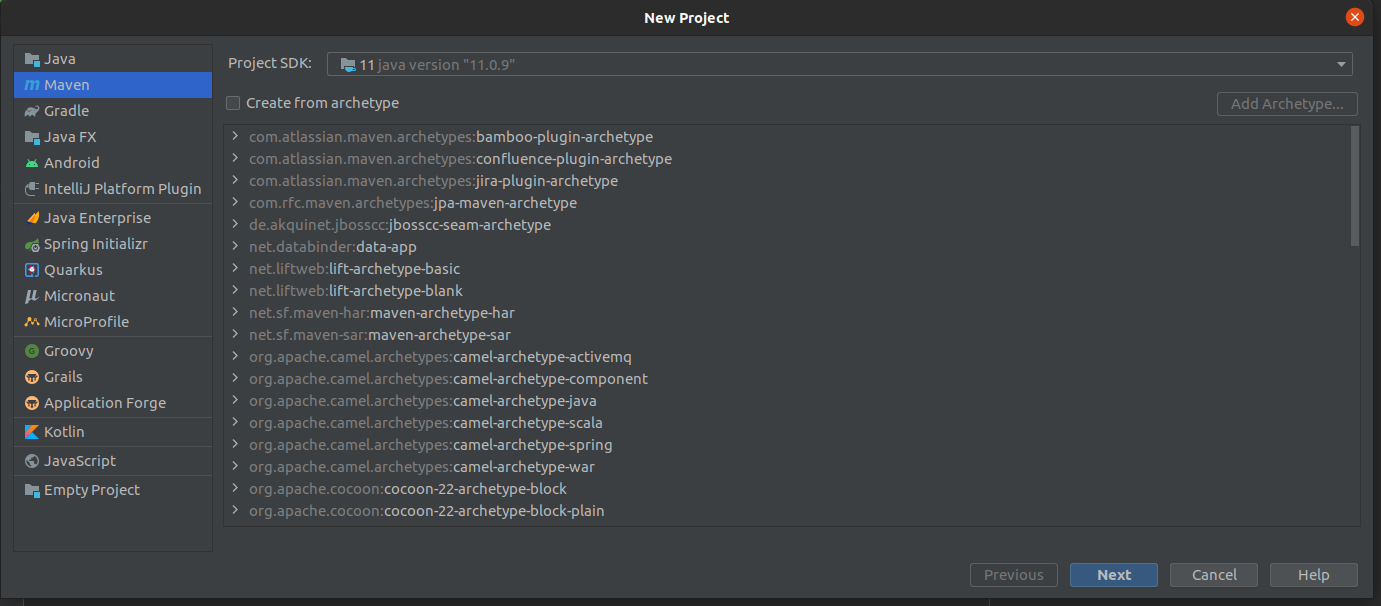
Creating a Project based on Maven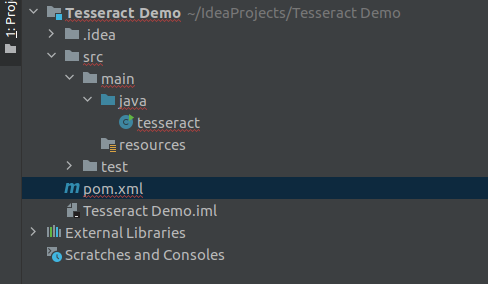
Folder Structure after creating the project
Modify your project’s pom.xml file to add the below dependency under dependencies element in pom.xml file to enable Maven.
Add Maven Dependency to pom.xml
After adding the above dependency, my pom.xml file will be like this.
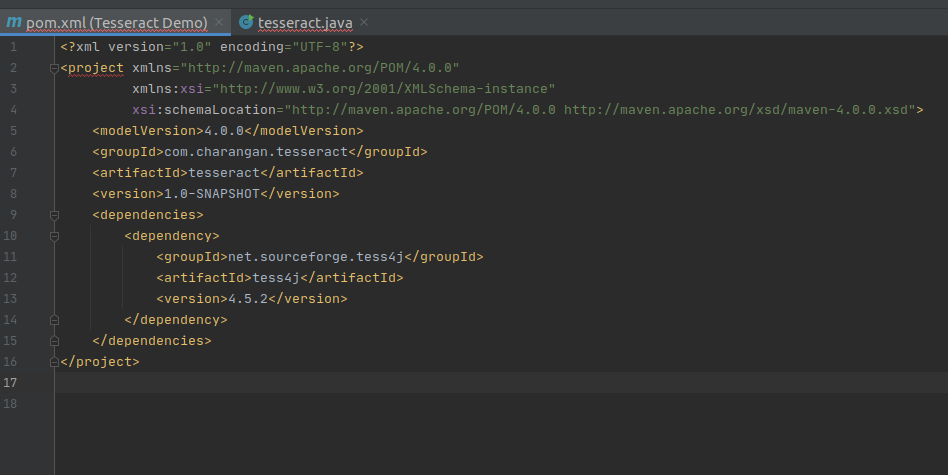
Modified pom.xml
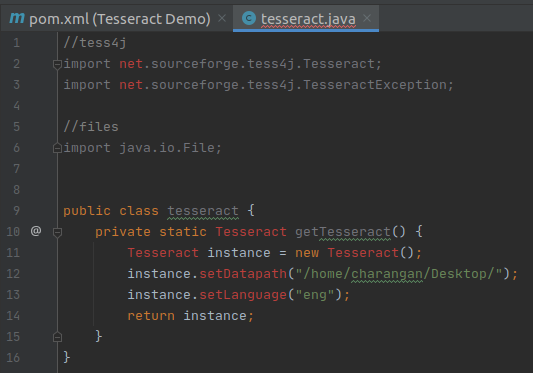
Once we have an empty class, we can start adding some code to it. Here is the import statement for the instantiation of the Tesseract object.
Import Tess4J for our Project File
and also we need to import the below statement to avoid exceptions rising while recognizing the text.
Import Tess4J Exception
I am going to use files for recognition which are on my local computer. So I need to import the below statement to handle files.
Import Java File Lib
Now, my IntelliJ IDEA view is

After all, packages imported
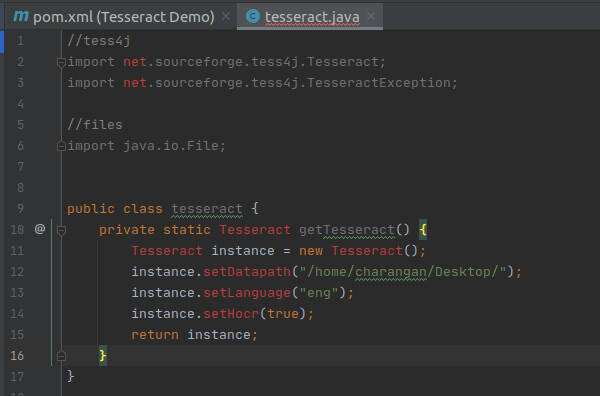
I will define a static method for Tesseract inside the class and Inside this method, make a new instance of Tesseract from the Maven library.
New Instance of Tesseract from the Maven Library
Next, I will add traineddata details to this instance like where the training data for this library can be found. As I mentioned earlier, I have downloaded the traineddata for English and stored it on my Desktop. So add the below two lines of code after instance creation inside the method.
Note: According to your traineddata file’s directory, the path will change.
Set Traineddaata Path
Finally, return the instance. Now my screen will be:
Return Plain Text
The above method returns the text as plain text from the resource. If you want to return the result as an HTML, you need to tell Tesseract that the output we need is in the format something called the hOCR(HTML). Basically, the hOCR format is a simple XML-based format.
We can make it an hOCR format by adding the below statement above the return statement.
Add hOCR Output Method
Return hOCR Format
Finally, I put the main function below to make it usable and call the static method inside it.
Tesseract Main Method
Now, what we have to do is provide a file to Tesseract which it can parse and read its Text. In this example, I am going to try with an image that is stored in my Ubuntu Desktop.
So, after knowing about the input file path, creating a new file instance, and setting the file path, I also need to pass the file to tesseract for recognition and write a java print statement to get the output. Finally, your code view will be:
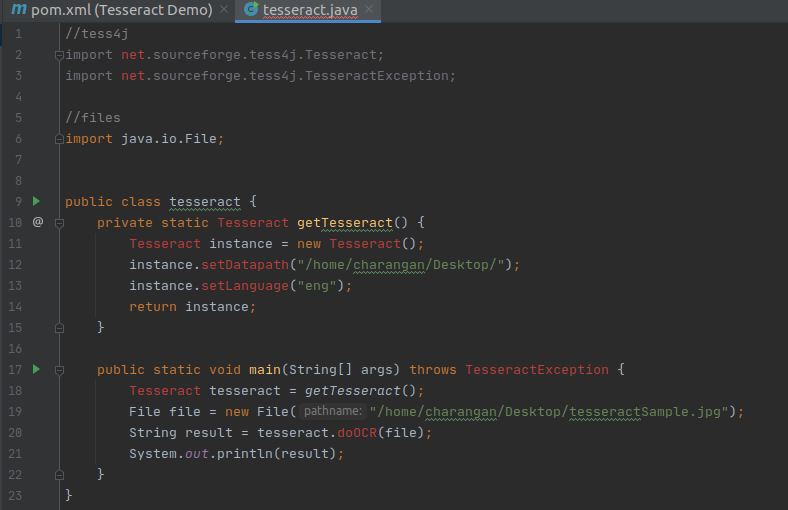
With the main function
Since I settled all things correctly, still IntelliJ IDEA shows some errors in my files. It’s nothing but, we have to reload the project to load all dependency packages and sources.
Right-click on pom.xml file -> Maven -> Reload Project
Now, the problem is solved.
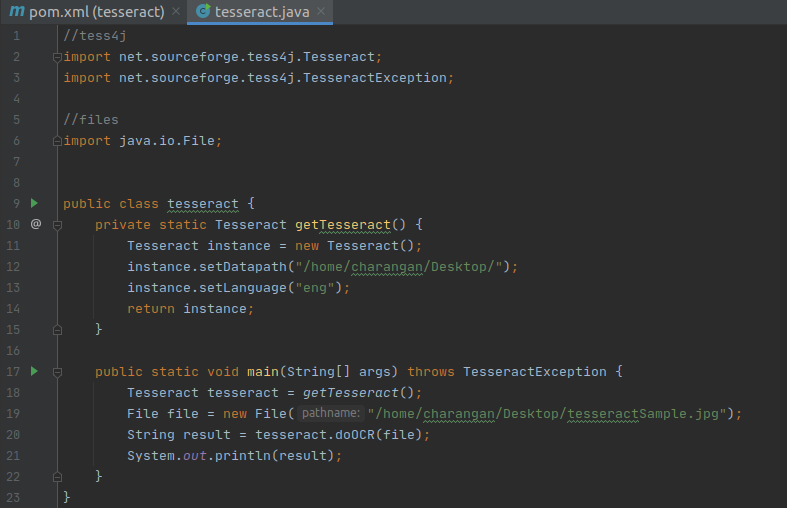
No errors after reloading the project
If we look closely, there is nothing we did much. That is the power of this wrapper for the Tesseract library I am provided with. Now we are ready to run our sample OCR program.
Note: Confirm that your project is set to the latest version of Java like Java 11. If you get an error regarding the Java version, you can simply set it to the latest version.
Go File -> Project Structure.
You will see a dialog box given below, Make sure that the Java version under Project and Modules section is set to the latest version of Java like Java 11.
Project Setting -> Project
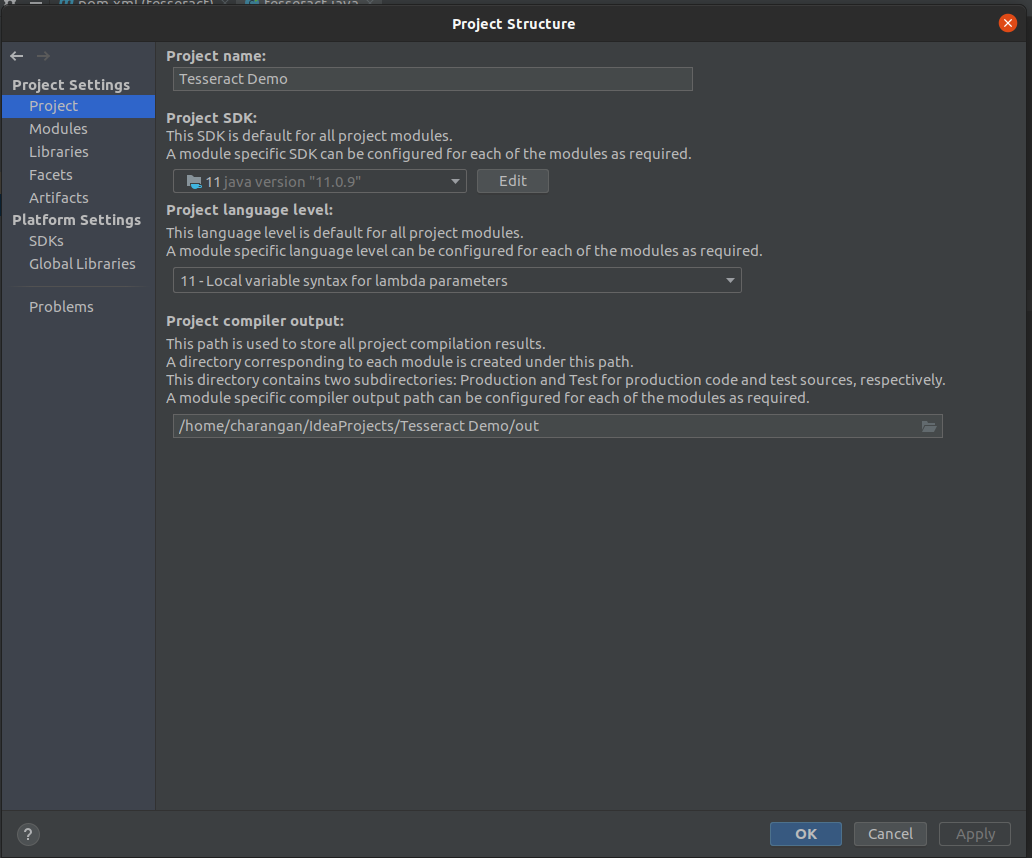
Project
Project Setting -> Modules
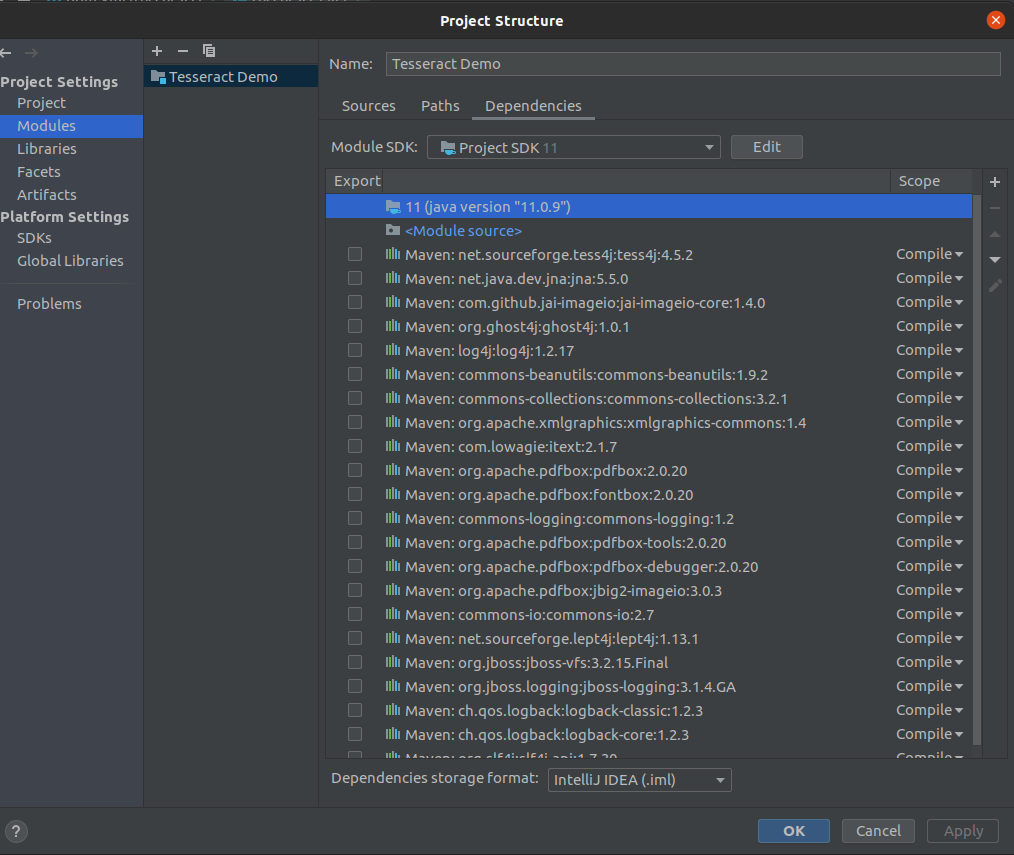
Module
And also make sure that the Java Compiler setting also by pressing Ctrl + Alt + S. You will popup a dialog box, then navigate to Java Compiler as given below and check if the target bytecode version is set above to 1.5 for your project.
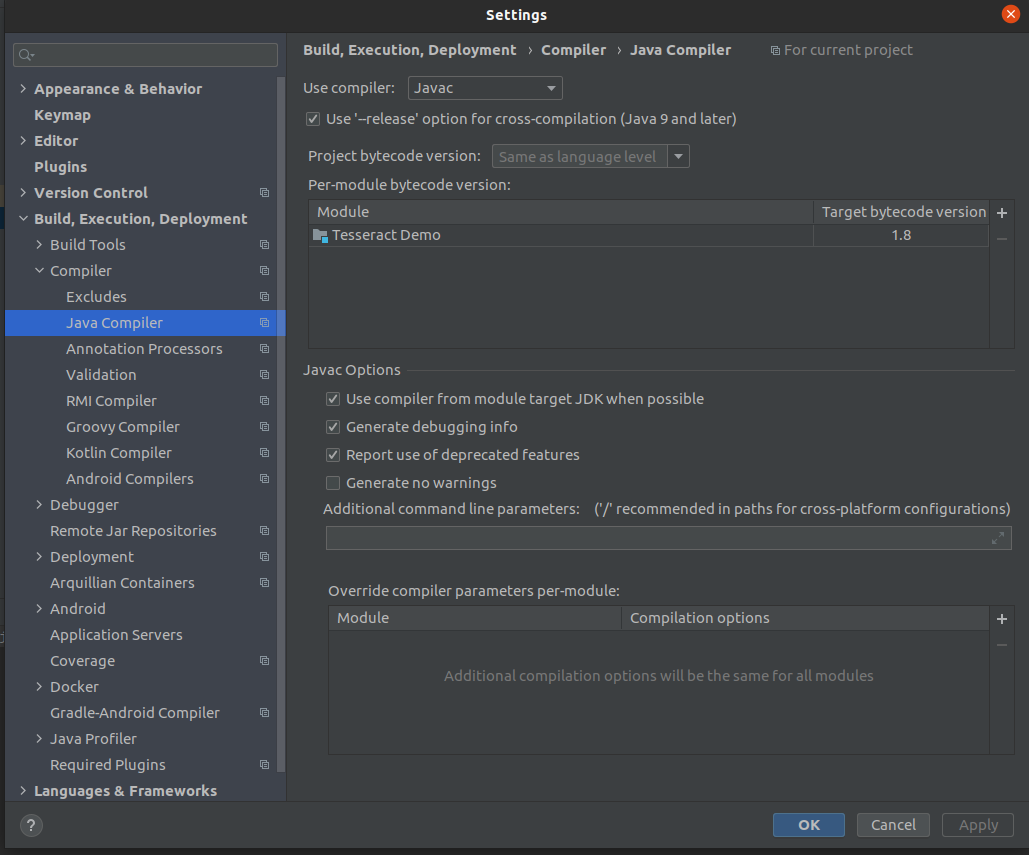
Target bytecode
Fine. Now the time to take a test drive through our sample application, so I am going to use google’s logo as my sample input.
Note: Try to avoid PNG images and use JPG/JPEG images instead if you’re working with images at all. This is because Tesseract is very bad at reading PNG images due to its compression techniques.

source: https://www.putnamlib.org/images/google.jpg/@@images/image.jpeg
Once I run the project, I get this simple output as:
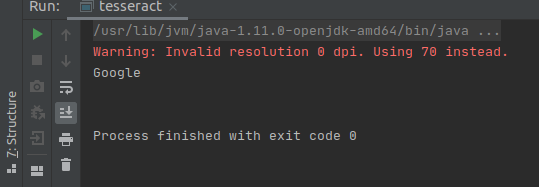
Output
Usage within Python
Within venv
https://github.com/sirfz/tesserocr
-
Install Pillow, a module for image processing in Python:
pip install Pillow
-
Code for Python:
https://medium.com/better-programming/beginners-guide-to-tesseract-ocr-using-python-10ecbb426c3d
offers this snippet:from PIL import Image # PIL = old version of Pillow utility column = Image.open('code.jpg') gray = column.convert('L') # convert to gray scale vs. RGB or CMYK. blackwhite = gray.point(lambda x: 0 if x < 200 else 255, '1') blackwhite.save("code_bw.jpg") # TODO: change to use program invocation parameter
-
Code for Shell script:
from PIL import Image
import sys
column = Image.open(sys.argv)
gray = column.convert('L')
blackwhite = gray.point(lambda x: 0 if x < 200 else 255, '1')
blackwhite.save("code_bw.jpg")
4.0 with LSTM
Tesseract 4.0 added a new OCR engine based on LSTM neural networks. It works well on x86/Linux with official Language Model data available for 100+ languages and 35+ scripts. See 4.0x-Changelog for more details.
Traineddata Files
For detailed information about the different types of models, see Data Files.
Model files for version are available from tessdata tagged 4.00. It has models from November 2016. The individual language file links are available from the following link.
tessdata 4.00 November 2016
Model files for version and later are available from tessdata tagged 4.0.0. It has legacy models from September 2017 that have been updated with Integer versions of LSTM models. This set of traineddata files has support for both the legacy recognizer with and for LSTM models with . These models are available from the following Github repo.
tessdata
Two more sets of traineddata, trained at Google, are made available in the following Github repos. These do not have the legacy models and only have LSTM models usable with .
- tessdata_best
- tessdata_fast
Training for Tesseract 4
-
TrainingTesseract 4.00 — Detailed Guide by Ray Smith
- Fonts
- Box Files
- The-Hallucination-Effect
- Links to Community Contributions for Finetune Training
- 4.0 Accuracy and Performance
5.0.0.x
Source Code
Tesseract 5.0.0.x source code is available in the ‘master’ branch of the repository. The master branch is using versioning because C++ code modernization caused API incompatibility with 4.x release.
Binaries are available from:
- Windows — Tesseract at UB Mannheim
Traineddata Files
Language model traineddata files same as listed above for version can be used with Tesseract . These are available from:
- tessdata
- tessdata_best
- tessdata_fast
- tessdata_contrib
- Links to Community Contributions
Usage
- Tips to Improve Recognition
- Command Line Usage
- Viewer Debugging
- Common Errors and Resolutions
- Frequently Asked Qustions
Technical Information
- Historical Technical Documentation
- Neural Nets in Tesseract
- VGSL Specs
- VGSL Specs info from Tensorflow
- Network spec for tessdata_fast models
- Network spec for tessdata_best models
-
DAS 2016 tutorial slides
Slides
#2,
#6,
#7
have information about LSTM integration in Tesseract 4.0x. - Tesseract OpenCL — Experimental
Training for Tesseract 5
-
Train Tesseract LSTM with make from Single Line Images and Groundtruth Transcription
- Example: Training Fraktur with GT4HistOCR
- Demo of PlusMinus training for Sanskrit
Limits on the Application of Frequency-based Language Models to OCR
Publication Year: 2011
Although large language models are used in speech recognition and machine translation applications, OCR systems are “far behind” in their use of language models. The reason for this is not the laggardness of the OCR community, but the fact that, at high accuracies, a frequency-based language model can do more damage than good, unless carefully applied. This paper presents an analysis of this discrepancy with the help of the Google Books n-gram Corpus, and concludes that noisy-channel models that closely model the underlying classifier and segmentation errors are required.
Usage

use thiagoalessio\TesseractOCR\TesseractOCR;
echo (new TesseractOCR('text.png'))
    ->run();

use thiagoalessio\TesseractOCR\TesseractOCR;
echo (new TesseractOCR('german.png'))
    ->lang('deu')
    ->run();
Multiple languages

use thiagoalessio\TesseractOCR\TesseractOCR;
echo (new TesseractOCR('mixed-languages.png'))
    ->lang('eng', 'jpn', 'spa')
    ->run();
Inducing recognition

use thiagoalessio\TesseractOCR\TesseractOCR;
echo (new TesseractOCR('8055.png'))
    ->allowlist(range('A', 'Z'))
    ->run();
Breaking CAPTCHAs
Yes, I know some of you might want to use this library for the noble purpose
of breaking CAPTCHAs, so please take a look at this comment:
Expose the Required APIs — Writing a Wrapper
using System;using System.Runtime.InteropServices;public class TesseractWrapper{#if UNITY_EDITOR private const string TesseractDllName = "tesseract"; private const string LeptonicaDllName = "tesseract";#elif UNITY_ANDROID private const string TesseractDllName = "libtesseract.so"; private const string LeptonicaDllName = "liblept.so";#else private const string TesseractDllName = "tesseract"; private const string LeptonicaDllName = "tesseract";#endif private static extern IntPtr TessVersion();}
So, we start by adding a class called TesseractWrapper which will act as an API layer between the application and the Tesseract DLL(s). As you might notice above the DLLs we got, have different names for different platforms. In order to get over this issue we are using Compiler Switches to fix the Tesseract and Leptonica(One of the major dependencies) plugin file names.The way we expose Functions is by using DllImport(<fileName>) and extern key word… The function signature is something you would have to look up from the Documentations. Here we are exposing the function TessVersion() which has…

Function signature according to the Tesseract Documentation, so the return type is a pointer (IntPtr) with no params.
Создаем Searchable PDF с помощью Tesseract OCR
Недавно на работе столкнулись с задачей разпознавания сканированных документов и поиска по ним.
Мною был рассмотрен движок распознавания текста с открытым исходным кодом Tesseract.
В данной статье будут рассмотрены основные моменты возможной реализации.
Предположим, что у нас есть многостраничный отсканированные документ в формате PDF, но нераспознанный.
И наша задача распознать текст с помощью OCR (Optical character recognition — Оптическое распознавание символов) и создать так называемый Searchable PDF.
Searchable PDF — это PDF, в котором поверх изображения размещается дополнительный слой, содержащий распознанный текст, причем на тех же позициях что и на изображении.
Для начала нужно установить необходимые программы.
- imagemagick — набор программ (консольных утилит) для работы с множеством графических форматов;
- tesseract-ocr — приложение оптического распознавания символов;
- tesseract-ocr-all — все языковые пакеты (но можно установить только конкретные языковые пакеты)
У tesseract есть языковые пакеты для русского и казахских языков, что очень круто.
Также можно не устанавливать локально у себя tesseract, а запустить через docker.
Официального образа на hub.docker.com я не нашел, поэтому сделал свой.
Запустить контейнер с tesseract из образа naik85/tesseract можно так (пример для linux/unix):
docker run --rm -v "$(PWD)":files -w files -it naik85tesseract bash |
После старта контейнера откроется консоль bash, где можно будет выполнять команды.
Также будут доступны ваши файлы из директории, где вы запустили команду docker run.
Первый этап
На первом этапе нужно извлечь изображения из PDF. Здесь есть два варианта либо преобразовать PDF в один файл TIFF, либо преобразовать в набор изображений.
TIFF — это многостраничный формат хранения растровых графических изображений.
Для конвертации в TIFF использовалась следующая команда:
convert -density 300 YOUR_FILE.pdf -depth 1 -strip -background white -alpha off YOUR_FILE.tiff |
Для конвертации в PNG использовалась следующая команда:
convert -density 300 YOUR_FILE.pdf -depth 1 -strip -background white -alpha off YOUR_FILE.png |
Параметры конвертации приведены для примера, их можно настроить под ваши требования.
После выполнения конвертации в PNG для каждой страницы будет создан отдельный файл изображения.
Например:
YOUR_FILE-0.png
YOUR_FILE-1.png
...
YOUR_FILE-N.png
Второй этап
К сожалению, у меня не получилось преобразовать документ TIFF в Searchable PDF через tesseract.
Была использована следующая команда:
tesseract YOUR_FILE.tiff searchable -l rus PDF |
Выходила следующая ошибка:
Tesseract Open Source OCR Engine v4.1.1 with Leptonica
Error in pixReadFromTiffStream: failed to read tiffdata
Для нашей задачи постраничное деление на отдельные файлы (изображения) было даже предпочтительней (об этом ниже).
Конвертируем каждую страницу (файл png) в Searchable PDF:
tesseract YOUR_FILE-.png searchable- -l rus+kaz+eng pdf tesseract YOUR_FILE-1.png searchable-1 -l rus+kaz+eng pdf ... tesseract YOUR_FILE-N.png searchable-2 -l rus+kaz+eng pdf |
На выходе получаем файлы:
searchable-0.pdf
searchable-1.pdf
...
searchable-N.pdf
Очень крутая фишка, что можно разпозначать несколько языков, перечислив их через символ ‘+’: rus+kaz+eng.
Команда распознавания и извлечения текста
tesseract YOUR_FILE-.png -l rus+kaz+eng YOUR_FILE- tesseract YOUR_FILE-1.png -l rus+kaz+eng YOUR_FILE-1 ... tesseract YOUR_FILE-N.png -l rus+kaz+eng YOUR_FILE-N |
В результате будут созданы текстовые файлы:
YOUR_FILE-0.txt
YOUR_FILE-1.txt
...
YOUR_FILE-N.txt
Распознавая отдельно каждую страницу, мы можем организовать постраничный поиск и при необходимости показывать пользователю только нужные страницы.
Склеив тексты страниц и положив их в поисковый движок, получим подокументый поиск.
Если нужен целый Searchable PDF, то можно его склеивать из отдельных страниц.
p.s. Деление на отдельные страницы затратно получается, но, думаю, зато это более гибко.
| Поделиться данной статьей через: |
Результаты OCR
Теперь, когда готов ocr.py протестируем его для выполнения OCR на некоторых примерах входных изображений.
В этом разделе проверим OCR двух образцов изображений.
- Сначала пропустим каждое изображение через двоичный файл Tesseract.
- Затем передадим каждое изображение скрипту ocr.py (который выполняет предварительную обработку перед отправкой их в tesseract).
- Сравним результаты обоих этих методов и выявим ошибки.
Пример картинки

Это изображение содержит на переднем плане текст черного цвета на фоне, который частично белый и частично рассеянный с искусственно создаваемыми круговыми пятнами.
В этом случае Tesseract отлично справился с ошибками.
Теперь подтвердим, что скрипт ocr.py также работает:
Скрипт правильно распознал текстовое содержимое из изображения выведя его в консоль.
Затем протестируем Tesseract и наш скрипт на изображении, предварительно обработанным фильтром с шумом «соль и перец».

Результаты работы двоичного файла tesseract:
К сожалению, tesseract не смог распознать текст без ошибок.
Однако, используя метод предварительной обработки blur в ocr.py, можем получить лучшие результаты, для этого установим переменную preprocess в blur.
Этап предварительной обработки blur позволило Tesseract правильно распознать OCR и вывести желаемый текст.
Таким образом были получены приемлемые результаты с tesseract для OCR, но лучшая точность будет получена от обучения пользовательских классификаторов символов на определенных наборах шрифтов, которые используются на реальных изображениях.
Примечание. Если текст повернут, нужно также выполнить предварительную обработку.
Traineddata Installation
Tesseract contains a new neural network-based recognition engine that requires significantly more training data to deliver significantly higher accuracy contents. So we have to train our neural network application to return a better engine with higher accuracy. Normally, it takes a few days to a couple of weeks. So, I am going to choose to use an existing traineddata set that is trained on about 400000 text lines spanning about 4500 fonts.
There are three sets of traineddata files compatible with Tesseract 4.0x+, but I choose tessdata for my installation due to its support for the legacy recognizer. This traineddata is faster than other traineddata sets and has better accuracy. Below I provide some language links to get their traineddata.
English: Download
Tamil: Download
Sinhala: Download
You can also get other languages’ traineddata sets from here.
Adapting the Tesseract Open Source OCR Engine for Multilingual OCR
Publication Year: 2009
We describe efforts to adapt the Tesseract open source OCR engine for multiple scripts and languages. Effort has been concentrated on enabling generic multi-lingual operation such that negligible customization is required for a new language beyond providing a corpus of text. Although change was required to various modules, including physical layout analysis, and linguistic post-processing, no change was required to the character classifier beyond changing a few limits. The Tesseract classifier has adapted easily to Simplified Chinese. Test results on English, a mixture of European languages, and Russian, taken from a random sample of books, show a reasonably consistent word error rate between 3.72% and 5.78%, and Simplified Chinese has a character error rate of only 3.77%.
ACM, 2009. This is the authors’ version of the work. It is posted here by permission of ACM for your personal use. Not for redistribution. The definitive version was published in Proceedings of the International Workshop on Multilingual OCR 2009, Barcelona, Spain July 25, 2009.
Summary
Today we learned how to install and configure Tesseract on our machines, the first part in a two part series on using Tesseract for OCR. We then used the binary to apply OCR to input images.
However, we found out that unless our images are cleanly segmented Tesseract will give poor results. In the case of “noisy” input images, we’ll likely obtain better accuracy by training a custom machine learning model to recognize characters in our specific use case.
Tesseract is best suited for situations with high resolution inputs where the foreground text is cleanly segmented from the background.
Next week we’ll learn how to access Tesseract via Python code, so stay tuned.
Использование разных языков
Tesseract OCR поддерживает , Чтобы использовать язык, вы должны сначала установить его
Когда вы найдете язык, который вы хотите использовать в списке, обратите внимание на его сокращение. Мы собираемся установить поддержку для валлийцев
Его сокращение — «cym», что сокращенно от «Cymru», что означает валлийский.
Инсталляционный пакет называется «tesseract-ocr-» с сокращением языка, помеченным на конце. Чтобы установить файл с валлийским языком в Ubuntu, мы будем использовать:
sudo apt-get install tesseract-ocr-cym

Изображение с текстом ниже. Это первый стих уэльского государственного гимна.

Давайте посмотрим, справится ли Tesseract OCR с этой задачей. Мы будем использовать (язык) вариант, чтобы позволить знать язык, на котором мы хотим работать:
tesseract hen-wlad-fy-nhadau.png anthem -l cym --dpi 150

отлично справляется, как показано в извлеченном тексте ниже. Da Iawn, Tesseract OCR.

Если ваш документ содержит два или более языков (например, словарь валлийский-английский), вы можете использовать знак плюс () сказать добавить другой язык, вот так:
tesseract image.png textfile -l eng+cym+fra
5. Пользовательские параметры
Если вы уже прочитали некоторое содержание документация по использованию Tesseract с командной строкой, Вы знаете, что есть много свойств, которые вы можете изменить. Оболочка PHP tesseract предоставляет несколько методов для наиболее часто используемых опций:
Изменить путь к исполняемому файлу
По разным причинам у вас может не быть доступного tesseract непосредственно в переменной окружения PATH, поэтому выполнение команды с помощью оболочки php « tesseract imagename.jpeg outputbase «не будет работать. Вы можете указать расположение исполняемого файла tesseract с помощью исполняемого метода:
Сегментация страницы
Вы можете установить режим сегментации страницы с помощью ->psm($mode) инструкция, которая инструктирует тессеракт, как интерпретировать данное изображение:
Возможные значения для сегментации страницы:
| Значение | Описание |
| Только ориентация и обнаружение сценариев (OSD). | |
| 1 | Автоматическая сегментация страницы с помощью экранного меню. |
| 2 | Автоматическая сегментация страницы, но без OSD или OCR. |
| 3 | Полностью автоматическая сегментация страниц, но без OSD. (Это значение используется по умолчанию, если ни один не предоставлен) |
| 4 | Предположим, что один столбец текста переменного размера. |
| 5 | Предположим, что один однородный блок текста вертикально выровнен. |
| 6 | Предположим, что один единый блок текста. |
| 7 | Рассматривайте изображение как одну текстовую строку. |
| 8 | Рассматривайте изображение как одно слово. |
| 9 | Рассматривайте изображение как одно слово в кругу. |
| 10 | Относитесь к изображению как к одному персонажу. |
Установите языки для распознавания
Вы можете определить один или несколько языков, которые будут использоваться во время распознавания, используя ->lang($lang1, $lang2) метод. Вы можете получить список все поддерживаемые языки по tesseract в документации здесь:
Используйте слова из списка
Вы можете предоставить список. этот список должен быть простым текстовым файлом, содержащим список слов, которые вы хотите, чтобы tesseract считал обычными словарными словами, например ( mywords.txt ):
И добавьте это с оберткой:
Этот список действительно полезен при работе с контентом, который содержит техническую терминологию.
Белый список персонажей
Вы можете даже ограничить символы, которые распознает tesseract, например, с помощью следующего изображения:
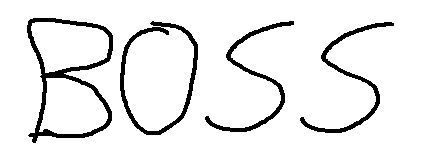
Тессеракт узнает «BOSS» , Это здорово, потому что на картинке кажется, что кто-то написал БОСС, но пользователь (вероятно, ребенок или кто-то с плохой каллиграфией) написал число «8055» ? Вот где белый список пригодится, в этом случае мы можем ограничить символы для распознавания только чисел, используя диапазон от 0 до 9:
Предоставление в результате ожидаемого числа «8055».
Установить значение конфигурации
Tesseract предлагает более 600 настраиваемых свойств (вы можете перечислить их, используя в консоли tesseract —print-parameters ) что вы можете изменить с помощью ->config($propertyName, $value) :
Если вам нужна дополнительная информация о поддерживаемых методах этой оболочки, пожалуйста, посетите официальный репозиторий здесь.
OCR with Nanonets

The Nanonets OCR API allows you to build OCR models with ease. You do not have to worry about pre-processing your images or worry about matching templates or build rule based engines to increase the accuracy of your OCR model.
You can upload your data, annotate it, set the model to train and wait for getting predictions through a browser based UI without writing a single line of code, worrying about GPUs or finding the right architectures for your deep learning models. You can also acquire the JSON responses of each prediction to integrate it with your own systems and build machine learning powered apps built on state of the art algorithms and a strong infrastructure.
Using the GUI: https://app.nanonets.com/
You can also use the Nanonets-OCR API by following the steps below:
Step 1: Clone the Repo, Install dependencies
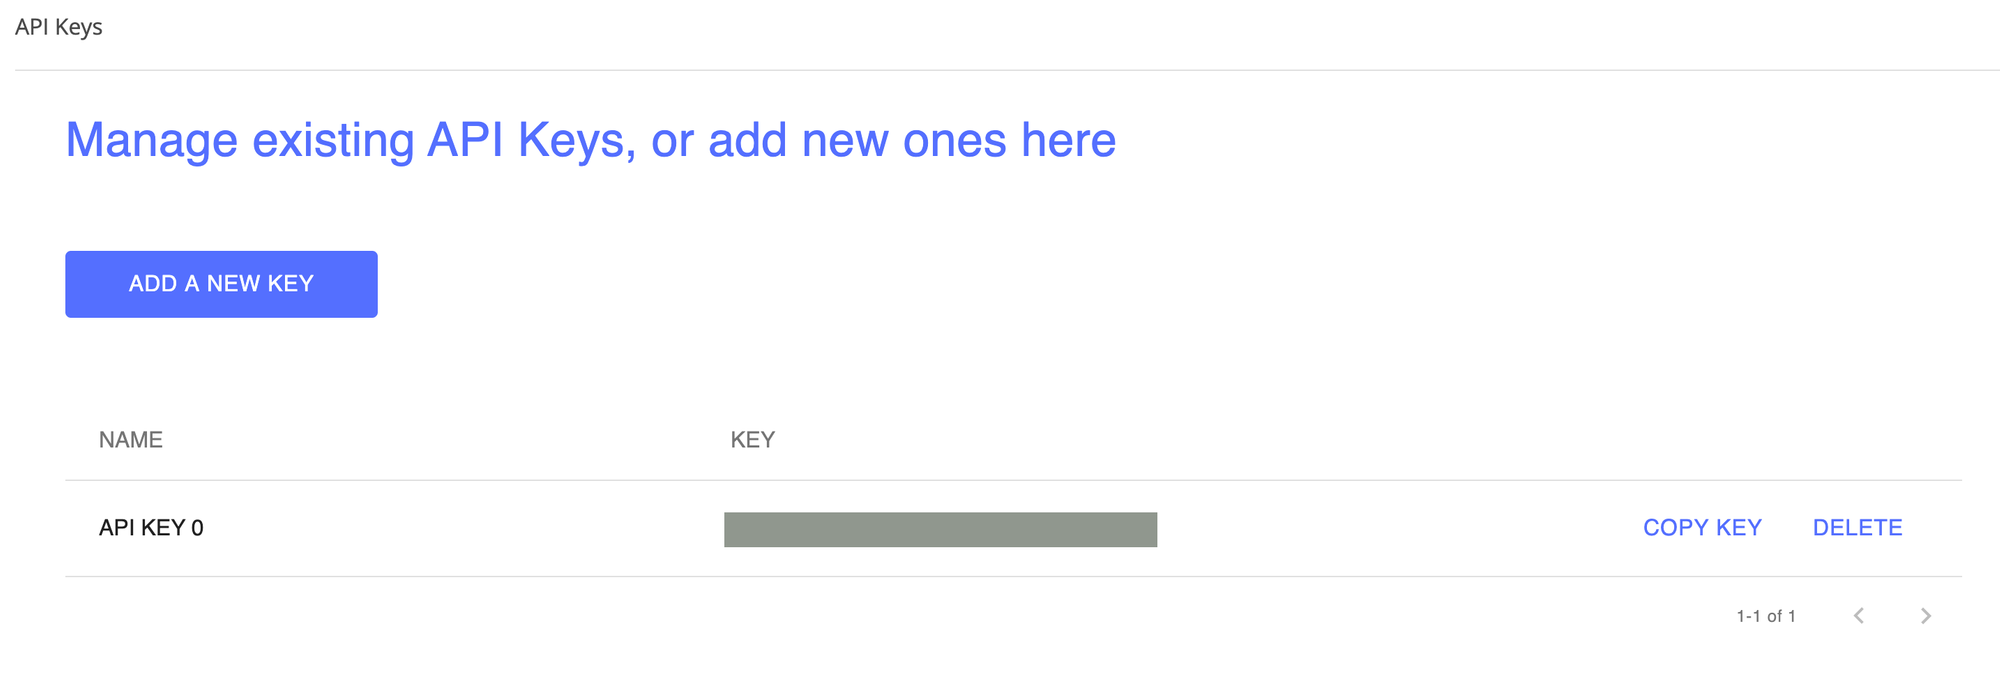
Step 2: Get your free API Key
Get your free API Key from
Step 3: Set the API key as an Environment Variable
Step 4: Create a New Model
Note: This generates a MODEL_ID that you need for the next step
Step 5: Add Model Id as Environment Variable
Note: you will get YOUR_MODEL_ID from the previous step
Step 6: Upload the Training Data
The training data is found in (image files) and (annotations for the image files)
Step 7: Train Model
Once the Images have been uploaded, begin training the Model
Step 9: Make Prediction
Once the model is trained. You can make predictions using the model
Improving Book OCR by Adaptive Language and Image Models
Publication Year: 2012
In order to cope with the vast diversity of book content and typefaces, it is important for OCR systems to leverage the strong consistency within a book but adapt to variations across books. In this work, we describe a system that combines two parallel correction paths using document-specific image and language models. Each model adapts to shapes and vocabularies within a book to identify inconsistencies as correction hypotheses, but relies on the other for effective cross-validation. Using the open source Tesseract engine as baseline, results on a large dataset of scanned books demonstrate that word error rates can be reduced by 25% using this approach.
Usage within Selenium
Selenium scripts can make use of Tesseract’s .
Alternately, Java coders can use Tess4j at https://sourceforge.net/projects/tess4j
by adding to pom.xml file add it as a dependency, such as:
    <dependencies>
        <dependency>
            <groupId>net.sourceforge.tess4j</groupId>
            <artifactId>tess4j</artifactId>
            <version>2.0.0</version>
            <scope>test</scope>
        </dependency>
Then, in your JUnit test file, add at the top:
import net.sourceforge.tess4j.*;
VIDEO (no sound):
Sample code is at https://unmesh.me/2015/06/30/using-tesseract-with-selenium-webdriver-for-checking-text-on-images-using-ocr/
VIDEO: How to set up Tess4j in Eclipse per this blog.
Tess4j is actually written in C#. However, those who code C# can use the <a target=”_blank” href=”http://www.emgu.com/wiki/index.php/Emgu_CV”Emgu</a> .Net wrapper library.
1. Установите Tesseract в вашей системе
Чтобы использовать API оптического распознавания символов, как упоминалось в статье, мы собираемся использовать Tesseract. Тессеракт является механизмом оптического распознавания символов (OCR) с открытым исходным кодом, доступным по лицензии Apache 2.0. Его можно использовать напрямую с помощью API для извлечения печатного, рукописного или печатного текста из изображений. Он поддерживает широкий спектр языков (которые должны быть установлены). Tesseract поддерживает различные форматы вывода: обычный текст, hocr (html) и pdf.
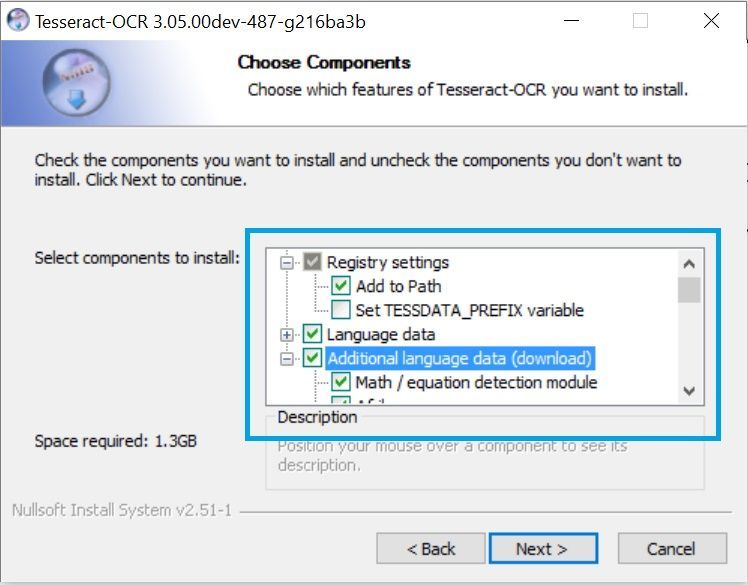
Windows
Процесс установки очень прост, просто следуйте инструкциям мастера. Однако мы рекомендуем вам установить в настройках непосредственно все языки, которые вам нужны для tesseract (только те, которые вам нужны, в противном случае процесс загрузки займет много времени) и зарегистрировать tesseract в PATH:
Подождите, пока установка закончится, и вы готовы к работе. Вы можете проверить, правильно ли он был установлен, запустив новое окно командной строки. tesseract -v (это должно вывести установленную версию).
Ubuntu
Установите Tesseract с помощью следующей команды:
Затем установите языки, которые необходимо распознать (например, -deu, -fra, -eng, -spa требуемый английский):
Тогда tesseract должен быть доступен на любом терминале и, следовательно, доступен для наших сценариев PHP позже.
MacPorts
Чтобы установить Tesseract, запустите эту команду:
Чтобы установить любые языковые данные, выполните:
Полный список доступных langcodes можно найти на Страница тессеракт MacPorts.
Homebrew
Чтобы установить Tesseract, запустите эту команду:
Если вам нужна дополнительная информация или вашей операционной системы нет в списке, обратитесь к Установка вики репозитория Tesseract в Github здесь.