Урок №1. введение в qt и установка qt creator
Содержание:
- Введение в Qt
- Finished main.py
- Compiling Qt Creator
- Руководство по настройке среды Qt Designer в Pycharm!
- Qt QML
- Usage
- Установка Qt Creator
- Создание проекта
- Prerequisites
- В-пятых, используйте собственные плагины
- An IDE that helps developers create applications for desktop and mobile device platforms, while offering support for a source code editor and debugging options
- Menus
- Shortcut Keys
- Строительство и установка вилки
- Создаем первую программу в Qt designer
Введение в Qt
Qt является кроссплатформенным (не зависящим от платформы/ОС) фреймворком для разработки приложений на языке С++. С помощью Qt были разработаны такие известные приложения, как: KDE, Opera, Google Earth и Skype. Впервые Qt был опубликован в мае 1995 года.
Qt5 подразумевает двойное лицензирование, а это означает, что Qt может быть использован в некоммерческих целях для создания приложений с открытым исходным кодом, а также как лицензия для коммерческих клиентов. За счет использования собственного фреймворка и мощного инструментария Qt позволяет быстро и удобно создавать собственные кроссплатформенные приложения. Кроме того, команды разработчиков получают возможность работать на разных платформах, используя при этом общие инструменты для разработки и отладки. Весь инструментарий Qt с открытым исходным кодом вы можете найти на сайте qt.io.
Изначально Qt был разработан норвежской компанией по разработке программного обеспечения Trolltech. В 2008 году компанию приобрела Nokia. Спустя четыре года в августе 2012 программные технологии Qt выкупила финская компания-разработчик Digia. Сейчас Qt развивается компанией QT Company, которая является дочерней компанией Digia, и как проект Qt под открытым исходным кодом с участием отдельных разработчиков и фирм.
Finished main.py
That’s the basic logic of using Qt Designer and PyQt to design and develop a GUI application.
You can safely edit your design and re-run the command without fear of your main code getting lost or overwritten.
Final notes
All the code in this example is done in the main UI thread, which is often a bad idea — especially if you have something that takes time to finish. For example if the function took long time our UI would be frozen the whole time. In one of the future tutorials I’ll cover PyQt threading, this one is focused on just the bare basics without too much unnecessary things. But please keep in mind that anything that doing stuff in main UI thread is generally a bad idea.
All the code and files used can be found in this gist: https://gist.github.com/nikolak/615def9e197d5db04bef
Useful links:
Python Inheritance SO thread: http://stackoverflow.com/questions/576169/understanding-python-super-with-init-methods
PyQt reference guide: http://pyqt.sourceforge.net/Docs/PyQt4/
Compiling Qt Creator
Prerequisites:
- Qt 5.14.0 or later
- Qt WebEngine module for QtWebEngine based help viewer
- On Windows:
- MinGW with GCC 7 or Visual Studio 2017 or later
- Python 3.5 or later (optional, needed for the python enabled debug helper)
- Debugging Tools for Windows (optional, for MSVC debugging support with CDB)
- On Mac OS X: latest Xcode
- On Linux: GCC 7 or later
- LLVM/Clang 10 or later (optional, LLVM/Clang 11 is recommended.
See on how to
get LLVM.
The ClangFormat, ClangPchManager and ClangRefactoring use the LLVM C++ API.
Since the LLVM C++ API provides no compatibility guarantee,
if later versions don’t compile we don’t support that version.) - CMake
- Ninja (recommended)
The installed toolchains have to match the one Qt was compiled with.
Linux and macOS
These instructions assume that Ninja is installed and in the , Qt Creator
sources are located at , Qt is installed in
, and LLVM is installed in .
Note that if you install Qt via the online installer, the path to Qt must
include the version number and compiler ABI. The path to the online installer
content is not enough.
See on how to
get LLVM.
Windows
These instructions assume that Ninja is installed and in the , Qt Creator
sources are located at , Qt is installed in
, and LLVM is installed in .
Note that if you install Qt via the online installer, the path to Qt must
include the version number and compiler ABI. The path to the online installer
content is not enough.
See on how to
get LLVM.
Decide which compiler to use: MinGW or Microsoft Visual Studio.
For Microsoft Visual C++ you can use the «Build Tools for Visual Studio». Also
install the «Debugging Tools for Windows» from the Windows SDK installer. We
strongly recommend using the 64-bit version and 64-bit compilers on 64-bit
systems. Open the from the
start menu items that were created for Visual Studio, and run the commands
below in it.
Qt Creator can be registered as a post-mortem debugger. This can be done in the
options page or by running the tool qtcdebugger with administrative privileges
passing the command line options -register/unregister, respectively.
Alternatively, the required registry entries
can be modified using the registry editor regedt32 to contain
When using a self-built version of Qt Creator as post-mortem debugger, it needs
to be able to find all dependent Qt-libraries and plugins when being launched
by the system. The easiest way to do this is to create a self-contained Qt
Creator by installing it and installing its dependencies. See «Options» below
for details.
Note that unlike on Unix, you cannot overwrite executables that are running.
Thus, if you want to work on Qt Creator using Qt Creator, you need a separate
installation of it. We recommend using a separate, release-built version of Qt
Creator to work on a debug-built version of Qt Creator.
Options
If you do not have Ninja installed and in the , remove from
the first call. If you want to build in release mode, change the build
type to . You can also build with release
optimizations but debug information with .
You can find more options in the generated CMakeCache.txt file. For instance,
building of Qbs together with Qt Creator can be enabled with .
Installation is not needed. It is however possible, using
To create a self-contained Qt Creator installation, including all dependencies
like Qt and LLVM, additionally run
Руководство по настройке среды Qt Designer в Pycharm!
http-equiv=»Content-Type» content=»text/html;charset=UTF-8″>yle=»margin-bottom:5px;»>Теги: Pyqt5
Qt designerпротив Pycharm Конфигурация среды
пролог
Qt designer Да Qt Созданный инструмент можно использовать как программное обеспечение (аналогичноPS ), вы можете разработать интерфейс более интуитивно понятным способом в программе и сохранить его какui файл,Qt DesignerEстьPyGUI Вы можете напрямую преобразовать файл пользовательского интерфейса вpy(Здесь сpyqt5 Например)py файл. Перед установкой Qt Designer убедитесь, чтоPyQt5 Установлен успешно, метод установки PyQt5 относительно прост, напрямую с помощьюpip :
Интерфейс Qt Designer выглядит следующим образом:

Настройте Qtdesigner и PyUIC в Pycharm
Настроить Qt Designer
Сначала найдите установленныйdesigner.exe Расположение файла, здесь могу порекомендовать инструментeverything Вы можете быстро получить местоположение файла на компьютере, обычно в следующей папке следующего уровня пакета python (site-packages-> pyqt-tools), например, на моем компьютере,designer.exe Расположение:C:\Users\13479\Anaconda3\Lib\site-packages\pyqt5_tools\designer.exe
Откройте pycharm и щелкните в соответствии со следующим каталогом: ** Файл -> Настройки -> Инструменты -> Внешние инструменты **, найдитеExternal Tools, Затем щелкните+ число,:

Затем появится окошко, вам нужно заполнить три места, заполнить следующими способами:
- Name Заполните Qt Designer;
- Program Заполните адрес дизайнера, вот мой:C:\Users\13479\Anaconda3\Lib\site-packages\pyqt5_tools\designer.exe;
-
Working directory заполнить:
P
r
o
j
e
c
t
F
i
l
e
D
i
r
ProjectFileDir
ProjectFileDir;
Затем нажмите ОК.

Настроить PyGUI
КонфигурацияPyGUI Метод иQt Designer Метод аналогичен:
- Name : PyGUI;
- Program : Это не адрес каталога Designer.exe, он относится к адресу python.exe, например: C: \ Users \ 13479 \ Anaconda3 \ python.exe
-
Arugments для:-m PyQt5.uic.pyuic
F
i
l
e
N
a
m
e
FileName
FileName -oF
i
l
e
N
a
m
e
W
i
t
h
o
u
t
E
x
t
e
n
s
i
o
n
FileNameWithoutExtension
FileNameWithoutExtension.py; -
Working directory :для**
F
i
l
e
D
i
r
FileDir
FileDir**;

Вышеупомянутое — это всеQt Designer Процесс настройки,
Как открыть Qt Designer в PyCharm:Tools -> External Tools -> Qtdesigner, Просто нажмите.

Поставитьui Файл преобразован вpy Файловый метод:
Вpycharm Выбраноui Файл, щелкните правой кнопкой мыши,Внешние инструменты (здесь я установил qt) -> PyGUI , Щелкните один раз, чтобы создать файл с тем же именем, но с суффиксом py.

Я сосредотачиваюсь на областях анализа данных, визуализации данных и обработки изображений Личная учетная запись WeChat: г-н Z, просто помните об этом, делайте это часто, когда вам нечего делать!
Интеллектуальная рекомендация
Наша страна — большая страна с далеко зашедшей винной культурой. Еще во времена династии Сун мы варили вкусные и мягкие спиртные напитки. Мы часто слышим, как старшие поколения говорят, что с возрасто…
1. Предположим, что вы tomcat6 и добавили библиотеку драйверов mysql в D: \ Program Files \ Apache Software Foundation \ Tomcat 6.0 \ lib 2. Добавьте в «Tomcat 6.0 \ conf \ context.xml&ra…
…
4. Условное суждение После выполнения условного тестового выражения обычно возвращается «истина» или «ложь», так же как возвращаемое значение после выполнения команды равно 0 д…
1. Что такое куча? Стек: особый видПолное двоичное деревоструктура. Большая корневая куча: полное двоичное дерево, удовлетворяющее тому, что любой узел больше, чем его дочерний узел.Большой; Неболь…
Вам также может понравиться
1. Введение Аполлон (Аполлон) — это НИОКР в Ctrip Framework SectorРаспределенный Центр конфигурацииМожно централизовать управление для управления различными средами, разными кластерами. После настройк…
…
Список может быть изменен, но иногда вам необходимо создать серию немодифицируемых элементов, а кортеж может удовлетворить эти потребности. Значение, которое не может быть изменено в Python, называетс…
тема: код показан ниже: Ожидание является обратной величиной вероятности. Накопите все ожидаемые значения, чтобы получить: N + N / 2 +… + 1, и положите N, чтобы получить: N (1 + 1/2 +… +…
1. Ролевое управление фоновым менеджментом 1.1 Определение ролевой формы для управления ролями Определите форму роли в файле forms.py в каталоге администратора приложения. 1.2 Список всех ролей в упра…
Qt QML
With Qt QML we focused on preparing for Qt 6, which has lead to a useful set of new features in Qt 5.15.
QML now has the concept of ‘required’ properties for components. These are properties that have to be set by a user of the component. Components can now be specified inline in a QML file. We’ve also added a new, declarative way of registering types.
We have improved the qmllint tool to give you far better warnings about possible problems in your QML code base. We’ve also added a new qmlformat tool that can help you format your QML files according to our QML coding style guidelines.
Finally, we’ve also worked on making sure that QML used in Qt for MCUs and Qt 5.15 are compatible.
Usage
A program is provided available as Scripts/pyqt5-tools.exe. There are
subcommands provided for each of Designer, QML Scene, and the QML Test Runner.
These wrapper commands provide additional functionality related to launching
the underlying programs. A larger set of Qt application are available as
subcommands of the Scripts/qt5-tools.exe program. In both cases, passing
--help will list the available subcommands.
Additionally, each pyqt5-tools subcommand listed below includes a parameter
to run a basic example which can be used to see if the plugins are working.
These examples are not intended to be used as examples of good code.
Each subcommand searches up the filesystem tree from your current
working directory to find a .env file and loads it if found. If found, the
environment variable DOT_ENV_DIRECTORY will be set to the directory
containing the .env file. With this extra variable you can specify paths
relative to the .env location.
PYQTDESIGNERPATH=${PYQTDESIGNERPATH};${DOT_ENV_DIRECTORY}/pathtomywidgets
Designer
There is a Scripts/pyqt5-tools.exe designer.exe entry point that will help fill out
PYQTDESIGNERPATH from either command line arguments or a .env file.
Unknown arguments are passed through to the original Qt Designer program.
Usage: pyqt5-tools designer

Options:
  -p, --widget-path DIRECTORY     Paths to be combined with PYQTDESIGNERPATH
  --example-widget-path           Include the path for the pyqt5-tools example
                                  button (c:\users\sda\testenv\lib\site-
                                  packages\pyqt5_plugins)

  --designer-help                 Pass through to get Designer's --help
  --test-exception-dialog         Raise an exception to check the exception
                                  dialog functionality.

  --qt-debug-plugins / --no-qt-debug-plugins
                                  Set QT_DEBUG_PLUGINS=1
  --help                          Show this message and exit.
If you want to view the generated code from within Designer, you can
run Scripts/pyqt5-tools.exe installuic and it will copy pyuic5.exe
such that Designer will use it and show you generated Python code. Note that
this will enable viewing using the C++ menu item while the Python menu item
will be broken. Without having made this adjustment, the C++ option shows
C++ code while the Python option shows PySide2 code. pyqt5 must already
be installed or this script will be unable to find the original pyuic5.exe
to copy.
In addition to the standard features of the official Designer plugin, this
provides an exception dialog for your widget’s Python code. Otherwise Designer
in Windows silently crashes on Python exceptions.
QML Plugin
The QML plugin is also included. In the future a tool may be provided to
handle copying of the plugin to each directory where it is needed. For now
this must be done manually.
site-packages/pyqt5_tools/Qt/bin/plugins/pyqt5qmlplugin.dll
QML Scene
Usage: pyqt5-tools qmlscene

Options:
  -p, --qml2-import-path DIRECTORY
                                  Paths to be combined with QML2_IMPORT_PATH
  --qmlscene-help                 Pass through to get QML scene's --help
  --qt-debug-plugins / --no-qt-debug-plugins
                                  Set QT_DEBUG_PLUGINS=1
  --run-qml-example               Run the pyqt5-tools QML example
  --help                          Show this message and exit.
Установка Qt Creator
Итак, пора рассмотреть как установить Qt Creator. Если для Windows разработчики позаботились и сделали оффлайн-установщик, то в Linux 32-bit этой возможности не предусмотрено. Поэтому во время установки вам может потребоваться стабильное интернет-соединение (~20-30 минут). Для начала скачаем установщик:
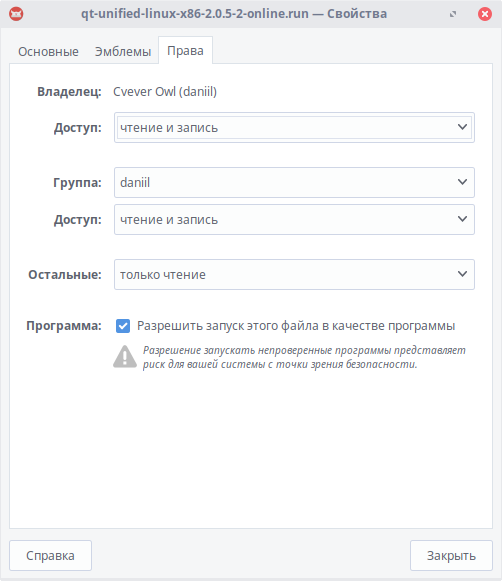
После окончания загрузки переходим в папку с файлом, нажимаем правой кнопкой мыши и выбираем пункт «Свойства».

Теперь перейдем на вкладку «Права» и поставим галочку «Разрешить запуск этого файла в качестве программы».
Запускаем программу.
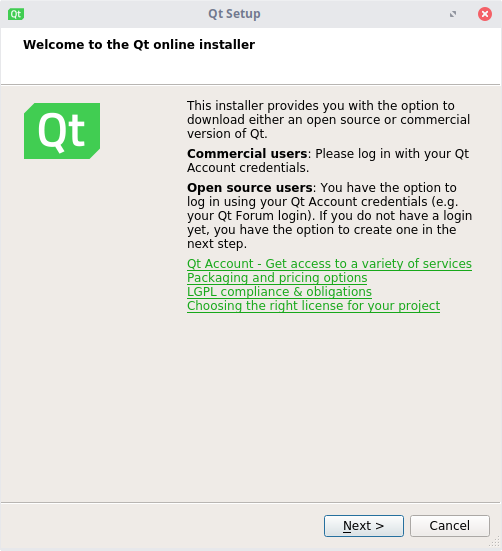
Теперь нажимаем «Next».
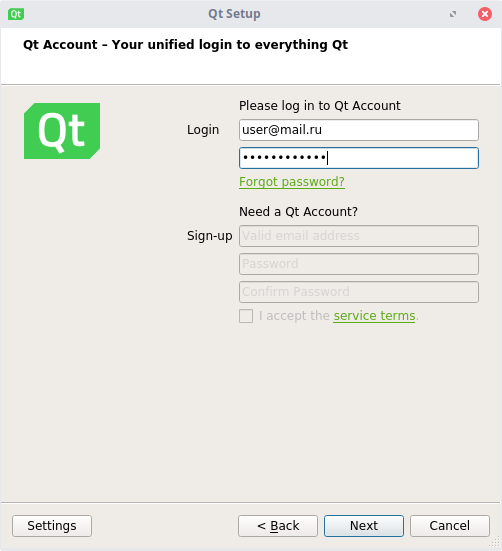
Здесь необходимо выбрать существующий аккаунт или создать его. Данное действие необходимо для проверки лицензии (коммерческой или некоммерческой).

Нажимаем «Next».
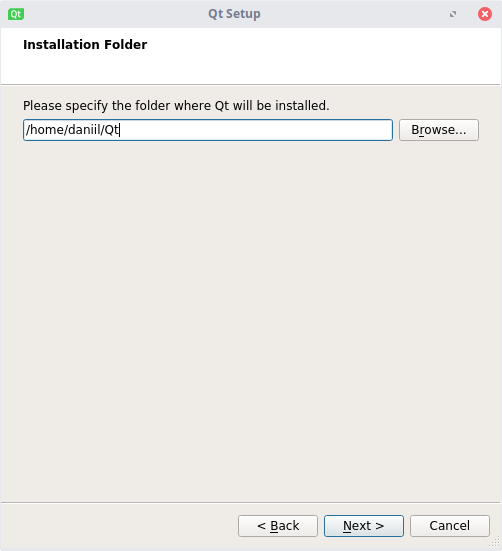
Выбираем директорию, в которой будет находиться Qt
Важно, чтобы в пути не было кириллицы и пробелов!
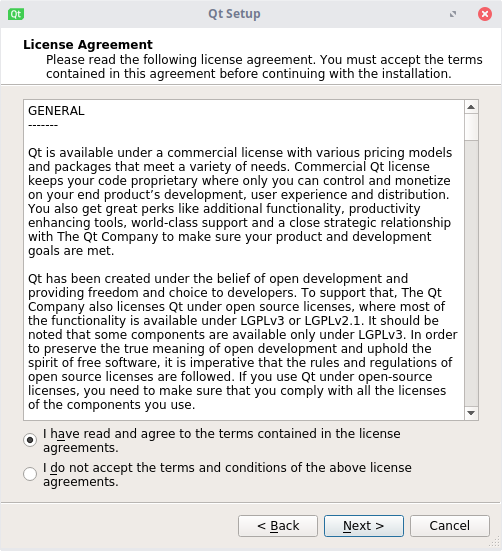
В этом окне принимаем лицензию. Жмем «Next».
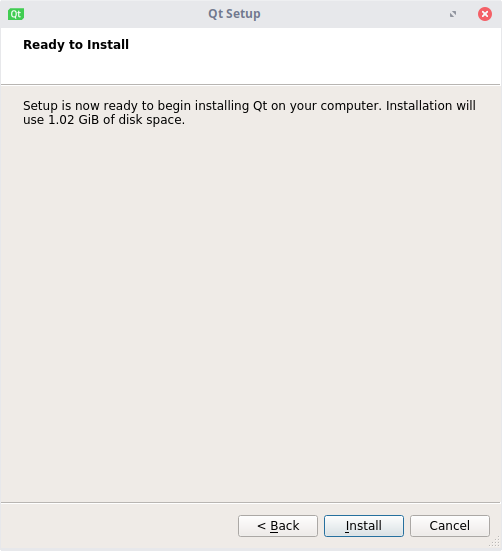
Если Вы готовы, начинайте установку. У Вас запросят пароль суперпользователя (sudo), после чего начнется скачивание и извлечение файлов. Альтернативный способ — установка через терминал. Для начала необходимо обновить список пакетов.
Скачиваем и устанавливаем Qt:
Теперь установка Qt Creator:
И, если нужно, исходники.
Создание проекта
Вначале нам необходимо создать проект. Сразу скажу, что наша программа будет консольным приложением. Для этого выберите или можно воспользоваться сочетанием клавиш :

Перед вами появится «Мастер настройки проектов». В левой колонке отметьте пункт , а затем в правой — :

На следующем шаге нужно будет указать имя для нашей будущей программы и папку, где будут располагаться файлы проекта. У меня это и соответственно:

На следующем шаге без изменений, поэтому просто нажимаем кнопку :

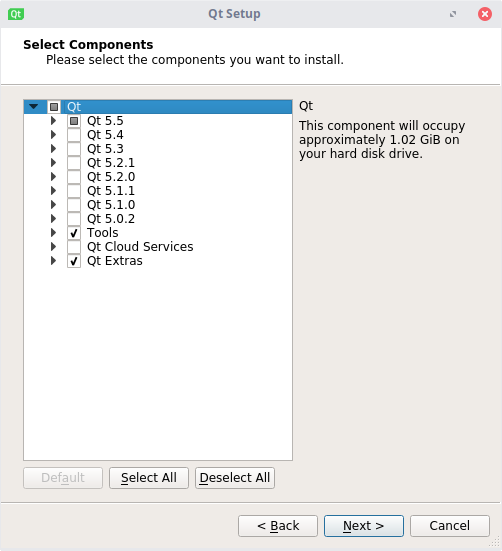
Теперь нам нужно выбрать набор компиляторов, который мы будем использовать для сборки нашего проекта. Я настоятельно рекомендую выбрать (сняв при этом отметки с остальных, если они у вас есть):

На последнем шаге нажимаем :

Теперь вы можете увидеть автоматически сгенерированный Qt-проект консольного приложения. Давайте рассмотрим его детально:

В корневой папке у нас лежит файл My_QtApplication.pro — это основной файл настроек проекта
Мы разберем его позже, а пока обратите внимание на папку «Исходники», в которой расположен файл main.cpp. Данный файл содержит минимальный исходный код нашей программы
Он был автоматически сгенерирован средствами Qt. Я не буду вдаваться в детальное описание класса QCoreApplication, скажу лишь, что он предоставляет обработку сообщений для консольного приложения Qt и является особенностью архитектуры построения Qt-приложений.
Prerequisites
You need PyQt and Qt Designer installed, and of course python.
I’ll be using PyQt4 with python 2.7.10 but there are no major differences between PyQt and PySide or python 3 versions of those, so if you already have PyQt5 or PySide installed there is no need to downgrade/switch.
If you don’t have anything installed you can get PyQt for Windows here:
It comes with Qt Designer bundled.
For OS X you can download the PyQt via homebrew:
And QtCreator (which contains Qt Designer) here: http://download.qt.io/archive/qt/4.8/4.8.6/
If you’re looking for a more straightforward installation of the qt Qt Designer alone then check out this privately maintained builds page https://build-system.fman.io/qt-designer-download
On Linux the packages required are probably in your distro repositories, if you’re on Ubuntu/Debian you can run:
After you’re done installing requirements on your operating system open terminal/command prompt and make sure you can run command it should show:
If you get «command not found» or something along those lines try googling on how to solve it for your operating system and pyqt version.
If you’re on windows you most likely don’t have (replace with your python version) in your .
To see how to solve that look at this SO thread
В-пятых, используйте собственные плагины
1. Создайте новый проект BatteryUser, дизайн интерфейса следующий: Измените функцию слота ползунка и элемента управления батареей:
2. Создайте подкаталог include в каталоге исходного файла проекта и скопируйте файл заголовка qwbattery.h, определенный классом QwBattery, файлы библиотеки отладки и выпуска qwbatteryplugind.lib и qwbatteryplugin.lib в этот каталог. Ниже проекту потребуется этот файл заголовка и файл библиотеки при компиляции и компоновке.
3. Импортируйте файл библиотеки.
Метод 1: метод руководства Щелкните проект правой кнопкой мыши и во всплывающем меню выберите «Добавить библиотеку …». При выборе типа библиотеки выберите внешнюю библиотеку «Внешняя библиотека»; при выборе местоположения файла библиотеки поместите включаемую папку Выберите qwbatteryplugin.lib под, он автоматически заполнит поле редактирования «Включить путь», выберите платформу Windows, выберите «Динамический» для метода подключения и отметьте «Добавить суффикс« d »для отладочной версии ниже, что означает добавление одного суффикса после имени библиотеки отладочной версии. Буква «d», чтобы компилятор мог автоматически различать выпускную и отладочную версию файлов библиотеки.
Метод 2: импорт кода вручную Измените файл проекта BatteryUser.pro и добавьте:
4. Запустите проект. в это время может нормально компилироваться, но не может нормально работать. После запуска произойдет сбой без сообщения об ошибке. (1) Первый шаг: компиляция Компилировать отдельно в режимах отладки и выпуска. (2) Шаг 2. Скопируйте DLL-файл подключаемого модуля. Скопируйте файлы библиотеки динамической компоновки qwbatteryplugin.dll и qwbatteryplugind.dll, сгенерированные подключаемым модулем в режимах отладки и выпуска, в две папки компиляции проекта:
(3) Шаг 3: Запуск
An IDE that helps developers create applications for desktop and mobile device platforms, while offering support for a source code editor and debugging options
What’s new in Qt Creator 5.0.1:
Fixed saving of MIME type settings
Read the full changelog
Qt Creator is a cross-platform utility that works through an integrated development environment (IDE) for helping developers create applications for desktop and mobile device platforms.
Advanced editor with support for QML and C++
Although it comes packed with a multitude of dedicated parameters, it sports a clean and straightforward interface that gives users the possibility to set up a new project by using the step-by-step approach, which comes in handy especially for rookies as they are offered assistance throughout the entire process.
Qt Creator features several tools designed to help you customize the layout of the programs that you are creating and a built-in text editor that offers support for C++ and QML programming languages, syntax highlighting, as well as code completion and code syntax checking options.
Integrated debuggers, visual editors for UI design, and other programming tools
What’s more, the program lets you build, run, and deploy QT applications for desktop environments and mobile devices, use the debugging mode for analyzing the state of applications (it integrates several debuggers, such as GNU Symbolic Debugger, Microsoft Console Debugger, and JavaScript), as well as design installation packages that can be published on different application stores and channels.
When it comes to configuring the settings of a new project, you can select the type of the utility that you want to create (Qt Quick or HTML5 or Qt widgets), set the programming language, use a version control system, as well as design separate versions of the project files.
Developing QT Quick applications and widget-based utilities can be done with two integrated visual editors (Qt Quick Designer and Qt Designer).
A powerful IDE fit for beginners and experienced programmers alike
Qt Creator comes packed with several tools for helping you write and edit code easier, as you can use the incremental and advanced search function, perform code refactoring operations in order to find and rename symbols, as well as configure the source code editor in terms of font, color, and indentation.
Plus, the program comprises the Valgrind code analysis tool that enables users to identify possible errors and memory leaks, various build systems (qmake and CMake), command-line operations, keyboard shortcuts, and external tools.
All in all, Qt Creator proves to be a reliable utility and one of the most powerful IDE for application developers. It provides a complete suite of tools and a straightforward layout that meet the requirements of rookies and professionals alike.
Menus
Menus are added to the menu bar by modifying the Type Here placeholders. One of these is always present for editing purposes, and will not be displayed in the preview or in the finished window.
Once created, the properties of a menu can be accessed using the , and each menu can be accessed for this purpose via the .
Existing menus can be removed by opening a context menu over the label in the menu bar, and selecting Remove Menu ‘menu_name’.
Creating a Menu
Double-click the placeholder item to begin editing. The menu text, displayed using a line edit, can be modified.
Insert the required text for the new menu. Inserting an ampersand character (&) causes the letter following it to be used as a mnemonic for the menu.
Press Return or Enter to accept the new text, or press Escape to reject it. You can undo the editing operation later if required.
Menus can also be rearranged in the menu bar simply by dragging and dropping them in the preferred location. A vertical red line indicates the position where the menu will be inserted.
Menus can contain any number of entries and separators, and can be nested to the required depth. Adding new entries to menus can be achieved by navigating the menu structure in the usual way.
Creating a Menu Entry
Double-click the Type Here placeholder to begin editing, or double-click Add Separator to insert a new separator line after the last entry in the menu.
The menu entry’s text is displayed using a line edit, and can be modified.
Insert the required text for the new entry, optionally using the ampersand character (&) to mark the letter to use as a mnemonic for the entry.
Press Return or Enter to accept the new text, or press Escape to reject it. The action created for this menu entry will be accessible via the , and any associated keyboard shortcut can be set there.
Just like with menus, entries can be moved around simply by dragging and dropping them in the preferred location. When an entry is dragged over a closed menu, the menu will open to allow it to be inserted there. Since menu entries are based on actions, they can also be dropped onto toolbars, where they will be displayed as toolbar buttons.
Shortcut Keys
In addition to the standard toolbar and context menu entries, there is also a set of keyboard shortcuts to apply layouts on widgets.
| Layout | Shortcut | Description |
|---|---|---|
| Horizontal | Ctrl+1 | Places the selected objects in a horizontal layout. |
| Vertical | Ctrl+2 | Places the selected objects in a vertical layout. |
| Grid | Ctrl+5 | Places the selected objects in a grid layout. |
| Form | Ctrl+6 | Places the selected objects in a form layout. |
| Horizontal splitter | Ctrl+3 | Creates a horizontal splitter and places the selected objects inside it. |
| Vertical splitter | Ctrl+4 | Creates a vertical splitter and places the selected objects inside it. |
| Adjust size | Ctrl+J | Adjusts the size of the layout to ensure that each child object has sufficient space to display its contents. See () for more information. |
Note: Ctrl+0 is used to break a layout.
Строительство и установка вилки
Одиночная вилка
Custom Widget Plugin Пример демонстрирует простойQt Designerplugin.
В файле для плагина должны быть указаны заголовки и источники как для пользовательского виджета, так и для интерфейса плагина. Как правило, в этом файле нужно только указать, что проект плагина должен быть построен как библиотека, но с определенной поддержкой плагина дляQt Designer. Это делается с помощью следующих объявлений:
QT          += widgets uiplugin
CONFIG      += plugin
TEMPLATE    = lib
переменная содержит ключевое слово . Это указывает на то, что плагин использует только абстрактные интерфейсы QDesignerCustomWidgetInterface и QDesignerCustomWidgetCollectionInterface и не имеет связи сQt Designerбиблиотеки.При доступе к другим интерфейсамQt Designerкоторые имеют связь, следует использовать ; это гарантирует, что плагин динамически ссылается наQt Designerбиблиотек и имеет от них зависимость во времени исполнения.
Если плагины собраны в режиме,несовместимом сQt Designer, они не будут загружены и установлены. Для получения дополнительной информации о плагинах см. Документ Plugins HOWTO .
Также необходимо убедиться,что плагин установлен вместе с другимиQt Designerплагины виджета:
target.path = $$/designer
INSTALLS += target
переменная является заполнителем для расположения установленных плагинов Qt. Вы можете настроитьQt Designerдля поиска подключаемых в других местах путем установки переменной среды QT_PLUGIN_PATH перед запуском приложения.
Note: Qt Designerбудет искать подкаталог в каждом указанном пути.
См. () для получения дополнительной информации о настройке путей для библиотек и подключаемых модулей с приложениями Qt.
Разделение Плагина
В реальном мире вам не нужны зависимости приложения,использующего настраиваемые виджеты отQt Designerзаголовки и библиотеки,введенные простым подходом,описанным выше.
В следующих разделах описано,как это решить.
Связывание виджета с приложением
Исходный и заголовочный файлы пользовательского виджета могут быть совместно использованы приложением иQt Designerпутем создания файла для включения:
INCLUDEPATH += $$PWD
HEADERS += $$PWD/analogclock.h
SOURCES += $$PWD/analogclock.cpp
Затем этот файл будет включен в файл плагина и приложения:
include(customwidget.pri)
Совместное использование виджета с помощью библиотеки
Другой подход заключается в том,чтобы поместить виджет в библиотеку,которая связана сQt Designerкак к плагину,так и к приложению.Рекомендуется использовать статические библиотеки,чтобы избежать проблем с размещением библиотеки во время выполнения.
Для общих библиотек см. Создание общих библиотек .
Использование Подключаемого модуля с QUiLoader
Предпочтительный способ добавления пользовательских виджетов в QUiLoader — создать его подкласс, переопределив ().
Тем не менее,можно также использоватьQt Designerнастраиваемые плагины виджетов (см. () и связанные функции). Чтобы избежать развертыванияQt Designerбиблиотеки на целевом устройстве,эти плагины не должны иметь связи сQt Designerбиблиотеки ( , см. ).
Создаем первую программу в Qt designer
Сделаем простую программку на основе Main Window, для этого выбираем шаблон и нажимаем кнопку Create (Создать).

Из бокса слева с помощью ЛКМ (левой клавиши мыши) перетаскиваем виджет Label (используется для отображения текста или рисунка) в центральное окно (это и есть окно нашей программы) теперь рассмотрим правую часть окна Qt designer:

Вверху располагается Object Inspector, в нем отображается все что мы «напихали» в нашу программу;

Далее расположен Property Editor в нем располагаются свойства выбранного витжета, так если выбрать наш Label, он будет выглядеть следующим образом:

Рассмотрим пока некоторые из пунктов:
objectName – определяет имя виджета (то как он будет отображаться в коде программы) по умолчанию стоит label (если добавим второй такой же виджет он будет называться label_2 и так далее);
В пункте geometry – задаются размеры виджета;
В пункте font – задается каким шрифтом, размером и типом будет выполнена надпись;
Далее прокручиваем вниз там находится Qlabel:
Пункт text – определяет что будет написано в нашем виджете;
Пункт alignment – определяет выравнивание текста.
Закончив настройку внешнего вида программы (а мы пока закончим на добавлении одного элемента label) сохраняем наш файл как label.ui (или под другим удобным для вас именем). После чего программу Qt designer можно закрыть, пока она нам больше не пригодится.