Ищем ошибки в monodevelop
Содержание:
- Step 3: Using the new library
- Credits
- MonoD
- Introduction
- Tutorials, Known Issues & Stuff
- Core GUI Services
- Adding some CodeBehind
- Credits
- Windows
- Для чего предназначена система?
- New Features and Improvements
- Conclusion
- For the Lazy
- Creating the Solution
- Функции
- История
- Linux
- 1 Answer 1
- macOS
- Adding Extensions
- Introduction
Step 3: Using the new library
Setting the Startup Project
Now we have two projects in our solution: an executable and a library. A solution can have multiple executable projects. You can specify the startup project (i.e. the project which is built and run when using the “Run” command) by right clicking on the Solution icon in the Solution pad and choosing “Options”, then Common->Startup Properties. From there you can select single or multiple projects:
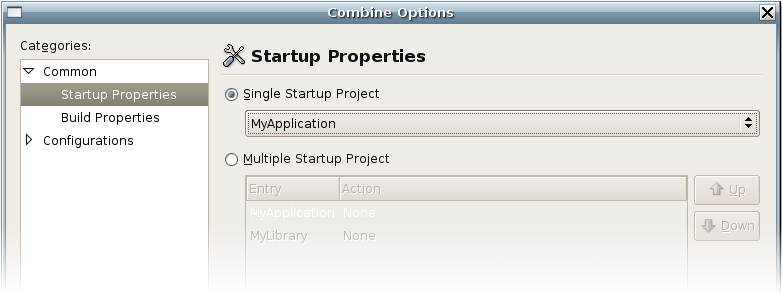
A solution with multiple projects will build and execute all of them in the order you specify. However, we want to set our startup application to “MyApplication” because this is the executable that we want to run.
Referencing our Library
If we are going to be able to use our new library, MonoDevelop needs to know this. We do this by adding a reference to it. From the Solution Pad, expand the node for our project “MyApplication”, this will reveal a References node among others. Right click this and select “Edit References”. This will bring up the References dialog. Select the “Project” tab. Our library should appear in the list, and we can check it as so:
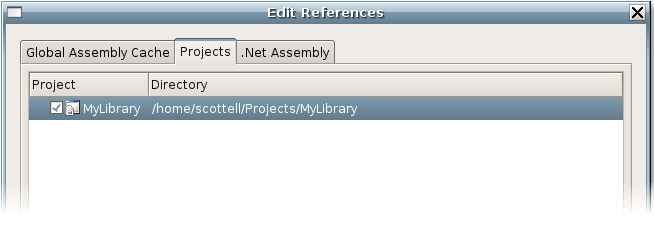
Click “Ok”. Now we have all the classes in our library “MyLibrary” available to our application (exactly one). Let’s test this by creating an instance of the class “MyClass”. Add the following to MyApplication->Main.cs:
Credits
Contributors to this Release
- Lluis Sanchez (project management, workbench, release engineering)
- Michael Hutchinson (Mac port, MonoTouch, MonoMac, MonoDroid)
- Mike Krueger (text editor, refactoring, hex editor)
- Alan McGovern (MonoTouch add-in)
- Jeff Stedfast (MonoTouch add-in)
- Rolf Bjarne (MonoTouch add-in)
- Andreia Gaita (MonoDroid)
- Alex Corrado (packaging)
- Hugo Bonacci (art)
All Contributors
Aaron Bockover, Alan McGovern, Alberto Paro, Alejandro Serrano, Alex Corrado, Alexandre Gomes, Alex Graveley, Andreia Gaita, Andrés G. Aragoneses, Andre Filipe de Assuncao e Brito, Andrew Jorgensen, Antonio Ognio, Ankit Jain, Ben Maurer, Ben Motmans, Carlo Kok, Christian Hergert, Daniel Kornhauser, Daniel Morgan, David Makovský, Eric Butler, Erik Dasque, Franciso Martinez, Geoff Norton, Gustavo Giráldez, Hugo Bonacci, Iain McCoy, Inigo Illan, Jacob Ilsø Christensen, James Fitzsimons, Jeff Stedfast, Jérémie Laval, Jeroen Zwartepoorte, John BouAnton, John Luke, Joshua Tauberer, Jonathan Hernández Velasco, Jonathan Pobst, Levi Bard, Lluis Sanchez Gual, Luciano N. Callero, Marc Christensen, Marcos David Marín Amador, Martin Willemoes Hansen, Marek Sieradzki, Matej Urbas, Maurício de Lemos Rodrigues Collares Neto, Michael Hutchinson, Miguel de Icaza, Mike Krüger, Muthiah Annamalai, Nick Drochak, Nikhil Sarda, nricciar, Paco Martínez, Pawel Rozanski, Pedro Abelleira Seco, Peter Johanson, Philip Turnbull, Richard Torkar, Rolf Bjarne Kvinge, Rusty Howell, Sanjoy Das, Scott Ellington, Thomas Wiest, Todd Berman, Viktoria Dudka, Vincent Daron, Vinicius Depizzol, Wade Berrier, Yan-ren Tsai and Zach Lute.
Translators
|
|
MonoD
- После установки самой IDE, ставим дополнение MonoD (установка одинакова для всех платформ):
- Открываем Monodevelop и переходим в меню Утилиты (или в англоязычной версии Tools):

И выбираем пункт Менеджер дополнений (Addin Manager):

После чего переходим во вкладку Галерея (Gallery) и открываем выпадающий список, который озаглавлен как Репозиторий (Repository):

Нас интересует пункт списка Управление репозиториями… (Manage Repositories…), который мы и выбираем.
Открывается небольшое окно, в котором нужно будет нажать кнопку Добавить (Add):

И опять появляется окошко:

в котором мы выбираем переключатель с надписью Зарегистрировать глобальный репозиторий (Register global repository), а в текстовое поле ниже вводим вот этот адрес — http://mono-d.alexanderbothe.com/repo/ .
Жмем кнопку Ок, после чего автоматически произойдет обновление списков репозиториев.
Если, по какой-то причине, это не произошло, то в окне управления репозиториями нужно галочкой пометить указанный чуть выше адрес репозитория MonoD, после чего закрыв это окно, перейти во вкладку Галерея и нажать кнопку Обновить, находящуюся справа от списка репозиториев.
Далее нас интересует изображенное ниже окно и вкладка Установленные (Installed), в которой в разделе Языковые привязки (Language bindings) выбираем D Language bindings и нажимаем кнопку Установить (Install):

Вот и все, MonoD установлена и можно переходить к настройкам среды.
Introduction
The MonoDevelop API is extensive and still changing. This article provides an overview of this API, explaining where to find the most important services and how to use them.
The API is split in three layers:
- The Core layer provides basic services such as logging, progress monitoring or file management which are used through the whole IDE.
- The Projects layer implements the project object model. It provides methods for reading, writing and building projects, as well as a parsing service.
- The top layer is the IDE itself.
It is worth noting that the Core and Projects layers are not tied to the IDE application, so it is possible to create independent applications which make use of those services.
Tutorials, Known Issues & Stuff
Build D Projects outside MonoDevelop
You still need a working MonoDevelop and Mono-D installation in order to proceed with the following step!
Just execute
mdtool build MyDSln.sln
to get e.g. a D project/solution built with Mono-D’s facilities.
Note: You’ll first off need to find mdtool in your XamarinStudio/MonoDevelop installation.
On Linux, this command may look like
/opt/mono/bin/mdtool build MyDSln.sln
On Windows, this may looks like
"C:\Program Files (x86)\Xamarin Studio\bin\mdtool.exe" build MyDSln.sln
If you only have one .sln existing in a directory, just invoking mdtool inside that directory is also sufficient!
Dub Project fails to build under OSX
Generally it is to mention that XS does overwrite the system’s $PATH environment variable when invoking dub or other native commands.
That overwritten $PATH does typically not contain /usr/local/bin — which is the reason why many dub setups will fail to work with Mono-D on OSX by default.
To fix this, just head to the ‘D’ -> ‘Dub Settings’ tab in the global options and enter e.g.
as ‘dub executable’.
Then, nearly everything should work fine.
Dub can’t find dmd
If you’re getting a build error message like
dub build "XYZ" "--build=plain"
Error executing command build:
Failed to invoke the compiler dmd to determine the build platform: /bin/bash: dmd: command not found
, you may set up your own dub executable ‘proxy’ so dub finds dmd again:
For instance into /Users/<user>/monod_dub.sh:
#!/bin/sh
export PATH="$PATH:/usr/local/bin"
dub $*
Now set /Users/<user>/monod_dub.sh to the ‘D’ -> ‘Dub Settings’ tab -> ‘dub executable’ option.
Core GUI Services
Image and Stock Icon Management
The class provides several methods for managing images and stock icons:
| GetPixbuf (), GetColourBlock (), GetImage () | Get a Gdk.Pixbuf or Gtk.Image from an icon name and size |
| GetStockId (), GetStockIdFromResource () | Get an icon name for a file or resource containing an image |
Displaying Alerts and other Message Dialogs
The Message Service
The class provides methods for showing alert and other message dialogs.
Here are some of the most useful methods:
| ShowException () | Shows an error message with detailed information about an exception (this information is hidden by default, but it can be made visible by the user). |
| ShowError () | Shows an error message. |
| ShowWarning () | Shows a warning message. |
| Confirm () | Shows a confirmation message to the user. The message dialog will have two buttons: Cancel and an AlertButton provided by the caller. |
| AskQuestion () | Shows a message dialog asking a question to the user, and offers a set of AlertButtons the user can click on to answer. |
| GetTextResponse () | Presents a question and an entry to the user. |
Some of those methods take a as parameter. There are several pre-defined alert buttons, such as , , , etc (all defined as static members of ). You can also create your own AlertButton instances with custom icons and response codes.
The arguments for the and methods can also be provided using objects of type and respectively. Using those objects it is possible to specify the same arguments available in the other overloads, but they allow specifying additional options:
| AllowApplyToAll | When set, the message dialog will show a checkbox with the message “Apply to all”. If the user activates it, subsequent calls to Confirm or AskQuestion will automatically return the value selected when the option was activated. |
| AddOption () | Adds an additional option to the dialog, which is shown as a checkbox. |
| GetOptionValue () | Returns the value of an option. |
| SetOptionValue () | Sets the value of an option. |
Here is an example:
Additional Dialogs
There are also a couple of dialogs which can be used to display messages:
| MonoDevelop.Core.Gui.Dialogs ErrorDialog | A generic error dialog. |
| MonoDevelop.Core.Gui.Dialogs MultiMessageDialog | A dialog which allows displaying a set of messages (errors or warnings). It can be used for to show a list of errors and warnings reported through a progress monitor. |
| MonoDevelop.Components FileEntry | An entry with a button which allows selecting a file. |
| MonoDevelop.Components FolderEntry | An entry with a button which allows selecting a folder |
| MonoDevelop.Components ListView | A simple list view which shows an icon and a label for every item. |
| MonoDevelop.Components TooltipWindow | Abstract class which implements most of the functionality required for displaying custom tooltip windows. |
| MonoDevelop.Components DataGrid | A simple data grid (used for example to display database query results). |
| MonoDevelop.Components.Chart BasicChart | A simple chart. |
| MonoDevelop.Components.PropertyGrid PropertyGrid | A property grid which can automatically show and allows editing the properties of an object (based on System.ComponentModel). |
| MonoDevelop.Ide.Gui.Components ExtensibleTreeView | A tree view whose behavior can be customized and extended by add-ins. |
Adding some CodeBehind
We’re developing this application with CodeBehind, because it’s a cleaner development model than writing your C# code in the .aspx file. If you look at the Default.aspx page, you’ll see that in the Page directive at the top it species that the page inherits from the AspNetDemo.Default class, which subclasses System.Web.UI.Page. By putting code in here (or any intermediate subclasses) we can keep it separate from the page structure.
The AspNetDemo.Default class is split between the partial classes in Default.aspx.cs and Default.aspx.designer.cs. The designer partial class contains code that’s autogenerated by MonoDevelop. If you take a look in it you’ll see that during the compile, MonoDevelop added members for the button and label that we added to the Default.aspx file. These provide a way for you to access the web controls from the CodeBehind. You should avoid editing the designer file, as your changes could be overwritten.
Open the Default.aspx file, and add an onClick attribute to your button. This specifies the name of a method that will be run when the button is clicked. There are a number of events that can be hooked upt to all ASP.NET controls in a similar way.
Next open the Default.aspx.cs file, and to the Default class add the following method
This is storing the current click count in the untyped ViewState collection property of the base System.Web.UI.Page class. ViewState is ASP.NET Web Forms’ mechanism for storing controls’s state between page postbacks and circumventing the stateless nature of the HTTP protocol. Note that we can access the outputLabel control because MonoDevelop defined it in the Default.aspx.designer.cs class, and due to this, MonoDevelop is able to provide code completion.
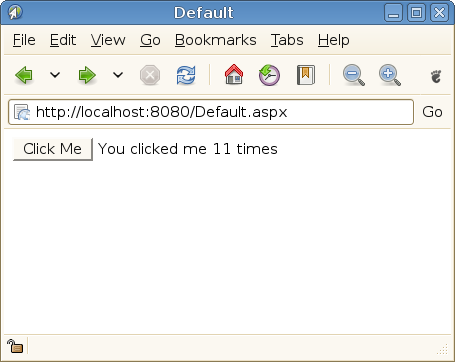
Run the page, and clicking the button will now produce some feedback, by updating the label with the number of times you’ve clicked it.
Credits
Contributors to this Release
- Lluis Sanchez (project management, workbench, debugger, Git add-in)
- Michael Hutchinson (ASP.NET, XML, T4, Mac port, MonoTouch, MonoMac, MonoDroid)
- Mike Krueger (text editor, refactoring, hex editor)
- Levi Bard (C/C++ add-in, Vala)
- Geoff Norton (MonoTouch)
- Carlos Alberto Cortez, Andreia Gaita (MonoDroid)
- IBBoard (git blame and diff improvements)
- David Siegel (MonoMac budle creator command)
- Robert Hollencamp (gdb fixes)
- Steven Schermerhorn (Jump lists)
- Alex Corrado, Andrew Jorgensen (QA & packaging)
- David Mulder (QA)
- Marc Christensen (QA)
All Contributors
Aaron Bockover, Alberto Paro, Alejandro Serrano, Alex Corrado, Alexandre Gomes, Alex Graveley, Andreia Gaita, Andrés G. Aragoneses, Andre Filipe de Assuncao e Brito, Andrew Jorgensen, Antonio Ognio, Ankit Jain, Ben Maurer, Ben Motmans, Carlo Kok, Christian Hergert, Daniel Kornhauser, Daniel Morgan, David Makovský, Eric Butler, Erik Dasque, Franciso Martinez, Geoff Norton, Gustavo Giráldez, Iain McCoy, Inigo Illan, Jacob Ilsø Christensen, James Fitzsimons, Jeff Stedfast, Jérémie Laval, Jeroen Zwartepoorte, John BouAnton, John Luke, Joshua Tauberer, Jonathan Hernández Velasco, Jonathan Pobst, Levi Bard, Lluis Sanchez Gual, Luciano N. Callero, Marc Christensen, Marcos David Marín Amador, Martin Willemoes Hansen, Marek Sieradzki, Matej Urbas, Maurício de Lemos Rodrigues Collares Neto, Michael Hutchinson, Miguel de Icaza, Mike Krüger, Muthiah Annamalai, Nick Drochak, Nikhil Sarda, nricciar, Paco Martínez, Pawel Rozanski, Pedro Abelleira Seco, Peter Johanson, Philip Turnbull, Richard Torkar, Rolf Bjarne Kvinge, Rusty Howell, Sanjoy Das, Scott Ellington, Thomas Wiest, Todd Berman, Viktoria Dudka, Vincent Daron, Vinicius Depizzol, Wade Berrier, Yan-ren Tsai and Zach Lute.
Translators
|
|
Windows
Установка под Windows гораздо проще, однако, некоторые шаги (особенно при отсутствии .NET Framework на компьютере) могут повергнуть в шок даже опытных пользователей:
- Заходим на сайт monodevelop.com и нажимаем кнопку Download.
- После этого, произойдет переход в один из подразделов сайта (сайт на английском, предупреждаю сразу), который обычно соответствует текущей платформе компьютера (отображает соответствующую для текущей операционной системы пакет под загрузку).
Нас интересует тот подраздел, который помечен логотипом Windows.
- После этого жмем кнопку Download Xamarin Studio и (если, вам также повезет) заполняем анкету, вводя свои «личные» данные (не волнуйтесь, это никак не отразится на вашем счете, если вы, конечно, не захотите сами стать их клиентом…).
- Устанавливаем Xamarin Studio, запустив выкачанный установщик.
Для чего предназначена система?
Свободная система программных средств MonoDevelop предназначена для написания настольных и веб-приложений C#, C, C++, Vala, CIL, Visual Basic .NET. Nemerie, Boo, Java. Будучи портом SharpDevelop на Mono/GTK+ проект начал активно развиваться и сильно отошёл от своих первых версий.
MonoDevelop – продукт проекта Mono от компании Xamarin, который входит в стандартный дистрибутив Unity3D как инструмент для написания скриптов.
Основные возможности:

- подсветка синтаксиса;
- автоматическое дополнение кода;
- выделение блоков кода с возможностью сворачивания/разворачивания;
- поддержка плагинов;
- браузер классов;
- встроенный отладчик;
- визуальный конструктор форм (GTK#);
- модульное тестирование;
- множество стандартных шаблонов;
- автоматическое создание бинарных пакетов и архивов по завершению компиляции.
С MonoDevelop перенос приложений .NET из Visual Studio на Linux и Mac OSX становится гораздо проще благодаря единой базе кода для всех платформ.
New Features and Improvements
This release contains lots of new features and improvements. Here is a summary of the new features. You will find a more detailed description of what’s new in the What’s new in MonoDevelop 2.4 page.
-
- Improved look
- Improved pad organization
- Improved Error Workflow with In-line Error Bubbles
- New Project/File dialogs
- New Navigate To dialog
- Solution and Class pad Zooming
- New Options for selecting the user interface language, output pad font and GTK+ theme.
-
- Standalone Assembly Projects
- External Console Support for Mac and Windows
- Support for adding files to solution folders
- Proper MSBuild file links in projects
-
- Improved in-line search
- Group Mode in Code Completion
- Symbol Usage Highlighting
- Editing Support in Block Selection Mode
- Import Type Command
- Move Lines Up/Down
- Code Focus Toggle and Follow-cursor
- Quick Fix Command
- Scrollable Region Tooltips
- Improved Filtering in Completion List
-
- Pinned Quick Watches
- Debug Value Visualizers
- Improved expression evaluation
- New Exception Dialog
-
- New Hex Editor
- Integrated T4 Templating
- More Code Metrics
-
- Support for WCF Web References
- Support for references that require authentication
- Improvements in other add-ins:
- NUnit
- MonoTouch
- Mac OS support
- Vala
Please see What’s new in MonoDevelop 2.4 for more details.
Conclusion
It’s hard to get a .NET environment running on Linux these days — but it’s doable :). Btw. we could need help improving the monodevelop Linux client — esp. dark theme support is lacking a bit 🙂
For the Lazy
Lately I’ve been reinstalling Ubuntu 17.10 and I did following (may be helpful):sudo apt-get install autoconf libtool-bin libglade2-dev libgnomeui-dev cmake libssh-dev libssh2-1* nuget mono-devel git intltool curl
git clone https://github.com/mono/monocd mono./autogen.sh —prefix=/opt/monomake get-monolite-latestmake; sudo make install; cd ..
git clone —branch gtk-sharp-2-12-branch https://github.com/mono/gtk-sharp.gitcd gtk-sharp./bootstrap-2.12 —prefix=/opt/monomake; sudo make install; cd ..
git clone https://github.com/mono/gnome-sharp.gitcd gnome-sharp# needed to edit Settings.cs atom ./sample/gconf/Settings.cs./bootstrap-2.24 —prefix=/opt/monomake; sudo make install; cd ..
git clone https://github.com/mono/xamarin-gtk-theme.gitcd xamarin-gtk-theme ./autogen.sh —prefix=/usrmake; sudo make install; cd ..
# Building monodevelop (git clone may be different for you)git clone git@github.com:mono/monodevelop.git cd monodevelop./configuremakemake run
# INSTALL MSBUILD# This is broken:git clone https://github.com/mono/msbuildcd msbuildgit checkout -b xplat-master origin/xplat-master./cibuild.sh —scope Compile —target Mono —host Mono
# Alternative — get an os x box grab msbuild from there and install and install it # in opt/mono/lib/mono/msbuild/15.0/bin/MSBuild.dll
sudo apt-key adv —keyserver hkp://keyserver.ubuntu.com:80 —recv-keys 3FA7E0328081BFF6A14DA29AA6A19B38D3D831EFecho «deb http://download.mono-project.com/repo/ubuntu xenial main» | sudo tee /etc/apt/sources.list.d/mono-official.listsudo apt-get updatesudoapt-get install msbuildsudocp -R /usr/lib/mono/msbuild/15.0 /opt/mono/lib/mono/msbuildsudocp /usr/bin/msbuild /opt/mono/bin
sudo mozroots —import —machine —sync
sudo certmgr -ssl -m https://go.microsoft.com
sudo certmgr -ssl -m https://nugetgallery.blob.core.windows.net
sudo certmgr -ssl -m https://nuget.org
git clonehttps://github.com/fsharp/fsharpcd fsharp./autogen.sh —prefix=/opt/monomake; sudo make install; cd ..
# install PCL# go to windows C:\Program Files (x86)\Reference Assemblies\Microsoft\Framework\.NETPortable# the portable libraries should end up in /opt/mono/lib/mono/xbuild-frameworks/.NETPortable# for me it looks like:# /opt/mono/lib/mono/xbuild-frameworks/.NETPortable$ ls# v4.0 v4.5 v4.6
# Building monodevelop (git clone may be different for you)git clone git@github.com:mono/monodevelop.gitcd monodevelop./configuremakemake run
Creating the Solution
After opening MonoDevelop, select New Project from the Welcome Page or the File menu, to bring up the New Solution dialogue. From the list of project types on the left expand the C# category to reveal the ASP.NET subcategory, and select it. Now select the “Web Application” project, and specify the name and location of the new project, as shown below.
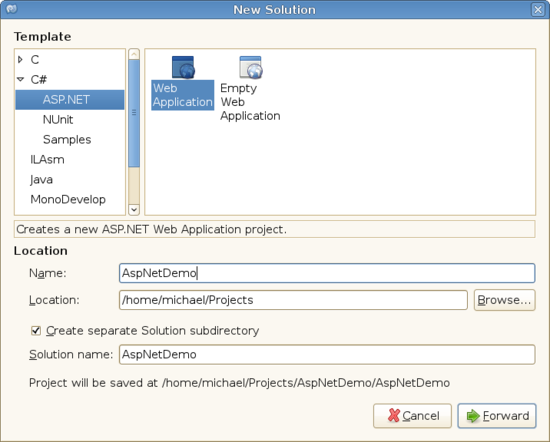
ASP.NET projects are similarly available for other languages, but may not be fully supported.
Click on Forward, and you will be presented with some additional features that can be added to your Solution, such as packaging and translation. These features can be added later, and are only shown at this point for your convenience. Click Ok to complete the creation of the Solution.
Функции
MonoDevelop — это IDE для платформы .NET с функциями, сопоставимыми с Microsoft Visual Studio . Основные моменты включают:
- Многоплатформенная IDE и пользовательские проекты (Linux, Windows и macOS)
- Многоязычный (C #, F #, Visual Basic .NET, C / C ++, Vala, JavaScript, TypeScript)
- Шаблоны проектов для C #, Visual Basic, Boo, Java (IKVM) и C / C ++
- Поддержка автозавершения кода для C #, шаблонов кода, сворачивания кода
- Настраиваемые макеты окон, определяемые пользователем привязки клавиш, внешние инструменты
- Встроенный отладчик для отладки Mono и собственных приложений
- Интегрированный компилятор (поддерживает до C # 6.0)
- GTK # Visual Designer для графического построения пользовательских интерфейсов GTK #
- Веб-проекты ASP.NET с поддержкой автозавершения кода и тестированием на XSP (веб-сервере Mono).
- Контроль версий, интеграция с make-файлами, модульное тестирование, упаковка и развертывание, локализация
Конструктор пользовательского интерфейса
MonoDevelop включает в себя конструктор графического интерфейса GTK # под названием Stetic, начиная с версии 0.1. для разработки пользовательских интерфейсов GTK + на C # . Stetic очень похож на Glade Interface Designer, но интегрирован в MonoDevelop с такими функциями, как перетаскивание . Его критиковали за то, что с ним труднее работать, чем с подобными Qt Designer и Microsoft Visual Studio Windows Forms Editor, когда программист еще не имеет в виду конкретный макет.
Xamarin Studio
Xamarin предлагает переименованную версию MonoDevelop 4.0 в Xamarin Studio, которая теперь использует код, зависящий от платформы, в различных местах для улучшения внешнего вида. В то время как Mono предоставляет пакет для Solaris 10, работающего на SPARC , пакеты MonoDevelop для OpenSolaris предоставляются только группами из сообщества OpenSolaris. MonoDevelop во FreeBSD также поддерживается только сообществом FreeBSD.
Visual Studio для Mac
Еще одна обновленная версия MonoDevelop — Visual Studio для Mac. Visual Studio для Mac использует многие из тех же инструментов, что и его аналог для Windows: например, платформа компилятора Roslyn .NET используется для рефакторинга и IntelliSense. Его система проектов и движок сборки используют MSBuild; и его исходный редактор поддерживает пакеты TextMate. Он использует одни и те же механизмы отладчика для приложений Xamarin и .NET Core и те же конструкторы для Xamarin.iOS и Xamarin.Android.
История
В конце 2003 года группа разработчиков из сообщества Mono начала перенос SharpDevelop , успешной IDE .NET с открытым исходным кодом, с Windows Forms в Windows на инструментарий GNOME (Gtk #) в Linux. Форк также был нацелен на платформу Mono, а не на реализацию Microsoft .NET Framework . Будучи ранним форком SharpDevelop, MonoDevelop архитектурно отличается от последних выпусков SharpDevelop.
Со временем проект MonoDevelop был поглощен остальной частью проекта Mono и с 2016 года активно поддерживается Xamarin и сообществом Mono. Начиная с Mono 1.0 Beta 2, MonoDevelop связан с выпусками Mono.
Начиная с версии 4.x, Xamarin переименовал MonoDevelop в Xamarin Studio, но только для версии среды IDE для Windows. С 2016 года Xamarin Studio также работает на macOS.
Linux
Установка всего комплекта для Linux (считаем, что у нас Linux, основанный на Debian) выглядит так:
В стандартном репозитории уже есть пакет monodevelop, вот только одна проблема: это устаревший пакет, что означает ручное добавление нового репозитория.
Для добавления нового репозитория вводим в терминал команду:
sudo sh -c "echo 'deb http://download.opensuse.org/repositories/home:/tpokorra:/mono/xUbuntu_14.04/ /' >> /etc/apt/sources.list.d/mono.list"
После чего выкачиваем публичный ключ для нового репозитория введя следующее:
wget http://download.opensuse.org/repositories/home:/tpokorra:/mono/xUbuntu_14.04/Release.key
Добавляем скачанный ключ:
sudo apt-key add - < Release.key
Обновляем список репозиториев:
sudo apt-get update
После чего ставим кастомный пакет с monodevelop-opt:
sudo apt-get install monodevelop-opt
На этом установка пакета кончается и я рекомендую установить следующие пакеты, если они у вас по какой-то причине отсутствуют: libgnomeui, xterm (или gnome—terminal, или mate—terminal, или konsole – эмулятор терминала на ваш вкус).
1 Answer 1
If you want the MonoDevelop IDE, you should download it from the MonoDevelop IDE website as described in the MonoDevelop IDE section of the link you provided.
Если вы хотите использовать MonoDevelop IDE, загрузите его с веб-сайта MonoDevelop IDE, как описано в разделе MonoDevelop IDE по указанной вами ссылке.
В этой статье речь пойдет опять про настройку IDE и на этот раз я покажу наилучшее решение из всех найденных мной для D …
Как известно, D – достаточно молодой язык программирования и, соответственно, пока он не имеет собственной интегрированной среды разработки ( Coedit не в счет, его пока сложно назвать средой разработки, да и на полноценный редактор он как-то не тянет), что еще также связано с довольно-таки любопытным мнением разработчиков самого языка, согласно которому для начала работы с языком хватит компилятора и обычного текстового редактора (с учетом того, что у каждого программиста есть свой излюбленный текстовый редактор да и большинство современных программ для редактирования исходного кода, как правило, уже имеют встроенную подсветку синтаксиса D и автодополнение в его зачаточной форме. Кстати, по поводу любимого текстового редактора: Bagomot ’у более симпатичен Sublime Text 3, ну а меня, как ни странно, больше радует gedit ).
Несмотря на это, сейчас активно развиваются сторонние дополнения к универсальным средам разработки, таким как Visual Studio или Eclipse , и которые добавляют некоторую поддержку D в эти монструозные программные пакеты. Как и всегда, без дегтя меда не бывает, и если вы работаете в нескольких операционных системах, а хочется унифицированного и простого вида привычного рабочего пространства, то с этим придется жестоко проститься и придется содержать разные IDE , что нисколько не радует…
Однако, как уже было упомянуто выше, я нашел хорошее решение, которое позволяет не задумываться о том, где и с чем работаешь, и такого рода решением является Monodevelop (под Windows она называется Xamarin Studio , хотя под Linux все то же самое) с расширением MonoD .
Единственным минусом данного продукта является то, что, в основном, это дело писалось под . NET и требует наличия установленного . NET Framework 4.5 (пользователи Windows 7/8/10 могут не париться – он уже по идее предустановлен) или Mono Runtime .
Для того, чтобы воспользоваться всеми прелестями MonoD , нужно сначала поставить Monodevelop (или Xamarin Studio ), причем, установка для разных операционных систем выглядит по-разному и что самое интересное, больше всех повезло пользователям Linux (собственно, как обычно…).
macOS
Building MonoDevelop from source on the Mac is straightforward when the latest Mono SDK package is installed. In general, the instructions in Development:Getting Started can be applied directly to building MD on macOS. However, there are a few caveats, so this page explains the Mac build process in more detail.
Building using Makefiles
Building
First you will need Xcode installed. If you have Xcode 4.3 or later, you will need to then install the Xcode Commandline tool from Xcode preferences, and install and from brew.
NOTE: Please ensure that you have the very latest Mono MDK.
Check out MD, configure using the Mac profile:
NOTE: DO NOT use configure –select on Mac — the Mac profile passes adds required arguments to the configuration of main. Instead edit profiles/mac manually to add any additional modules.
IMPORTANT: Do not install MonoDevelop into the install prefix. MonoDevelop will pick up libraries from the prefix automatically. If you configured with a non-default prefix, then when you build an app bundle, the entire prefix will be merged into the app bundle.
Things you might have to do before running the script
-
Tell aclocal where to find the pkgconfig M4 macro (pkg.m4), e.g.
Comment: this did not appear necessary
-
Add the GTK+ libraries’ location to the Mac dynamic loader path:
Comment: this did not appear necessary
Building extras
To include additional addins from extras in the build, instead of using the Mac profile, use to select addins. This will write the default profile. Next, replace the line in profiles/default that begins with “main” with the one from profiles/mac, then run configure again using the default profile.
Building the App package
To build the app package, navigate to the macOS build directory:
From here, build the MonoDevelop.app using . You can then build the .dmg using the script. To include addins from extras, manually copy their build directories into the MonoDevelop.app directory, e.g.
Building using MonoDevelop
When building MonoDevelop using MonoDevelop, be sure to select the Mac configuration, as this will enable building only the addins that work on Mac.
Main
Building main is straightforward. Open , select the Mac configuration, and run the Build command. Note that running MonoDevelop from within MD will currently only work if you export as described above.
Extras
Loading the full MonoDevelop.mdw workspace and building the addin solutions from extras will only work if the Makefiles’ configure script has been run. Even then, not all of them will build correctly. Until this is resolved, use the makefiles to build extras.
To update, run the following commands in the directory:
Adding Extensions
Now that the addin is defined, we can add some extensions.
Each extension point has a unique path, so the extension is contained in and Extension element with a path attribute. This element may contain multiple extension nodes to plug into the extension point. The nodes’ names and attributes are defined by the extension point. Some extension nodes can have child nodes, and they then become extension points in their own right. For example, the /MonoDevelop/Ide/Commands extension point accepts Command or Category nodes, and category nodes may contain commands or categories. Since MonoDevelop.Ide already has a category with the id “Edit” registered at the /MonoDevelop/Ide/Commands extension point, we can add a command directly to the resulting /MonoDevelop/Ide/Commands/Edit Extension point.
This extension defines a command for the command system. The command ID should correspond to an enum value. The underscore prefixing the label and description attributes indicates that they’re translatable using Gettext, but adding a Gettext translation catalog to the addin is beyond the scope of this introduction.
MonoDevelop’s command system provides ways to control the availability, visibility and handling of commands depending on context. Commands can also be assigned a keyboard shortcut and an icon. For more details, read the guide to the Command System. We will implement the command later in the walkthrough.
Commands can be bound to keyboard shortcuts and can be inserted into menus. We’re going to insert this command into the main Edit menu with another extension.
The extension manifest is now complete. This is the whole file:
Introduction
MonoDevelop 6.0 introduces a new Project Model. The Project Model is a model of classes that implement the functionality of loading, saving, building and doing all kind of operations on projects.
The old project model was designed with several layers of abstraction, so that the same model could be used to support different file formats for the same kind of project. This allowed, for example, supporting a native format (.mdp) while migrating to MSBuild. The drawback of this approach is that the abstraction layer required to support this model makes it hard to introduce format specific features.
The new project model has less abstraction layers and is more focused to MSBuild. From the outside, the project model API is very similar. The class hierarchy is more simple in some cases, and some methods change a bit, but in general it is the same. However, on the inside there are many changes. The file format abstraction is gone, and the extension model has been completely revamped. Also, the new API takes advantage of async.