Media creation tool для windows 8.1
Содержание:
- Create Installation Media For Another PC Option
- How can I use Windows 11 Media Creation Tool?
- Create an Installation Media or Download ISO file
- WinSetupFromUSB
- Windows 10 Media Creation Tool: Обзор продукта
- Windows 10 Media Creation Tool for Mac Alternative 1: UUByte ISO Editor
- Windows 10 Media Creation Tool FAQ
- What You Will Require?
- Как использовать Media Creation Tool для создания своего собственного установочного носителя Windows 10 на карте памяти USB
- Use the Windows 10 Media Creation Tool to create a bootable USB memory stick with the Windows 10 setup
- Windows 10 Installation Media Tool
- Download Windows 11 Media Creation Tool
- Новая материнская плата? Потеря Windows
- Некоторые особенности работы
- What is Media Creation Tool?
- Выводы статьи
Create Installation Media For Another PC Option
If you select ‘Create installation media for another PC option’, then follow the steps given below-
When you select the option, you will be asked to select the language, edition, and architecture of the Windows you want to install. You can click ‘Use the recommended options for this PC,’ if you want the Media creation tool to automatically select the options for the machine. Once done, click on next.

-
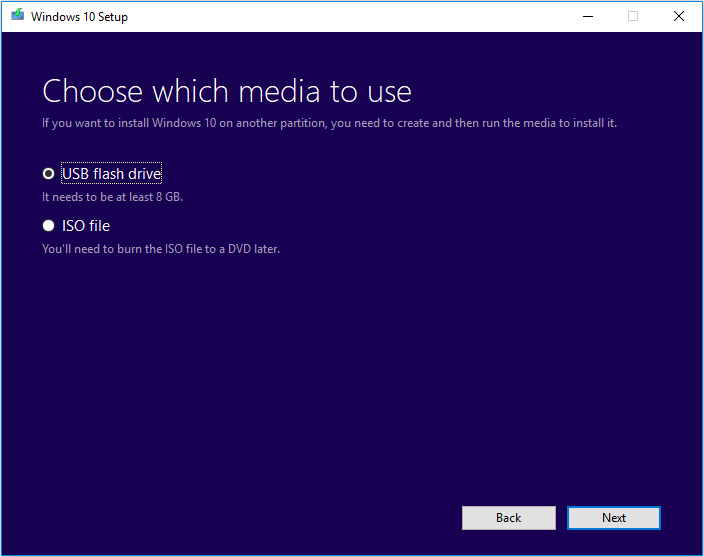
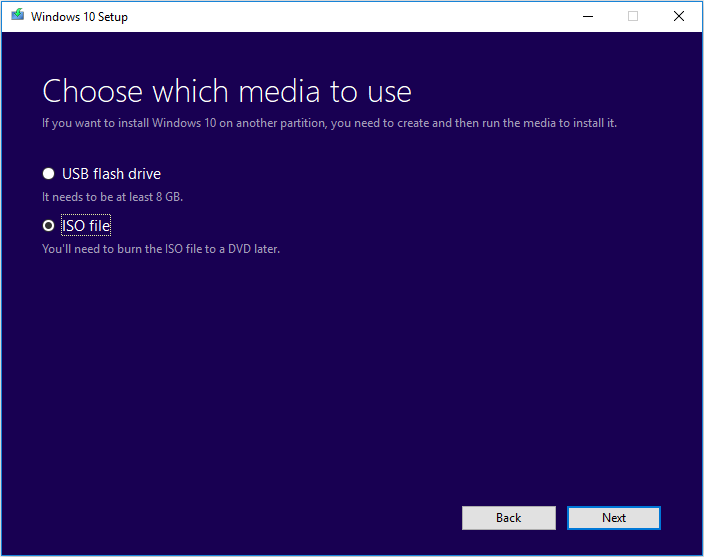
Next, you will see two options on the window- ‘USB flash drive,’ and ‘ISO file.’
- USB flash drive- If you select this option, the Windows media creation tool will create a bootable USB drive for you.
- ISO file- If you select this option, the media creation tool will download the ISO file. You will be able to burn the ISO file later to create a bootable USB drive or a DVD.
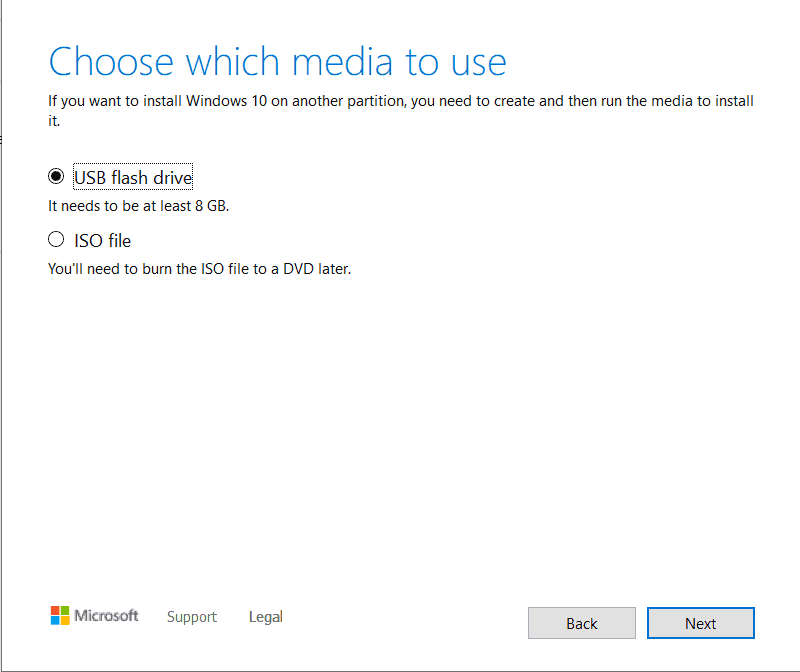
- If you select the ‘USB flash drive’ option, ensure you connect a USB drive that is at least 8GB in storage. The media creation tool will begin downloading the Windows 11 and will burn it to the USB flash drive automatically.
- If you select the ‘ISO file’ option, the ISO file of Windows 11 will be downloaded. You can later burn it with the help of burning tools like Power ISO. You can use such tools to burn the ISO file to a USB drive.
- Once you have created the bootable USB drive of Windows 11, plug the USB drive into the computer which you want to upgrade to Windows 11.
- After plugging in the USB drive, boot into BIOS and install the Windows.
ALSO READ: How to Upgrade Windows 10 to Windows 11
How can I use Windows 11 Media Creation Tool?
1. Try it as an upgrade tool
- After you downloaded the tool from the Microsoft Store, run it, then choose to Upgrade this PC now, and click on Next.
- Wait a few seconds until your OS is completing the process. Note that this also depends on your PC’s capabilities and internet speed.
- Your operating system will also check settings and configurations.
- After this, choose to keep your personal files and apps. For a clean install you should click on the Change what to keep option, then select the files you got to remove.
- Your PC will restart and will power on the latest Windows 11 OS.
2. Use it as a bootable USB tool
- To simply do it, you should open the downloaded tool, choose to Create installation media, instead of Upgrade this PC now, then click on Next.
- It will automatically populate the configuration of your computer. If you need to change it you can uncheck the Use the recommended options for this PC option and make the necessary changes and click Next.
- Select the USB flash drive option, then click on Next.
- Insert a USB flash drive, with a minimum of 8 GB, then the tool will automatically detect it.
- The creation of Windows 11 OS installation media will begin.
- Once it is finished you will get a Windows 11 bootable USB.
For more information, check out this guide on how to make a bootable USB drive for Windows 11.
In addition, because protection is mandatory, take a look at the best antivirus software for USB flash drives. Choosing one of these options will keep you away from infecting with malware or other harmful threats.
3. Try it using an ISO file
- Follow the same two steps as in the above solution.
- Instead of the USB flash drive option, choose ISO file, then click on Next.
- Follow the on-screen instructions.
If there are times when you need to run Windows 11 on VM, this option represents an important step in achieving your goal.
Note that if you choose the ISO file option, the Windows 11 ISO file will be downloaded. You can later burn it using certain burning tools.
Check out the best software to create and open ISO files, then decide which one suits you the most.
Also, you should take a look at how to burn ISO files in Windows 10. Considering the latest OS model works similar to the previous one, this article will surely help you.
Why should I use the Windows 11 Media Creation Tool?
You’ve seen how Windows 11 Media Creation Tool can be used, but let’s see now what its real advantages are. The following aspects really matter when it comes to creating a unique digital experience:
- Files protection – This tool won’t change any of your files while upgrading your PC or laptop to the latest version.
- It is quite easy to use – If you correctly follow an efficient guide, your OS will be upgraded without consuming time.
- No cost – It is a free utility developed by Microsoft, so you won’t have to pay for it.
The above solutions will guarantee important help in your future Windows 11 activity. As you see, the Media Creation Tool is great and can reduce your effort considerably.
Because your opinion matters the most, you should share it with us by leaving a comment in the section below.
Was this page helpful?
MyWOT
Trustpilot
Thank you!
Not enough details
Hard to understand
Other
x
Contact an Expert
Start a conversation
Create an Installation Media or Download ISO file
Another function of Window 10 Media Creation Tool is that it can help you create an installation media for another PC or download ISO file. And all Windows 10 editions are available when you select Windows 10, except for Enterprise edition. When finished, you can use the bootable USB drive or DVD disc to install Windows 10.
Note: Before you install or reinstall Windows on your PC, remember to back up important files on your system disk.
Before you download Windows 10 Media Creation tool, make sure you have:
- A PC with a working Internet connection
- A blank USB flash drive or DVD with at least 8 GB of available storage space
- A product key if you’ve not installed Windows 10 before or if you want to perform a clean install
Now you can follow the steps as below to create Windows 10 installation media (USB flash drive or DVD) and use it to install a new copy of Windows 10, perform a clean installation, or reinstall Windows 10.
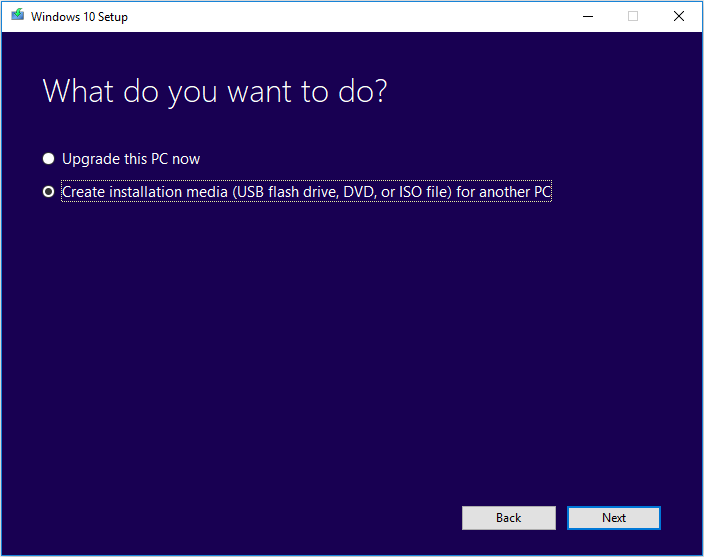
Step 1. Download Windows 10 Media Creation Tool and follow the instruction to get the following page. Then, check the second option Create installation media (USB flash drive, DVD, or ISO file) for another PC and click Next.
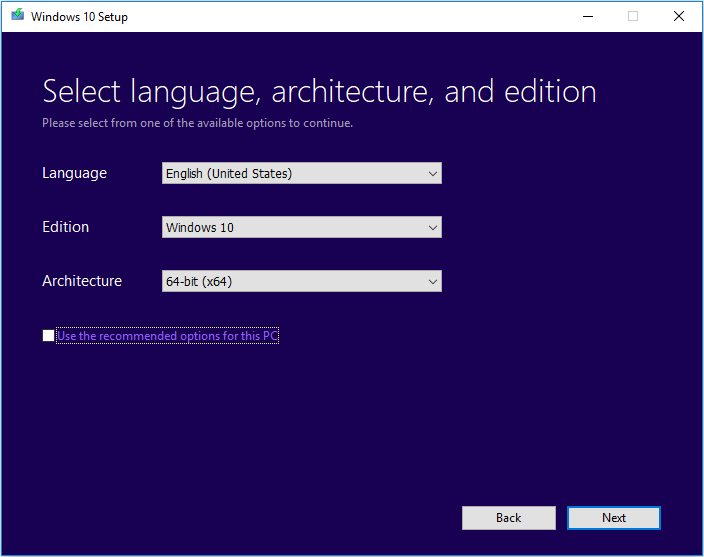
Step 2. Choose the Language, Windows Edition, and Architecture that you want to use for creating the installation media. After selection, then click Next to continue.
You can also choose to Use the recommended options for this PC, which automatically selects the language, edition, and architecture that match the PC that you are using right now.
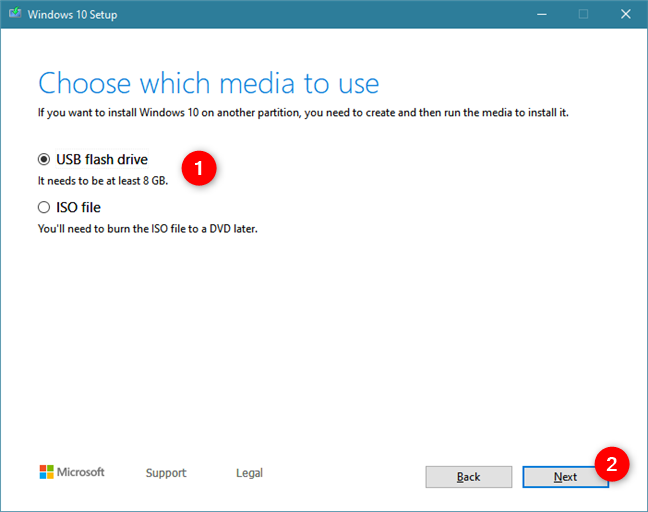
Step 3. Choose what kind of media storage device you want to use. Here I take USB flash drive as an example. Choose USB flash drive and press Next.
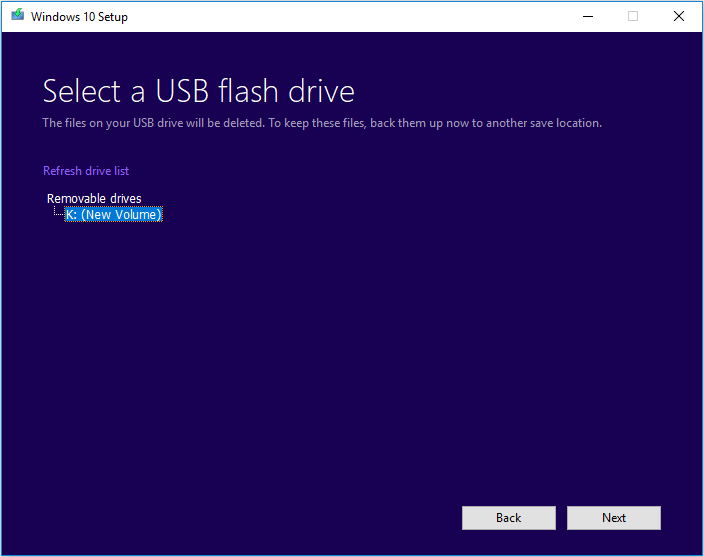
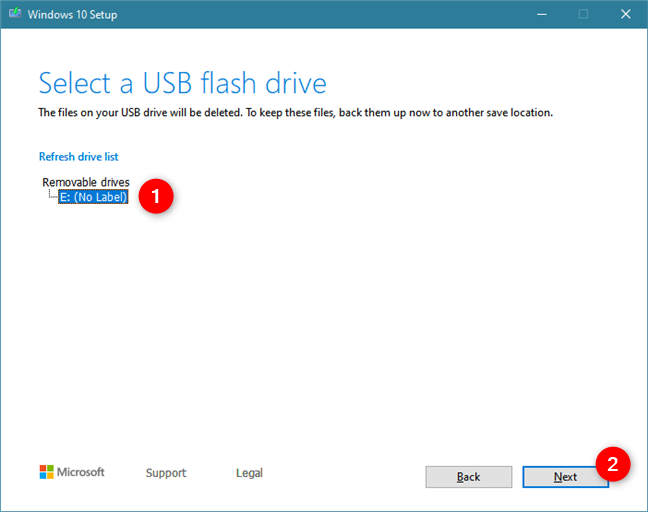
Step 4. Select the USB drive you want to use for creating Windows 10 installation media and click Next.
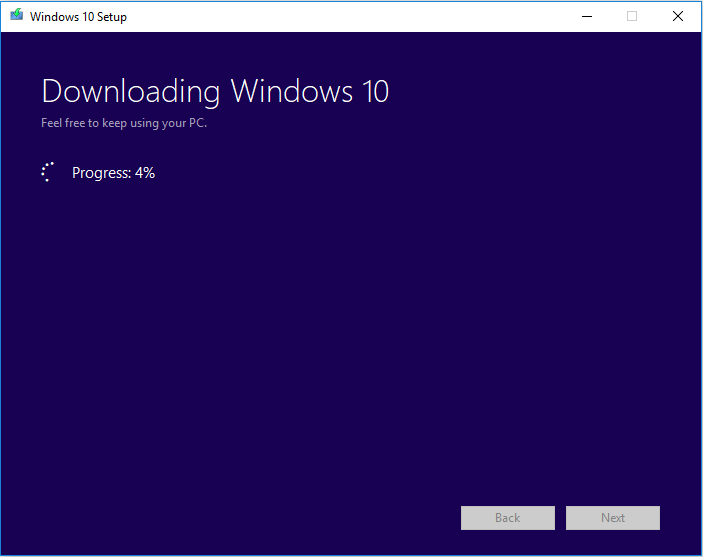
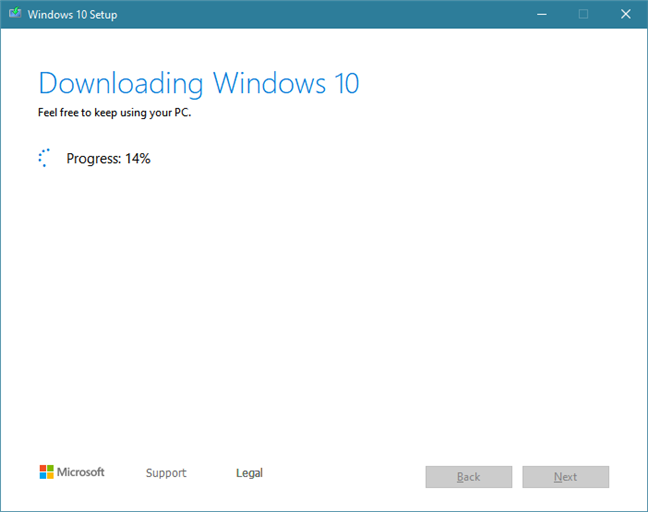
Step 5. Then Microsoft Media Creation Tool starts to download the latest Windows 10 installation files on your computer or device.
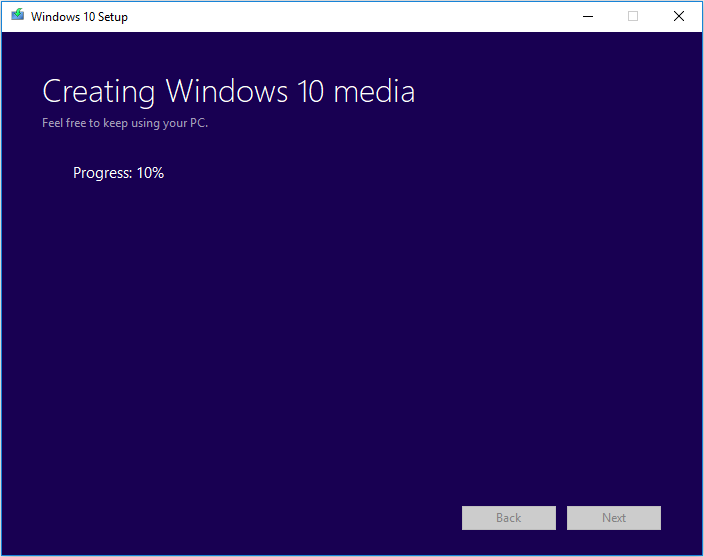
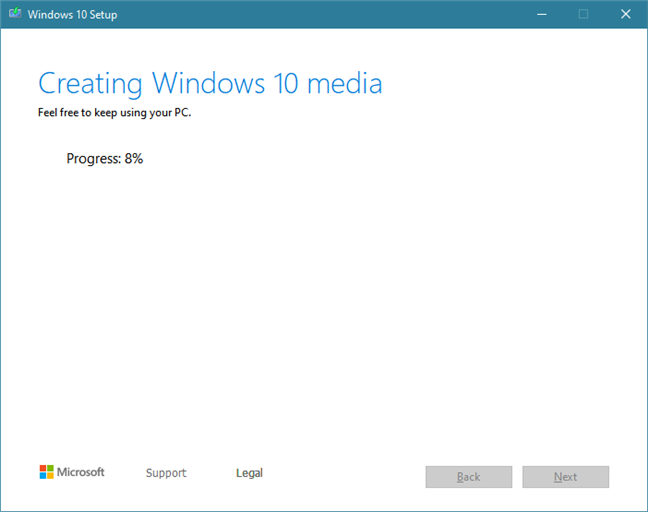
Step 6. When the download is completed, it will start to create Windows 10 media.
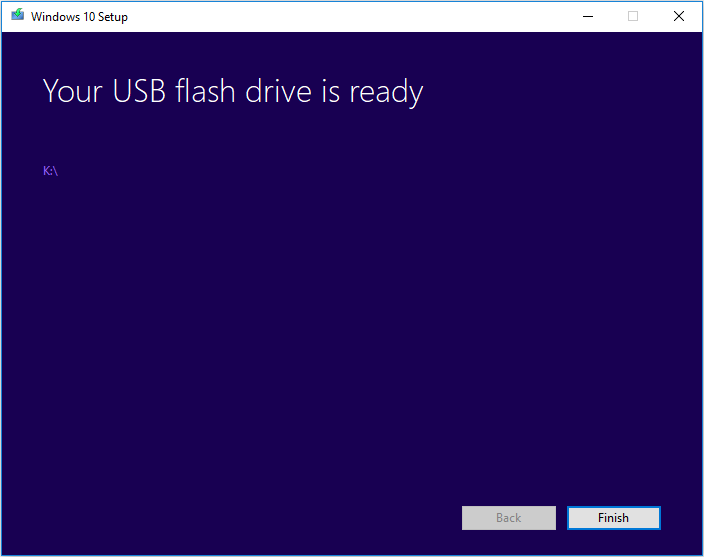
Step 7. When it is done, click Finish and then you can use that drive to boot up your computer and install Windows 10.
If the computer that you want to install Windows 10 has a DVD player, you can also select ISO file to burn the ISO file to a DVD later.
Just follow the step-by-step prompts on the Media Creation Tool to download Windows 10 installation files and save the ISO file to a specific location. When it is finished, you can burn the ISO file to a DVD.
WinSetupFromUSB
Скачиваем здесь WinSetupFromUSB, распаковываем, открываем.
- В верхнем поле указываем флешку, на которую будем сохранять нашу Windows 10.
- Сразу чуть ниже устанавливаем флажок «Autoformat it with FBinst»
- Ставим галочку напротив «Windows Vista / 7 / 8 ….» (не волнуйтесь, для десятки всё тоже подходит) / Открываем квадратную кнопку многоточием справа / Находим на компьютере файл ISO с нашей копией / Жмем «Открыть».
- Большой кнопкой «GO» внизу запускаем процесс записи образа.
- Подтверждаем, что мы не против очистки флешки. Добросовестная программа переспрашивает это два раза разными словами, так что жмем «Да» и потом снова«Да» .
- Начинается запись, по окончании и появлении фразы «Job done» нажимаем ОК. Принимаем работу!
Windows 10 Media Creation Tool: Обзор продукта
Media Creation Tool — программа, которая позволяет скачать официально Windows 10 прямо от Microsoft. Пользователи Windows 7, 8, 8,1 и 10 могут удобно обновлять свою систему и модернизировать её в случае необходимости.
С помощью этой программы пользователь выполнит обновления или переустановку операционной системы Windows. Программное обеспечение может быть получена без особых усилий, с архитектурой издания 32 бит и 64 бит, выберите совместимую версию файла и загрузить его.
Пользовательский интерфейс не вызывает сложностей на протяжении ряда действий. Как только пакет загружается и запускает себя, он спросит пользователя, следует ли обновить или создать установочный носитель (USB — устройство флеш памяти, DVD диска или ISO файл) для другого компьютера.
Если вы решили установить на ПК Windows 10, то задумывались, как это сделать, потратив минимум усилий. Поможет бесплатное приложение Media Creation Tool. Оно создаст образ, или обновит систему. Ключ продукта не понадобится, он сгенерируется с сервера Microsoft. Рассмотрим подробно как работать с этим приложением.
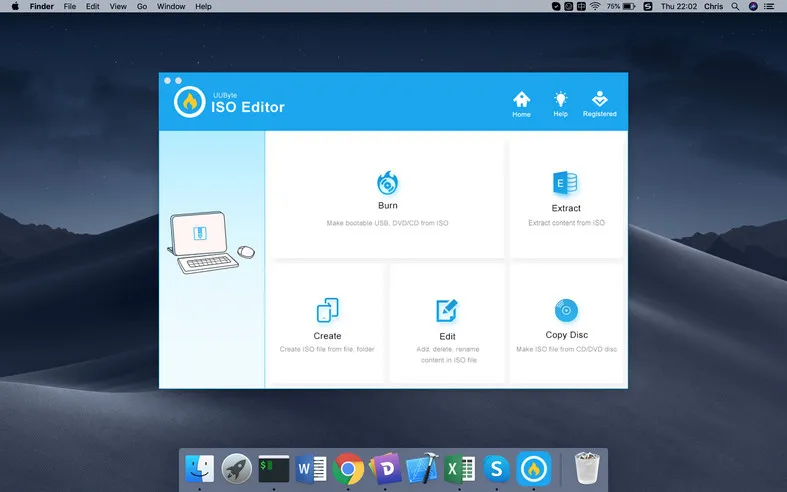
Windows 10 Media Creation Tool for Mac Alternative 1: UUByte ISO Editor
There are various methods to create a Windows 10 bootable USB on Mac, but here you will get three best and effective tools that will reduce your workload and you will get the utmost result. So, let’s begin with these tools.
UUByte ISO Editor is an advanced tool that enables users to extract and edit the contents of the ISO file and is also capable enough to create a bootable device. Most importantly, it is working perfectly on multiple operating systems such as Windows and Mac. It is the perfect alternative to Windows 10 Media Creation Tool on Mac. Now, go through the steps listed below to create a Windows 10 bootable USB on Mac.
Step 1: Download
To begin this method, you need to download and install UUByte ISO Editor on your Mac and also ensure that the Windows 10 ISO is downloaded.
Step 2: Load Windows 10 ISO
Insert a USB drive on your Mac. Now, launch UUByte ISO Editor and click ‘Burn’ tab. On the home Screen, you will get the ‘Browse’ button, click on it to import Windows ISO file from the saved location.
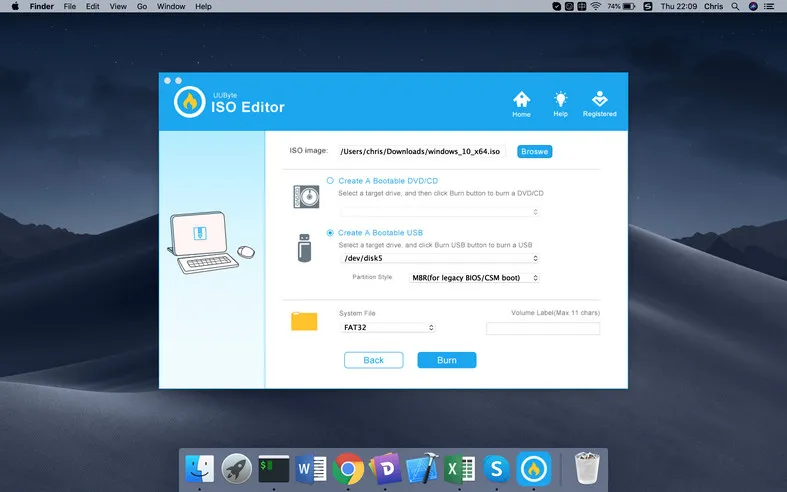
Step 3: Create Windows 10 Bootable USB
Make sure to click on the radio button stating ‘Create a bootable USB’ to enable this feature and then select drive name of the USB drive. After completing the above steps, click on the ‘Burn’ button. Your job is done and after the completion of the process, ejects the USB.

UUByte ISO Editor is a full packaging solution that will give you ample options to perform all kinds of ISO task. The tool is easy to use and it supports USB as well as DVD. The technical support is also provided by UUByte, so if you stuck in any situation, then you can take the assistance of techies.
Windows 10 Media Creation Tool FAQ
How do I get Windows 10 media creation tool?
You can get Windows 10 media creation tool by visiting the Microsoft Media Creation Tool website. Then click the Download tool now button from the webpage. Then install and run the application on your PC. After that, you can choose to create installation media for another PC or upgrade Windows 10 with Windows 10 media creation tool.
How do I upgrade to Windows 10 using media creation tool?
First, visit the Microsoft support website. Click the Download tool now button on the page. Run the Media Creation Tool and click the Accept button to agree to the terms. On What do you want to do page, select Upgrade this PC now and click Next. Then follow the prompt to complete upgrade to Windows 10.
How do I create a bootable USB using Windows 10 media creation tool?
Prepare a blank USB flash drive with at least 8 GB and connect it to your PC. Download the free Windows 10 media creation tool from the Microsoft’s official website and run the tool. On the What do you want to do page, select Create installation media for another PC. Then select language, Windows Edition, and Architecture for the installation media. On Choose which media to use page, select USB flash drive and follow the prompts to create the bootable USB drive.
What is Windows 10 media creation tool?
Windows 10 Media Creation Tool is a free utility developed by Microsoft, which lets you create a Windows 10 installation USB drive or download its .ISO file that you can burn on to a DVD to install the operating system on a different computer. With Windows 10 creation tool, you can upgrade Windows to its latest version or create a Windows 10 installation USB drive/DVD disc to install Windows 10 or repair a Windows PC.
What You Will Require?
Before we continue with the guide to using Windows 11 Media Creation Tool, let’s discuss a few things that you will need throughout the process. There are certain things that you require to continue with the process of upgrading Windows with the media creation tool.
- Ensure you have a computer to install Windows.
- Take a backup of your data before you continue with the process. In case of data loss, you can easily restore the data if you have a backup of it.
- Ensure you have a stable internet connection. You will need a good speed internet connection to download Windows and then upgrade your Windows or create a bootable USB drive.
- Ensure you have a USB drive with at least 8GB of storage. You will need this if you are not upgrading your Windows but creating a bootable USB drive from the Media Creation tool.
Как использовать Media Creation Tool для создания своего собственного установочного носителя Windows 10 на карте памяти USB
Вы также можете использовать Media Creation Tool в качестве USB-инструмента Windows 10, что означает, что он может помочь вам загрузить установочные файлы Windows 10 и автоматически создать загрузочную флешку Windows 10 USB, которую затем можно использовать для установки этой операционной системы на все ваши компьютеры
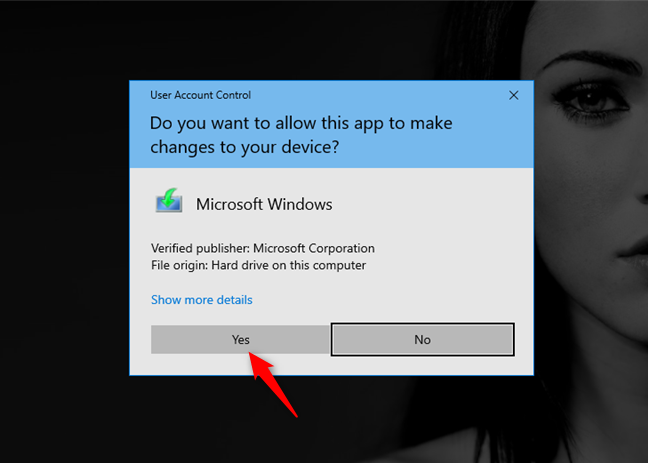
Обратите внимание, что вы должны войти в систему как администратор, чтобы запустить MediaCreationTool.exe. Когда Контроль учетных записей пользователей (UAC) спросит, уверены ли вы, что хотите запустить это приложение, нажмите или коснитесь Да
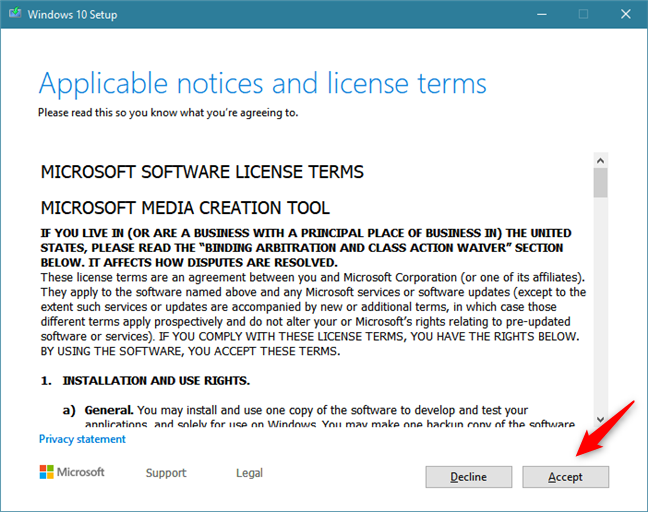
Затем Media Creation Tool загружает свой пользовательский интерфейс и просит вас принять его условия лицензии. Прочитайте условия и нажмите или нажмите кнопку «Принять», чтобы продолжить.
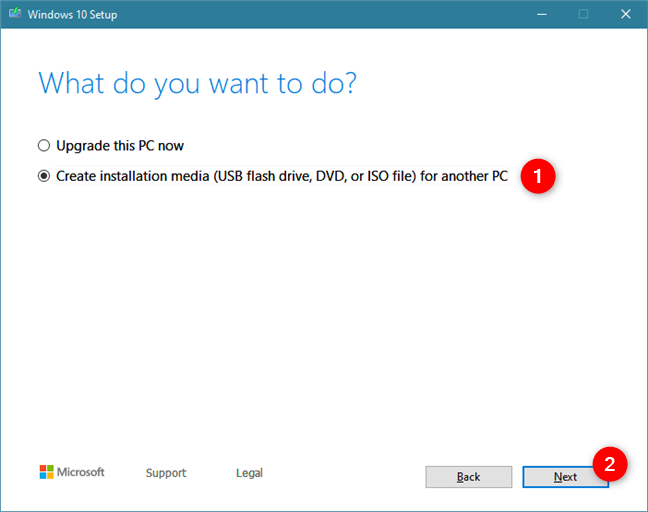
Инструменту создания мультимедиа требуется несколько секунд, чтобы «подготовить кое-что». Затем он спрашивает, хотите ли вы обновить компьютер или создать установочный носитель, который можно использовать для установки Windows 10 на любой компьютер или устройство. Отметьте второй вариант, который гласит: «Создать установочный носитель (USB-накопитель, DVD-диск или файл ISO) для другого ПК».
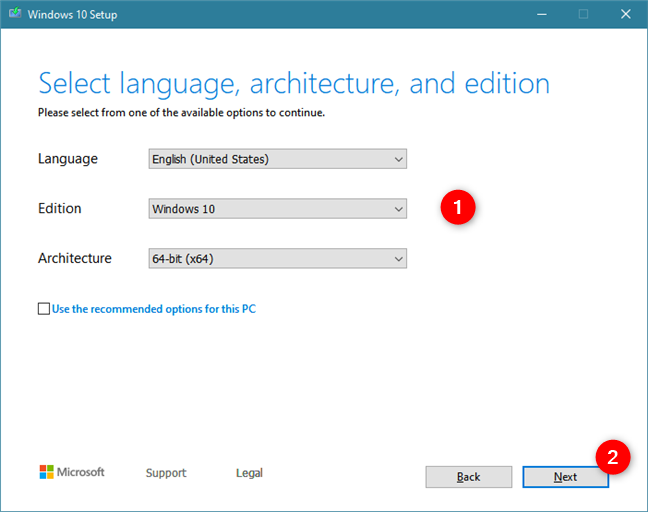
Затем выберите язык, редакцию и архитектуру, которые вы хотите использовать для создания установочного носителя. Архитектура может быть 64-битной, 32-битной или обеими. Мы рекомендуем использовать 64-битную версию как можно чаще. Вы также можете выбрать «Использовать рекомендуемые параметры для этого ПК», что автоматически выберет язык, редакцию и архитектуру, соответствующие ПК, который вы используете прямо сейчас. Выбрав нужные параметры, нажмите Далее.
Затем выберите тип хранилища мультимедиа, которое вы хотите использовать. Выберите «USB flash drive» и нажмите «Далее».
Вы видите все флэш-диски и внешние жесткие диски, которые подключены к вашему компьютеру или устройству Windows. Выберите тот, который вы хотите использовать для создания установочного носителя Windows 10. Не забывайте, что все данные на нем будут уничтожены. Убедитесь, что у вас есть его копия, прежде чем двигаться вперед.
После того как вы выбрали USB-накопитель, Media Creation Tool начнет загружать последние версии установочных файлов Windows 10 на ваш компьютер или устройство. В зависимости от скорости вашего интернет-соединения и нагрузки на серверы Microsoft, это может занять некоторое время. Все, что вам нужно, это терпение.
После завершения загрузки проверяется целостность, чтобы убедиться, что все в порядке. Затем выбранный USB-накопитель станет загрузочным с самой новой версией Windows 10. Этот процесс может занять еще пару минут.
Когда вы закончите, вам сообщат, что карта памяти USB готова. Нажмите или коснитесь Готово , и затем вы сможете использовать этот диск для загрузки и установки Windows 10.

Заключение
Как вы можете видеть, инструмент Media Creation Tool интуитивно понятен и прост в использовании, даже если вы не являетесь техническим экспертом. Если вы будете следовать нашим инструкциям, у вас не должно возникнуть проблем при создании собственного установочного файла ISO для Windows 10 или создании загрузочной карты памяти USB для Windows 10 со всеми ее установочными файлами. Если у вас есть какие-либо вопросы, не стесняйтесь спрашивать в разделе комментариев ниже.
Use the Windows 10 Media Creation Tool to create a bootable USB memory stick with the Windows 10 setup
You can use the Media Creation Tool as a Windows 10 USB tool. In other words, it can download the Windows 10 setup files and automatically create a bootable Windows 10 USB memory stick, which you can then use to install the operating system on any computer. When the Windows 10 Media Creation Tool loads its user interface, it asks you to accept its license terms. Read the terms, and click or tap Accept to continue.

Accept the license terms for the Windows 10 Media Creation Tool
Media Creation Tool needs a few seconds to «get a few things ready.» Then, it asks whether you want to upgrade your PC or create installation media that you can use to install Windows 10. Check the second option: «Create installation media (USB flash drive, DVD, or ISO file) for another PC,» and press Next.

Choose to create installation media (USB flash drive, DVD, or ISO file)
Next, you can choose the Language, Edition, and Architecture (32-bit, 64-bit, or both) that you want to use for the Windows 10 setup media. By default, the Media Creation Tool uses the recommended options for your PC. It is best to leave these options as they are and just press Next. However, if you uncheck the box for «Use the recommended options for this PC,» you can set things in detail before moving on to the next step.

Select the language, architecture, and edition
You are prompted about the media storage you want to use. Plugin the USB memory stick on which you want to store the Windows 10 setup files, select «USB flash drive» and press Next.

Choose to create a bootable USB flash drive with the Windows 10 setup
You see all the flash drives and external hard disks currently connected to your Windows computer or device. Select the one you want to use for creating Windows 10 installation media, and then press Next. Do not forget that all the data on the drive is going to get wiped during this process. Make sure that you have a copy of it before moving forward.

Select the flash drive or external hard drive for the Windows 10 setup files
Once you have selected the USB flash drive, the Windows 10 Media Creation Tool starts to download the latest installation files. Depending on your internet connection speed and the load on Microsoft’s servers, this might take a while. All you need is patience.

Downloading the Windows 10 setup files
Once the download of the Windows 10 setup files is over, it is verified for integrity. Then, the USB memory stick you selected is made bootable, with the newest Windows 10 setup. This process may take another couple of minutes.

Creating the Windows 10 media
When the process is finished, you are informed that the USB memory stick is ready. Click or tap Finish, and then you can use that drive to boot from and install Windows 10.

Click or tap Finish
Safely remove the USB flash drive from your computer, and use it as you see fit.
TIP: To install Windows 10 without problems, read: How to install Windows 10 from DVD, USB, or ISO file.
Windows 10 Installation Media Tool
To download the Windows 10 Installation Media Tool, visit Microsoft.com and scroll down till you see two purple Download Tool Now buttons.
The Windows Media Creation Tool will allow you to download the Windows 10 ISO directly from Microsoft, without having a product key. You can use it to clean install or Upgrade to Windows 10. It can be used to download the following editions of Windows 10 – Windows 10 Home, Windows 10 Home N, Windows 10 Home Single Language, Windows 10 Pro and Windows Pro N.
The tool includes file formats optimized for download speed, built-in media creation options for USB & DVDs, and allows for optional conversion to ISO file format. There are two versions of the tool available – a 32-bit version and a 64-bit version. Download the appropriate version of the tool and run it.
When you run the tool, it creates two directories on your system partition – $WINDOWS.~BT and $Windows.~WS. These folders contain the downloaded setup and installation files, and an option to resume the creation process if it fails.
When you click on it to run the tool, you will see the following screen asking you if you want to Upgrade this PC now or Create installation media for another PC.
If you click on Create installation media for another PC, you will see a screen asking you to choose the media to use. You may use a USB Flash Drive which is at least 3 GB, or you can create an ISO file, which you can burn to a DVD later if you wish. I chose to create an ISO file.
In any case, once you click on Next, the downloading of Windows 10 will start.
The tool will then soon automatically start creating Windows 10 media.
Once the ISO file is ready, you will see two options. One is to open the location where the ISO file has been saved and the other to Open a DVD Burner software to burn the ISO to disc.
I chose to open the ISO folder and run the setup file inside it to perform an in-place upgrade of my Windows 8.1 to Windows 10.
The upgrade process went smoothly, except for one thing…
Something happened when installing Windows 10
I received a Something Happened error screen. I closed the screen and restarted the setup. It worked, and I was able to smoothly upgrade Windows 8.1 to Windows 10.
If on the other hand, you select Upgrade This PC in the first screen, as mentioned above, and click on Next, you will see the following screen.
Select your Language, architecture, and edition and click Next. The upgrade process will begin directly.
TIP: See this post if you receive any Windows 10 Media Creation Tool Errors.
Related reads:
- How to create a Windows 10 bootable USB on Linux
- How to create a Windows 10 Bootable USB on Mac.
Our next post takes you through a screenshot tutorial which shows how you can clean install or Upgrade to Windows 10, using Windows 10 ISO file you created here.
This post will show you how to install any version of Windows from one USB flash drive. You can also download Windows 10 Enterprise ISO with Media Creation Tool.
Download Windows 11 Media Creation Tool
First of all, make sure you have registered in the Windows Insider program. To download the official file, you will need a Windows Insider account, So make it first. Now go to this official page and download the Windows 11 installation media. Click on Windows 11 icon and then click on the download tool now. Your Windows 11 Installation media will be now downloaded successfully in minutes (depending upon your network speeds).
After installing the file, run it on your PC system. After this, you’ll get a prompt saying “Getting a few things ready!”. Now, you’ll see two options: “Upgrade the PC Now” and “Create Installation Media (USB flash drive, DVD, or ISO file) for another PC”.
You can choose the option accordingly, if you choose “Upgrade the PC Now”, then your system will be upgraded to Windows 11. While, on the other hand, if you choose “Create installation media” then it will create a bootable file instead of upgrading your system.

Upgrade the PC Now
If you choose the “Upgrade the PC Now” option, then the Media Creation tool will start downloading the Windows 11 File and upon downloading successfully, you will be able to install it in your system. After successful installation, complete the setup and you will be now able to run Windows 11 in your system seamlessly.
Create Installation Media
If you choose the option “Create installation media.” then you will now get a prompt asking for language, edition, and architecture details of your system. Make sure to enter the details correctly and also you can choose the option “Use the recommended option for the PC!”. It will automatically select the option compatible with your system.
Now click on Next and you’ll get two options namely “Create USB flash drive” and “ISO file”. In create a USB flash drive option, it will create a bootable USB drive for you. And if you choose the second option, you will be able to burn the ISO file later to create a bootable USB drive or a DVD.
- If you select the “Create USB Flash drive” option, then make sure to connect the USB. The tool will automatically download and burn into the US connection. And you can flash it later.
- For the “ISO File” option, it will download the ISO file of Windows 11 and you’ll later have to burn it using any third-party apps to make it bootable.
We recommend you to use the “Create USB Flash Drive” option here, as it is easier to use.
Ready to Install
After creating the bootable Windows 11, plug the USB Drive in which you’ve installed the bootable file. Boot the PC into BIOS and install the system. You can now use Windows 11 seamlessly if you have followed all the steps mentioned above correctly. You can read our “types of Windows 11 product key”, “Password Reset”, and TPM 2.0 Bypass” article here.
Новая материнская плата? Потеря Windows
При активации Microsoft сразу связывает лицензию ОС с уникальным кодом различных компонентов вашего ПК, называемым также Product ID. Благодаря этому становятся возможным обновления и возможные переустановки Windows 10 на этом компьютере в будущем. Однако существует риск отказа системы из-за слишком большого количества замененных системных компонентов.
После покупки нового жесткого диска или же обновления BIOS «десятку» придется активировать заново — это мы поняли во время тестирования. Однако все иначе в случае с материнской картой: после замены этого критического компонента Windows 10 больше не может быть активирована на этом компьютере. Необходимо покупать лицензию или же сначала установить старую версию, а уже с нее провести обновление до «десятки».
Этот метод, впрочем, работает только с Retail-вариантами с ключом в комплекте. Если же у вас OEM-версия, а материнская плата от того же производителя, что и ПК и была заменена в рамках ремонта, необходимо к нему же и обратиться. Производитель несет ответственность за восстановление прежнего состояния вашего компьютера.
Некоторые особенности работы
Внешний HDD, приобретает файловую систему FAT32. Что предпринять? Нажимаем «Win+R», далее пропишите команду «diskmgmt.msc», для перехода к утилите управления дисками.
Отобразятся все разделы диска. Отформатируйте его.
Программа не видит флешку
При работе появляется сообщение, что USB-накопитель не найден. Эта ошибка актуальна для Windows 7/10 разрядности 32/64. Что предпринять? Скачайте утилиту предыдущей версии, например, 10.0.14393.0 Некоторые флешки определяются в качестве накопителя, а как жесткий диск не распознаются. Отформатируйте ее в FAT32 через командную строку. Про это подробно описано в статье: «Как отформатировать жесткий диск? 4 четких способа!».
Проверка устройства на наличие ошибок
Откройте его в новом окне. Далее выбираем командная строка с правами администратора. В последних версиях ОС вместо командной строки будет написано Power Shell. Набираем «Файл»-«Запустить Power Shell».
Далее прописываем команду CHKDSK /G (указываете букву накопителя). Далее соглашаемся на разблокировку (пишем «Y», нажимаем клавишу «Enter»). Ждем окончания работы. Утилита проверит диск, исправит ошибки автоматически, или укажет возможные причины неполадки.
Media Creation Tool не запускается
Сбой происходит из-за неправильного распознавания утилиты системой безопасности, которая блокирует подозрительную активность. Отключите антивирус. Например, если установлен Smart Security, нажимаем его иконку правой кнопкой мыши, отключаем антивирус.
Не хватает прав на запуск
Откройте утилиту с правами администратора. Кликните по скачанному файлу правой кнопкой мыши, выберите соответствующий пункт.
Очистка временных файлов
В адресной строке проводника напишите: %TEMP%. Далее нажимаем «Enter». Откроется папка где находятся временные файлы ПО, которое работало.
Удалите все ее содержимое, перезагрузите ПК. Как сделать проще? Используйте специальный софт. Подробнее об этом прочитайте в статье: «Как работает Wise Registry Cleaner».
What is Media Creation Tool?
Windows 10 Media Creation tool has two functions:
- Upgrade the PC which has already installed Windows 10
- Create installation media (USB flash drive, DVD) for another PC or simply download the latest Windows 10 ISO file.
Windows Update Assistant is another tool which can be used to upgrade the PC seamlessly but I prefer the media creation tool. If you want to upgrade your PC to the latest version of Windows 10, you should select the first option. And if you want to create a bootable USB/DVD, then you should select the second option.
The only problem with the Media Creation Tool is that it will try to download the Windows 10 setup every time you want to create a bootable USB/DVD. This is the default behavior.
Выводы статьи
В бесплатной программе Media Creation Tool можно выполнить обновление Windows 10 до новой версии системы. Программа выполнит все необходимые операции, в итоге, на компьютере будет установлена самая последняя версия Windows 10. При настройках по умолчанию, в обновленной версии системы будут сохранены все данные пользователя и установленные программы.
Обновление Windows 10 в Media Creation Tool (видео)
Похожие публикации:
- Сравнение версий Windows 10: таблица
- Как отключить или удалить OneDrive в Windows 10
- Диск восстановления Windows 10
- Как установить русский язык в Windows 10 — 2 способа
- Индекс производительности Windows 10 — 5 способов