Новая версия vsdc позволяет обрабатывать изображения с помощью искусственного интеллекта, а также добавлять блики и капли дождя
Содержание:
- VSDC – Free Video Editing Software for Windows 7 Overview
- How do you overlay videos in VSDC?
- Shift position text effect
- Как скрыть лицо на видео в два клика
- Стилизация лица на видео
- All features
- Full format compatibility
- Paper burn effect (Pro version)
- VSDC Wizard
- Olive
- VSDC reviews by users
- How to slow down or speed up MP4 videos/ How to reverse an MP4 video
- Использование кривых Безье
- Blur a face or any other object you need to hide in the video
- Профессиональные функции
- Как скрыть объект на видео с помощью маски нестандартной формы
- How to set up chart dynamics
- Видеоуроки – это хобби, не требующее бюджета
- New video effects: drop shadow and page turn
VSDC – Free Video Editing Software for Windows 7 Overview
When you open VSDC for the first time, you get a clear picture of what your options are. The upper ribbon-style menu pretty much includes everything you need to start.
The feature-set can be broken down into the following sections:
- Actual editing: cutting, splitting, cropping, rotating the footage.
- Merging video fragments: adding transitions between the elements.
- Visual adjustment: color filters, styles, and advanced color correction tools.
- Video effects: zoom, mirror effect, old TV effects, Chroma Key (green screen), etc.
- Speed adjustment: slow motion and timelapse effects.
- Audio effects: amplitude setup, noise reduction filters, the Reverse audio effect.
- Working with text: adding subtitles and creating titles using a full-featured text editor.
When it comes to video creation process, VSDC suggests two ways: the short one and the longer one. We’ll review both.
How do you overlay videos in VSDC?
There are several ways to add an overlay into your video. Here is the easiest one:
-
Launch VSDC and use the “Import content” button to add your main creative: video or image.
- Now that the file is on the timeline, make a double-click on it – a new tab will open.
- Move to the left side of the timeline and open the “Blend” menu. Select “Screen” and watch how two files get blended.
- Go to the “Tools” menu at the top and click on the wrench icon. Adjust the opacity level of the overlay if you want to make it more transparent.
- On a very basic level, this is it. You can go ahead and save your video to PC using the “Export project” tab.
At this point, you can set your creative spirit free and start playing with the settings. For example, you may want to layer the effect partially or make the overlay gradually disappear. You may also use blending modes to change the way your footage is blended. Here are three ideas for you to practice.
Create a photomotion effect
Photomotion is a popular effect that can help you bring still images to life. Using video overlays, you can add moving clouds to the sky area in the photo, make snow fall, or create water movement. It all depends on where your imagination leads you.
To create a photomotion, import a still image instead of a video as your main creative, make a double click on it and add an overlay. Resize the overlay by cropping the video, change its opacity, and place over the area you want to bring to life. Voila!
Use video overlays to create cinematic transitions
Video overlays are used to set the tone and add emotions. For instance, wedding videos often contain the famous light leaks overlay because it creates such a dreamy, romantic look.
Light leaks – and overlays in general – can also serve as a perfect, authentic transition between scenes. Learn how to apply a light leaks transition in VSDC from the tutorial below:
Practically any dynamic overlay video will make a good transition. Watch this video showing how to create a simple glitch transition if you need more ideas.
Create a double exposure effect
The last trick we’re about to show you is so impressive and sooo easy to replicate, you won’t believe your eyes.
If you aren’t familiar with the double exposure technique, it uses the same principles as a video overlay, although it’s applied to photos more often than to videos. The outcome is a composition of two or more images blended in a unique way. Here is a step-by-step guide to creating a double exposure video with a smoke overlay:
- Launch VSDC and use the “Import content” button to add your main video.
- Add the smoke overlay using the “Add object” button. You can find one on free stock video marketplaces like Videezy or Videvo.
- Select the overlay, go to the “Video effects” menu, proceed to “Adjustments” and select “Inverse”.
- Move to the left side of the timeline, open the “Blend” menu and select “Screen”.
- Adjust the opacity of the smoke level if needed using the “Tools” menu.
Here is a 1-minute long video guide to using smoke overlay:
Ready to put this into practice? Then go ahead – download VSDC, a few overlay videos to experiment with, and let your creativity take over.
Enjoy!
Shift position text effect
The Shift position text effect is designed to make symbols slide in one by one from the selected area on the screen to the text placeholder. On the timeline, this effect appears as TextShiftPosition.
To open the settings, make a right mouse-click on the effect layer and select Properties. On the right-hand side, you’ll find Text shift effect settings that include all the controls you need to adjust the text animation. Let’s review these controls in detail.
Effect direction
Following the same logic we described earlier, this parameter allows you to set the movement direction. If you select Fade-in, the text will be appearing on the screen, symbol by symbol. If you select Fade-out, the text will be disappearing from the screen, symbol by symbol.
Processing order
This parameter defines in which order the letters start appearing or disappearing.
Again, you can choose from three options:
- From first glyph to last — letters appear or disappear following a direct order
- From last glyph to first — letters appear or disappear following a reversed order
- Random order — letters appear or disappear randomly
Glyph drawing time
For this effect, the Glyph drawing time means the time required for each symbol to move from its initial position to its final position — or the other way around, depending on which direction you’ve selected. The higher its value, the more gradual the movement will be.
Initial glyph position
This parameter allows you to set the initial point from where the text symbols will be moving to their final spots.
There are three options available:
- Constant shift — symbols appear one by one at a 45-degree angle from a fixed distance. While you can change the angle, the distance will remain the same.
- Outside text object — symbols along with the background color appear one by one from outside of the text placeholder. The position of the symbols changes based on the Distance value. At 100%, the symbols are right outside of the text placeholder. However, the lower the value is, the closer the symbols to their final point.
- Custom point — symbols appear from the point on the screen you select manually.
For the position you select, you can adjust three parameters: Angle change per glyph, Angle and Distance.
Angle change per glyph — this parameter changes the movement angle of each subsequent symbol. Suppose, the Angle change is 30 degrees while the initial Angle is 10 degrees. This will mean that the first symbol will appear at a 10-degree angle, the following symbol will appear at a 40-degree angle (10+30); the third symbol will appear at a 70-degree angle (40 + 30), and so on.
Angle sets the initial angle at which the symbols move toward their final point. Keep in mind that if the Angle change per glyph equals zero, this parameter sets the angle for the entire movement duration.
Distance sets the distance between the initial location and the final location of a symbol.
Note: you can change the Initial and the Final values for all three parameters which means the values at the beginning and at the end of the effect can be different.
Как скрыть лицо на видео в два клика
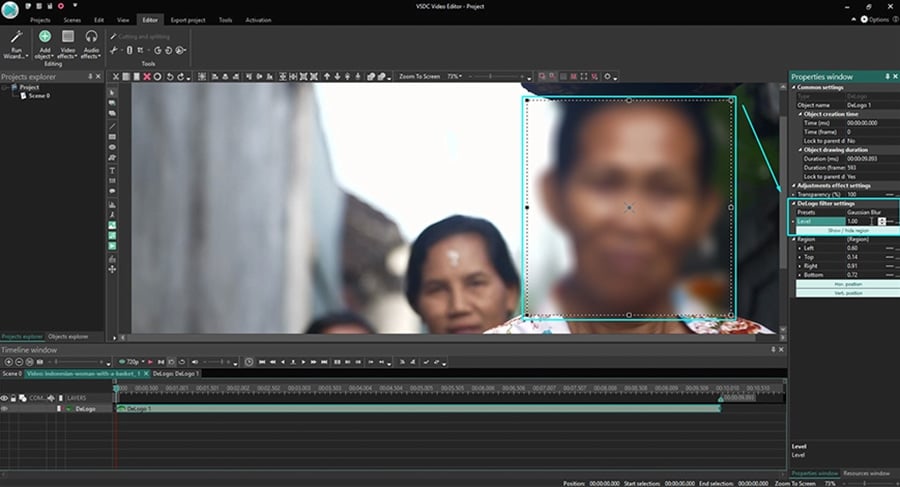
Итак, если вам по-быстрому нужно наложить цензуру на любой объект на видео, встроенный фильтр DeLogo – наиболее подходящий для вас вариант. Вся его суть в том, что по клику мыши вы автоматически добавляете на сцену размытый «экран» прямоугольной формы, который можно изменять по размеру и положению. Работает это следующим образом:
- Добавьте видео на сцену.
- Перейдите во вкладку Видеоэффекты, откройте Фильтры и выберите “DeLogo”. На сцене мгновенно появится объект прямоугольной формы, а на шкале времени – новая вкладка с размещённым на ней фильтром. На иллюстрации ниже мы показали области меню, на которые нужно ориентироваться.
- Щёлкнув по фильтру, вы увидите контурную рамку по его границе, а также направляющие точки.
- Захватив фильтр в центре мышкой, вы сможете легко перемещать его по сцене.
![]()
При необходимости стиль фильтра можно сменить. Например, выбрать между пикселями, мозаикой и размытием.
Чтобы сделать это, откройте Окно свойств справа. Если вы не можете найти его, правой кнопкой мыши щёлкните по фильтру и выберите «Свойства». В появившемся меню опуститесь до настройки «Параметры фильтра DeLogo» и выберите нужный пресет, а также уровень плотности.
Таким образом, вы сможете легко скрыть лицо на видео (или любой другой объект) буквально за пару минут. После этого перейдите во вкладку “Экспорт проекта” и сохраните ролик на своём ПК в нужном формате.
Стилизация лица на видео
Инструмент под названием «Украсить лицо» появился в меню спецэффектов. С помощью нейронных связей программа мгновенно определяет лицо в кадре и позволяет добавить стилизованную маску, которая впоследствии будет двигаться вместе с лицом. Размер и движения маски задаются на основе автоматически определяемых контрольных точек для каждой ключевой зоны лица: глаз, носа, подбородка и так далее. В результате, получается эффект, напоминающий фильтры в Instagram или Snapchat.
Несколько шаблонов с масками уже доступны в галерее VSDC, однако, вы также можете загрузить собственное изображение и использовать его в качестве маски. Это лишь первая версия данного инструмента, однако, мы планируем развивать его по мере выхода новых версий.
All features
Supported formats and codecs
The video editor supports (opens) nearly all video, audio and image formats and codecs and saves all mainstream formats. Below is a table of supported formats.
Supported formats / Reading
Video formats
AVI, QuickTime (MP4/M4V, 3GP/2G2, MOV, QT), HDVideo/AVCHD (MTS, M2TS, TS, MOD, TOD), WindowsMedia (WMV, ASF, DVR-MS), DVD/VOB, VCD/SVCD, MPEG/MPG/DAT, Matroska Video (MKV), Real Media Video (RM, RMVB), Flash Video (SWF, FLV), DV, AMV, MTV, NUT, H.264/MPEG-4, DivX, XviD, MJPEG
Audio formats
MP3/ MP2, WMA, M4A, AAC, FLAC, OGG, RA, RAM, VOC, WAV, AC3, AIFF, MPA, AU, APE, CUE, CDA
Image formats
BMP, JPEG/JPG, PNG, PSD, GIF, ICO, CUR
Supported formats / Writing
Video formats
AVI, DVD, VCD/SVCD, MPEG, MP4, M4V, MOV, 3GP/3G2, WMV, MKV, RM/RMVB, FLV, SWF, AMV, MTV
Audio formats
MP3, M4A, AAC, OGG, AMR, WAV
Image formats
BMP, JPEG, PNG, GIF
Full format compatibility
This is another topic often causing unnecessary headaches. Frankly, formats should be the last thing for you to worry about, but here is what happens and why. Different recording devices produce different video formats and codecs on the output. Some video editors have troubles opening some of those formats. For example, it’s well-known that Movie Maker — the used-to-be-default video editor for Windows – couldn’t easily open MP4 video files. And because MP4 is quite a common video format, many users had to deal with conversion before they could open a video for editing.
So, in case you were wondering…
VSDC developers addressed this issue by implementing a built-in converter so that their video editor opens all the popular formats regardless of what device was used to record the footage. VSDC recognizes and works flawlessly with videos shot on smartphones, professional cameras, action cameras, drones – what have you.
Here are some popular formats supported by VSDC
AVI, QuickTime, HDVideo, WindowsMedia, DVD, MPEG, MPEG-4/MP4, Divx, AMV, and many others. On top of that, you can edit 4K videos as well!
Paper burn effect (Pro version)
The paper burn transition effect creates a realistic illusion of a burning piece of paper that reveals the following scene. You can apply it to videos, however, it looks even more impressive when applied to a still image.
Like all effects in VSDC, the paper burn transition is fully customizable. You can adjust the color, size, direction, and intensity of the flame. As an alternative template for this transition, you can select freezing.
The cherry on top? If you activate time inversion for this transition, the effect gets reversed. For instance, instead of a burning piece of paper, you’ll get a piece of paper that is restored from being burnt.
VSDC Wizard
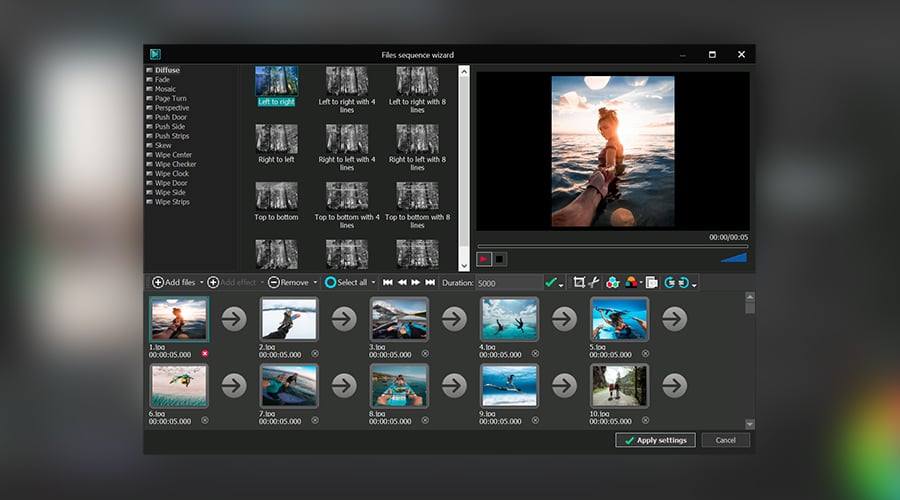
The fastest way to create a simple slideshow-type video is using the “Run Wizard” option in the upper left corner. This is a good choice when you just need to have multiple images or videos combined into a quick clip. Nothing fancy and only several minutes worth of your time.
If you ever created clips in Windows Movie Maker, you’ll immediately get a hang of VSDC Wizard. In a nutshell, you can upload several images and videos in bulk and then merge them using smooth transitions and effects. Wizard menu enables you to cut, crop, and rotate pictures, set up duration, and apply Instagram-like filters. These filters are actually quite convenient if you want all the files to appear in the same style and color theme.
Once you’re done with the sequence, click on the Apply Settings button, and you’ll find your creation on VSDC timeline. It will be named “Sprite”, so don’t be surprised. In VSDC terminology, Sprite is a way to describe a sequence of merged files. Technically, after that, you can just add an audio file for background music (“Add object” button) and export your project, because the movie is ready.
This is, however, just the top of an iceberg when it comes to what this free video editing software for Windows 7 is capable of. Keep reading to learn about the advanced effects available in VSDC.
Olive
Olive is an open-source video editor that works on macOS, Windows, and Linux. The tool is currently in development and available in the alpha version, but it performs well and looks promising. According to the video editing community on Reddit, Olive is one of the best iMovie alternatives for Windows.
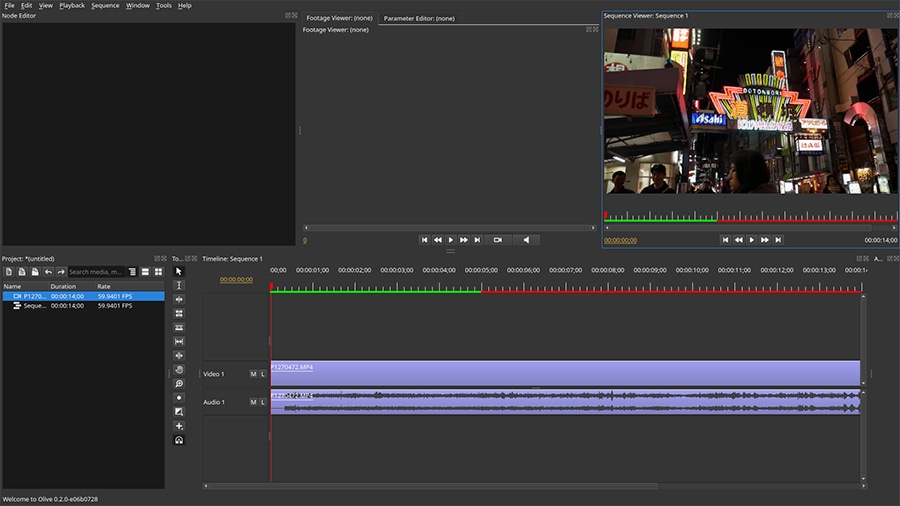
Olive is simpler than most video editors on this list in many ways: it is based on shortcuts, it has a bare minimum of effects and transitions, and overall, its interface is clean and straightforward. You can perform some of the operations right in the preview window where you can downsize, rotate, and relocate files – again, quite a convenient feature for the split-screen and picture-in-picture effects. Plus, there is a built-in voice recorder, audio noise effect, and a simple title creator.
Keep in mind that Olive is a work in progress which means more features will be introduced in the future. However, even for now, it’s a decent choice for someone who occasionally needs to quickly merge a few friends and family videos, add a soundtrack and captions.
VSDC reviews by users
Our user family is the best audience we could wish for. And each time we hear from them, it fills our hearts with pure joy. There’s nothing better, really, than knowing our solution has helped someone achieve a business goal, finish a school project, share vacation memories, create a breathtaking drone video, grow a YouTube channel, or just have a lot of fun.
Here are some beautiful messages we received in the past few months. You can find more on our Facebook page.
“VSDC is well-designed and not hard to learn. I used it to create professional-standard training videos for business web-applications. The support team is friendly, responsive and accommodating”.Pieka Grobbelaar
Finally, iMovie allows you to remove green and blue screens from your footage easily by the same old drag-n-drop movement where you just overlay the green/blue screen video on the video or image that is supposed to replace the background. Overall, there are more than 200 different effects available in this editor including the popular picture-in-picture, slow motion, fast-forward, fade transitions, zoom, freeze frames, and many others.
“I’m still as impressed with VSDC today as when I first tried it years ago. Every one of the videos on my channel (over 900) had been edited through use of VSDC».Quadcopter 101, YouTuber and drone enthusiast
“I have been using it for a couple of months and I am very impressed. Still lots to learn, it’s amazing what it can do”.Russell Macpherson
“I love it! I’ve had big trouble finding free video editor for windows until I’ve found this. After using it for ½ year for youtubing and gaming videos I bought it for ca. 20$. That unlocked few futures like faster rendering and adaptive alfa background remover. They are constantly developing so once in a while there are new options. Last update was 64bit hardware enhancement for faster rendering and editing, previews update gave us 4K videos. Thanks VSDC”.Zdenek Walker
“Awesome software! I just got my kids some action cameras and the file type used is MOV. I ran into issues with other editors and converters. Go Pro Studios would not recognize the files and this editor is easier to use anyways in my opinion. This software works so good that I even went and got a cheap action camera for myself so I can start recording my kayak fishing trips. Once I start putting out YouTube videos on my fishing channel I will be sure to put out the good word on your product! The editor seems fairly simple to figure out and the converter opinions are outstanding! It’s been fun learning the basics of video editing which I never thought I’d be able to do. Thank you very much for the free version! I am already telling all my friends and family about your awesome free software! As soon as I have the hang of the basics I will be purchasing the pro version for more opinions and effects”!Derek Perez
“I am a total beginner at editing, but I understand programs quite fast. To make a simple video was no big deal, also the tools like audio capture and screen capture are nice to have and you do not need extra programs for it. As it goes for the free solution it is just great.I also think the company philosophy for providing a free edition is great in this point”.Benjamin Georg Berg
“I love VSDC. I’ve tried a lot of free video programs, but this is my favourite and I’ve been using it for a long time. Great job, guys”!Andra Ariadna
How to slow down or speed up MP4 videos/ How to reverse an MP4 video
To slow down an MP4 video, you need to reduce the playback speed of your file. This is a very easy task:
- Select the fragment of the video you want to slow down.
- Go to the Properties window and scroll down to the Speed% menu section.
- Change the speed according to your needs. For instance, setting the speed at 50% will make your video twice slower.
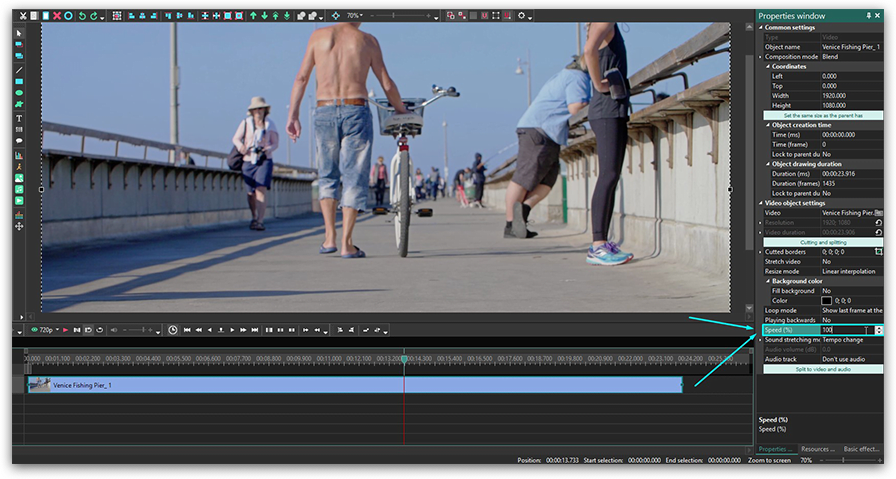
If you need to speed up an MP4 file, use the same settings to increase the speed % to the desired level. We have a separate detailed tutorial on how to speed up a video and achieve a fast-motion effect, if you’d like to learn more.
Finally, if you’re trying to find out how to reverse an MP4 video, switch from “No” to “Yes” in the dropdown “Play backward” menu above the Speed% parameter as illustrated above.
Remember that when you change the video playback speed, its audio adapts automatically. Therefore, you might want to mute it or replace it with a more appropriate soundtrack.
Использование кривых Безье
Кривые Безье лежат в основе технологии, которая используется во многих профессиональных программах для монтажа. С новой версией кривые Безье стали доступны и в рамках функционала VSDC. Если вы не знакомы с технической терминологией, главное, что стоит запомнить – это то, что кривые Безье позволяют создавать более плавные переходы. В частности, благодаря новой технологии, вы сможете настраивать скорость анимации или перехода для любого отдельно взятого момента времени, что было невозможно прежде.
Кроме того, кривые Безье вошли в набор инструментов для создания свободной формы (free shape). С помощью Безье рисовать более сложные формы будет быстрее и проще.
Blur a face or any other object you need to hide in the video
Blurring or pixelating something in a piece of footage is arguably the most popular video masking effect, and you have surely seen it a million times. It is often used in movies, in the news, on security camera records, anonymous interviews, on drone-recorded videos to hide the GPS coordinates — you name it.
Technically, you simply choose an area that must be hidden from a viewer’s eye and apply masking to it, so that the blurring effect will only appear on that chosen area.
To achieve your goal, you want to use the Inverted mask in VSDC:
- Once you’ve imported your footage to VSDC, go to Video Effects -> Filters -> Pixelize. The entire video will get pixelated, but don’t get confused — it’s a part of the process. You can also use the Properties window on the right-hand side to tweak the filter settings and make the mask more pixelated.
- Double-click on the effect on the timeline — the «Pixelize” tab will open.
- Click on the Add object option at the top and select Ellipse, Rectangle or a Free Shape for your mask. Place the object on the area that will be pixelized.
- Go to the right-hand side menu and click on the Composition menu to select “Mask”.
- Then switch the Invert mask mode from No to Yes.
This is how you blur an object! Easy enough, isn’t it?
The very same way you can apply any other video filter or effect to a chosen area — and it doesn’t have to be simple blurring.
Sometimes you might need a mask to follow a moving object. Say, if it’s a person who doesn’t stay still in the video and whose face must be hidden at all times. That will require you to use motion tracking along with masking, and we encourage you to watch a detailed how-to tutorial below to see how it works.
Профессиональные функции
Еще больше возможностей разработчики дали для монтажеров-профессионалов. Профессиональных функций очень много. Мы расскажем о некоторых из них – о тех, которые нам кажутся важными и интересными.
Итак, вот небольшой список профессиональных возможностей VSDC:
- видеоредактор поддерживает обработку 3D-видео;
- корректировать цвет ролика можно с помощью градиента;
- большое количество фильтров – размытие (по рамке, стековое размытие, в движении), фильтры как в Instagram и т.д.;
- в редакторе можно работать с масками и режимом наложения;
- очень много эффектов, среди которых ТВ-эффекты – прыгающая лента, наложение шума и треска пленки, имитация старого кино и т.д.;
- возможность объединить объекты и накладывать эффекты сразу на группу;
- хорошие инструменты для редактуры аудио: создание эффекта амплитуды, проигрывание трека в обратном направлении, одновременная работа с несколькими дорожками и т.д.;
- функция «Движение» — передвижение видеообъектов по траектории, заданной пользователем, в реальном времени;
- функция хромакея – удаление фона по заданным цветам;
- можно записывать голос, озвучивать видео, редактировать ролики в разрешении 2K и 4K и многое другое.
Вот, например, как пользуются хромакеем в VSDC – убирают зеленый фон в ролике, чтобы оставить на видео только человека или добавить какой-нибудь другой фон.

Как скрыть объект на видео с помощью маски нестандартной формы
Если вы хотите создать маску нестандартной формы, фильтр DeLogo не подойдёт. Он имеет прямоугольную форму по умолчанию, и её нельзя изменить. Однако вы можете создать маску желаемой формы самостоятельно, используя инструмент “Свободная фигура”. Этот инструмент позволяет нарисовать любую фигуру и работает по принципу векторной графики. К готовой фигуре можно применить любой фильтр и использовать её в качестве маски для видео.
Работает это следующим образом:
- Добавьте видеофайл на сцену.
- В меню слева выберите инструмент Свободная фигура.
-
Расставляя контрольные точки на небольшом расстоянии друг от друга, начинайте “обводить” выбранный объект. В дальнейшем, вы сможете сдвигать добавленные точки и корректировать форму.
- Как только вы закончили отрисовку фигуры для маски, перейдите в первую вкладку на шкале времени – это Сцена 0. Правой кнопкой мыши щёлкните по видеофайлу и выберите опцию “Копировать”. Затем сделайте двойной щелчок по слою со свободной фигурой и вставьте копию видеофайла в открывшейся вкладке.
- Откройте меню Режимы наложения для видео, которое вы только что вставили, и выберите опцию «Source in» – так, как показано ниже.
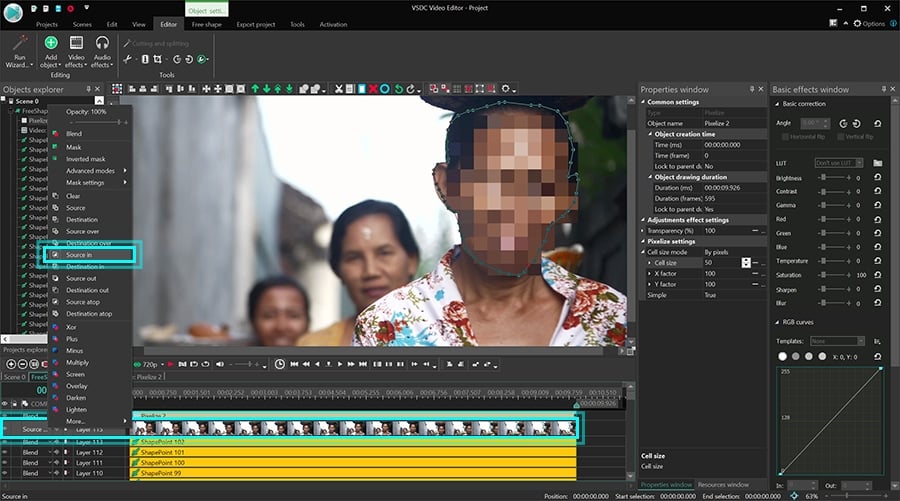
Получилась так называемая “обратная” или инвертированная маска. Следующий шаг – применить к ней фильтр, чтобы лицо получилось скрытым.
Откройте меню Видеоэффектов, перейдите к Фильтрам и выберите Пикселизация. Во всплывающем окне нажмите Ok, чтобы подтвердить, что вы хотите применить фильтр к выбранному видео. Эффект будет заметен сразу.
Если же человек перемещается в кадре, вам необходимо сделать так, чтобы маска двигалась вместе с ним. Заставить маску перемещаться синхронно с объектом можно с помощью модуля отслеживания движения, доступного в VSDC Pro. VSDC Pro — это продвинутая версия редактора, её можно приобрести за $19.99 в год. Чтобы узнать, как скрыть движущийся объект на видео, читайте нашу инструкцию.
Понравилась эта инструкция? Вас также могут заинтересовать:
How to set up chart dynamics
We’ve finally approached the most exciting and the shortest part of our instruction – applying dynamics to a chart. The point of a dynamic chart is that its elements (bars, for instance) change their values on both Axis as the video continues.
To apply dynamics to a chart, you need to open the following setting on the “Series” layer: “Series properties – Points”. Then, select the point you’re planning to apply dynamics to and find the “Argument” or the “Value” field. Click on the three-dot <…> icon and you’ll see a straight trajectory in the timeline.
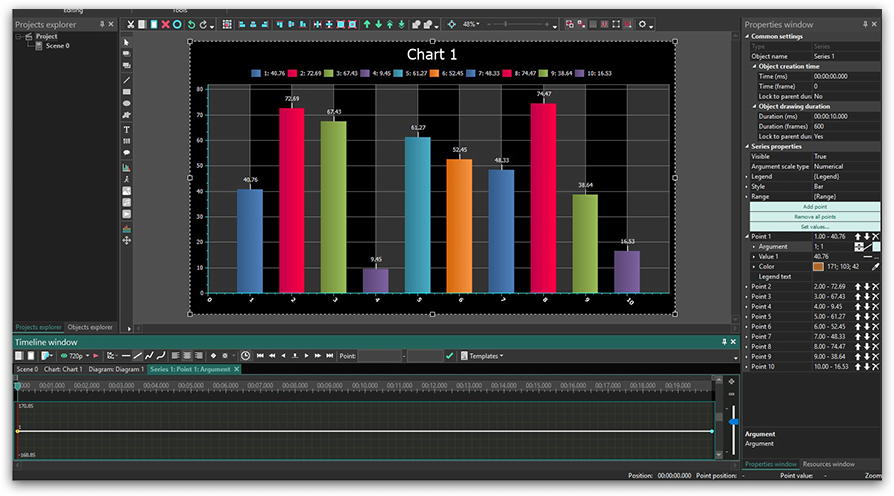
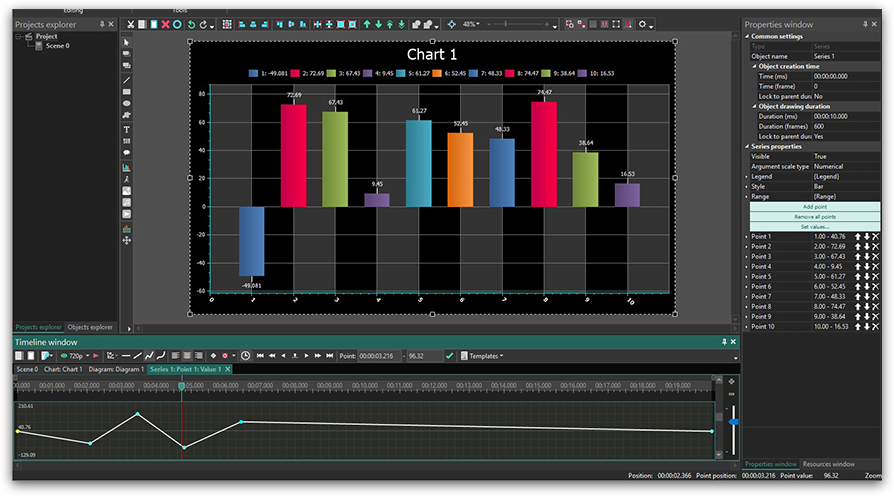
This trajectory corresponds with the value of the chosen bar on the Axis X or on the Axis Y – depending on whether you chose the “Argument” or the “Value” field. By making double clicks on it, you can create control points and drag them around modifying the trajectory. By dragging control points up and down you apply positive or negative values for a particular chart bar in a chosen time moment.
Below is an illustration of dynamics applied to the Point 1.
Now go ahead and try to design your first animated chart in VSDC!
Looking for more awesome tutorials? Check out our YouTube channel and ask any question on our Facebook page.
Download NowVSDC Free Video Editor
You can get more information about the program on Free Video Editor’ description page.
Видеоуроки – это хобби, не требующее бюджета
Видеоуроки имеют огромный потенциал на YouTube. Люди всё чаще выбирают именно видео вместо того, чтобы искать инструкции в текстовом формате, а сегодняшняя ситуация в мире – самое подходящее время для того, чтобы завести обучающий канал.
Волноваться перед публикацией своей первой инструкции – нормально. Более того, в какой-то момент вы посмотрите на готовое видео и подумаете, что можно было бы сделать его ещё лучше. Это тоже нормально, как и сомневаться в общем успехе своей задумки. Пусть это вас не останавливает.
Отбросьте сомнения и следуйте своей интуиции. Думайте о том, что ваши видеоуроки могут действительно кому-то помочь.
New video effects: drop shadow and page turn
The new version of VSDC brings a fresh look at the “Drop shadow” and the “Page turn” effects by adding professional-level fine-tuning tools. Both effects are available in the free version.
Drop shadow
This quick and easy effect will help you draw a realistic shadow for any object added to a video, be it a piece of text, an image, or an icon. Paired with the motion tracking module, it is perfect for creating a moving text title as it adds the illusion of volume that almost looks like a 3D effect.
Ready to try it for yourself? Find “Drop shadow” in the “Special FX” category of the video effects menu.
Page turn
The page turn transition in its basic version has been available in VSDC for a while. But even such a simple effect can be taken to a whole new level if you have the right tools at hand.
In VSDC 6.4.5, you can get really geeky about the angle, the curl, the shadows, and other little details of the page-turning process.