Разработка tizen-приложений для samsung smart tv: полный гайд для javascript-разработчиков
Содержание:
- IoT Capability of Tizen 3.0
- История системы Tizen
- Что представляет собой ОС Tizen для Samsung Smart TV
- Connect Everything
- Configuring Device Manager
- Java Development Kit (JDK) Requirements
- Configuring the Main SDK Repository
- Android TV
- Updating with the CLI Package Manager
- Connecting Devices
- Занимательные истории на клиентских проектах
- Устройства с системой Tizen
- Tizen — Convergence Platform for the Emerging Era
- How To Use Native CLI
- Создание сертификатов автора и дистрибьютора. Способ №2
- How To Use Web CLI
- Using the GUI Installer
- Java Development Kit (JDK) Requirements
IoT Capability of Tizen 3.0
The most important things that enable Tizen to move to the next level are IoT and convergence capabilities:
-
Device Convergence: Tizen 3.0 provides a device-to-device convergence framework for easy data sharing and direct remote control between devices. Using this framework, you can handle events or data on the remote device as if they were local. Device Convergence in Tizen opens up a host of capabilities that developers can use to create a new way of experiencing connectivity.
- IoTivity for Connectivity: In an IoT world, where everything is connected, it is important that a software platform supports seamless connectivity among all devices. For seamless connectivity, Tizen is closely co-operating with Open Connected Foundation (OCF), which is taking the lead in providing specifications and an open-source solution for IoT connectivity. It is getting great support from companies including Cisco, GE, Mediatek, Intel, and Samsung. OCF’s standard is being implemented as an open source, which is called IoTivity. All the profiles in Tizen 3.0 will include IoTivity by default, which means that all Tizen devices will be IoTivity-ready.
История системы Tizen
Tizen существует уже долгое время. Она была создана в результате эволюции операционной системы под названием Bada, которую компания Samsung использовала в своих первых телефонах с сенсорным экраном, еще задолго до внедрения Android.

На ней работали модели из популярной серии Samsung Wave. Изначально Tizen не был так распространен, как его предшественник, но это не помешало компании выпускать все больше устройств, функционирующих на этой системе.
Samsung выпустил пять моделей телефонов из серии Z: Z, Z1, Z2, Z3 и Z4. Все они были оснащены Tizen и считались вполне достойной альтернативой Android. В то время считалось, что эта система станет ведущей для потребителей, когда ее более популярный конкурент перестанет существовать на рынке. Но проблема заключалась в отсутствии официально поддерживаемых приложений Tizen.

В первых моделях спортивных часов марки Samsung была установлена именно эта система. Хотя можно с уверенностью сказать, что появление этих устройств не было столь успешным, как можно было бы ожидать. Но их полная совместимость с телефонами Samsung со временем стала основной причиной того, что Tizen стала привлекать больше пользователей.
Что представляет собой ОС Tizen для Samsung Smart TV
Абсолютно все «умные телевизоры» с функцией Смарт имеют встроенную операционную систему, от которой будут зависеть:
- интерфейс;
- способности (функционал): выход в интернет, поддержка приложений и прочее;
- общие показатели изделия.
Какая она будет, решает изготовитель, и отличия зависят от марки и модели конкретного устройства. Так, в большинстве продуктов Самсунг загружена собственная ОС под названием Tizen.
Разработано такое программное обеспечение было в 2014 году и с тех пор платформой обеспечиваются почти все телевизоры этой компании (а также некоторые другие продукты: телефоны, планшеты, некоторая бытовая техника). Главной особенностью, которой гордится Samsung, является уникальность и несхожесть ни с одной подобной ОС конкурентов, ведь написана она была по уникальному коду (полностью с нуля).
Преимущества
Система имеет массу преимуществ, отличающих ее от других, за которые разработчикам не будет стыдно. Среди основных можно выделить:
- удобное управление;
- простые настройки. Не нужно иметь особых знаний, чтобы подстроить ТВ под свои потребности, все предельно понятно даже новичку;
- есть возможность подключения устройств ввода (мышки, клавиатуры, джостик);
- поддержка игр;
- приятная мелочь для программистов: на большом экране можно писать программы на С++;
- привлекательный интерфейс.
Недостатки
Но также у Тайзен имеются и некоторые недостатки:
- поддерживает малое количество приложений (если сравнивать, например, с Андроидом);
- крайне сложно установить сторонние программы. В некоторых случаях приходится устанавливать виджеты, используя способ подмены DNS.
- отсутствие возможности удаления установленных заводских программ, занимающих лишнюю память;
- незащищенность. Есть вероятность загрузки вредоносного контента, что будет угрожать не только вреду для самой ОС, но и потере конфиденциальных данных пользователя. Происходит так по причине открытого исходного кода, что очень умело могут использовать хакеры.
Несмотря на негативные стороны, разработчики стараются устранить ошибки, расширить возможности и возможно вскоре все недостатки станут неактуальными.
Connect Everything
As diverse devices are getting smarter and more connected, there is a strong need for a software platform for integrated services with connected products. Tizen is designed for this and has been advancing to connect everything. To support different types of devices with seamless user experience, Tizen categorizes the features and functions as profiles. There are currently 4 profiles and the amount will grow as more products are included in the ecosystem. In the near future, lots of Internet-connected devices are anticipated to be on the market and IoT (Internet of Things) services will pervade everyone’s daily life. Tizen is moving forward to the future of everything connected.

Configuring Device Manager
You can access Device Manager Configuration window by clicking the Settings icon.
Figure: Device Manager Configuration

You can set the following settings for Device Manager:
- Application path
To set the application installation path and data storage location, select the General tab, change the directory paths, and click OK.
- File transfer timeout
This is the maximum wait time for push and pull operations in the File Explorer view. To set the timeout value, select the Device tab, change the value, and click OK.
Note Only values between 30,000 and 600,000 (milliseconds) are allowed.
- Log buffer size
This is the maximum amount of log entries to store in the log table. To set the buffer size, select the Log tab, change the value, and click OK.
Note Only values between 5,000 and 100,000 (lines) are allowed.
Java Development Kit (JDK) Requirements
NoteThere is no JDK prerequisite for Tizen Studio 3.7 and higher.
You must install Oracle Java Development Kit (JDK) 8 or OpenJDK 12 for Tizen Studio 3.5 and Tizen Studio 3.6.
Follow these instructions to install the appropriate JDK version for your system:
- Microsoft Windows
Download the JDK from the official Oracle Web site. Select the appropriate platform for your hardware architecture and Windows version. Then, run the downloaded execution file and follow the displayed instructions.
- macOS
Download the JDK from the official Oracle Web site and follow the instructions to install the JDK.
To support legacy Java software on macOS, you must download and install the Java for OS X 2015-001. Download it from https://support.apple.com/kb/DL1572.
- Ubuntu
Go to the Ubuntu Web site for detailed instructions for installing the Oracle JDK version 8. The raw binaries can be downloaded directly from Oracle (Oracle Java download page).
NoteFor RT IDE use Oracle Java Development Kit (JDK) 8 only.
You can also use Oracle’s OpenJDK. For more installation details, see OpenJDK and OpenJFX Installation Guide.
Configuring the Main SDK Repository
You can set the configuration for installing or updating Tizen Studio using one of the following methods. Before changing the package repository, note that the installed packages may be removed automatically, and you may need to reinstall the packages from the changed repository.
Configuring the Package Repository
The package repository is a server which stores all the packages that you are using or will use in Tizen Studio. Using the Package Manager, you can install or update packages from that repository. Rather than providing a single repository for the main SDK, several CDNs (Content Delivery Networks) are offered around the globe for your convenience. You can select the nearest package repository to install or update packages more quickly.
Figure: Configuration window with the Package Repository selected
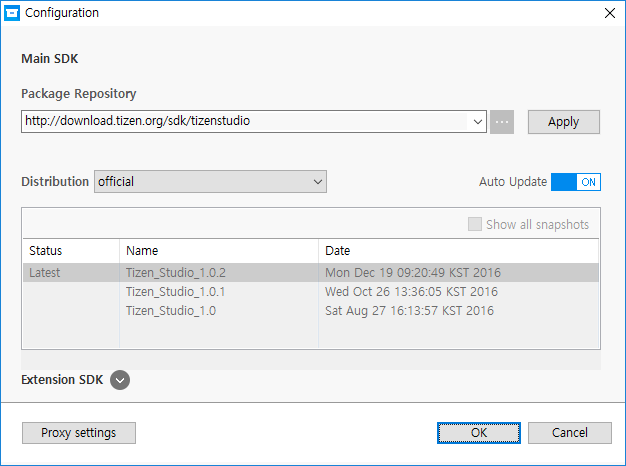
To set the package repository:
- Select an available repository from the drop-down list. Select the nearest repository for quickest installation and update.
- Click Apply next to the combo box. Wait for a few seconds until the repository is validated.
- In the Distribution combo box, select the distribution you want to access.
- On your selection in the Distribution combo box, different snapshots are listed in the snapshot box. By switching off the Auto Update switch, you can select the specific snapshot in the list. If you leave the switch on, the Package Manager always updates all the packages from the latest snapshot.
- Click OK to confirm your setting.
NoteIf you switch off the Auto Update option, you can select an earlier snapshot than the snapshot you are currently using. Be careful when doing this, since the update can cause entire packages to be removed to guarantee system integrity.
Configuring the SDK Image
To install or update packages with the SDK image:
- Enter the full path of the SDK image file in the Package Repository box, or click next to the combo box to open the file browser.
In the file browser, select the SDK image file, and click OK. When you select the image file, the image’s origin repository information is displayed below the combo box.
- Click OK to confirm your setting.
NoteIf you install or update packages using an image file, the SDK image’s origin repository URL or distribution ID can be different than the current packages’ URL or distribution ID. Be careful when doing this, since the installation or update can cause entire packages to be removed to guarantee system integrity.
Android TV
Android TV — самая распространенная ОС для Smart TV. Ее можно найти на телевизорах многих производителей под разными оболочками: Xiaomi, Telefunken, TCL, Hyundai, Sony и другие. Жаль только, что разработчики Android TV о комфорте пользователя, похоже, и не слышали.
Интерфейс здесь не слишком удобный, и это сразу бросается в глаза: меню занимает весь экран и предлагает не только определенные сервисы, а показывает сразу все разделы с приложениями, играми и настройками. Так что листать его и одновременно что-то смотреть не выйдет — придется поставить видео на паузу или прервать просмотр.
С другой стороны, для владельцев Android-смартфонов у платформы есть неоспоримые преимущества — они легко подключаются к телевизору без дополнительного ПО прямо с мобильных устройств, к тому же в телевизоре можно использовать свой Google-аккаунт с уже купленными играми и приложениями.
Еще одно преимущество по сравнению с остальными ОС — большой выбор приложений в магазине Google Play. Софт также можно загружать в виде файлов apk с флэшки. Пожалуй, такого количества приложений не предлагает больше ни одна система.
Платформа поддерживает функцию сдвига во времени TimeShift — любую программу из телеэфира можно поставить на паузу, чтобы продолжить просмотр позже. Ни Tizen, ни webOS такой возможностью похвастаться не могут.
Кстати, совсем недавно Google показала новую оболочку — Google TV. Со временем ее обещают перенести на все телевизоры с Android TV, хотя пока она доступна только на новой медиаприставке Chromecast. И там как раз интерфейс сильно переработан: он основан на продвинутом алгоритме рекомендаций, синхронизируется с другими устройствами и выглядит совсем иначе.
Updating with the CLI Package Manager
Run the CLI Package Manager with the command using the following syntax:
Table: Update command parameters
| Parameter | Description |
|---|---|
| Accepts the license terms. | |
| Skips the Java version check. | |
| Proxy configuration value. Use one of the following values: direct, auto, or ip:port. | |
| If you want to install packages from a local SDK image, specify the full path of the SDK image file. | |
| Administrator (sudo) password for authentication. Ubuntu only. | |
| This option is only useful for updating Tizen Studio to the latest version after you downgraded it manually to an earlier version. Otherwise, the Package Manager updates it to the latest version with or without this option. |
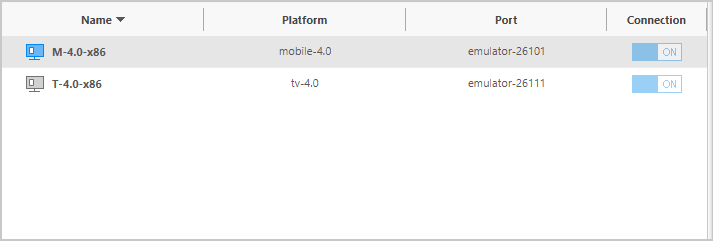
Connecting Devices
Device Manager shows both local devices connected to the system and any configured remote devices:
- Only connected local devices (both physical and virtual devices) are listed. Disconnected devices automatically disappear from the list. Therefore, the Connection switch is disabled.
- Remote devices are listed even if the connection is lost. You can turn the connection on and off with the Connection switch.
Figure: Connected devices in Device Manager
Connecting a device to a computer depends on the device type:
- Physical device
When you connect a local physical device with a USB cable, it automatically appears in Device Manager.
- Virtual device
To connect a virtual device, click Emulator Manager , select the virtual device, and click Launch.
When the emulator finishes booting, the device appears in Device Manager.
- Remote device
To connect a remote device, follow these steps:
- In the Tizen Studio menu, select Tools > Device Manager.
- In the Device Manager window that appears, click Remote Device Manager .
-
In the Remote Device Manager window that appears, you can scan, add, edit, and delete a device. You can click Scan Devices to see the list of available devices.
- To add a remote device, click Add +.
-
In the Add Device dialog that appears, enter the device name, the IP address of the device to which the connection needs to be made, and the port number. The default port number is 26101.
Note If you are using an emulator, then you need to enter the IP address of the system on which the emulator is launched.
- Confirm the IP address and port number of the remote device, and toggle the Connection switch to ON.
When the connection is established, the remote device appears in Device Manager.
Занимательные истории на клиентских проектах
Кейс 1: поддержка голосового управления (Корея vs все остальные)
Голосовое управление совершенно беспомощное и беспощадное одновременно. Как это должно выглядеть: ты говоришь в пульт «телевизор, я хочу кофе» и через 10 минут курьер доставляет вам капучино. Производитель пишет красиво про “you can register general voice commands, which trigger a listener when the user speaks them”, но за каждым “can” скрывается “must”. Как это обычно бывает, две беды слились воедино: необходимость предварительной регистрации команд и плохое распознавание голоса. И если вас или вашего клиента посетит мысль добавить голосовое управление, будьте готовы дополнять словари Volume Up и Louder не только синонимами, но и созвучными Bloom Up и Laura.
В корейской версии интерфейса телевизора всё значительно лучше. Но, как говорится в их народной пословице, «чем вильнёшь, коли нет хвоста?»
Кейс 2: быстрый переход внутрь приложения и deep link
Приз в номинации в «наименее часто используемая фича» уходит функции Smart Hub Preview, которая дает прямой доступ к внутренним разделам приложения. Благодаря такому deep linking можно фичерить контент или отправлять пользователя сразу в любимый раздел.
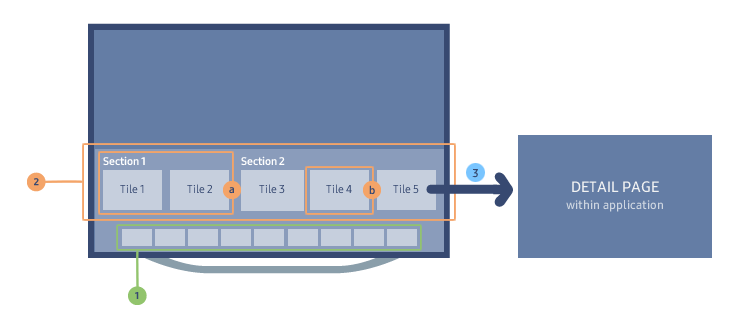 На схеме показан пример фичеринга в тематических подборках, т.е. выделение рекомендованного контента для пользователя (от англ. to feature — выделять)
Кейс 3: баг MPD-стрима длиной 50 дней
При портировании одного проекта на Tizen 4.0 в модели 2017 года возникла проблема: не работал звук при воспроизведении прямой трансляции (MPD-поток, от англ. media presentation description).. Кнопки Volume Up/Down/Mute, а также управление звуком через API не помогали. На других платформах — например, на LG Smart TV (WebOS) — проблема отсутствовала, ссылка на MPD-стрим и содержание файла также не вызывали вопросов – все теги и директивы поддерживались Tizen.
На тестовых стримах звук был.
Сомнения вызывала только директива availabilityStartTime, которая указывает нулевую точку на временной шкале и по умолчанию равна Unix epoch, т.е. 1970-01-01T00:00:00Z.
Оказалось, что в стримах со значением availabilityStartTime больше 49.7 дней звук отсутствовал или пропадал в процессе. И правильно, потому что 49.7 дней или 2,147,483,647 миллисекунд или 2**32 равно максимальному положительному значению целого числа в 32-битных системах (Number.MAX_SAFE_INTEGER) Короче, это просто баг стека мультимедиа Tizen, и мы ничего не можем с этим поделать.
Как решилось? На следующий день телевизор автоматически обновил прошивку до версии 1251 и проблема исчезла.
Устройства с системой Tizen
В последних версиях программного обеспечения Samsung изменил название пользовательского интерфейса, назвав его “Единым пользовательским интерфейсом” или One UI, но он по-прежнему базируется на программном обеспечении Tizen. Поэтому понятно, почему Samsung занимается этой операционной системой, по крайней мере, когда речь идет об устройствах для мониторинга активности.
Среди спортивных часов Samsung, разработанных на базе Tizen, можно выделить основные:
- Samsung Galaxy Watch – современные смарт-часы и аналоговые часы в одном корпусе,
- Samsung Galaxy Watch Active – это спортивная версия вышеуказанных часов, выполненная в спортивном стиле.
Samsung в настоящее время является одной из крупнейших розничных компаний по продаже телевизоров. Компания предлагает 4K HDR устройства со стильным дизайном и удивительными интеллектуальными функциями. Скорее всего, большое количество пользователей впервые столкнулись с системой Tizen в своих телевизорах, даже не осознавая этого. Сам пользовательский интерфейс называется Eden 2.0.
Он обеспечивает легкий доступ к популярным службам потокового вещания, таким как Netflix, YouTube и Google Play. Интерфейс Eden на основе Tizen можно найти на большинстве (если не на всех) новых телевизоров Samsung QLED.
Tizen — Convergence Platform for the Emerging Era
Since 2012, Tizen has been expanding as smart gadgets have become generalized and connected. By accommodating various device types, Tizen is gearing up for the new era of convergence. As of now, there is a wide variety of Tizen devices on the market:
- Mobile phones: Samsung Z-series (Z1, Z2, Z3)
- Tablets: DIGMA Plane 8501 3G
- Wearables: Gear-series (Gear 2, Gear 2 Neo, Gear S, Gear S2, Gear S3)
- Smart TVs: Samsung SUHD, UHD, LED TVs
- Cameras: Samsung NX-series, Gear 360
- Smart Appliances: Samsung Family Hub Fridge
Over 3 million units of Tizen phones were sold in 2015. In addition, Samsung is holding the highest market share in the global TV market and its recent models are all based on Tizen platform. It is expected for the Tizen platform to broaden its ecosystem with increasing market requirements and user demands.
How To Use Native CLI
$ native-gen project -n NativeSample -s form
Creating a project: NativeSample...
A project was created successfully in /home/username/workspace/NativeSample
To build a project, run native-make in /home/username/workspace/NativeSample/CommandLineBuild.
Because Native CLI only can be used in the directory {Project}/CommandLineBuild/, you need to create a project by native-gen with the same as your project’s like below, then copy the CommandLineBuild folder to your own project.
$ native-gen project -n Calculator -s form
Compile the project.
$ cd NativeSample/CommandLineBuild/
$ native-make  -a i386 -t LLVM-3.1
If you want to add the parameters –n –v, please use as this -n «Tizen Emulator 2.1» -v «Tizen 2.1».
A *.exe file is compiled out named NativeSample.exe
Package the project with signature.
$ native-packaging -ak /home/username/tizen-sdk/tools/certificate-generator/sign.p12 -ap 1234
Note that replace the username to a real username.
A *.tpk file is packaged.
Install the tpk onto target.
$ native-install -p B4k8jHVcdG-1.0.0-i386.tpk
B4k8jHVcdG-1.0.0-i386.tpk        3249 KB/s (176309 bytes in 0.052s)
path is /opt/usr/apps/tmp/B4k8jHVcdG-1.0.0-i386.tpk
__return_cb req_id pkg_type pkgid key val
__return_cb req_id pkg_type pkgid key val
__return_cb req_id pkg_type pkgid key val
__return_cb req_id pkg_type pkgid key val
__return_cb req_id pkg_type pkgid key val
spend time for pkgcmd is ms
If you connect two or more targets, you need to add the parameter «-s serial number», such as «-s Medfieldxxx» or «-s emulator-26100».
Launch the app on the target.
$ native-run -p B4k8jHVcdG (Package ID)
Debug the app.
Создание сертификатов автора и дистрибьютора. Способ №2
Заходим в Tools — Certificate Manager.

Далее нажимаем на значок Плюса.

Выбираем Samsung.

Ставим галочку на TV и нажимаем Next.

Вводим произвольное название сертификата.

Вводим произвольные Author name и Password, запомните их или запишите, возможно понадобится в будущем. После нажатия Next появитсяокно с просьбой войти в свой аккаунт, нажимаем OK.

Вводим данные аккаунта, который ранее создали на сайте Samsung.
После удачного входа просто нажимаем Next.

Ещё раз Next.

Далее вводим Password, можно такой же как ранее создавали, всё остальное оставляем как есть.

Если всё сделали правильно появится окно с сообщением о создании сертификатов. Обязательно сохраните в другом месте сертификаты, возможно получить их можно только один раз на телевизор, папка с сертификатами находится в Диск:\Users\Имя пользователя\SamsungCertificate.

How To Use Web CLI
The CLI is located in the $<TIZEN_SDK_HOME>/tools/ directory. For developing the application using the CLI, set path to the CLI directory using the following command:
$ export PATH=$PATH:/home/username/tizen-sdk/tools/ide/bin
Note that replace the username to a real username.
webtizen is an encapsulation of web-list, web-gen, web-signing, web-packaging, web-install, web-run, web-debug and web-uninstall. You can also use them independently.
- Generate a new web project.
Generate a web project by default.
$ webtizen -g --name WebSample --path ~/workspace/
Search a template web project.
$ web-template --search tizen
tizenwebuifw-singlepage - Tizen Web UI Framework - Single Page.
tizenwebuifw-navigation - Tizen Web UI Framework - Navigation.
tizen-basic - Tizen basic Application.
tizenwebuifw-masterdetail - Tizen Web UI Framework - MasterDetail.
tizenwebuifw-common-resources - Tizen Web UI Framework - common resources.
tizenwebuifw-multipage - Tizen Web UI Framework - Mutil Page.
There are some samples in the directory ~/tizen-sdk/tools/ide/realm/template/
Create a signature.
Create a certificate firstly.
$ cd ~/tizen-sdk/tools/certificate-generator/
$ ./certificate-generator.sh
Input some necessary messages such as password and name as below.

Then a *.p12 file will be created in the current directory.
Modify the key path in template profiles.xml.
$ vi ~/tizen-sdk/tools/ide/sample/profiles.xml
Modify the key path to the key you just created. Note that replace the username to a real username.
<?xml version="1.0" encoding="UTF-8"?>
<profiles>
        <profile name="test">
                <profileitem author="true" identifier="%a:%f:%w:%h:%t" key="/home/username/tizen-sdk/tools/certificate-generator/sign.p12"
ca="/home/username/tizen-sdk/tools/certificate-generator/certificates/developer/tizen-developer-ca.cer"/>
                <profileitem author="false" identifier="%a:%f:%w:%h:%t" key="/home/username/tizen-sdk/tools/certificate-generator/sign.p12"
ca="/home/username/tizen-sdk/tools/certificate-generator/certificates/developer/tizen-developer-ca.cer"/>
        </profile>
</profiles>
Create a signature for the web project.
$ cd ~/workspace/WebSample/
$ webtizen -s --nocheck -p test:/home/username/tizen-sdk/tools/ide/sample/profiles.xml
Note that replace the username to a real username.
Input author password and Distributor password which are the same with the password of the key you created before.
A signature file signature1.xml will be created.
Note: If you have created project with Tizen 2.1.0 SDK IDE, there are .project file and .setting folder in each project.To create a correct signature by CLI, you need to remove them manually or using «-e» option to exclude them.
Package files into a widget.
$ webtizen -p --nocheck WebSample.wgt ../WebSample/
Install the widget into the target.
$ webtizen -i -w WebSample.wgt
If you connect two or more targets, you need to add the parameter «-d serial number», such as «-d Medfieldxxx» or «-d emulator-26100».
List web applicaton info installed by user.
$ webtizen -l
«Package ID» and «App ID» will be listed.
Launch the app on the target
$ webtizen -r -i tSkijLbOmo.WebSample(App ID)
Debug the app.
$ webtizen -d -i tSkijLbOmo.WebSample(App ID)
Note that debug dialog cannot be shown up with connecting IA device.
web-uninstall can uninstall the widget.
$ webtizen -u -i tSkijLbOmo(Package ID)
Using the GUI Installer
To install Tizen Studio:
- Launch the Tizen Studio installer.
- Accept the software license.
The license contains important legal notices for using Tizen Studio. Read it fully, and click Accept only if you agree with the license statement:
- Click the … button and specify a new directory to set the SDK and data location. If the new directory is valid and shows no errors, click Install:
- Click Install to install the required packages and tools in the specified directory.
You can monitor the installation process or cancel the installation. The installation process is completed in a few minutes, unless you cancel it.
- Click Finish and close the installer:
If you want to install additional platforms and tools, launch the Package Manager by checking the Launch the Package Manager check box and click Finish.
Using the Tizen Studio Package Manager, you can install and update additional tools. For more information on the Package Manager, see Updating Tizen Studio.
Note If you install Tizen Studio in a directory that requires administrator privileges for access, such as , administrator privileges are required to run the Tizen SDK tools.
Java Development Kit (JDK) Requirements
You must install Oracle Java Development Kit (JDK) 8 or OpenJDK 12 for Tizen Studio 3.5 and Tizen Studio 3.6.
Follow these instructions to install the appropriate JDK version for your system:
-
Microsoft Windows
Download the JDK from the . Select the appropriate platform for your hardware architecture and Windows version. Then, run the downloaded execution file and follow the displayed instructions.
-
macOS
Download the JDK from the and follow the instructions to install the JDK.
To support legacy Java software on macOS, you must download and install the Java for OS X 2015-001. Download it from .
-
Ubuntu
Go to the for detailed instructions for installing the Oracle JDK version 8. The raw binaries can be downloaded directly from Oracle ().
You can also use Oracle’s OpenJDK. For more installation details, see OpenJDK 12 and OpenJFX Installation Guide.