Подключение putty по ssh-ключу в один клик
Содержание:
- Download PuTTYgen for Linux
- Скачайте PuTTY для Windows 7 на русском бесплатно
- Xshell 5
- Команды PuTTY
- Как пользоваться клиентом PuTTY
- Download PuTTYgen for Linux
- Как работать с Putty
- 1.2 How do SSH, Telnet and Rlogin differ?
- Download PuTTYgen on Windows
- MobaXterm
- mRemoteNG
- Transfer files to your Linux instance using the PuTTY Secure Copy client
- Что это такое Putty и зачем его использовать?
- Known security vulnerabilities
- How to Use Puttygen on Windows
- Как сохранить настройки в программе PuTTY
- Connect to your Linux instance
- SSH key management needs attention
- How to use PuTTYgen?
- Download PuTTYgen
Download PuTTYgen for Linux
In order to download PuTTYgen for Linux (Ubuntu) operating system, one required to install PuTTYgen separate from the PuTTY client in case of some Linux distributions.
For example, Debian Linux requires the below-given code to install PuTTYgen:
sudo aptitude install putty-tools
Generate Key Pair for Authentication in Linux
Use the below command to create the key pair for authentication in Linux.
PuTTYgen -t RSA -b 2048 -C “user@host” -o keyfile.ppk
Various Command Line Options of PuTTY in Linux
Below is the list of important command line options for PuTTY in Linux operating system.
PuTTYgen | keyfile]
Options:
- Keyfile – It is the name of the existing key file to read at the time of changing the current key.
- -t keytype – This command specifies the type of the key to creating. Its acceptable values are RSA and dsa.rsa1.
- -b bits – This command specifies a total number of bit in a particular key. 1024 is the perfect size for DSA key, while 2048 or 4096 are the perfect size for RSA keys.
- -q – This command suppresses the message about progress at the time of key generation.
- -C new-comment – This command is used to specify the comment to describe the key. It can be used for new and/or existing key. Key operation is not affected by comment. However, it is used to recognize the key owner, it’s not reliable completely as any value can be applied to it.
- –P – This command is used to update the passphrase of a key. Passphrase helps to encrypt the private key. As passphrase can’t be add or update on command line, it prompts a new passphrase tool to alter it.
- –old-passphrase-file – The old password of the key remains in this file. This is used when the key is protected by a passphrase.
- –new-passphrase file – This file entails the new passphrase of the key. This command comes in the action either at the time of generating new key or while applying –P command to change the passphrase.
- -O output-type – This command defines what to give in output. By default, the private key is the output.
Thus, above are the prominent commands of PuTTYgen in Linux operating system. There are many other commands also available to perform a various task from the command prompt in Linux at flank speed.
Скачайте PuTTY для Windows 7 на русском бесплатно
| Версия | Платформа | Язык | Размер | Формат | Загрузка |
|---|---|---|---|---|---|
| * скачайте бесплатно PuTTY для Windows, файл проверен! | |||||
|
PuTTY 0.66 RU |
Windows 7 |
Русский | 9.8MB | .zip |
Скачать |
|
PuTTY 0.7 x32 |
Windows | English | 2.9MB | .exe |
Скачать |
|
PuTTY 0.7 x64 |
Windows | English | 3.1MB | .exe |
Скачать |
Обзор PuTTY
PuTTY (Путти) – бесплатная клиентская программа, предназначенная для работы с рядом протоколов, включая SSH, SCP, Telnet и SFTP. Предназначена для системных администраторов и опытных пользователей с навыками профессиональной работы с сетями.
Скриншоты
Похожие программы
SpeedFan
Google Earth
DirectX — пакет библиотек, необходимый системе для работы с мультимедиа
ArtMoney
Andy
Hamachi
Tunngle
Game Maker Studio — разработка игр и приложений под различные платформы
IObit Malware Fighter — для удаления вредоносных программ – троянов, кейлоггеров
Mobogenie
Nokia PC Suite
BlueStacks — программа для запуска android приложение на windows
360 Total Security — условно-бесплатное антивирусное программное обеспечение
Fences
Hotspot Shield
7-Zip — бесплатный архиватор для windows
Origin
CPU-Z
Driver Booster Free — программа для поиска и установки новых драйверов
Acronis Disk Director — пакет инструментов для работы с жесткими дисками компьютера
DriverPack Solution — для автоматической установки и обновления драйверов
Cheat Engine
VirtualBox — создание вирутальных машин
Reg Organizer — программное обеспечение для оптимизации и очистки компьютера
Bandicam — программа для снятия скриншотов и записи видео с экрана
Nox App Player — программа для запуска андроид игр и приложений на windows
2GIS
Razer Game Booster — программа для отключения неиспользуемых процессов
Punto Switcher
Radmin
Mathcad
Ammyy Admin
3DMark
Action!
FurMark
Xpadder
Adobe Dreamweaver
Driver Genius — сканирования и обновление драйверов на компьютере
PowerDVD — проигрыватель мультимедийных файлов
CheMax
GOM Player — медиапроигрыватель для Windows
FBReader
Cool Reader
Samsung Kies — подключение телефонов и смартфонов компании Samsung к ПК
Connectify Hotspot
MyPublicWiFi
Nero Burning ROM
Free Studio — пакет объединяющий более 40 мультимедийных программ
WinSCP
ImgBurn
FB2 Reader
FastStone Capture
EasyBCD
STDU Viewer
NVIDIA PhysX
ManyCam
Virtual Router
Dropbox
Adguard
Dr.Web CureIt! — бесплатная утилита для лечения компьютера от вредоносного ПО
Яндекс.Диск
Kaspersky Free — бесплатная версия антивируса от лаборатории Касперского
NOD32 — хороший антивирус для компьютера
iTunes — программа для синхронизации между мобильными устройствами Apple
Rufus
PRO100
Arduino
CGMiner
Maple
Visual Studio
Bitcoin Core
Глаз.ТВ
Kingo Root
Android Studio
Scratch
Firebird
Charles
NVIDIA GeForce
MinerGate
Microsoft .NET Framework — платформа создающая условия установки компьютерного ПО
Eclipse
NVIDIA Inspector — для работы с графической подсистемой
HWMonitor
Core Temp
Display Driver Uninstaller — для удаления устаревших драйверов видеокарт
VueScan
CrystalDiskInfo — диагностическая утилита для проверки жестких дисков
HDD Low Level Format Tool — утилита, предназначенная для форматирования жестких дисков
Ускоритель компьютера — оптимизация операционной системы Windows
Classic Shell
WinThruster — оптимизация операционных систем семейства Windows
Avast Free Antivirus — бесплатный Аваст антивирус для компьютера
Mcafee — антивирусная программа, для защиты компьютера от внешних угроз
Intel Driver
ASUS Update — утилита, предназначенная для обновления BIOS на компьютере
Clownfish
Evernote
GeForce Experience — автоматического поиск драйверов видеокарт компании Nvidia
Облако Mail.ru
CPU Control
Microsoft Security Essentials — антивирус для защищиты операционной системы
ActiveSync
BlueSoleil
Malwarebytes Anti-Malware — частично бесплатная антивирусная утилита
TV Player Classic
CyberGhost VPN
RivaTuner
PuTTY
Trend Micro HijackThis
VMWare Workstation
Supremo
AnyDesk
Rainmeter
RocketDock
Lightshot
TunnelBear
AMD Catalyst Control Center — программа для настройки видеокарт AMD Radeon
Аудио | Видео программы
Графические программы
Microsoft Office
Игры
Интернет программы
Диски и Файлы
Xshell 5
Xshell – мощный эмулятор терминала, поддерживающий SSH, SFTP, TELNET, RLOGIN и SERIAL.
Он обеспечивает лучшие в отрасли характеристики и функциональные возможности, которые недоступны в его бесплатных альтернативах.
Возможности, которые будут использоваться корпоративными пользователями, включают в себя среду с вкладками, динамическую переадресацию портов, сопоставление пользовательских ключей, пользовательские кнопки, скрипты VB и терминал UNICODE для отображения 2 байтовых символов и поддержки международного языка.
Xshell предлагает множество удобных для пользователя функций, которые недоступны в других эмуляторах терминалов.
Эти функции включают загрузку файлов Zmodem путем перетаскивания, загрузку файлов Zmodem путем выбора имени файла, простого режима, полноэкранного режима, параметров прозрачности и режима пользовательского макета.
Экономия времени и усилий при выполнении терминальных задач с помощью Xshell.
Xshell бесплатно для дома и в школе. Пожалуйста, ознакомьтесь с нашим бесплатным лицензионным соглашением для дома и школы на условиях.
Ключевые особенности:
- Гибкая и мощная среда с вкладками
- IPv6 Ready.
- Аутентификация клиента с помощью MIT Kerberos
- Современная Xshell
- Переадресация ввода ключа на несколько терминалов
- Обеспеченные сеансы с помощью мастер-пароля
- Предотвращает несанкционированный доступ с автоматической блокировкой терминала
- Редактировать содержимое терминала с помощью текстового редактора, настроенного пользователем
- Мощная автоматизация с поддержкой языка Scripting Language
- Пользовательская поддержка ключевых карт
- Поддержка нескольких языков для глобальных пользователей
- Несколько сеансов в одном окне со вкладкой сеанса
- Управление Xshell с использованием интерфейса локальной оболочки
- Быстрые соединения SSH / Telnet с использованием адресной строки
- Отправить часто используемые команды и строки с помощью команды быстрого доступа
- Безопасная связь с SSH
- Запуск приложений X через туннель SSH (пересылка X11)
- Отправьте строку нескольким серверам одновременно с помощью панели создания
- Мониторинг каналов в реальном времени (SSH) Использование туннельной
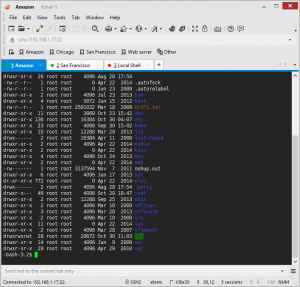
Команды PuTTY
В программе Путти используется достаточно много команд, рассмотрим основные и самые используемые (вводятся без кавычек):
- «pwd» – отображает путь к текущей директории.
- «cd имя диска/имя папки» – переход к указанной директории, смена диска.
- «cd ..» — вернуться на уровень вверх относительно текущей папки.
- «cd ~» — переход в корень жесткого диска.
- «ls /папка» — выводит содержимое указанной директории.
- «ls –a 10» — выводит все файлы, в том числе скрытые.
- «ls –h 11» — отображение всех файлов, с указанием размера.
- «ls –r 12» — рекурсивное отображение всех подкаталогов.
- «ls -is 13» — отображение содержимого сортированного по размеру.
- «ls –alh» вывод информации о элементах с подробным описанием.
- «cp» — копирование.
- «cp –r» — копирование папки и всех вложенных элементов.
- «cp filename.php /home/filename2.php» — копирование файла с переименованием.
- «mv» — переместить файл.
- «mv page.php /home/newpage.php» — перемещение с переименованием.
- «mkdir название» — создание новой директории.
- «touch название.формат» — команда для создания пустых файлов с выбранным расширением.
- «zip -r » — сжатие папки в архив zip.
- «unzip » — распаковка архива в указанную папку.
- «tar -czvf » — создание директории tar.
- «tar –xvf » — распаковка архива tar.
- «rm» — команда для удаления файлов.
- «rm *» — удаляет все элементы в каталоге
- «rmdir» — удаляет папку.
- «chmod » — изменяет права на изменение данных в файле или папке.
- «chmod 754 newfolder 30» — изменение прав доступа к директории.
- «chmod -R 754 newfolder» — изменение прав доступа к директории и всем вложенным файлам.
Инструкция по использованию продуктов Acronis Disk Director и True Image
Как пользоваться клиентом PuTTY
Наиболее популярный вопрос после установки: как пользоваться программой putty, чтобы она работала корректно. После запуска программы в окне «Сеанс», которое расположено слева вверху, заполняем данные. Окошко для имени хоста или IP-адреса самое верхнее. Порт, используемый для подключения, оставляем тот, который стоит по умолчанию, то есть 22. В окошке тип подключения отмечаем необходимый например SSH и нажимаем соединиться.

Еще ниже расположено окно Управление сеансами где есть пункты загрузки, сохранения, удаления сессии. Стоит прописать название сеанса, нажать кнопку “Сохранить”. После этого вам не нужно будет постоянно вводит ip адресс выбирать порт и тип соединения. Нужно будет лишь выбрать из списка необходимый сеанс.

Также придется настроить корректное отображение кириллических символов. Слева выбираем вкладку «Окно», верхнюю ссылку «Внешний вид» , жмем на «Изменить», расположенную справа.

В нижней части окна настройки шрифта из набора символов выбираем «Кириллица».

После нажатия “Ок”, зайдите во вкладку «Кодировка», проверьте кодировку, которая настраивает подключаемый сервер. Должно стоять UTF-8. в таком случае программа putty будет корректно отображать русскоязычный текст.

Чтобы подключение через putty прошло успешно, и пользователь смог работать с терминалом, сервером, сетевым маршрутизатором, на стороне, где расположены конечные устройства, должны быть произведены настройки SSH-сервера, открыт порт 22, указанный в настройках программы. На локальном компьютере, с которого будет произведено подключение, рекомендуется отключить защиту Файрволл / Брандмауэра Windows.
Начиная подключение впервые, на экране монитора пользователя появится окошко, предупреждающее на английском языке, что программа будет записывать удаленный ключ шифрования сервера. Из трех вариантов нужно выбрать “Да”.

После этого откроется терминал, в котором нужно ввести логин, пароль. Каждый ввод должен заканчиваться нажатием «Enter». Символы не будут видимыми, подтверждением правильности операции станет подключение к серверу. Чтобы управлять системой воспользуйтесь командами Unix, Cisco.
Программа PuTTY – простой, удобный инструмент, открывающий широкие возможности работы с сервером. Утилита бесплатная, обеспечивает превосходную степень надежности при передаче информации, обладает гибкими настройками, чем заслужила востребованность.
Download PuTTYgen for Linux
In order to download PuTTYgen for Linux (Ubuntu) operating system, one required to install PuTTYgen separate from the PuTTY client in case of some Linux distributions.
For example, Debian Linux requires the below-given code to install PuTTYgen:
sudo aptitude install putty-tools
Generate Key Pair for Authentication in Linux
Use the below command to create the key pair for authentication in Linux.
PuTTYgen -t RSA -b 2048 -C “user@host” -o keyfile.ppk
Various Command Line Options of PuTTY in Linux
Below is the list of important command line options for PuTTY in Linux operating system.
PuTTYgen | keyfile]
Options:
- Keyfile – It is the name of the existing key file to read at the time of changing the current key.
- -t keytype – This command specifies the type of the key to creating. Its acceptable values are RSA and dsa.rsa1.
- -b bits – This command specifies a total number of bit in a particular key. 1024 is the perfect size for DSA key, while 2048 or 4096 are the perfect size for RSA keys.
- -q – This command suppresses the message about progress at the time of key generation.
- -C new-comment – This command is used to specify the comment to describe the key. It can be used for new and/or existing key. Key operation is not affected by comment. However, it is used to recognize the key owner, it’s not reliable completely as any value can be applied to it.
- –P – This command is used to update the passphrase of a key. Passphrase helps to encrypt the private key. As passphrase can’t be add or update on command line, it prompts a new passphrase tool to alter it.
- –old-passphrase-file – The old password of the key remains in this file. This is used when the key is protected by a passphrase.
- –new-passphrase file – This file entails the new passphrase of the key. This command comes in the action either at the time of generating new key or while applying –P command to change the passphrase.
- -O output-type – This command defines what to give in output. By default, the private key is the output.
Thus, above are the prominent commands of PuTTYgen in Linux operating system. There are many other commands also available to perform a various task from the command prompt in Linux at flank speed.
Как работать с Putty
В целом, и Putty хорошо подходит для работы с сервером. С этим приложением вы легко сможете пробросить туннель, авторизоваться и выполнить определенные действия на сервере. К примеру, чтобы создать туннель, вам нужно лишь узнать номер порта и IP-адрес, куда направить соединение. Через настройки Putty в разделе Tunnel вы сможете создать нужный туннель. Для этого в Tunnel пропишите порт и IP, куда подключаться, а потом жмите Open. У вас должно быть две сессии, чтобы вы смогли пробросить tunnel — в этом вся суть туннелирования между портами.
Кроме того, в настройках Putty есть множество других конфигураций, кроме Tunnel. Основной функционал заключается в использовании специальных команд для управления сервером. Чем выше уровень доступа у вас на хосте, тем больше действий вы сможете предпринять. Основные действия, которые доступны для вашего ПК, как для клиента — это просмотр общей информации и статистики с сервера, остановка системы, управление файлами и директориями, поиск, монтирование файловых систем, управление пользователями, управление уровнями доступа файлов, архивирование и распаковка каталогов и т. д.
Чтобы подключиться к серверу через Putty, вам нужно будет определиться со способом аутентификации. Очень часто сервера используют открытые ключи. Чтобы подключиться к такому хосту, вам понадобится публичный ключ, а сгененировать его поможет один из модулей Putty. Вы сможете создать ключ для разных версий протокола, а также задать его длину. После этого забросите ключ на сервер и сможете подключиться к хосту.
Чтобы научиться максимально эффективно пользоваться клиентом и управлять доступными возможностями сервера, вам стоит изучить его основные команды. Для этого пропишите в терминале -help. После этого Putty выдаст вам справку, где будут написаны основные функции клиента, которыми вы сможете воспользоваться. Со временем вы научитесь пользоваться этим приложением! И пока не установили Putty, подумайте на счет Kitty — все-таки этот клиент имеет свои весомые преимущества.
1.2 How do SSH, Telnet and Rlogin differ?
This list summarises some of the differences between SSH, Telnet and Rlogin.
- SSH (which stands for «secure shell») is a recently designed, high-security protocol. It uses strong cryptography to protect your connection against eavesdropping, hijacking and other attacks. Telnet and Rlogin are both older protocols offering minimal security.
- SSH and Rlogin both allow you to log in to the server without having to type a password. (Rlogin’s method of doing this is insecure, and can allow an attacker to access your account on the server. SSH’s method is much more secure, and typically breaking the security requires the attacker to have gained access to your actual client machine.)
- SSH allows you to connect to the server and automatically send a command, so that the server will run that command and then disconnect. So you can use it in automated processing.
The Internet is a hostile environment and security is everybody’s responsibility. If you are connecting across the open Internet, then we recommend you use SSH. If the server you want to connect to doesn’t support SSH, it might be worth trying to persuade the administrator to install it.
If your client and server are both behind the same (good) firewall, it is more likely to be safe to use Telnet or Rlogin, but we still recommend you use SSH.
Download PuTTYgen on Windows
To download PuTTYgen the primary requisite is to acquire the copy of PuTTY installation package. For the 64-bit operating system, one must install the 64-bit version of PuTTY, i.e. putty-64bit-<version>-installer.msi.Similarly, for the 32-bit operating system, the respective 32-bit version of PuTTY, i.e. putty-<version>-installer.msi needs to be installed.
To get PuTTY, go to PuTTY Installation Download page, whereby the complete installation package will be available with setup instructions, installation guide, and download links to all other components of PuTTY such as putty.exe, pscp.exe, psftp.exe, puttytel.exe, plink.exe, pageant.exe and putty.zip.
Following the successful download of the PuTTY installation package. It is time to install the program. Go to How to install PuTTY on Windows, whereby you will find the step by step guidance for PuTTY installation for Windows operating system.
After successfully downloading and installing PuTTY on your Windows machine, you are just 2-3 clicks away to run PuTTYgen. Follow the below-given step by step guidance to run PuTTYgen:
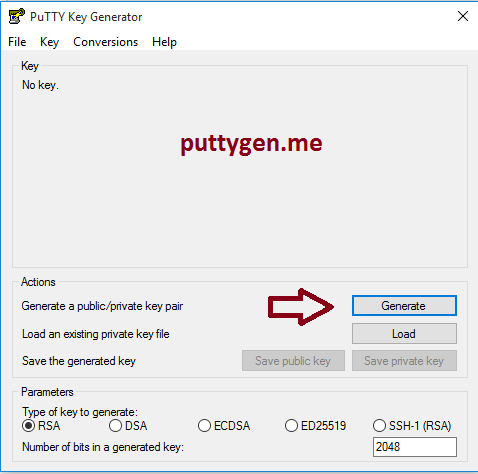
Run PuTTYgen on Windows
To run PuTTYgen, Go to Windows -> Start Menu -> All Programs -> PuTTY -> PuTTYgen. You will see a window for the PuTTY Key Generator on your screen.
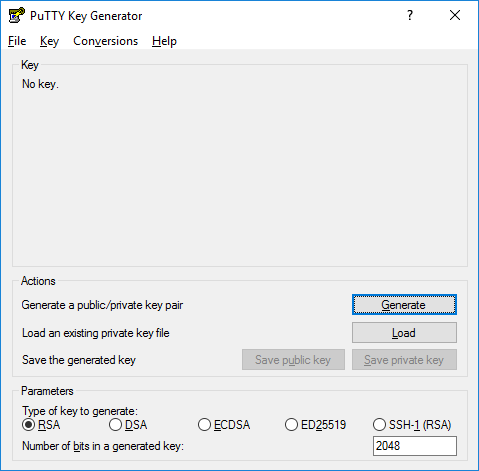 PuTTY key generator screenshot
Voila! Now you can generate public or private key pair using PuTTYgen.
MobaXterm
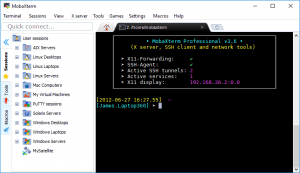
MobaXterm – это усовершенствованный терминал для Windows с сервером X11, с вкладкой SSH-клиента, сетевыми инструментами и многими другими.
MobaXterm предоставляет все важные удаленные сетевые инструменты (SSH, X11, RDP, VNC, FTP, MOSH, …) и команды Unix (bash, ls, cat, sed, grep, awk, rsync, …) на рабочий стол Windows, в одном портативный exe-файл, который работает из коробки.
Вы можете бесплатно скачать и использовать MobaXterm Home Edition.
Существует множество преимуществ наличия сетевого приложения «все в одном» для ваших удаленных задач, например. когда вы используете SSH для подключения к удаленному серверу, автоматически открывается всплывающий графический SFTP-браузер, чтобы напрямую редактировать удаленные файлы.
Ваши удаленные приложения также будут легко отображаться на рабочем столе Windows с помощью встроенного X-сервера.
mRemoteNG
mRemoteNG – это форк mRemote: открытый, с вкладками, многопротокольный, диспетчер удаленных подключений имеется.
mRemoteNG добавляет исправления ошибок и новые функции в mRemote.
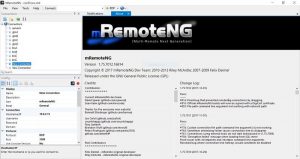
Он позволяет просматривать все ваши удаленные подключения в простом, но мощном интерфейсе с вкладками.
mRemoteNG поддерживает следующие протоколы:
- RDP (удаленный рабочий стол / сервер терминалов)
- VNC (виртуальные сетевые вычисления)
- ICA (независимая вычислительная архитектура Citrix)
- SSH (Secure Shell)
- Telnet (TELecommunication NETwork)
- HTTP / HTTPS (протокол передачи гипертекста)
- Rlogin
- Соединения с разъемами Raw Socket
- Windows 7 SP1
- Windows Server 2008 R2
- Windows 8.1
- Windows Server 2012
- Windows Server 2012 R2
- Windows 10
Transfer files to your Linux instance using the PuTTY Secure Copy client
The PuTTY Secure Copy client (PSCP) is a command line tool that you can use to transfer
files between your Windows computer and your Linux instance. If you prefer a
graphical user interface (GUI), you can use an open source GUI tool named WinSCP.
For more information, see .
To use PSCP, you need the private key you generated in . You also need the public DNS name of your
Linux instance, or the IPv6 address if your instance has one.
The following example transfers the file from the C:\ drive on
a Windows computer to the home directory on
an Amazon Linux instance. To transfer a file, use one of the following commands.
-
(Public DNS) To transfer a file using your instance’s public DNS name, enter the
following command. -
(IPv6) Alternatively, if your instance has an IPv6 address, to transfer a file using
your instance’s IPv6 address, enter the following command. The IPv6 address must be
enclosed in square
brackets ().
Что это такое Putty и зачем его использовать?
Putty – это бесплатная программа для подключения к серверу через безопасное соединение SSH, Telnet, TCP или rlogin. То есть, это только своеобразная оболочка, отвечающая за отображение: работа выполняется на стороне удаленного узла.
Грубо говоря, она применяется для передачи команд серверу. Происходит это примерно по следующей схеме: вы подключаетесь к серверу с помощью настроенной Putty, вводите в строку команду, сервер её выполняет.
Данная утилита настраивает шрифты, цвета и разрешение консоли, ведет логи, сохраняет в своей памяти ключи авторизации, а также поддерживает полноценную работу через прокси-сервер. При этом, является абсолютно бесплатной.
Еще одним применением является передача файлов с компьютера на сервер и обратно, но для этого чаще используют другие программы, такие как Total Commander, Filezilla или Far Manager.
Known security vulnerabilities
Version 0.66 and earlier are known to contain security vulnerabilities. Upgrading to the latest version is recommended.
-
Buffer overflow in SCP. This a potential stack overflow and remote code execution vulnerability. A corrupt server could execute code on the client when any file is downloaded. It could also be exploited by man-in-the-middle attacks.
-
Integer overflow in terminal escape sequence handling. This is a memory corruption and possible remote code execution vulnerability. It involves sending an escape sequence to the terminal. For example, a compromised switch could inject the attack into a session. It can also be exploited by a corrupt server to execute code on the client, or using man-in-the-middle attacks.
Lack of proper key management can expose servers to risk and allow attackers to spread server-to-server or jump through desktops/laptops containing SSH keys. More information on SSH key management can be found here.
How to Use Puttygen on Windows
There are two different ways of using Putty gen on Windows. You can either open it from Putty, or you can open the Puttygen.exe file itself. I’ve guided both the ways below.
Open from Putty
If you’ve already installed Putty on your Windows, then you can go to Windows>Start Menu>All Programs>Putty>Puttygen and click on that. And It’ll start.
Open the Puttygen.exe File
Open your Download folder on your Windows PC. There you’ll see the Putty gen exe file. Just right-click on it and select open. It’ll start Putty gen.
Now, you’ve successfully started Putty key generator, just click on “Generate” to generate your first SSH key with Putty gen. You can also select the Parameters and Number of Bits in a generated key.
If you already have a Generated SSH key, just click on “LOAD”.
After generating the SSH key, just click on “Save public Key” or “Save Private Key” and select your SSH key type.
Как сохранить настройки в программе PuTTY
Все данные, которые вы вводите в настройках программы PuTTY, никак не сохраняются. Поэтому при повторном подключении приходится заново вводить IP адрес сервера, путь к приватному ключу и другие настройки. Чтобы избежать этой рутинной работы, введенные настройки можно сохранять и загружать.
Для этого настройте все параметры подключения в PuTTY и вернитесь на вкладку «Session». Здесь нужно ввести имя сессии и сохранить ее помощью кнопки «Save».

В дальнейшем вам не придется каждый раз вводить одни и те же настройки. Вы сможете просто загружать их с помощью кнопки «Load».

После загрузки ранее сохраненных настроек можно сразу запускать подключение нажатием на кнопку «Open».
Connect to your Linux instance
Use the following procedure to connect to your Linux instance using PuTTY. You need
the
file that you created for your private key. For more information,
see in the preceding
section. If you receive an error while attempting to connect to your instance,
see Troubleshoot connecting to your
instance.
To connect to your instance using PuTTY
-
Start PuTTY (from the Start menu, choose All Programs,
PuTTY, PuTTY). -
In the Category pane, choose Session and
complete the following fields:-
In the Host Name box, do one of the following:
-
(Public DNS) To connect using your instance’s public DNS name, enter
@. -
(IPv6) Alternatively, if your instance has an IPv6 address, to connect using your
instance’s IPv6 address, enter
@.
For information about how to get the user name for your instance, and the public DNS
name or IPv6 address of your instance, see . -
-
Ensure that the Port value is 22.
-
Under Connection type, select
SSH.
-
-
(Optional) You can configure PuTTY to automatically send ‘keepalive’ data at regular
intervals to keep the session active. This is useful to avoid disconnecting
from your instance due to session inactivity. In the
Category pane, choose
Connection, and then enter the required interval in
the Seconds between keepalives field. For example, if
your session disconnects after 10 minutes of inactivity, enter 180 to
configure PuTTY to send keepalive data every 3 minutes. -
In the Category pane, expand Connection, expand
SSH, and then choose Auth.
Complete the following:-
Choose Browse.
-
Select the file that you generated for your key pair and
choose Open. -
(Optional) If you plan to start this session again later, you can save the session
information for future use. Under Category,
choose Session, enter a name for the session in
Saved Sessions, and then choose
Save. -
Choose Open.
-
-
If this is the first time you have connected to this instance, PuTTY displays a
security alert dialog box that asks whether you trust the host to which you
are connecting.-
(Optional) Verify that the fingerprint in the security alert dialog box matches the
fingerprint that you previously obtained in . If these fingerprints
don’t match, someone might be attempting a «man-in-the-middle» attack. If
they match, continue to the next step. -
Choose Yes. A window opens and you are connected to
your instance.Note
If you specified a passphrase when you converted your private key to
PuTTY’s format, you must provide that passphrase when you log in to
the instance.
-
If you receive an error while attempting to connect to your instance, see Troubleshoot connecting to your
instance.
SSH key management needs attention
SSH is often used with public key authentication to implement automation and single sign-on.
Public key authentication uses a new kind of access credential, the SSH key, for authentication. It is much more secure than traditional password authentication, especially compared to hard-coded passwords in scripts, but the keys need proper management.
Most organizations with more than a hundred servers have large numbers of SSH keys. Usually, these keys have not been properly managed and audited. An SSH risk assessment is recommended. Organizations should consider deploying key management software to establish proper provisioning, termination, and monitoring for key-based access.
Risks of unmanaged SSH keys include uncontrolled attack spread across the server infrstructure, including to disaster recovery data centers and backup systems.
Organizations should also be aware of security risks related to SSH port forwarding. It is a technology that has many good uses, but it can also enable unfettered access across firewalls. Employees and attackers can leave tunnels back into the internal network from the public Internet. This particularly affects organizations using cloud computing services.
How to use PuTTYgen?
PuTTYgen is used to generate public or private key pair for creating SSH keys. Below is the complete guidance about how to generate RSA key in the Windows operating system:
- Once you install the PuTTY on your machine, you can easily run PuTTYgen. For the same, go to Windows -> Start Menu -> All Programs -> PuTTY -> PuTTYgen.
- You will see the PuTTY key generator dialog box on your screen
- You will find a “Generate” button in that dialog. Clicking on it will lead to generating the keys for you.
- Now you will need to add a unique key passphrase in the Key passphrase and Confirm passphrase field.
- Click on the “Save Public Key” and “Save Private Key” buttons to save your public and private keys.
- You will see the text starting with ssh-RSA in the Public key for pasting into OpenSSH authorized_keys file field which is located at the top of the window. Copy that entire text to your clipboard by pressing ctrl+c as you will require the key to paste on your clipboard in the public key tool of control panel or directly on the cloud server.
Various Ways to Use RSA Key Pair
RSA key pair generated through PuTTYgen is used in two various ways defined as below:
- To assign while creating a new cloud serverYou can choose the public key from the given list of keys at the time of creating a cloud server. If you don’t find your key in that list, then first add and then assign it.
- Assign to an existing cloud serverAt the time of connecting to the cloud server, first of all, you need to tell PuTTY to use it for utilizing your newly created RSA key pair.
Download PuTTYgen
PuTTYgen being a component of the terminal emulator PuTTY does not have to be downloaded separately, hence, comes with the PuTTY .msi installation package. You can follow the simple steps to download PuTTYgen software for your system. That is the reason why you don’t need to download PuTTYgen separately. Once you download PuTTY software, you will be able to install and run PuTTYgen easily in no time. Below is the complete instruction about how to download and install PuTTY on Windows.
Apart from that, it is also integrated into third-party programs such as WinSCP installation package. Below you can find a complete PuTTYgen download and installation guide for all operating systems.