Latex 5.0.2 русская версия для windows 10
Содержание:
- Numbered and unnumbered sections
- WinEdt — winedt
- Два, редактор LaTeX
- Agenda
- 1.4 Структура входного файла
- The standalone package
- Настройка LaTeX на Atom
- Греческий алфавит в LaTeX
- О разных дистрибутивах и редакторах.
- Recent
- BaKoMa TeX Word — bakoma
- Main package
- gedit with the gedit-LaTeX-plugin
- 1.3 Исходные файлы LATEX
- Creating your first LEd project
- Nested lists
Numbered and unnumbered sections
To get an unnumbered chapter, section, subsection, etc. add an asterisk () at the end of the command, before the opening curly brace. These will not go into the table of contents. Here is our first example (above) but this time using instead of :
\documentclass{article}
\usepackage{blindtext}
\title{Sections and Chapters}
\author{Overleaf}
\date{\today}
\begin{document}
\maketitle
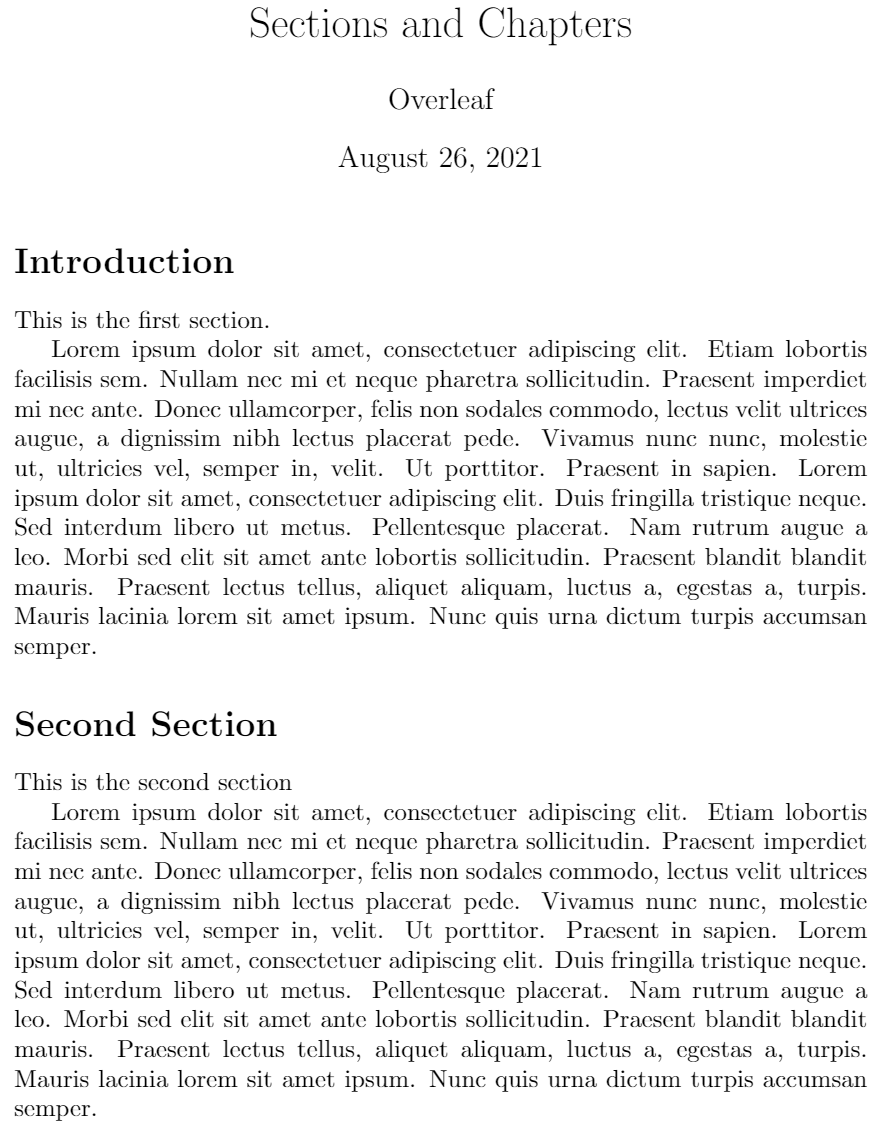
\section*{Introduction}
This is the first section.
\blindtext
\section*{Second Section}
This is the second section
\blindtext
\end{document}
This example produces the following output:
Unnumbered sections in the table of contents
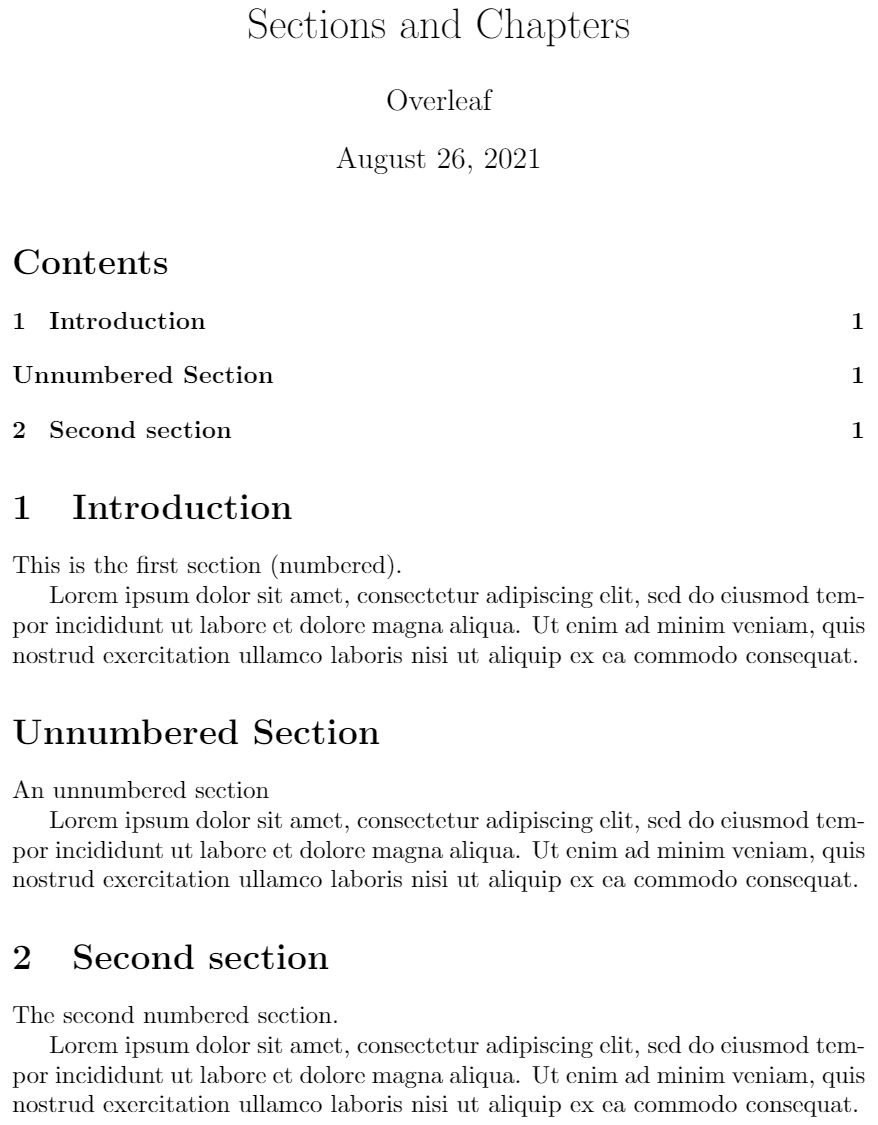
To add an unnumbered section to the table of contents, use the command like this:
\addcontentsline{toc}{section}{Title of the section}
Here is an example using but see the article Table of contents for further information and examples.
\documentclass{article}
\title{Sections and Chapters}
\author{Overleaf}
\date{\today}

\begin{document}
\maketitle
\tableofcontents

\newcommand\shortlorem{Lorem ipsum dolor sit amet, consectetur adipiscing elit, sed do eiusmod tempor incididunt ut labore et dolore magna aliqua. Ut enim ad minim veniam, quis nostrud exercitation ullamco laboris nisi ut aliquip ex ea commodo consequat.}

\section{Introduction}
This is the first section (numbered).

\shortlorem
\addcontentsline{toc}{section}{Unnumbered Section}
\section*{Unnumbered Section}
An unnumbered section

\shortlorem

\section{Second section}
The second numbered section.

\shortlorem
\end{document}
This example produces the following output:
WinEdt — winedt
- Platforms: (Windows XP until version 9.1)/Vista/7/8/10
- License: Shareware, personal license $60
- Languages: en
- Unicode: Yes (from version 7)
- RTL/bidi: Yes (from version 10)
- directives: Probably possible.
- Syntax Highlighting: Yes, customizable and including a mode
- Code Completion: Yes, customizable
- Code Folding: Yes, customizable (from version 8)
- Spell Checking: Yes
- SyncTeX: Yes with appropriate PDF viewer (e.g. SumatraPDF)
- Built-in Output Viewer: No
- Project Management: Yes, own project management system and outliner
A lot of useful add-ons for WinEdt can be found on the WinEdt’s Community site
WinEdt is a good option on Windows.
I wrote a post on some of the features I liked in WinEdt 6.0.
To summarise:
- Tree View can be customised
- Automatically display your current location in TOC
- Colour coding that aids usability
- Intelligent defaults
- Options to customise almost anything
- Easy configuration interface with MikTeX
- One click build process for LaTeX documents
- Intuitive default shortcut keys and intuitive alt menu letters
It’s not free, but it’s also not that expensive.
Два, редактор LaTeX
Сейчас на рынке много редакторов,BeebomРекомендуется 8 простых в использовании редакторов LaTeX : 1)TeXmaker Открытый исходный код, кроссплатформенная поддержка, проверка орфографии, автозаполнение.
2)Texstudio Открытый исходный код, кроссплатформенная поддержка, проверка орфографии, автозаполнение. Этот инструмент разработан на основе исходного кода TeXmaker, поэтому он является расширением первого (например, подсчет слов в статистическом документе, анализ частоты слов).
Вы также можете перетаскивать изображения в документ, это здорово …
3)TeXworks Открытый исходный код, кроссплатформенная поддержка. основан на исходном коде TeXshop.
4)ShareLaTex 5)Overleaf 6)Authorea Нет необходимости устанавливать, редактировать онлайн.
7)Vim with LaTeX-suite Кроссплатформенная поддержка.
8)TeXlipse plugin for Eclipse IDE LaTeX можно записать в редакторе Eclipse Кроме того, Википедия также даетСравнение различных редакторов LaTeX 。
Agenda
- Обо всём и ни о чём! LaTeX большой и цельный. Немного мотивации. О разных движках (PdfTex, XeTeX и т.д.). Математика и картинки.
- Связка R + LaTeX — что может быть круче? Оформляем расчёты правильно. Попутно решаем проблему тысячелетия: что было раньше, курица или яйцо?
- Что такое юникод, немного подробнее про шрифты. Снова про таблицы. Немного рукоблудия: В LaTeX прямо из Exel и в LaTeX прямо из Wolfram. Безумно красивая графика в Tikz. Великая и могучая Geogebra.
- Оформление документа в целом. Преамбула для души. Продаём душу и вместе пишем письмо в Хогвартс.
- Делаем автоматический список литературы, углубляемся в преамбулу. Пишем свои собственные, свежие, команды. Слушаем скучные роскозни про ГОСТ.
- R + LaTeX. Как создать много одинаковых документов одним нажатием кнопки. История про киллера и деда мороза.
- Презентации в LaTeX — большая боль или чувство стиля? Оформляем код в пакете Minted. Немного смотрим на Atom. Немного говорим про Markdown.
- То, что нигде не рассказывают, а знать надо. За первый семинар изучаем командную строку и запускаем код считаться в своём собственном облаке. За второй семинар понимаем как работает git и заводим свой первый репозиторий.
1.4 Структура входного файла
Когда LATEX2e обрабатывает входной файл, он ожидает от него
следования определенной структуре. Так, каждый
входной файл должен начитаться с команды
Она указывает, документ какого типа вы собираетесь писать. После
этого, вы можете включать команды, влияющие на стиль документа в
целом, или загружать пакеты, добавляющие новые
возможности в систему LATEX. Для загрузки такого пакета используется
команда
Когда вся настройка закончена , вы начинаете тело текста командой
Теперь вы вводите текст с командами LATEX. В конце документа вы
добавляете команду
Все, что следует после нее, LATEX игнорирует.
Рис. ниже показывает для LATEX2e.
входной файл дан на
следующем рис..
Минимальный файл LATEX
\documentclass{article}
\usepackage{babel}
\begin{document}
Краткость~--- сестра таланта.
\end{document}
Пример реалистичной журнальной статьи
\documentclass{article}
\usepackage{latexsym}
\usepackage{babel}
\begin{document}
\author{Б.~Тоботрас}
\title{Минимализм}
\frenchspacing
\begin{document}
\maketitle
\tableofcontents
\subsection{Начало}
Вот тут и начинается моя замечательная статья.
\subsection{Конец}
\ldots{} а тут она кончается.
\end{document}
The standalone package
The package standalone provides the same functionality as subfiles and is more flexible, but the syntax is more complex and prone to errors. The main difference is that each subfile has its own preamble.
The examples in this section have the next hierarchical file structure:
The main file
The main file is very similar to that of any other project with multiple files.
\documentclass{article}
\usepackage{standalone}
\usepackage{import}

\title{Standalone package example}
\author{Overleaf}
\date{May 2021}

\begin{document}

\maketitle

\section{First section}
\import{sections/}{introduction}

\section{Second section}
\import{sections/}{section2}

\end{document}
The line
\usepackage{standalone}
enables the standalone package, it should be placed early in the document. The parameter inside brackets tells LaTeX to import the preamble from each subfile (packages are imported only once), if omitted, make sure you have all the necessary commands in the main document preamble for the subfiles to work. One must be careful because of possible incompatibilities in the different preambles.
In the body of the main document, each subfile is imported with . The standard command can also be used, but the one in this example is recommended to manage large projects because it prevents errors in nested files.
The subfiles
Each subfile must have its own preamble and import all packages needed to work as standalone document.
\documentclass{standalone}
\usepackage{standalone}
\usepackage{import}
\usepackage{blindtext}
\begin{document}
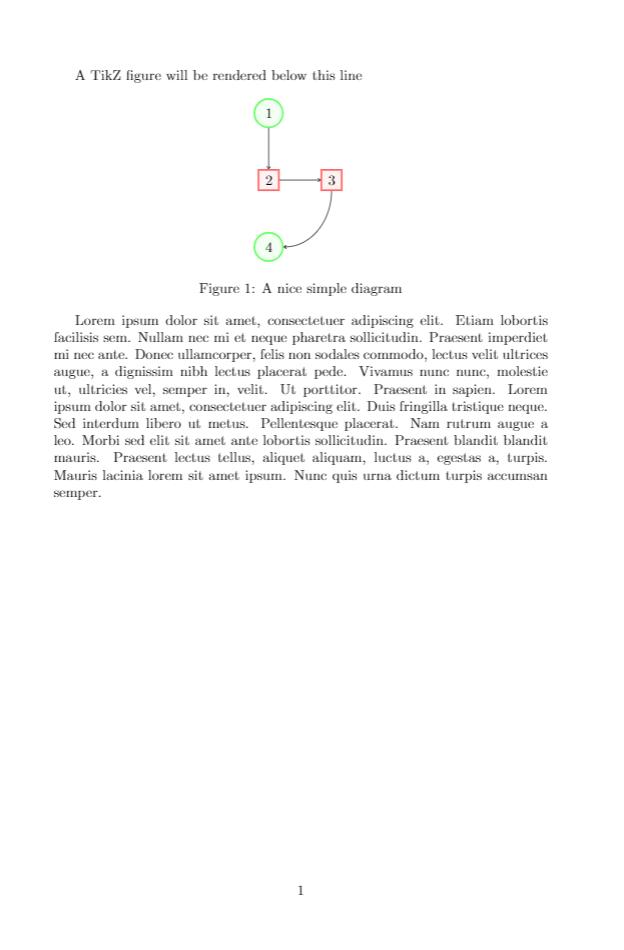
A TikZ figure will be rendered below this line
\begin{figure}
\centering
\subimport{../}{diagram.tex}
\label{fig:tikzexample}
\caption{A nice simple diagram}
\end{figure}
\blindtext
\end{document}
The first line in the subfile is
\documentclass{standalone}
This declares that this is a file to be used with the standalone package, there are two optional parameters inside the brackets.
- . Sets as underlying class, any other class can be used: book, report, etc. (except beamer).
- . If this option is omitted the output will be cropped to a minimum size.
The next command is not mandatory
\usepackage{standalone}
but hast to be used in this example because there’s a nested standalone file here. A tikz picture is inserted with , you can see the contents of the file «diagram.tex» below:
\documentclass{standalone}
\usepackage{tikz}
\usetikzlibrary{positioning}
\begin{document}

\begin{tikzpicture}[
roundnode/.style={circle, draw=green!60, fill=green!5, very thick, minimum size=7mm},
squarednode/.style={rectangle, draw=red!60, fill=red!5, very thick, minimum size=5mm},
]
%Nodes
\node      (maintopic)                              {2};
\node        (uppercircle)        {1};
\node      (rightsquare)        {3};
\node        (lowercircle)        {4};

%Lines
\draw (uppercircle.south) -- (maintopic.north);
\draw (maintopic.east) -- (rightsquare.west);
\draw (rightsquare.south) .. controls +(down:7mm) and +(right:7mm) .. (lowercircle.east);

\end{tikzpicture}
\end{document}
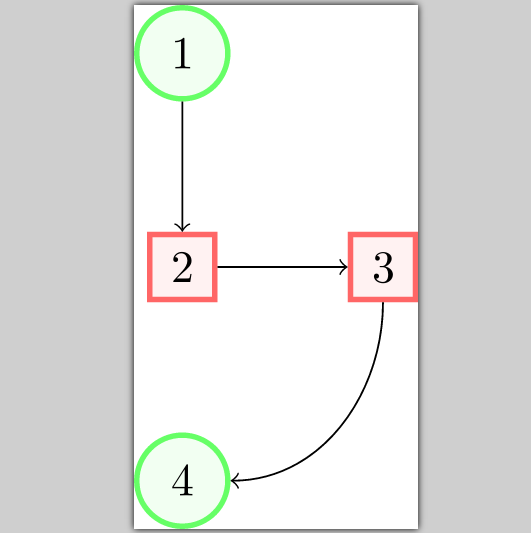
This is the main feature in standalone, you can import this file in any other document and recycle the code. For instance, this diagram can later be used in a presentation without further changes.
Настройка LaTeX на Atom
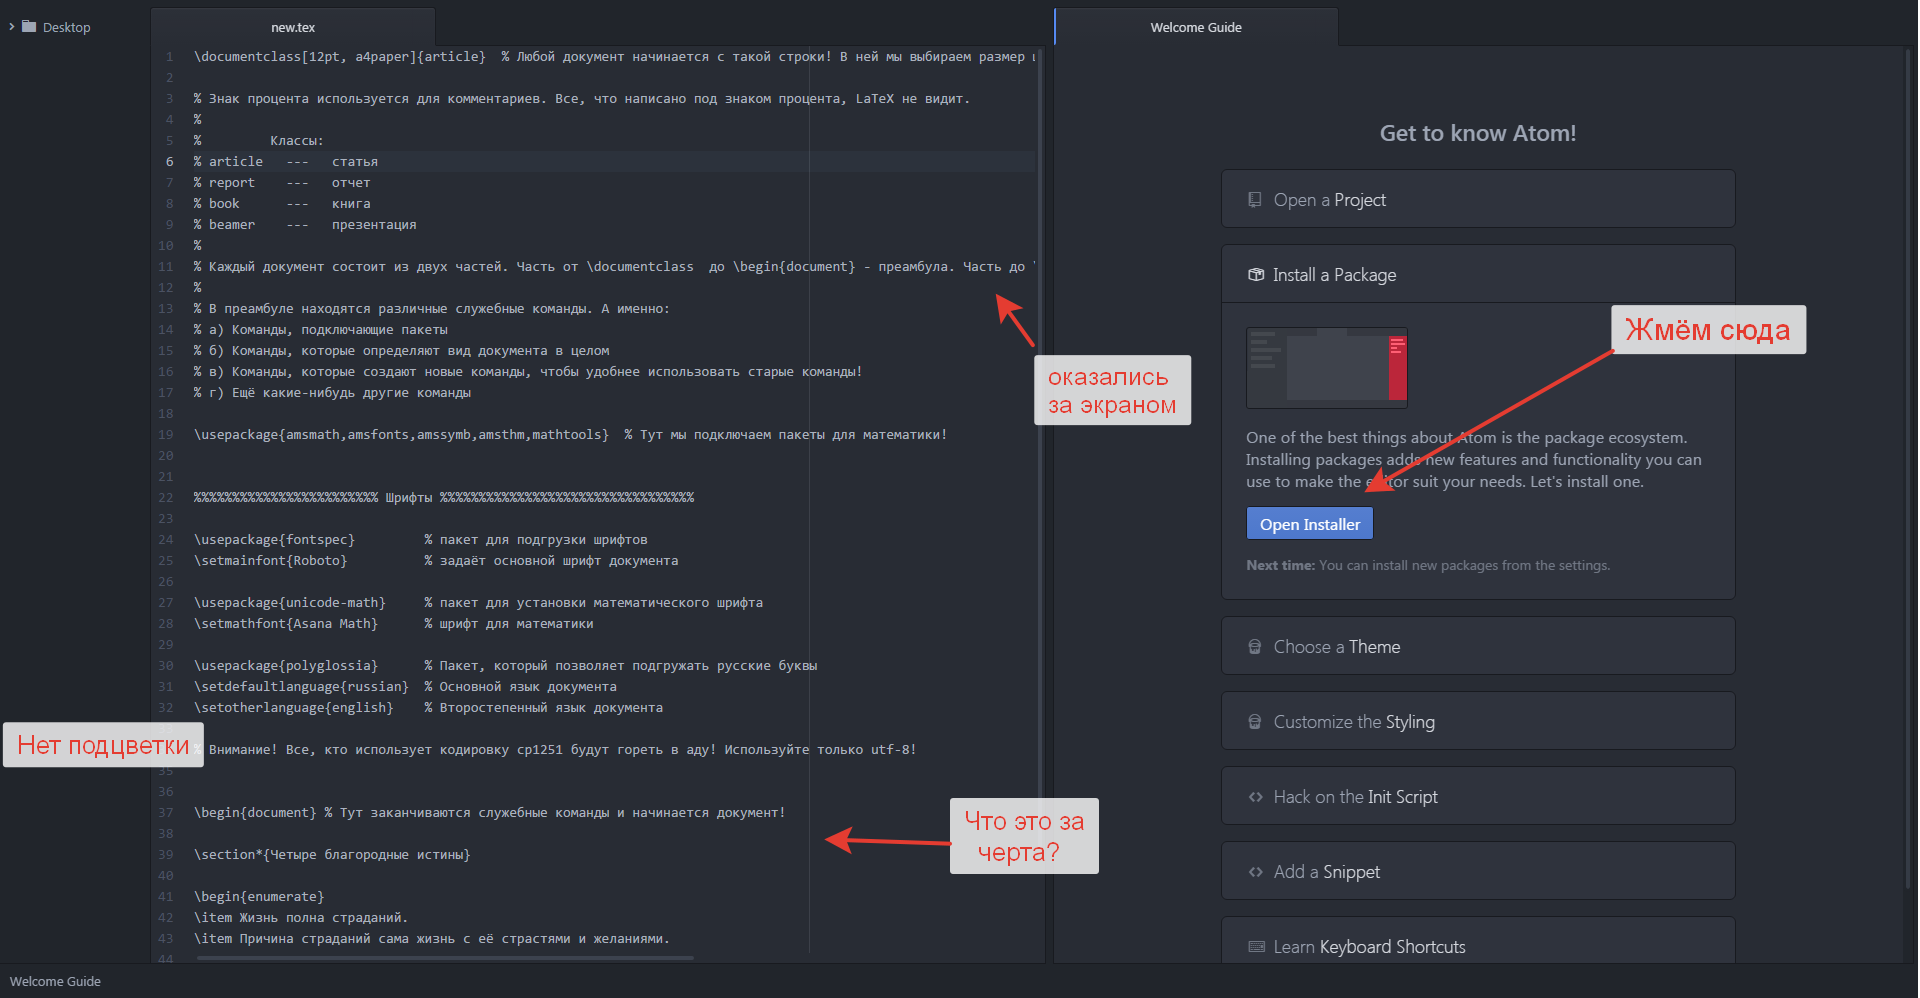
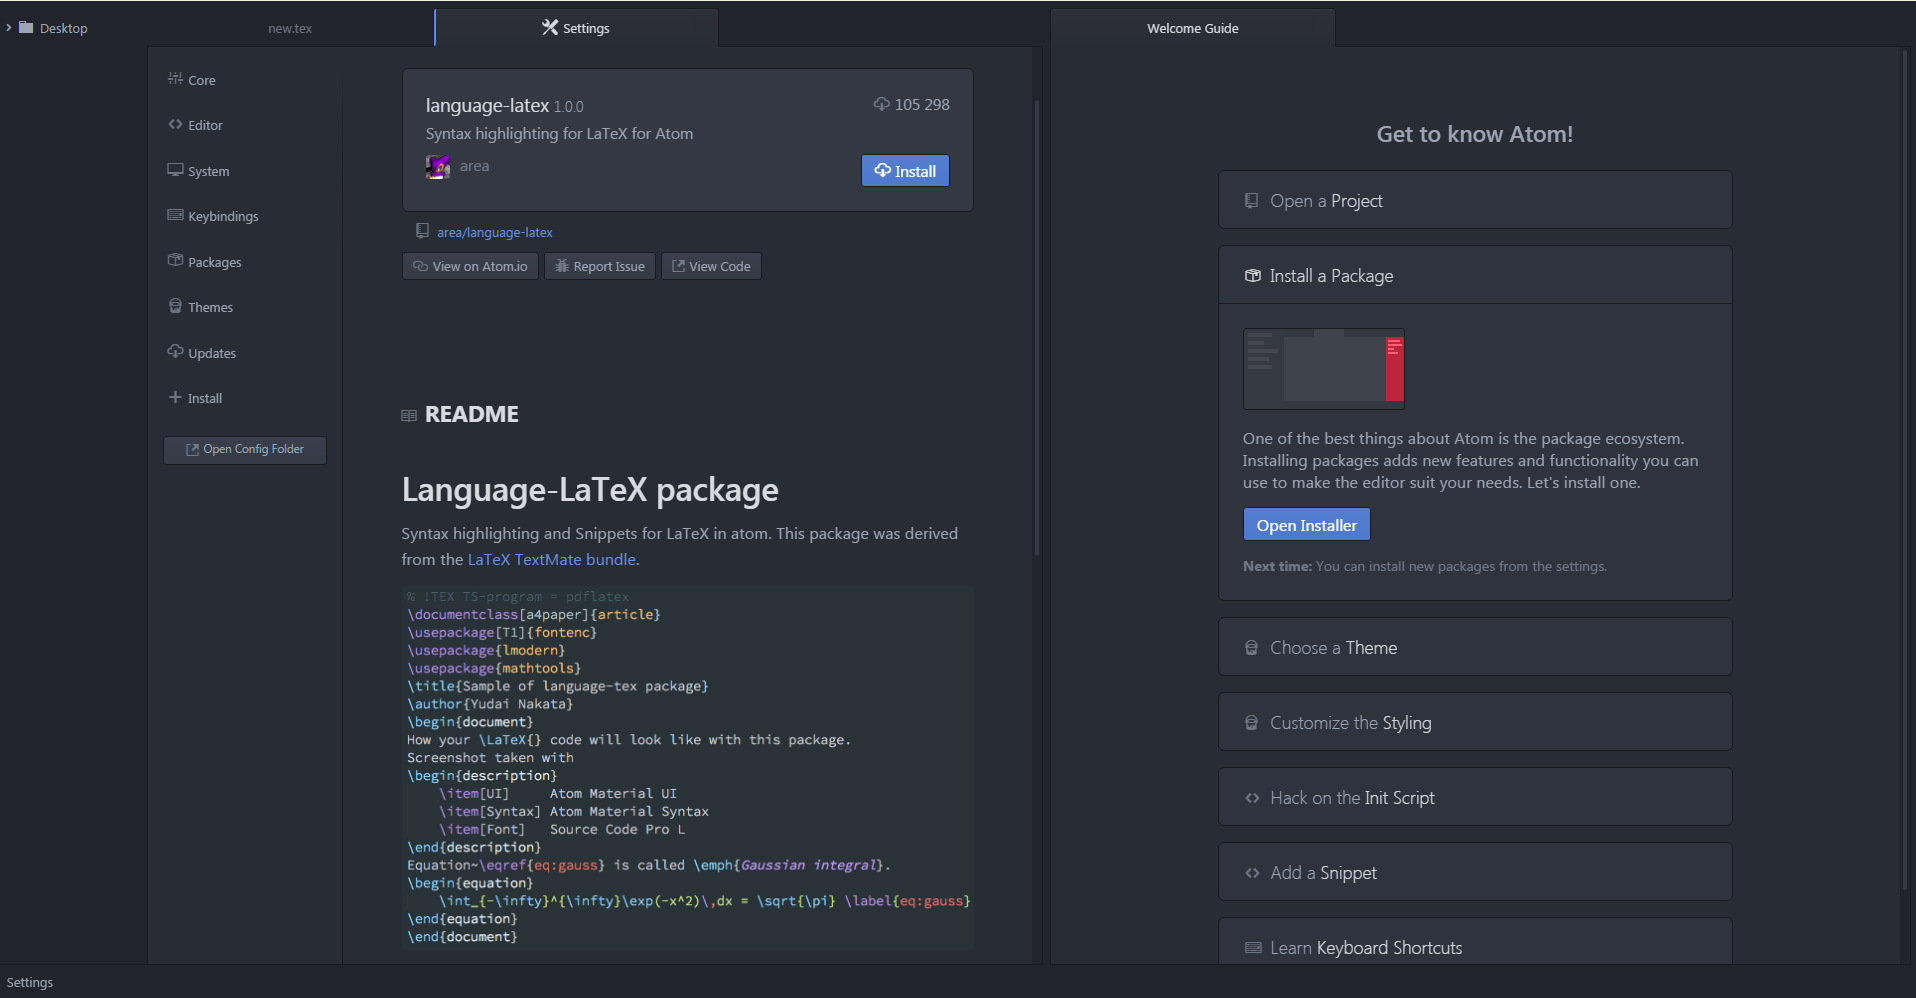
Тыкаем Install a Package. Находим пакет для подсветки кода language-latex. Выглядит симпатично. Жмём Install.
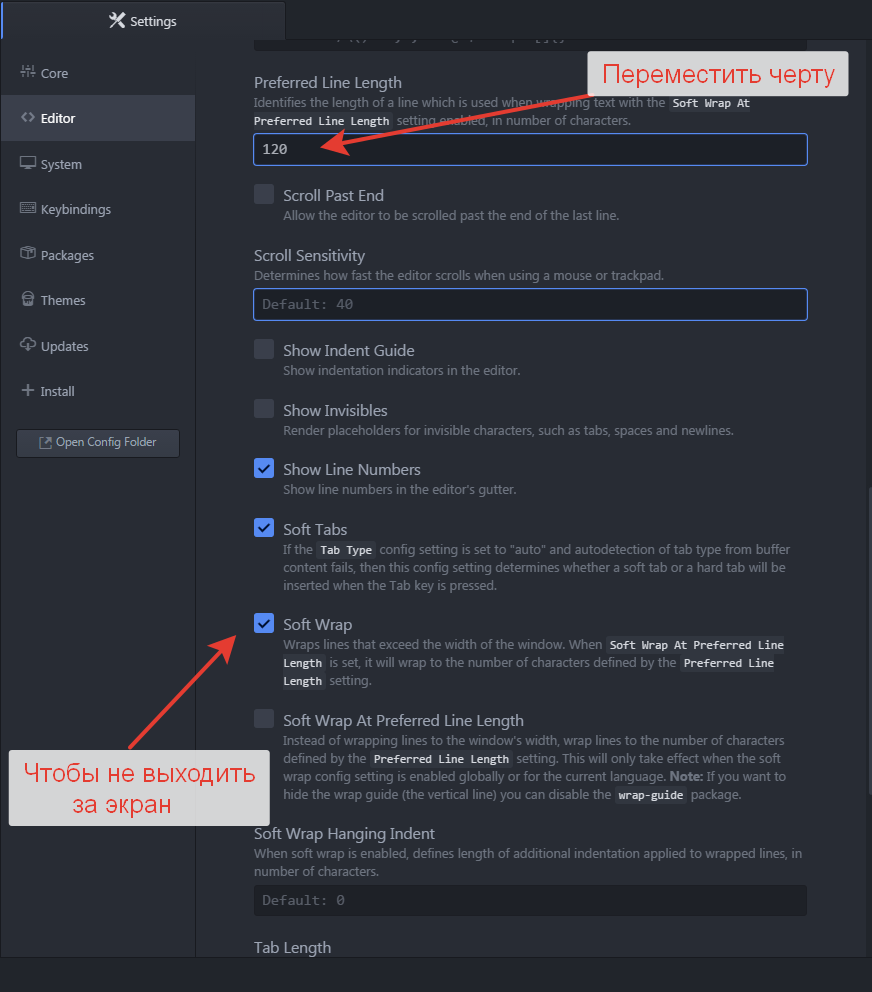
Как только закончится установка, открываем меню с настройками. Выбираем всё так, как хочет ваша душа. Отлично! У нашего кода появились красивости. Рекомендую поставить галочку у Soft Wrap, это решит проблему с пробиванием строками границы экрана. Точно также можно поставить галочку у Soft Wrap во вкладке Editor. Это решит проблему с пробиванием границы экрана для абсолютно всех программ, которые вы будете открывать в Atom, а не только для LaTeX. Там же можно переместить или вообще отключить подозрительную черту. Она используется в Atom как красная строка в школьных тетрадях. Вы сами ставите её где хотите, чтобы не писать код за её границей.
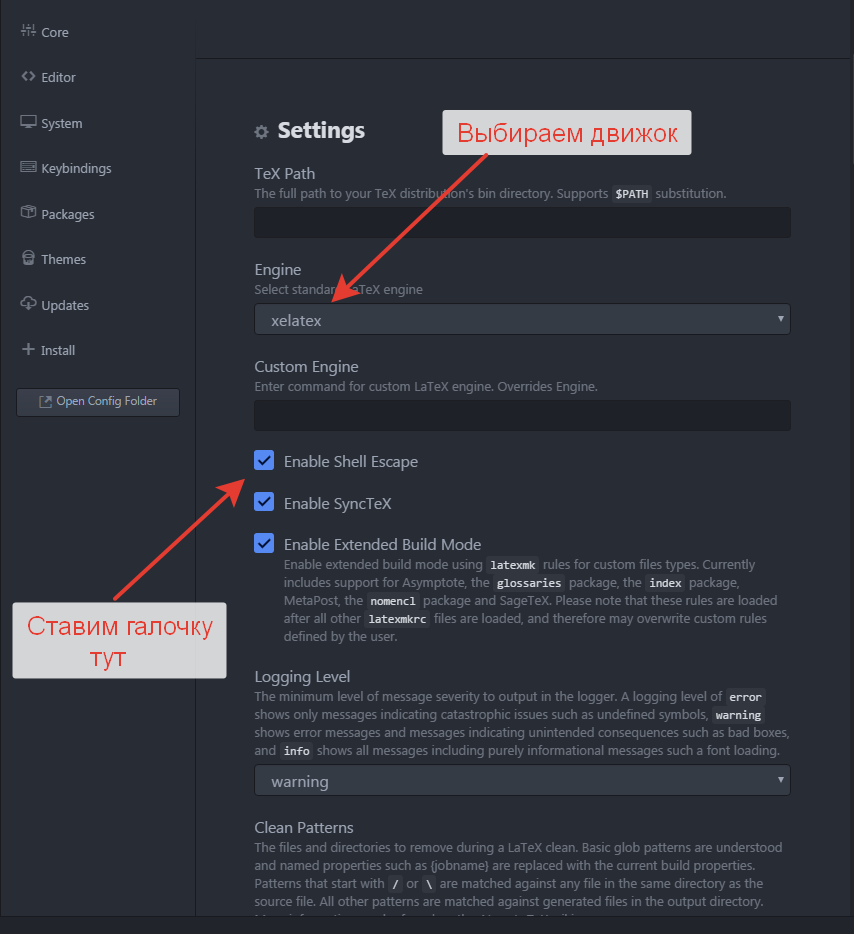
Находим пакет latex — самый главный пакет, который отвечает за компиляцию и связь с Texlive. Устанавливаем его. Переходим в настройки. В Engine выбираем в качестве движка xelatex. Ставим галочку под Enable Shell Escape.
Во вкладке Opener выбираем pdf-view. Видим несколько жизненно-важных сочетаний клавиш. заставляет файл скомпилироваться, удаляет всякий хлам. Если интересно, то читаем инструкцию.
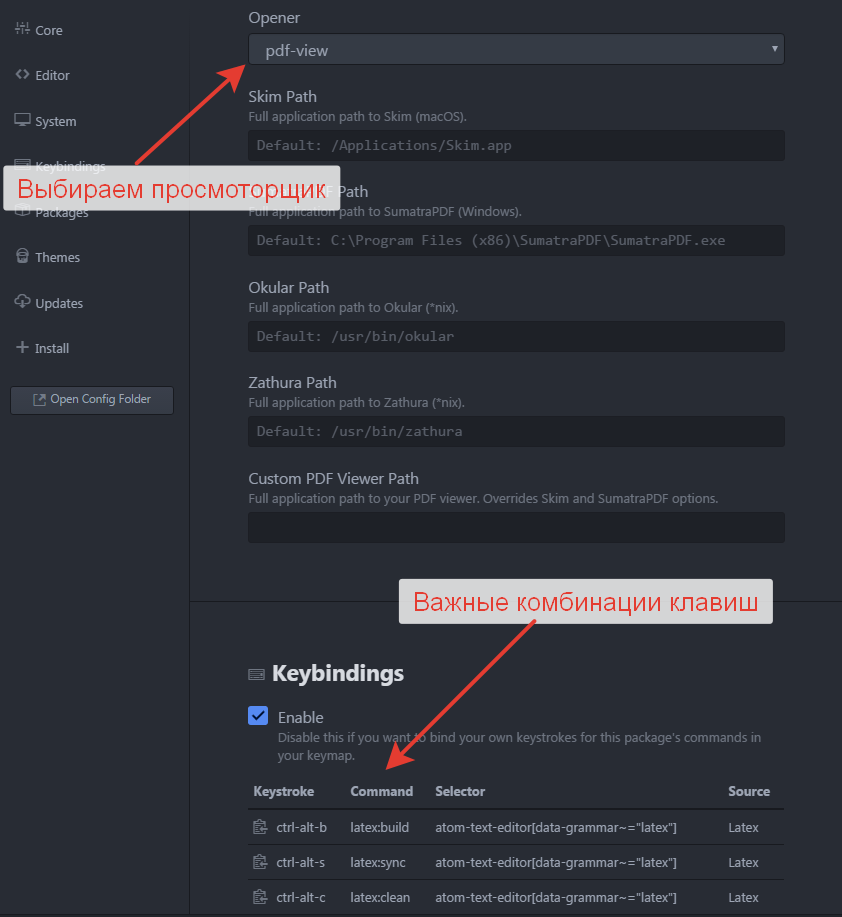
- Устанавливаем пакет pdf-view. Он позволяет открывать pdf прямо в Atom.
- Во вкладке Themes можно подобрать тему по вкусу.
Греческий алфавит в LaTeX
Написание греческих букв в LaTeX довольно логично. На английском языке оно вообще практически совпадает с обычным написанием.
Но на всякий случай полезно иметь источник для самопроверки.
| Русское название | LaTeX код строчной | Вид | LaTeX код прописной | Вид |
|---|---|---|---|---|
| альфа | \alpha | α | \Alpha | Α |
| бета (вита) | \beta | β | \Beta | Β |
| гамма | \gamma | γ | \Gamma | Γ |
| дельта | \delta | δ | \Delta | Δ |
| эпсилон | \epsilon | ε | \Epsilon | Ε |
| дзета (зита) | \zeta | ζ | \Zeta | Ζ |
| эта (ита) | \eta | η | \Eta | Η |
| тета (фита) | \theta | θ | \Theta | Θ |
| йота | \iota | ι | \Iota | Ι |
| каппа | \kappa | κ | \Kappa | Κ |
| лямбда (лямда) | \lambda | λ | \Lambda | Λ |
| мю (ми) | \mu | μ | \Mu | Μ |
| ню (ни) | \nu | ν | \NU | Ν |
| кси | \xi | ξ | \Xi | Ξ |
| омикрон | \omicron | ο | \Omicron | Ο |
| пи | \pi | π | \Pi | Π |
| ро | \rho | ρ | \Rho | Ρ |
| сигма | \sigma | σ | \Sigma | Σ |
| тау (тав) | \tau | τ | \Tau | Τ |
| ипсилон | \upsilon | υ | \Upsilon | Υ |
| фи | \phi | φ | \Phi | Φ |
| хи | \chi | χ | \Chi | Χ |
| пси | \psi | ψ | \Psi | Ψ |
| омега | \omeg | ω | \Omega | Ω |
| \varepsilon | \Varepsilon | |||
| \vartheta | \Vartheta | |||
| \varpi | \Varpi | |||
| \varrho | \Varrho | |||
| \varsigma | \Varsigma | |||
| \varphi | \Varphi |
У эпсилона, теты, пи, ро, сигма, фи есть два варианта написания: обычный и var,
который получается добавлением приставки
var к коду обычного написания. Например \Epsilon \Varepsilon
О разных дистрибутивах и редакторах.
Можно немножечко по-разному распространять одну и ту же программу. Её разные сборки называются дистрибутивами. Существует огромная куча разных дистрибутивов, распространяющих LaTeX. Тут собрана основная информация об основных дистрибутивах для любопытных.
Texlive
Texlive — это флагман среди дистрибутивов LaTeX. Распространяется группой свободных разработчиков TeX Users Group. Регулярно обновляется. Содержит в себе практически всё, что необходимо для работы. В том или ином виде может быть поставлен на любую из трёх основных операционных систем.
MikTeX
Дистрибутив поддерживается только в Windows. Является свободным программным обеспечением. Использует свою программу управления пакетами, которая умеет загружать не установленные, но указанные в документе пакеты. Тем не менее, лучше сразу установить все доступные пакеты, чтобы потом при компиляции не ждать, когда они загрузятся.
MacTeX
Дистрибутив для MacOS. В качестве основы в дистрибутиве используется TeX Live. Кроме системы пакетирования, ориентированной на мак, дистрибутив отличается от TeX Live тем, что с ним в комплекте идут несколько дополнительных программ.
Редакторы
Кроме самого дистрибутива для полноценной работы необходим текстовой редактор. В течение курса мы будем работать в Texstudio. Если вам нравится какой-то другой редактор, то вы можете работать в нём. В конце курса мы попробуем на вкус ультрановомодный Atom, который подходит для редактирования … всего.
Recent
 A Beamer Theme for the Faculty of Pharmacy at the Masaryk University in Brno
A template for mubeamer, a beamer theme for the typesetting of presentations at the Masaryk University (Brno, Czech Republic).
Vít Novotný, Aleš Křenek
 thesis-template
just anotter thesis-template
OtterWhisperer
 Template TCC — IFRN João Câmara
Modelo de Trabalho de conclusão de curso para o IFRN Campus João Câmara; Adaptado do template do Instituto Federal de Educação, Ciência e Tecnologia do Sul de Minas, disponível na galeria do Overleaf;
João Paulo Guimarães
 Edinburgh University — Undergraduate BSc Dissertation
The dissertation template as required officially by Edinburgh University.
Maksymilian Mozolewski
 成都理工大学本科论文模板
这是为成都理工大学地球物理学院2022届本科毕业生所编写的学士学位论文LaTeX模板
付濛
 Example Project
An example LaTeX project for starting off your own article
Overleaf
 Memoria-Tesis / FCFM / UChile
Plantilla para escribir memorias y tesis de la Facultad de Ciencias Físicas y Matemáticas de la Universidad de Chile (v.1.6.1).
Template to write memorias and theses for the Faculty of Physical Sciences and Mathematics, University of Chile (v.1.6.1).
LICENSE: MIT
Nikolas Tapia M., Manuel Ortega, Alfredo Cádiz, Willy Maikowski, Tomás Ahumada, Aidan Hogan

Arquivo simples mostrando algumas funcionalidades do LateX . Feito para o Workshop de introdução à escrita científica usando Latex da Expotec IFRN/JC — 2021;
João Paulo Guimarães
 A Letter Template for the Central European Institute of Technology at the Masaryk University in Brno
A template for muletter, a document class for the typesetting of letters at the Masaryk University (Brno, Czech Republic).
Vít Novotný
BaKoMa TeX Word — bakoma
- platforms: Windows, OS X, Linux
- License: commercial — €55 or $101 per licence (other quantity discounts)
- Languages: English
- Unicode: Yes
- Syntax Highlighting: Yes, customizable
- Code Completion: Yes, customizable
- Code Folding: No
- Spell Checking: Yes
- SyncTeX: ?
- Built-in Output Viewer: Yes. Can view output in real time, and directly edit output file
- Project Management: Yes
I think BaKoMa is an innovative useful WYSIWYG editor. It allows users to edit both in the file and in the output file. The real-time preview feature can come in handy when creating graphics and figures (e.g. using or ). In a review of BaKoMa, Martin Osborne made the following comment:
Main package
LEd is distributed in two alternative ways: a single zip archive and an installation package.
For the zip archive, you only need to download the file to your hard disk and extract it into the directory you want.
Then, you can run LEd.exe and start working.
No installation process is needed.
For the installation package, you should download the setup executable file and run it to install LEd.
| Description | Date | Zipped | Installer |
| LEd Standard Edition version 0.53 beta (build 6501) | 2009-10-09 | 5922 KB | 5794 KB |
Notes:
- LEd is free, however, if you want to support us, please consider a donation.
- For previous versions of LEd please visit the download—archive page.
gedit with the gedit-LaTeX-plugin
Available for: Windows, Mac, Linux and others
Open SourceUnicode: yesRTL/bidi: yes
It has a clean interface and provides: Code Completion, Spell Checking, Syntax Checking and Validation, Outlines, Wizards, BibTeX Integration, Template Editing, User-Defined Snippets and a preconfigured comprehensive build system using rubber (including LaTeX → DVI with source specials for inverse search).
For my gedit LaTeX suite to be complete, I add two other plugins, first the ‘Control your tabs’ plugin to get Ctrl-(Shift)-Tab behavior, and also the AutoCompletion plugin which provides automatic suggestions for completion of any word, based on the words already present in the document — it can be a real time saver.
Temporary edit:
Currently the plugin is not ready for release with gedit 3. So, if you’re running the latest Ubuntu (11.10) or like being cutting edge, you need to manually install the LaTeX-plugin. The easiest way is to download the version you want from here extract and install with the standard , , sequence. Read the file in the archive for more details. You can also get the most recent version of the plugin from their git repository.
1.3 Исходные файлы LATEX
Исходными данными для LATEX являются обычный текстовый файл в
ASCII. Его можно создать в любом текстовом редакторе. Он
содержит текст документа вместе с командами, указывающими LATEX,
как верстать текст.
1.3.1 Пробелы
<<Пустые>> символы, такие, как пробел или табуляция, трактуются
LATEX одинаково, как <<пробел>>. Несколько
последовательных пустых символов трактуются
как один <<пробел>>. Пустые символы в начале строки обычно
игнорируются, а единичный перевод строки воспринимается как
<<пробел>>.
Пустая строка между двух строк текста определяет конец
абзаца. Несколько пустых строк трактуются так же, как
одна пустая строка. Ниже приведен пример. Сверху — текст из
входного файла, снизу — форматированный вывод.
Неважно, вставляете ли вы
один или несколько
пробелов между словами.
Пустая строчка начинает
новый абзац.
Неважно, вставляете ли вы
один или несколько
пробелов между словами.
Пустая строчка начинает
новый абзац.
1.3.2 Спецсимволы
Следующие символы являются
зарезервированными символами, которые либо имеют в LATEX
специальное значение, либо имеются не во всех шрифтах. Если вы введете
их в текст напрямую, то они обычно не напечатаются, а заставят
LATEX сделать что-нибудь, вами вовсе не предусмотренное.
Как вы позже увидите, эти символы можно использовать в ваших
документах, добавляя к ним префикс <<>>:
\$ \& \% \# \_ \{ \}
$ & % # _ { }
Прочие символы, как и многие, многие другие, можно набрать
специальными командами в математических формулах или как акценты. Знак
<<>> нельзя вводить, добавляя перед ним еще один, так
как эта команда () используется для разрыва
строки.
1.3.3 Команды LATEX
Команды LATEX чувствительны к регистру и принимают
одну из следующих двух форм:
- Они начинаются с символа backslash <<>> и
продолжаются именем, состоящим только из букв. Имена команд
завершаются пробелом, цифрой или любой другой <<не-буквой>>. - Они состоят из <<>> и ровно одного специального символа.
LATEX игнорирует пробелы после команд. Если вы хотите получить
пробел после команды, вы должны поместить
или <<>> и пробел, или специальную команду пробела после
имени команды. <<>> не дает LATEX игнорировать все пробелы
после имени команды.
Я слышал, что Кнут разделяет
людей, работающих с \TeX{}
на \TeX{}ников и \TeX пертов.\\
Сегодня~--- \today
Я слышал, что Кнут разделяет
людей, работающих с TEX
на TEXников и TEXпертов.
Сегодня — Ноябрь 27, 1998
Некоторые команды нуждаются в параметре, который
должен быть задан между фигурными
скобками <<>> после имени команды. Некоторые команды
поддерживают необязательные параметры, которые добавляются после
имени команды в квадратных
скобках <<>>. Следующий пример использует некоторые
команды LATEX. Не задумывайтесь над ними, они будут разъяснены позже.
Вы можете \textsl{положиться}
на меня!
Вы можете положиться
на меня!
Пожалуйста, начните новую
строчку прямо тут!\newline
Спасибо!
Пожалуйста, начните новую
строчку прямо тут!
Спасибо!
1.3.4 Комментарии
Когда в процессе обработки входного файла LATEX встречает символ
, он игнорирует остаток текущей строки. Это полезно для
добавления в исходный файл замечаний, которые не будут выводиться на
печать.
Это % глупый
% Лучше: поучительный <----
пример.
Это
пример.
Creating your first LEd project
Project based on a template
To create a project based on a template please choose File\New from the menu and select
the Templates tab.
Here you can see a number of available document templates.
Let us select Paper, set the project name as MyPaper, leave
the Location unchanged, and press OK.
In a project tree you can see three files:
-
MyPaper.tex—it is the main LaTeX source;
in projects you can store more than one LaTeX source, but only one can be main (it is necessary to know which file should be
compiled);
the main file is marked with a green icon;
(to select the main file in larger projects, you only need to right-click its name and choose from the popup menu
Mark As Main); - MyPaper.toc—it is an auxiliary file necessary to easily work the document’s table of contents;
-
build.bat—it is a file used to build the whole project;
you can change it if you need some special processing of the document.
Now, you should double-click on MyPaper.tex to see it in an editor window.
You can introduce some text into this file and when you finish you can save it.
LEd will ask you about the location of the project and its components.
When the project is saved, you can compile it.
To do this, press the green arrow speed button or use a shortcut Ctrl+F9.
If it succeeds, you can see the DVI file in a built-in DVI viewer, which can be seen by moving the splitter pane at the right
side of the LEd’s window.
If some errors appear, you can see the compilation log in the lower part of the main window.
There is also a Message window (to see it, please use the splitter pane shown at the lower side of
the LEd’s window), which stores the messages from the compilation.
You only need to double click the error message to move to this line of the source text in the editor.
Another project
To create a project which is not based on a template please choose from the menu File\New and select
the Projects tab.
Here you should select TeX/LaTeX — Project description file, give the project a name,
select a location, and press OK.
Now, you should choose from the menu File\New one more time and select
the Files tab.
Then, you should select TeX/LaTeX document, mark Add to project, choose
the project you created, give the file a name, and press OK.
Then, you can follow the same directions given in the previous section.
What next?
Now you can start writing your documents, and exploring LEd’s features which are not described here.
We are writing more detailed documentation of LEd, but unfortunately, you have to be patient, for it is in an early stage.
If you need some assistance with LaTeX, please visit our links page, where
a number of interesting books and documents are presented.
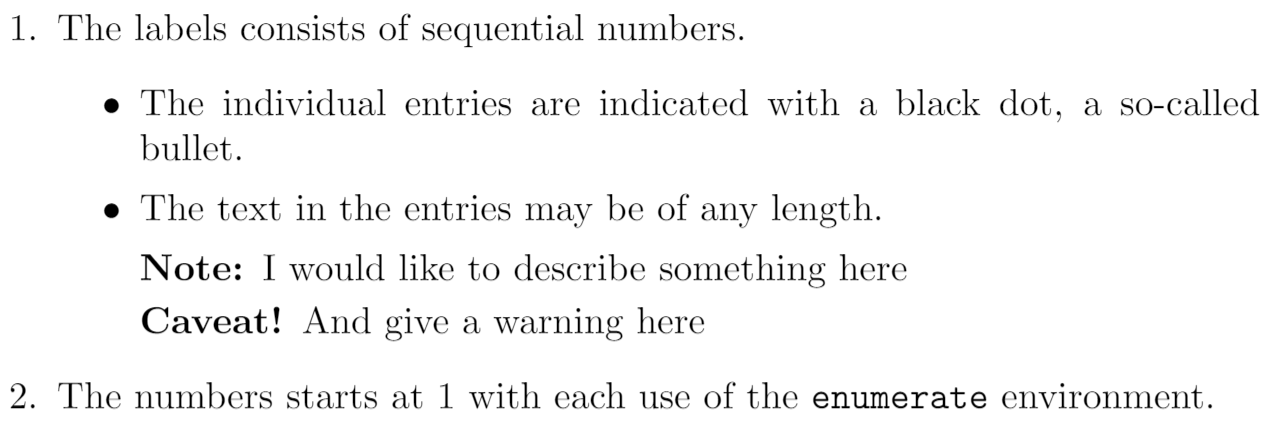
Nested lists
In LaTeX you can insert a list inside another list. The above list types may be included within one another, either mixed or of one type, to a depth of 4 levels.
\begin{enumerate}
   \item The labels consists of sequential numbers
   \begin{itemize}
     \item The individual entries are indicated with a black dot, a so-called bullet
     \item The text in the entries may be of any length
     \begin{description}
     \item I would like to describe something here
     \item And give a warning here
     \end{description}
   \end{itemize}
   \item The numbers starts at 1 with each use of the \texttt{enumerate} environment
\end{enumerate}
This example produces the following output:
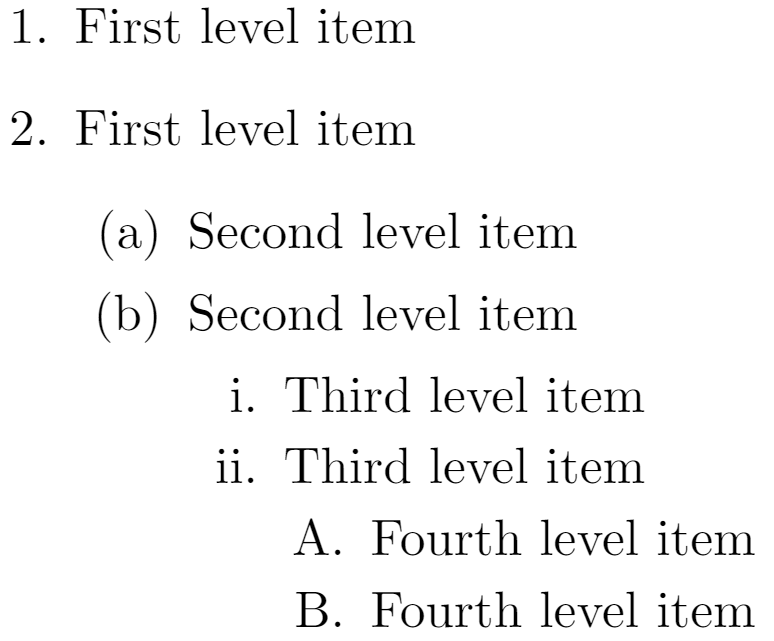
Nested lists: label style
The label style of nested list entries changes according to its depth in the list. For nested lists the bullet type changes; for lists the number format changes with increasing depth of entry. Both are limited to a depth of 4 levels.
Nested lists: number format
\begin{enumerate}
   \item First level item
   \item First level item
   \begin{enumerate}
     \item Second level item
     \item Second level item
     \begin{enumerate}
       \item Third level item
       \item Third level item
       \begin{enumerate}
         \item Fourth level item
         \item Fourth level item
       \end{enumerate}
     \end{enumerate}
   \end{enumerate}
 \end{enumerate}
This example produces the following output:
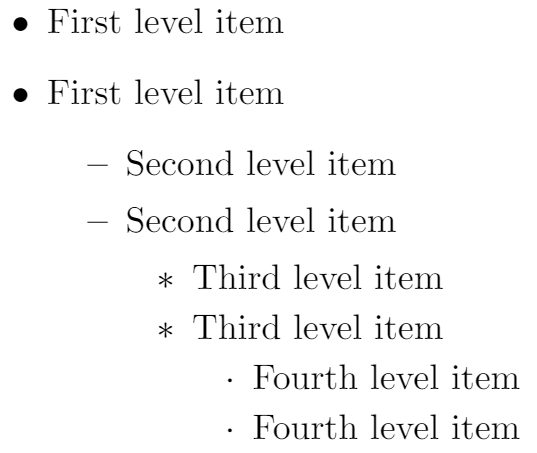
Nested lists: bullet style
The bullet style changes depending on the depth of the nested lists:
\begin{itemize}
   \item First level item
   \item First level item
   \begin{itemize}
     \item Second level item
     \item Second level item
     \begin{itemize}
       \item Third level item
       \item Third level item
       \begin{itemize}
         \item Fourth level item
         \item Fourth level item
       \end{itemize}
     \end{itemize}
   \end{itemize}
 \end{itemize}
This example produces the following output: