Getting started with github desktop
Содержание:
- Why Go? Why not Node?
- GitHub Actions
- Part 3: Exploring GitHub Desktop
- Install Git on Mac
- GitHub’s Logos
- Practice: Use GitHub Desktop and an editor to make a change from your computer
- Создание ветки
- Part 1: Installing and authenticating
- Скачивание через qBittorrent
- Overview
- How to use Wrapper
- Создаём новый репозиторий
- Ветки
- Repositories
- Сервис для хостинга проектов GitHub
- Заключение
Why Go? Why not Node?
I chose Go because it is cross-platform, felt like less overhead than Java, has been around longer than most people think. Plus, I wanted to experiment with it. I’ve been asked why I didn’t write it with Node. Trying to write a tool with the tool you’re trying to install doesn’t make sense to me. As a result, my project requirements for this were simple… something that’s not Node. Node will continue to evolve and change. If you need a reminder of that, remember io.js, Ayo, all the breaking changes between 4.x.x and 6.x.x, and the shift to ES Modules in 12+. Change is inevitable in the world of software. JavaScript is extremely dynamic.
GitHub Actions
Create a GitHub Action and use it in a workflow.
GitHub Actions
Workflows
Hello World
GitHub Actions: Continuous Integration
Learn how to create workflows that enable you to use Continuous Integration (CI) for your projects.
GitHub Actions
Workflows
CI
Continuous Integration
Integration
GitHub Actions: Publish to GitHub Packages
This course will walk you through using GitHub Actions to get your code in a deployable state once your CI workflows have completed.
GitHub Actions
GitHub Packages
Deployment
Workflows
Docker
GitHub Actions: Continuous Delivery with Azure
Create two deployment workflows using GitHub Actions and Microsoft Azure.
GitHub Actions
Microsoft Azure
Workflows
CD
Deployment
GitHub Actions: Writing JavaScript Actions
Learn how to write your own GitHub JavaScript Action! This course will empower you to begin automating customized tasks unique to your workflow.
JavaScript
API
Actions toolkit
GitHub Secrets
Workflows
GitHub Actions: Write Docker container actions
Learn how to write your own GitHub Docker container action! This course will empower you to begin automating customized tasks unique to your workflow.
Docker
Containers
Workflows
Application programming interface (API)
Publishing GitHub Actions
GitHub Actions: Using GitHub Script
This course covers how to use GitHub Script to quickly use octokit/rest in a GitHub Actions workflow.
GitHub Actions
Octokit
Workflow
Automation
Application programming interface (API)
Part 3: Exploring GitHub Desktop
In the file menu at the top of the screen, you can access settings and actions that you can perform in GitHub Desktop. Most actions also have keyboard shortcuts to help you work more efficiently. For a full list of keyboard shortcuts, see «Keyboard shortcuts.»
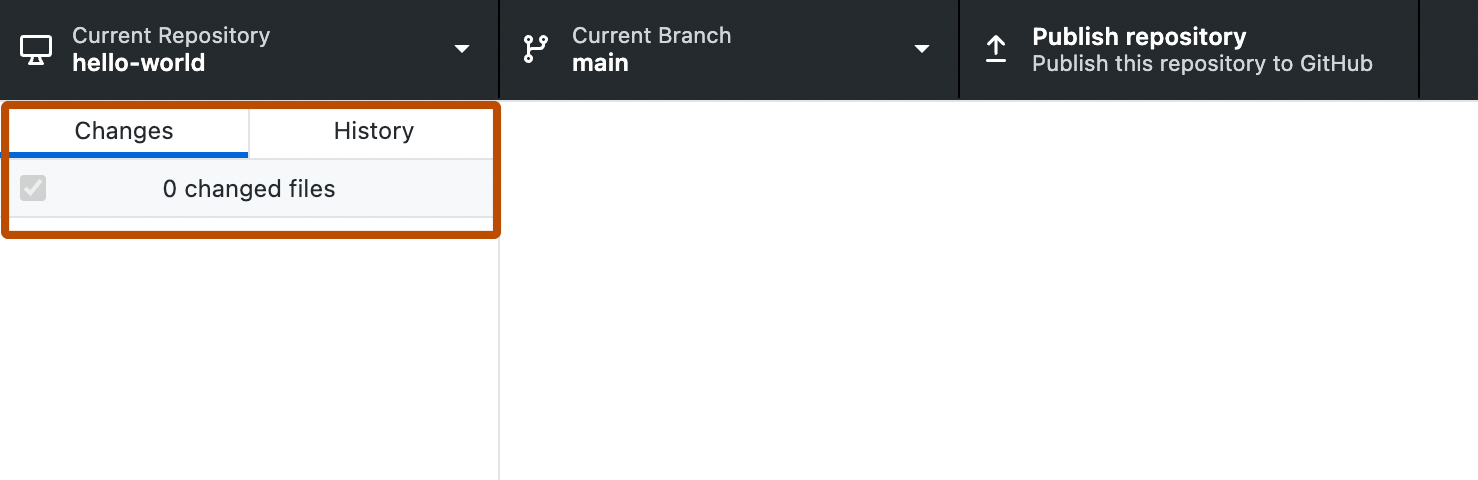
At the top of the GitHub Desktop app, you will see a bar that shows the current state of your repository.
-
Current repository shows the name of the repository you’re working on. You can click Current repository to switch to a different repository in GitHub Desktop.
-
Current branch shows the name of the branch you’re working on. You can click Current branch to view all the branches in your repository, switch to a different branch, or create a new branch. Once you create pull requests in your repository, you can also view these by clicking on Current branch.
-
Publish repository appears because you haven’t published your repository to GitHub yet, which you’ll do later in the next step. This section of the bar will change based on the status of your current branch and repository. Different context dependent actions will be available that let you exchange data between your local and remote repositories.
Changes and History
In the left sidebar, you’ll find the Changes and History views.
-
The Changes view shows changes you’ve made to files in your current branch but haven’t committed to your local repository. At the bottom, there is a box with «Summary» and «Description» text boxes and a Commit to BRANCH button. This is where you’ll commit new changes. The Commit to BRANCH button is dynamic and will display which branch you’re committing your changes to.
-
The History view shows the previous commits on the current branch of your repository. You should see an «Initial commit» that was created by GitHub Desktop when you created your repository. To the right of the commit, depending on the options you selected while creating your repository, you may see .gitattributes, .gitignore, LICENSE, or README files. You can click each file to see a diff for that file, which is the changes made to the file in that commit. The diff only shows the parts of the file that have changed, not the entire contents of the file.
Install Git on Mac
Most versions of MacOS will already have installed, and you can activate it through the terminal with . However, if you don’t have Git installed for whatever reason, you can install the latest version of Git using one of several popular methods as listed below:
Install Git From an Installer
- Navigate to the latest macOS Git Installer and download the latest version.
- Once the installer has started, follow the instructions as provided until the installation is complete.
- Open the command prompt «terminal» and type to verify Git was installed.
Note: is a popular and recommended resource for downloading Git on a Mac. The advantage of downloading Git from is that your download automatically starts with the latest version of Git. The download source is the same macOS Git Installer as referenced in the steps above.
Install Git from Homebrew
Homebrew is a popular package manager for macOS. If you already have Homwbrew installed, you can follow the below steps to install Git:
- Open up a terminal window and install Git using the following command: .
- Once the command output has completed, you can verify the installation by typing: .
GitHub’s Logos
The license grant included with the Software is not for GitHub’s
trademarks, which include the Software logo designs. GitHub reserves
all trademark and copyright rights in and to all GitHub trademarks.
GitHub’s logos include, for instance, the stylized designs that
include «logo» in the file title in the «logos» folder.
The names GitHub, GitHub Desktop, GitHub for Mac, GitHub for
Windows, Atom, the Octocat, and related GitHub logos and/or stylized
names are trademarks of GitHub. You agree not to display or use
these trademarks in any manner without GitHub’s prior, written
permission, except as allowed by GitHub’s Logos and Usage Policy: https://github.com/logos.
Practice: Use GitHub Desktop and an editor to make a change from your computer
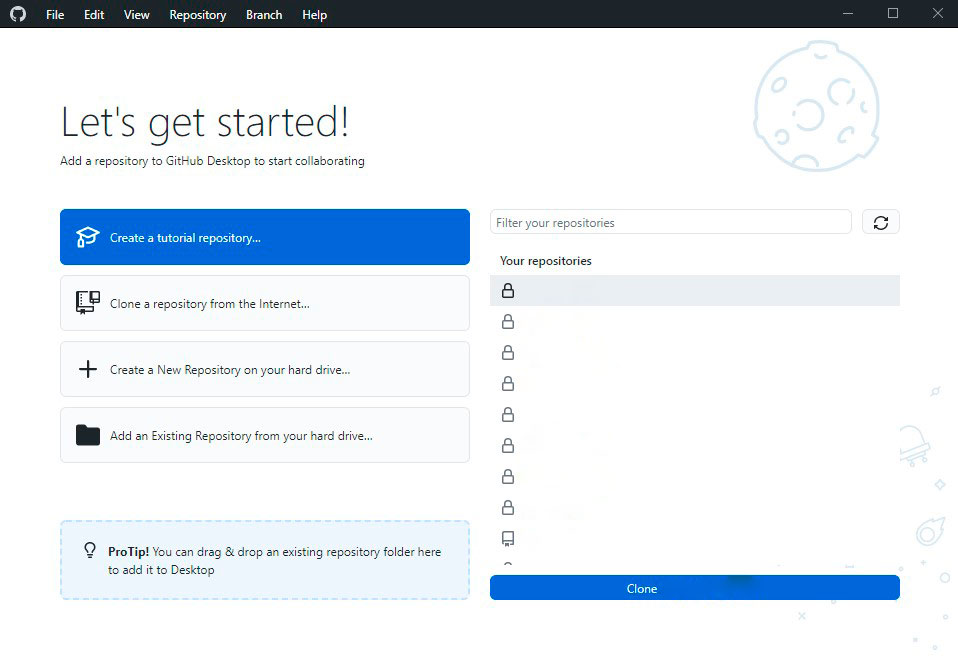
Start by downloading GitHub Desktop if you haven’t already done so, and install it on your computer. Go through the GitHub Desktop onboarding steps, and when you get to the “Let’s get started” screen, go ahead and choose the repository you were just working with on GitHub.com, and click “Clone.”
Using an editor to make changes
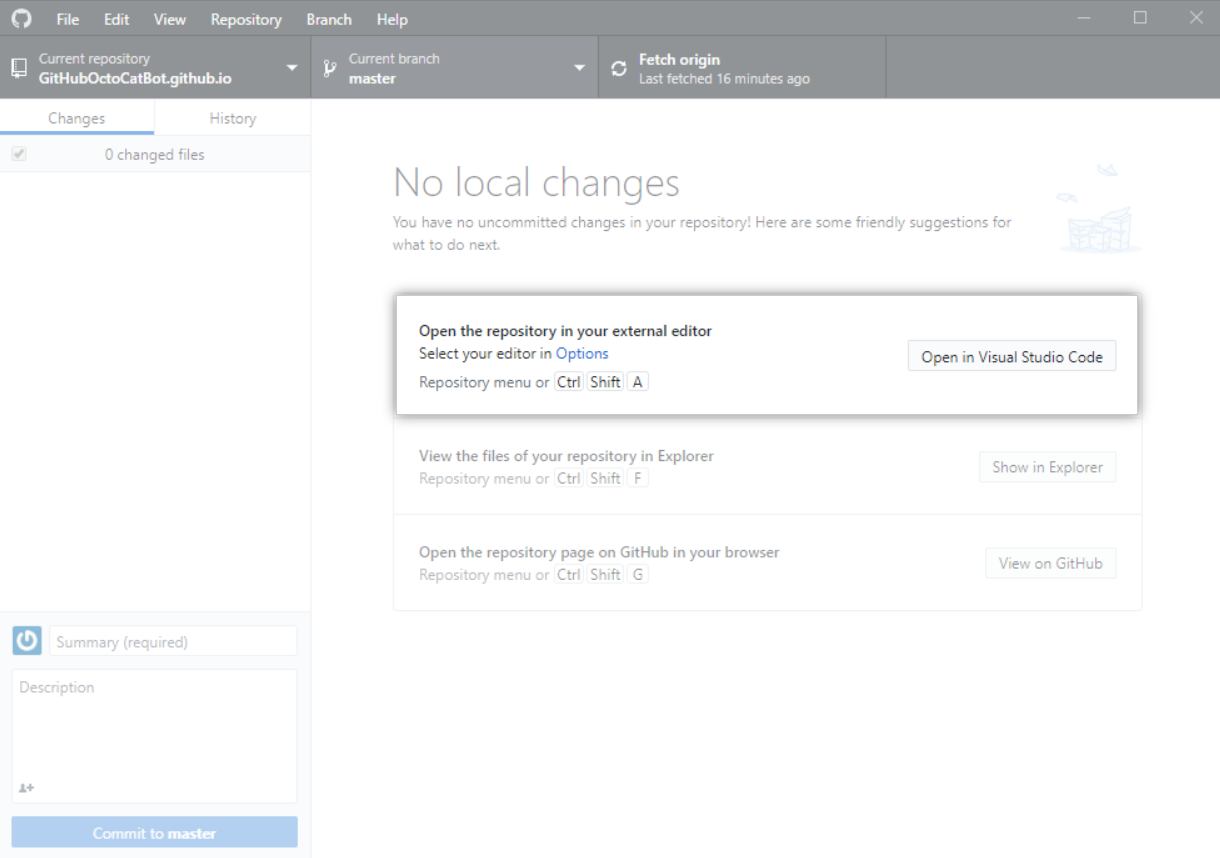
Let’s make a change to your GitHub Pages site, just like you did on GitHub.com, except this time we’re going to do it all from your computer. From GitHub Desktop, click the “Open in…” button in the middle of the screen to “open the repository in your external editor” that you just downloaded.
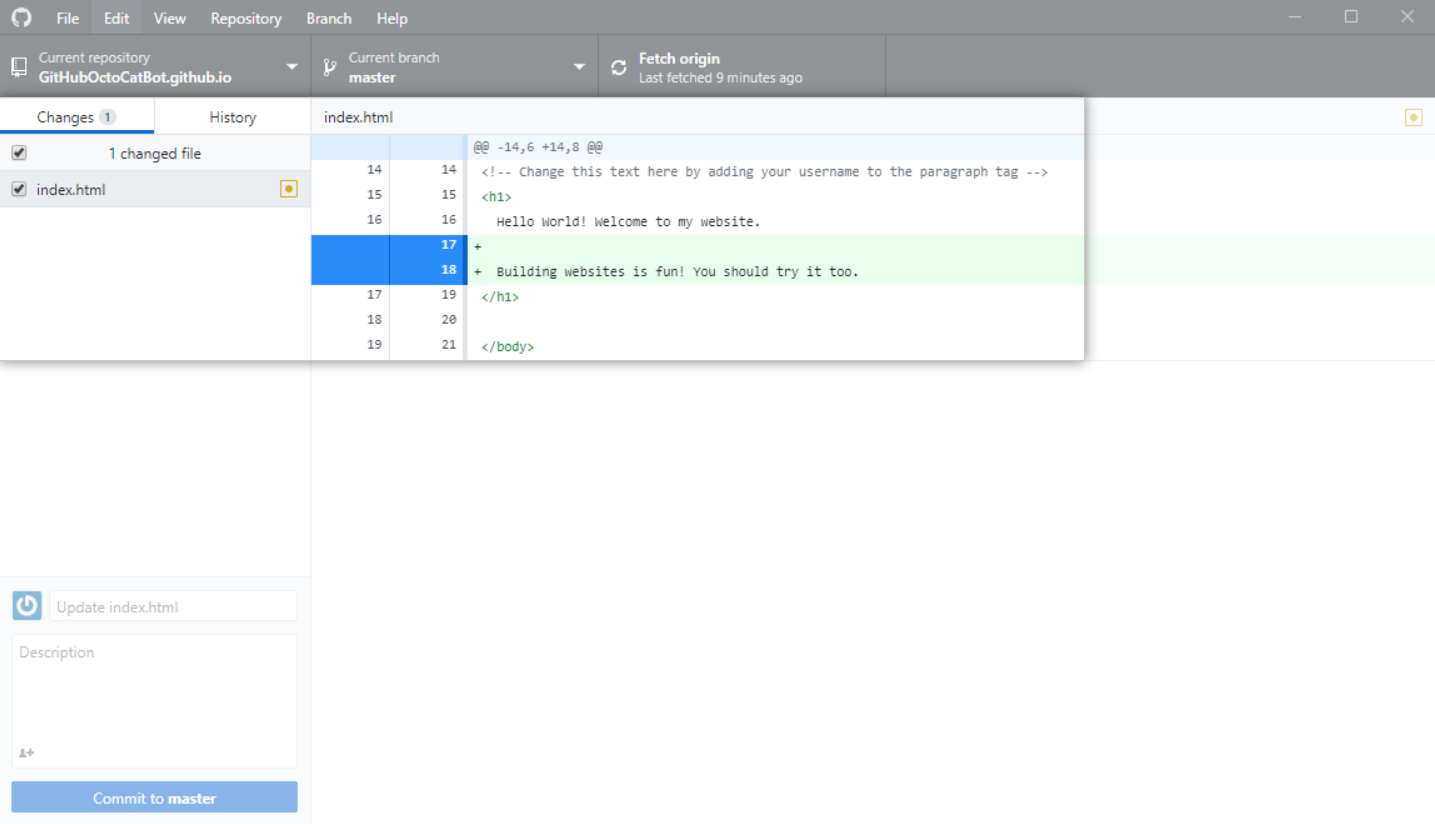
In the left sidebar, click the file to open it, and go ahead and add another line. Maybe, “Building websites is fun! You should try it too!” or whatever you want to add.

Now switch back to GitHub Desktop, and you should see the change you made.
Commit your changes
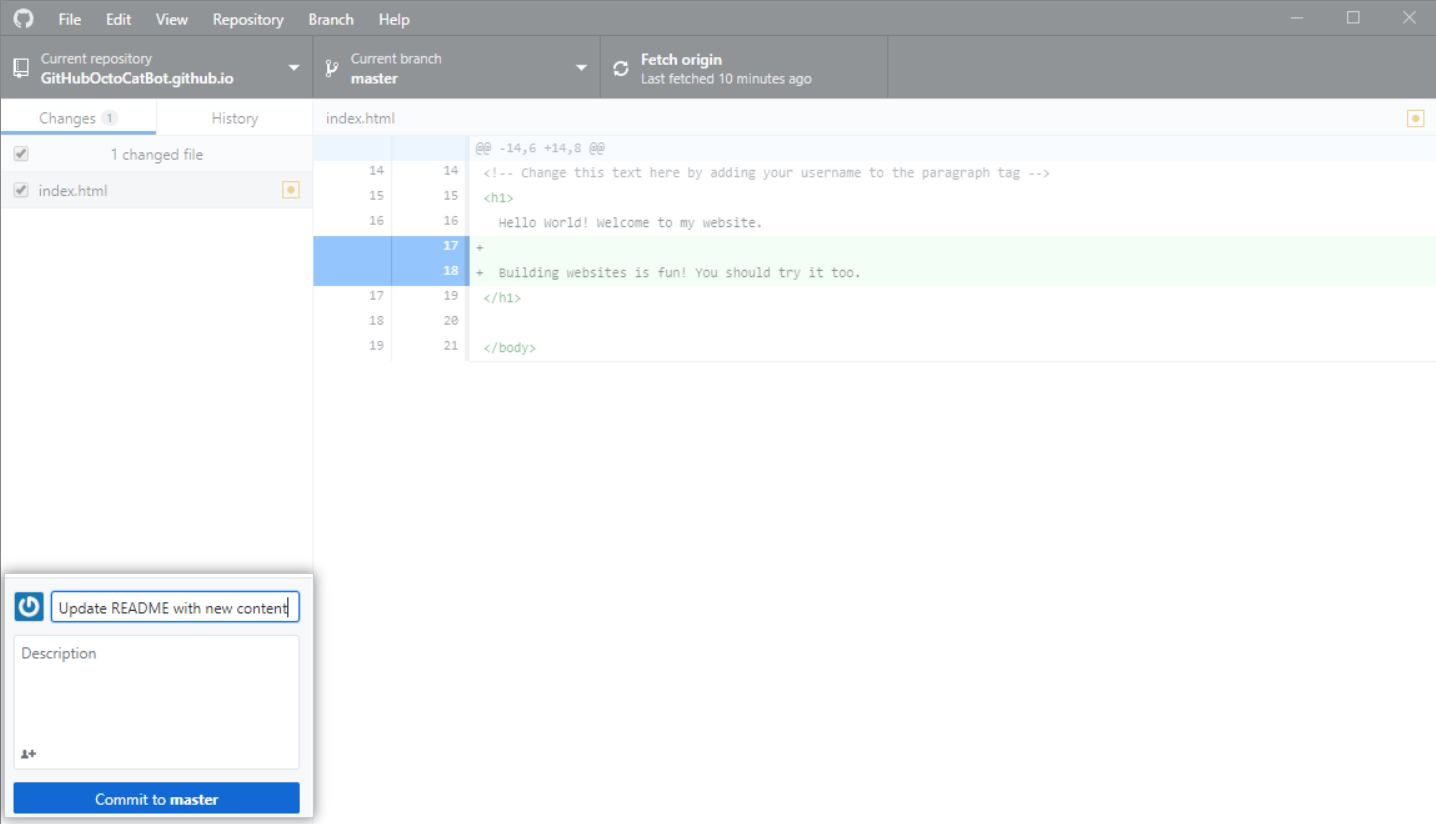
Now you can commit your changes by typing a message in the box at the bottom left, and then click the blue button below that.
Push your changes to GitHub.com
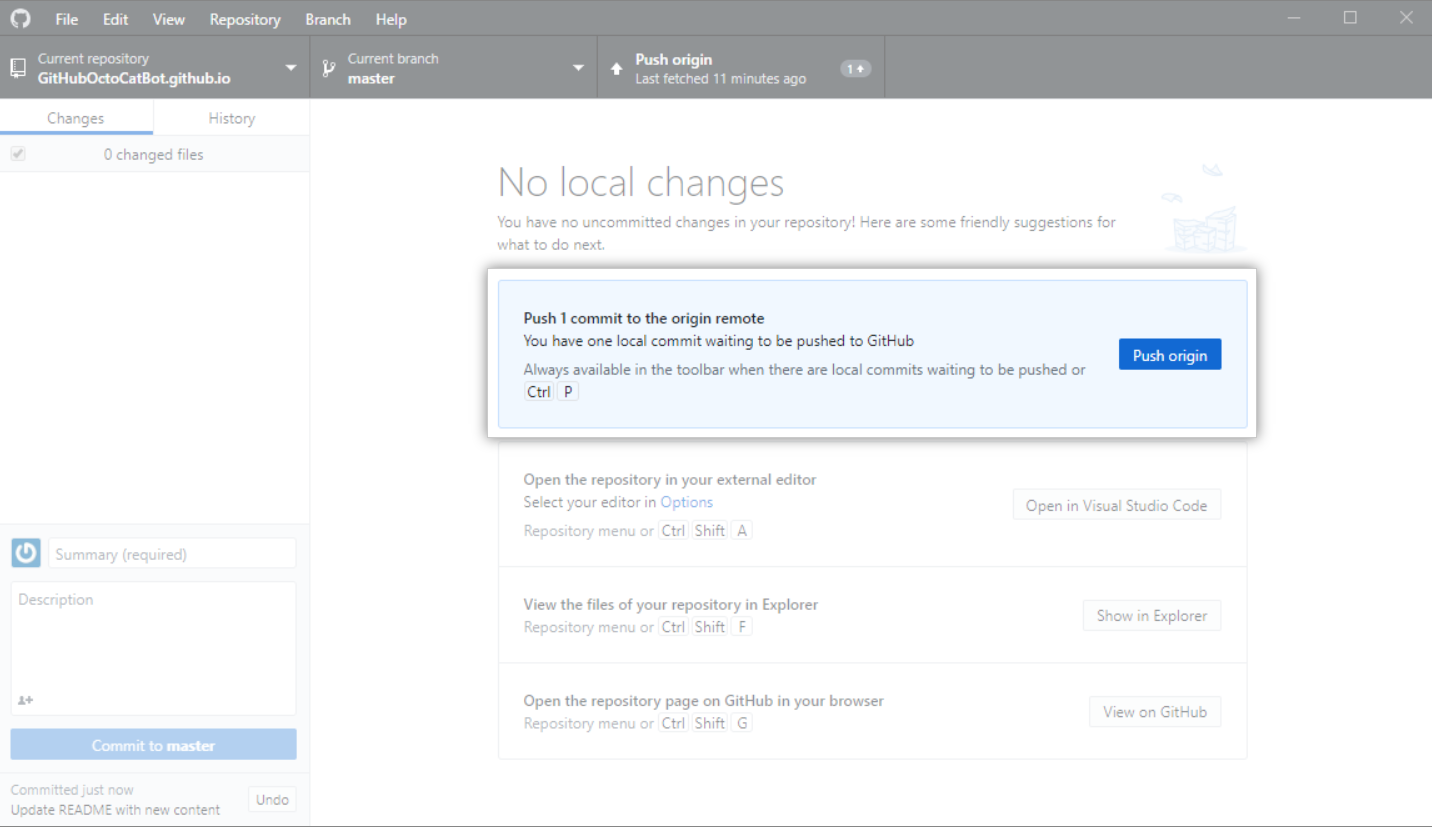
One of the great things about working on things on your computer is that you get to control when other people see them. Now let’s push your commit to GitHub.com as well so it’s saved there and you can publish it to your site. Click the “Push origin” button to push your commit to GitHub.com.
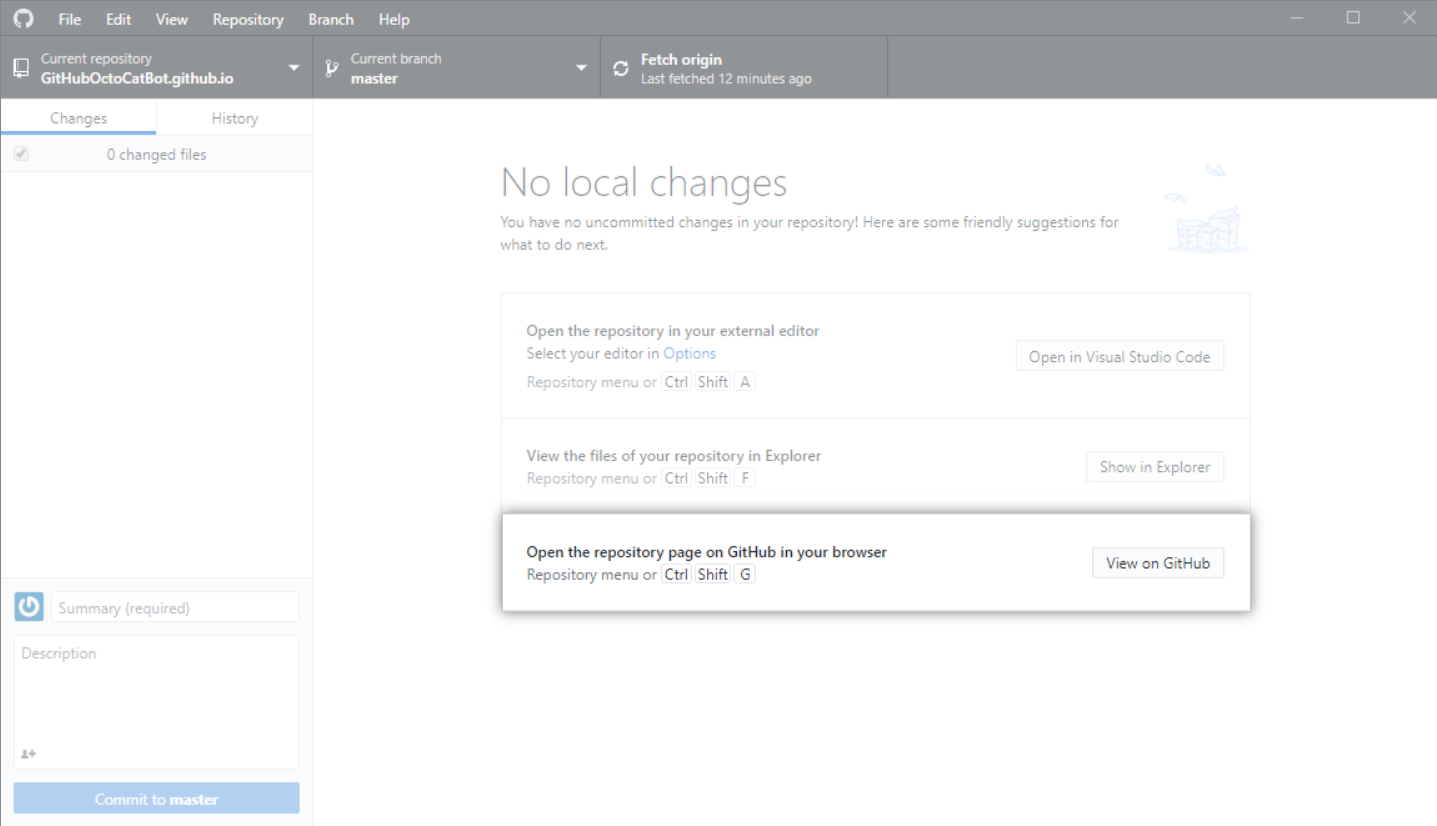
Now click the “View on GitHub” button to get back to your repository’s page on GitHub.com.
Deploy and see your changes live on your GitHub Pages website!
Once you commit your changes, they are automatically published on your GitHub Pages website. Refresh your browser to see it live!
Celebrate!
Hooray! Now you have your repository linked between your computer and GitHub.com. In the future, you can use GitHub Desktop to push any changes you decide to make from your computer.
Создание ветки
Теперь создадим ветку, внесем изменения и посмотрим как влияют изменения на ветку.
В GitHub Desktop переходим в Branch > New Branch и создаем новую ветвь. Назовем ее «development» и нажмем Create Branch.
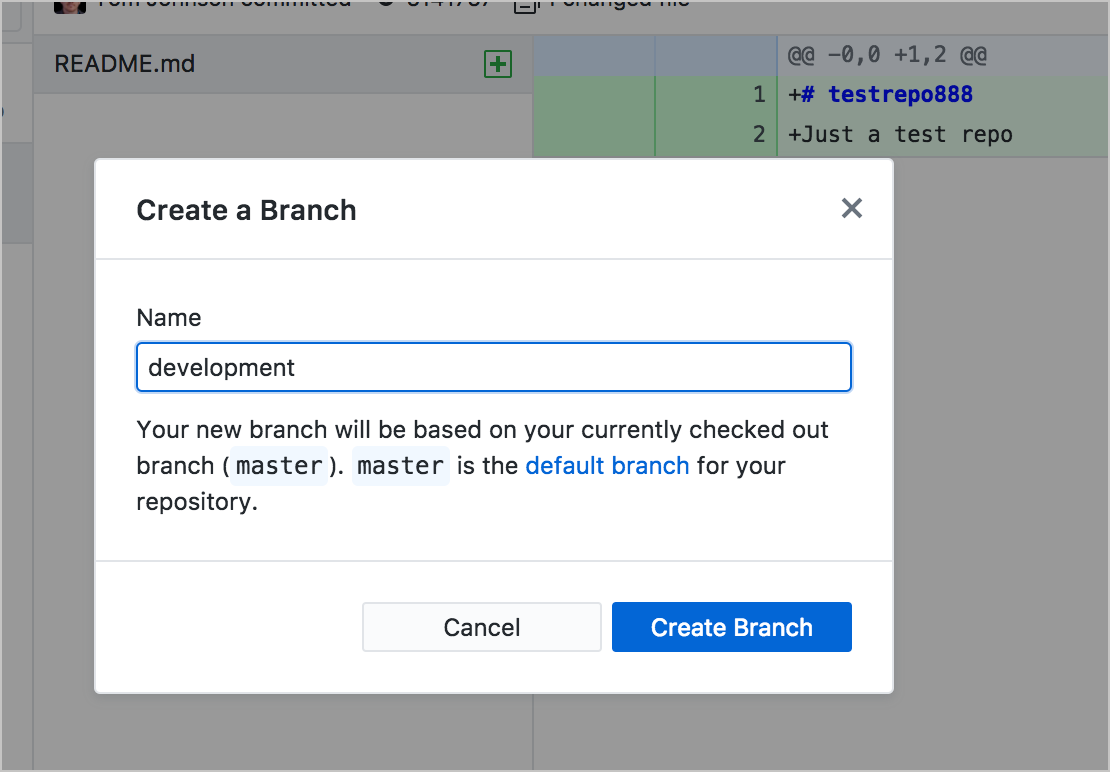 Создание новой ветки
После создания ветки, в центре раскрывающееся меню будет указывать на ту ветку, в которой мы работаем. Создание ветки копирует существующий контент (из ветки master) в новую ветку (development).
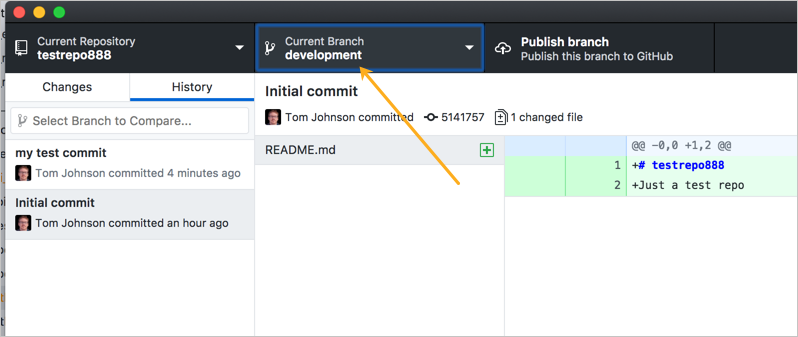 Работа с ветками
Откроем файл, которые ранее создали и внесем в него изменения, например добавим новую строку с текстом
Сохраним изменения.
Вернемся в GitHub Desktop и обратим внимание, что на вкладке «Changes» у нас появились новые измененные файлы.
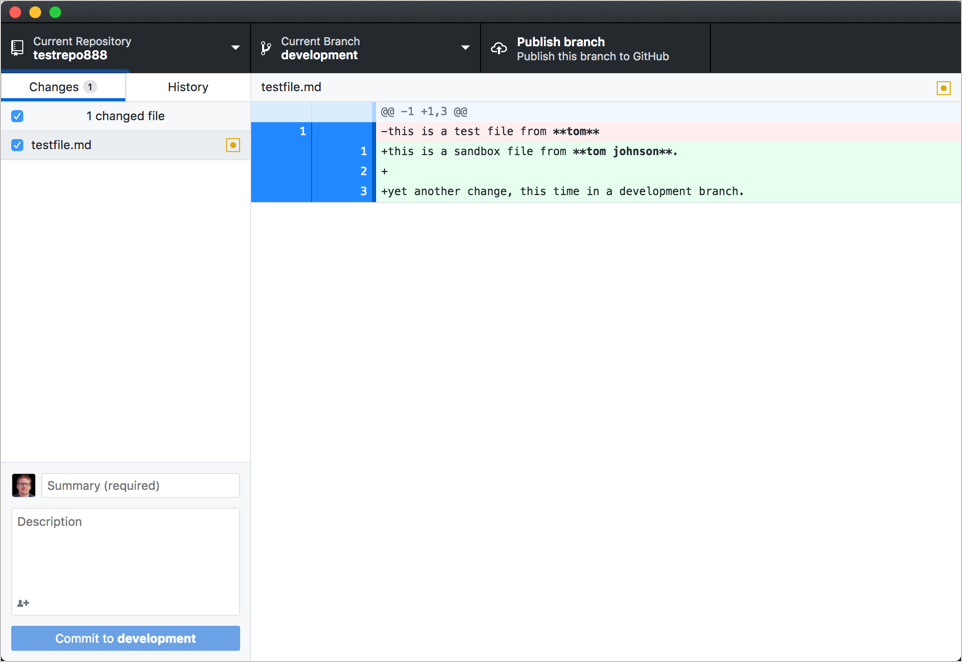
Изменения в файле показывают удаленные строки красным и новые строки зеленым цветом. Цвета помогают увидеть, что изменилось.
Закоммитим изменения в левом нижнем углу и кликнем на Commit to development.
Нажимаем Publish branch (в верхней части окна GitHub Desktop), чтобы сделать локальную ветку также доступной в Origin (GitHub). (Всегда существует две версии ветки: локальная версия и удаленная версия.)
Вернемся в основную ветку (выбираем master в раскрывающемся меню). Затем посмотрим на свой файл (в текстовом редакторе)
Стоит обратить внимание, что изменения, внесенные нами во время редактирования в ветке , не отображаются в основной ветке.
Обычно новую ветку создают, когда вносят значительные изменения в контент. Например, нужно обновить раздел («Раздел X») в своих документах. Возможно, опубликовать другие обновления не нужно, прежде чем публиковать подробные изменения в Разделе X. Если работа была в той же ветке, было бы сложно выборочно загружать обновления для нескольких файлов за пределами Раздела X без отправки обновлений, которые сделали к файлам в разделе Х.
Посредством ветвления можно ограничить свои изменения конкретной версией, которая не запускается, пока не будут готовы изменения к объединению с master веткой.
Part 1: Installing and authenticating
You can install GitHub Desktop on any supported operating system. For more information, see «Supported operating systems.»
To install GitHub Desktop, visit the download page for GitHub Desktop. For more information, see «Installing GitHub Desktop.»
After you have installed GitHub Desktop, you can authenticate the application with your account on GitHub or GitHub Enterprise. Authenticating allows you to connect to remote repositories on GitHub or GitHub Enterprise.
-
Before you can authenticate to GitHub or GitHub Enterprise, you will need an account. For more information about creating an account, see «Signing up for a new GitHub account» or contact your GitHub Enterprise site administrator.
-
In the GitHub Desktop drop-down menu, click Preferences. In the preferences window, click Accounts and follow the steps to sign in. For more information on authenticating, see «Authenticating to GitHub.»
-
Before you can authenticate to GitHub or GitHub Enterprise, you will need an account. For more information about creating an account, see «Signing up for a new GitHub account» or contact your GitHub Enterprise site administrator.
-
In the File drop-down menu, click Options. In the options window, click Accounts and follow the steps to sign in. For more information on authenticating, see «Authenticating to GitHub.»
Скачивание через qBittorrent
При скачивании файлов есть опасность потратить свои BTT, они будут потрачены на ускорение скачивания.
Для предотвращения этого можно скачивать торрент другим клиентом и в автоматическом режиме передавать их в μTorrent/BitTorrent.
- Переходим в настройки QBittorrent: Сервис -> Настройки… -> Загрузки
- указываем Путь сохранения по умолчанию, это папка куда будут скачиваться торренты.
- указываем Копировать торрент-файлы завершенных загрузок в, сюда будут сохранены торрент файлы для передачи их в μTorrent/BitTorrent.
- Переходим в настройки QBittorrent: Сервис -> Настройки… -> BitTorrent
- В самом низу находим Ограничения раздачи
- Ставим галку По достижению рейтинга раздачи в значение: 0
- В пункте затем выбираем Остановить торрент
- Заходим в μTorrent Настройки -> Настройки программы
- указываем путь Помещать загружаемые файлы в как у QBittorrent.
- ставим галку у пункта Automatically load torrents from и указываем путь куда QBittorrent сохраняет торрент файлы.
Overview
Manage multiple installations of node.js on a Windows computer.
tl;dr Similar (not identical) to nvm, but for Windows. Has an installer. Download Now!
This has always been a node version manager, not an io.js manager, so there is no back-support for io.js. Node 4+ is supported. Remember when running or , Windows usually requires administrative rights (to create symlinks).

There are situations where the ability to switch between different versions of Node.js can be very useful. For example, if you want to test a module you’re developing with the latest bleeding edge version without uninstalling the stable version of node, this utility can help.

Installation & Upgrades
Uninstall any pre-existing Node installations!!
Uninstall any existing versions of Node.js before installing NVM for Windows (otherwise you’ll have conflicting versions). Delete any existing Node.js installation directories (e.g., ) that might remain. NVM’s generated symlink will not overwrite an existing (even empty) installation directory.
Backup any global config
(e.g. )
Alternatively, copy the settings to the user config . Delete the existing npm install location (e.g. ) to prevent global module conflicts.
Install nvm-windows
Use the latest installer (comes with an uninstaller). Alternatively, follow the guide.
If NVM4W doesn’t appear to work immediately after installation, restart the terminal/powershell (not the whole computer).

Reinstall any global utilities
After install, reinstalling global utilities (e.g. yarn) will have to be done for each installed version of node:
Upgrading nvm-windows
As of v1.1.8, there is an upgrade utility that will automate the upgrade process.
To upgrade nvm-windows, run the new installer. It will safely overwrite the files it needs to update without touching your node.js installations. Make sure you use the same installation and symlink folder. If you originally installed to the default locations, you just need to click «next» on each window until it finishes.
Usage
nvm-windows runs in an Admin shell. You’ll need to start or Command Prompt as Administrator to use nvm-windows
NVM for Windows is a command line tool. Simply type in the console for help. The basic commands are:
- : Show if node is running in 32 or 64 bit mode. Specify 32 or 64 to override the default architecture.
- : Display active version.
- : The version can be a specific version, «latest» for the latest current version, or «lts» for the most recent LTS version. Optionally specify whether to install the 32 or 64 bit version (defaults to system arch). Set to «all» to install 32 AND 64 bit versions. Add to the end of this command to bypass SSL validation of the remote download server.
- : List the node.js installations. Type at the end to show a list of versions available for download.
- : Enable node.js version management.
- : Disable node.js version management (does not uninstall anything).
- : Set a proxy to use for downloads. Leave blank to see the current proxy. Set to «none» to remove the proxy.
- : Uninstall a specific version.
- : Switch to use the specified version. Optionally use , , or . is the latest installed version. Optionally specify 32/64bit architecture. will continue using the selected version, but switch to 32/64 bit mode. For information about using in a specific directory (or using ), please refer to issue #16.
- : Set the directory where nvm should store different versions of node.js. If is not set, the current root will be displayed.
- **: Displays the current running version of NVM for Windows.
- : Set the node mirror.People in China can use
- : Set the npm mirror.People in China can use
️ Gotcha!
Please note that any global npm modules you may have installed are not shared between the various versions of node.js you have installed. Additionally, some npm modules may not be supported in the version of node you’re using, so be aware of your environment as you work.
Antivirus
Users have reported some problems using antivirus, specifically McAfee. It appears the antivirus software is manipulating access to the VBScript engine. See issue #133 for details and resolution.
tldr;
See the for details.
- Download source / Git Clone the repo
- Change GOARCH to amd64 in build.bat if you feel like building a 64-bit executable
- Fire up a Windows command prompt and change directory to project dir
- Execute
- Execute
- Execute
- Check the directory for generated setup program.
How to use Wrapper
- Download and expand the archive;
- Run and import Sophia.ps1;
- Configure every function;
- Open the tab and press .
How to run the specific function(s)
# With a dot at the beginning
. .\Functions.ps1
Now you can do like this (the quotation marks required)
Sophia -Functions <tab>
Sophia -Functions temp<tab>
Sophia -Functions unin<tab>
Sophia -Functions uwp<tab>
Sophia -Functions "DiagTrackService -Disable", "DiagnosticDataLevel -Minimal", UninstallUWPApps

UninstallUWPApps, "PinToStart -UnpinAll"
Or use an old-style format without the TAB functions autocomplete (the quotation marks required)
.\Sophia.ps1 -Functions CreateRestorePoint, "ScheduledTasks -Disable", "WindowsCapabilities -Uninstall"
Создаём новый репозиторий
Создаём у себя на компьютере (например, на диске C:) папку projects, где локально будут храниться все наши репозитории.
Переходим в Github Desktop, нажимаем на начальном экране “Create a New Repository on your hard drive…“ или File > New Repository
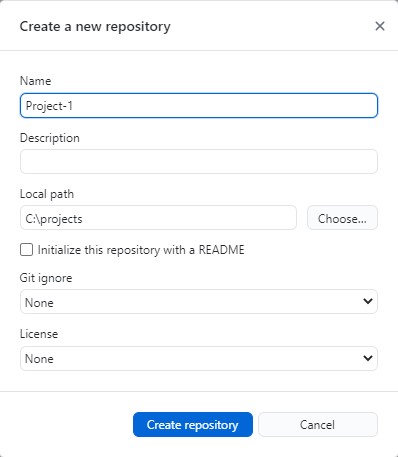
В открывшемся окне в поле Name пишем название репозитория. В поле Description — описание репозитория, если необходимо. В Local Path выбираем созданную на диске C: папку projects, остальное оставляем по-умолчанию и нажимаем “Create repository”
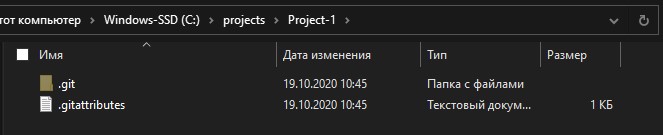
В папке projects появился репозиторий Project-1

В репозитории Project-1 на данный момент находятся только необходимые служебные файлы Git.
На данный момент репозиторий расположен только локально на компьютере в папке Project-1. Чтобы репозиторий появился в аккаунте GitHub и хранился там, нажимаем “Publish repository”
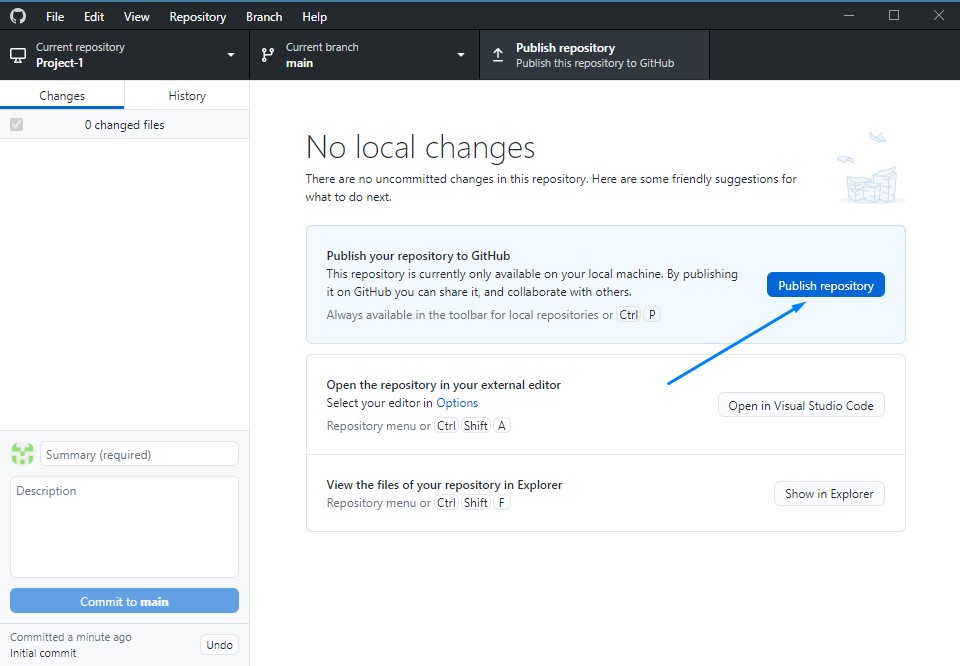
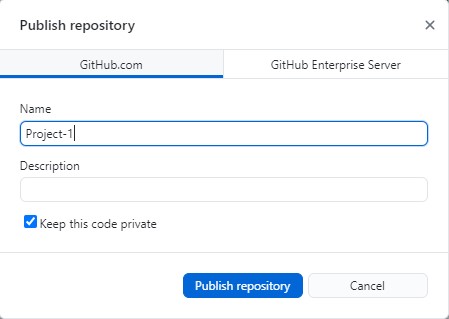
В появившемся окне оставляем все по-умолчанию. Пункт “Keep this code private” оставляем отмеченным, чтобы репозиторий, пока что, был виден только нам, потом в любой момент репозиторий можно будет сделать открытым, чтобы его видели другие пользователи GitHub. Нажимаем “Publish repository”
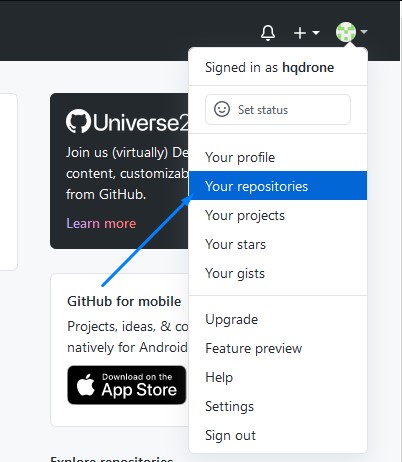
Теперь репозиторий скопирован в аккаунт GitHub. Переходим в браузере на GitHub. Сверху справа нажимаем на круглую иконку аккаунта и выбираем пункт “Your repositories”
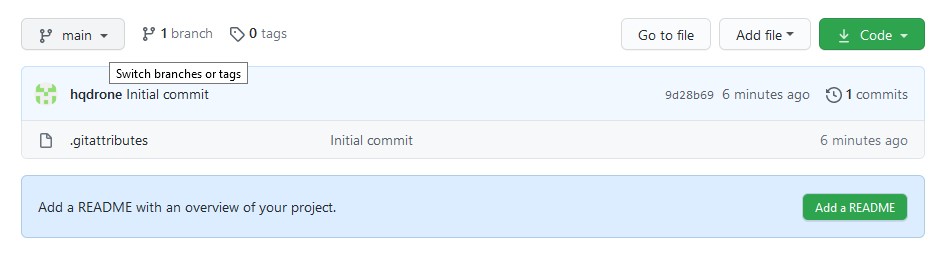
На странице наших репозиториев появился созданный репозиторий Project-1

Откроем страницу репозитория, нажав на название репозитория в списке. На данный момент в репозитории только служебные файлы.
Создадим на компьютере в папке Project-1 файл index.html и напишем в нем минимальную разметку.
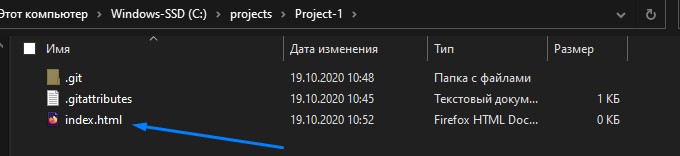
На данный момент файл index.html расположен только локально в папке Project-1. Локальная система Git, которая была создана вместе с репозиторием, об этом файле ничего не знает.
Чтобы Git узнала, что в репозиторий добавился файл, необходимо сообщить это через команду Commit.
Commit — фиксирование текущего состояния файлов, звучит как коммит.
Коммитам необходимо давать названия.
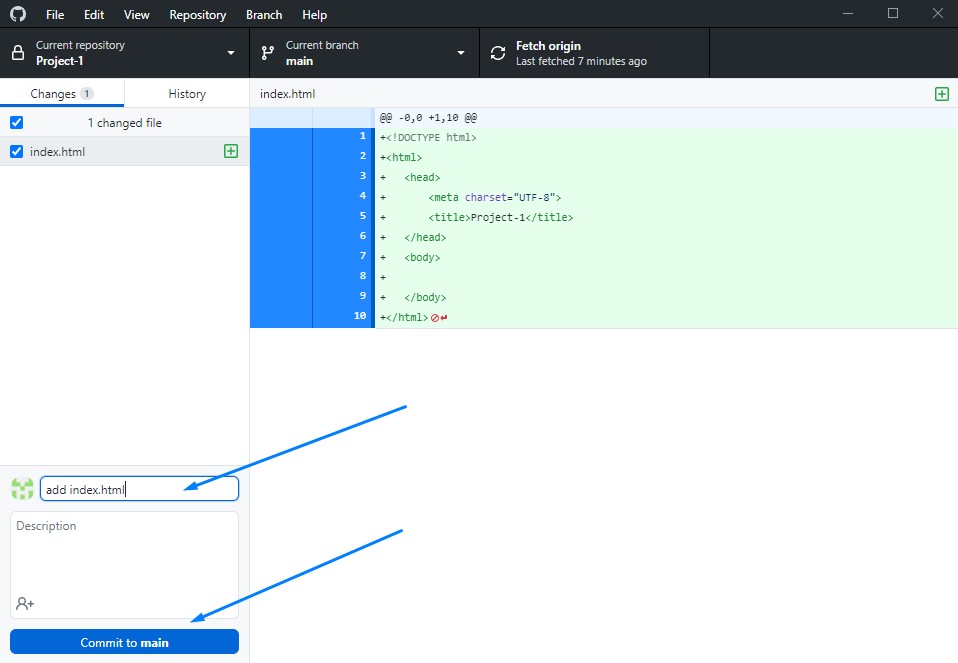
Откроем Github Desktop. Во вкладке Changes видим созданный index.html.
Вводим в поле ниже название коммита — . Затем нажимаем “Commit to main”, чтобы зафиксировать данное состояние файлов в локальную систему Git. (На данный момент не будем углубляться в ветвление Git)
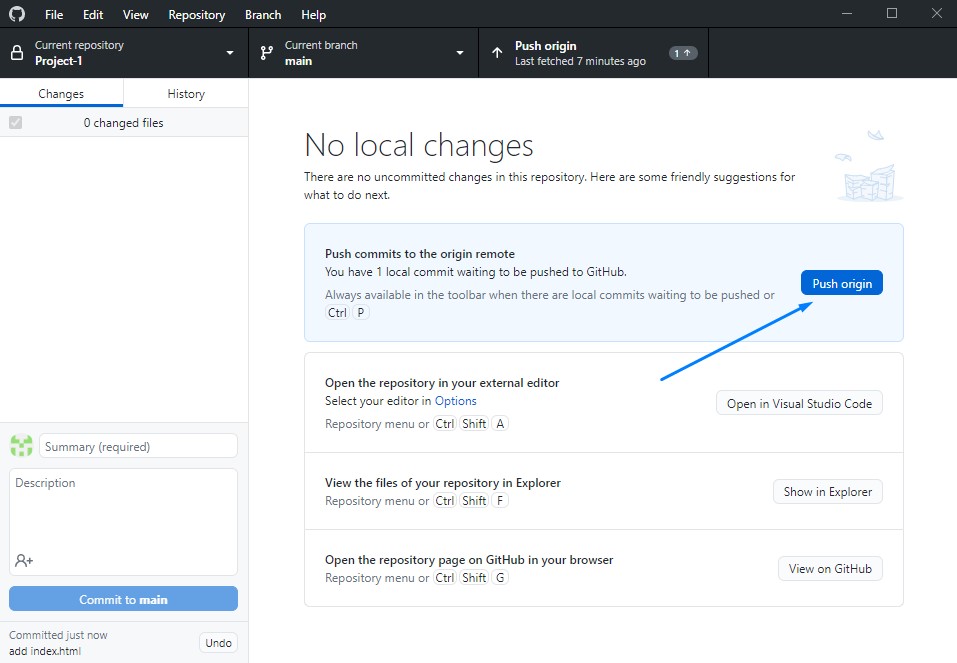
На данный момент мы зафиксировали файлы в текущем состоянии и сделали запись об этом в локальную систему Git.
Далее, чтобы передать изменения в репозиторий на GitHub, нажимаем “Push origin”
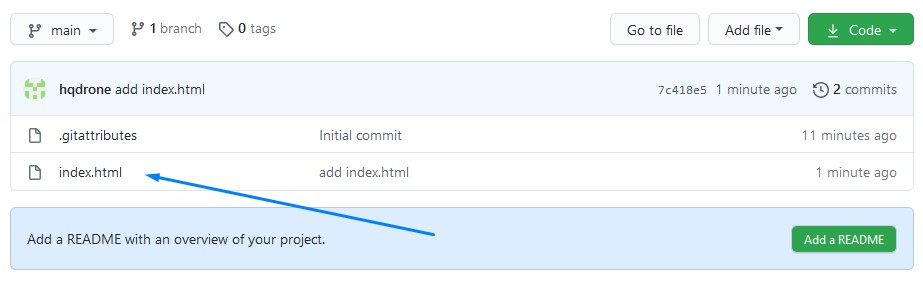
Переходим в наш репозиторий на GitHub и убеждаемся, что файл index.html был добавлен
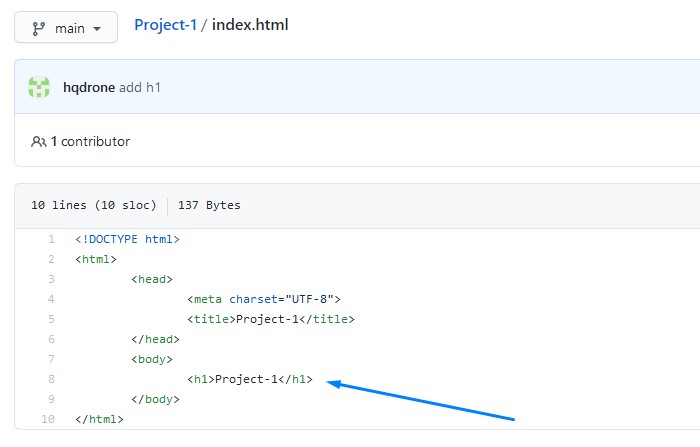
Далее внесем изменения в файл index.html — добавим заголовок
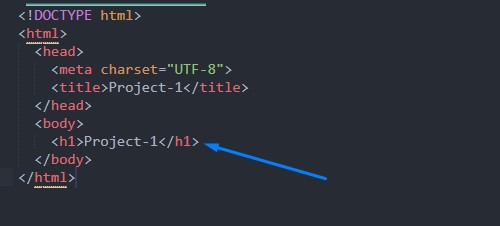
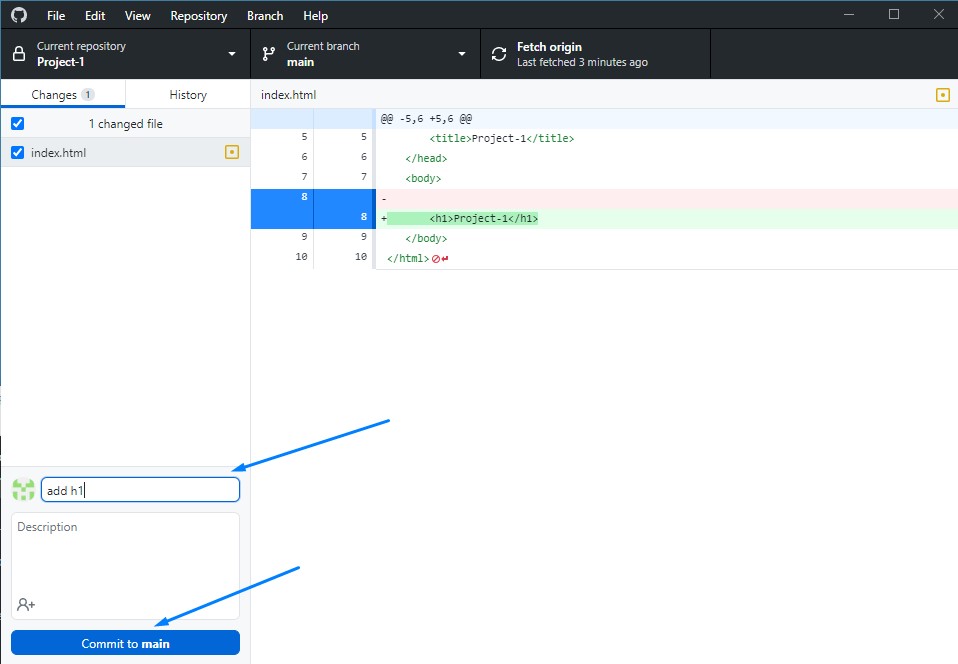
Переходим в GitHub Desktop, видим что index.html был изменен, вводим название нового коммита — и нажимаем “Commit to main”
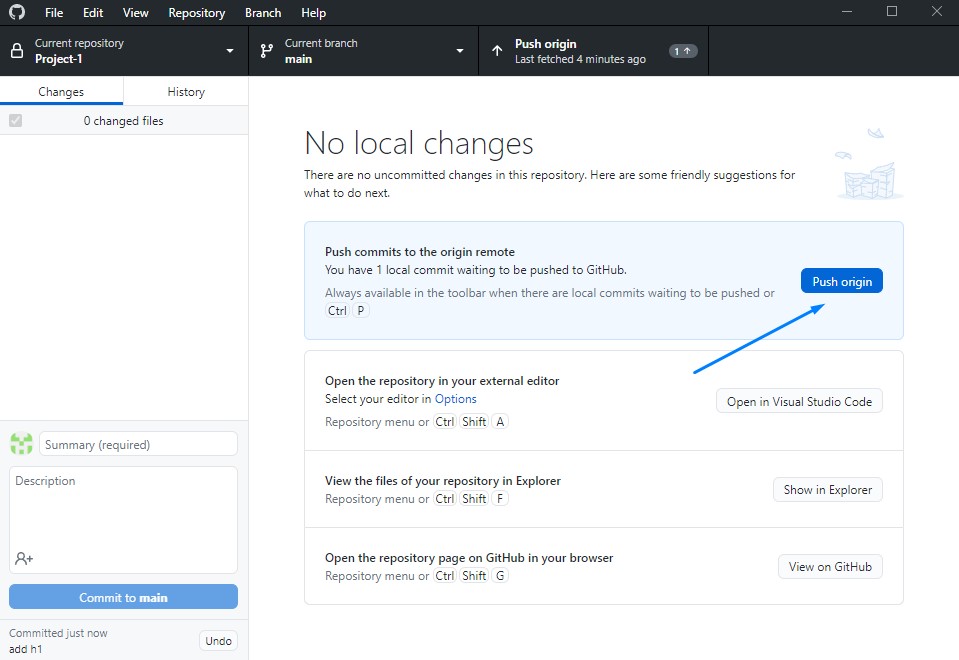
И снова передаем изменения в репозиторий на GitHub — нажимаем “Push origin”
Видим, что index.html был изменен при коммите
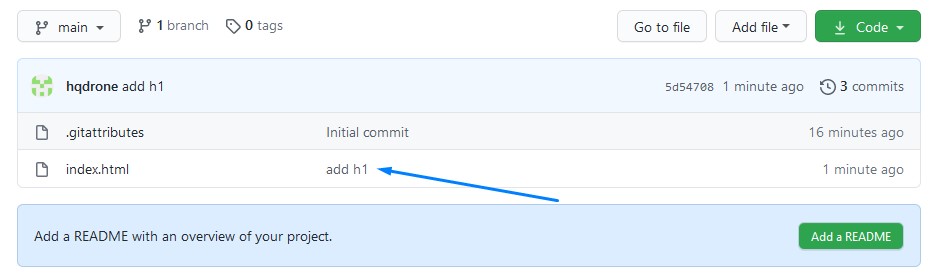
Нажав на название файла index.html, убеждаемся что заголовок добавлен
На данный момент умеем создать репозиторий, делать коммиты, и передавать на GitHub
Далее рассмотрим работу с GitHub Desktop с нескольких рабочих мест
Ветки
В git есть понятие branch (ветка). Ветка — это покоммитный “путь” до некоторого коммита, называемого “концом” (tip) ветки. Мы можем иметь несколько независимых веток при работе. Коммит делается в конкретную ветку, по умолчанию это ветка master. Создать новую ветку можно как на сайте, так и в приложении GitHub Desktop. Для этого нужно выбрать вкладку Current branch и нажать на New branch:

Выбираем имя и в эту ветку пойдет вся информация с ветки master (точнее, новая ветка будет “смотреть” на тот же коммит, что и master), в том числе и все файлы:

И теперь мы можем переключать ветки и вносить изменения в конкретную ветку, не затрагивая основную, в данном случае master. Например, мы удалим один файл, и изменим другой. Удалённый файл будет отмечен красным минусом, а изменённый — желтой точкой. При этом справа видно, что мы работаем в ветке Features.

Делаем коммит в новую ветку и смотрим, что произошло. Как мы видим, в ветке master всё осталось, как прежде. Она по прежнему указывает на тот же коммит, что и раньше.

А вот в ветке Features удалённого файла уже нет. Переключить ветку можно, нажав на кнопку Branch с названием ветки:

Ветки удобно использовать для добавления новых функция, что они не ломали рабочий код до новой функции. После разработки ветку можно объединить с master (merge, смёржить, слить) сделав так называемый Pull request.
Repositories
Right now, we’re in your first GitHub repository. A repository is like a folder or storage space for your project. Your project’s repository contains all its files such as code, documentation, images, and more. It also tracks every change that you—or your collaborators—make to each file, so you can always go back to previous versions of your project if you make any mistakes.
This repository contains three important files: The HTML code for your first website on GitHub, the CSS stylesheet that decorates your website with colors and fonts, and the README file. It also contains an image folder, with one image file.
Сервис для хостинга проектов GitHub
Крупнейшим сервисом для хранения Git-проектов является GitHub.

Этот сервис позволяет размещать проекты любой сложности. В частности, на GitHub размещен исходный код ядра Linux.
В 2018 году Microsoft купила GitHub за 7,5 млрд долларов.
До апреля 2020 г. на GitHub можно было бесплатно размещать только открытые проекты.
Сейчас можно размещать бесплатно как открытые, так и закрытые проекты. На сервисе GitHub по состоянию на май 2021 г. было зарегистрировано 65 миллионов программистов.
На GitHub есть система звезд, которые выставляются репозиториям. По количеству звезд можно находить самые востребованные проекты.
Заключение
Чем больше использовать GitHub, тем больше опыта работы с нужными рабочими процессами. Git — это мощная платформа для совместной работы, в которой есть множество команд, рабочих процессов и функций, которые можно использовать для различных сценариев. Несмотря на разнообразие команд и рабочих процессов Git, наиболее используемые сценарии ограничены по объему и доступны для изучения без особых усилий. Довольно скоро такие рабочие процессы станут автоматическими.
Используемые в этом занятии команды в интерфейсе GitHub Desktop можно попробовать и в командной строке. Возможно, что командная строка понравится больше. Но GitHub Desktop может стать хорошей отправной точкой.