Установка, настройка и использование эмулятора dosbox в linux
Содержание:
- Подготовка
- Шаги
- Что такое DOSBox и для чего он нужен.
- Запускаем игры через DOSBox. Способ №1
- 1 Скачивание и установка DosBox
- Build DOSBox
- Disney Sound Source
- DOSBox-X supported platforms and releases
- Монтирование директорий как дисков в DosBox
- Alternate methods for running a game
- Файлы и папки DOSBox.
- Usage
- Features that DOSBox-X is unlikely to support at this time
- Подготовка
- Origin and history of the DOSBox-X project
- Other Useful features
- Contributing to DOSBox-X
- 2 Как открыть игру в DosBox
Подготовка
Естественно, сначала не забываем про такую мелочь, как установка эмулятора. В Linux дистрибутивах все как обычно банально и упрощено до одной строчки. На примере Ubuntu это делается при помощи терминала и строчки:
sudo apt-get install dosbox
Пользователи Windows и дистрибутивов, которые по какой-либо причине не могут установить DOSBox из репозитория, могут скачать нужный файл с официального сайта.
Дальше предлагаю сразу создать структуру каталогов, куда мы будем складывать игры. В принципе это не обязательно, если вы не планируете устанавливать много игр, но я предпочитаю делать так. На самом деле ничего сложного выдумывать не нужно: в корне одного из разделов жесткого диска, например на диске D в Windows или домашнем каталоге пользователя в Linux, создаем папку «DOSBox» и уже в ней создаем еще две папки — «Apps» если Вы планируете пользоваться приложениями и «Games«, непосредственно для игр.
Теперь пришло время скачать архив с игрой. Этот вопрос вы уже решаете сами, сайтов в интернете с таким добром полно. После скачивания распаковываете папку с игрой в каталог Games и можно приступать к ее запуску.
Шаги
Часть 2
Монтирование дисков
Ниже описаны способы монтирования дисков в DOSBox. Монтирование папки с играми позволит вам запускать игры, хранящиеся в этой папке. Монтирование компакт-диска позволит вам запускать игры с CD-диска. Монтирование образа диска (файл ISO) позволит вам открывать образы дисков.
-
1
Смонтируйте папку с играми. Не стоит монтировать весь жесткий диск в DOSBox — смонтируйте только папку с играми, которая будет играть роль виртуального жесткого диска.
- Введите mount C C:\DOSGAMES и нажмите ↵ Enter. Введите C: и нажмите ↵ Enter. Приглашение изменится на C:\>.
- В macOS введите соответствующий путь, например mount C ~/DOSGAMES
-
2
Смонтируйте CD-диск. Вставьте компакт-диск в оптический привод. Введите следующие команды:
- Введите mount D D:\ -t cdrom и нажмите ↵ Enter. Замените D:\ буквой вашего оптического привода. Введите D: и нажмите ↵ Enter. Приглашение изменится на D:\> и вы сможете работать с файлами на компакт-диске.
- cdrom нужно вводить строчными буквами.
-
3
Смонтируйте образ диска (ISO-файл).
Введите imgmount D C:\ImagePath\image.iso -t iso и нажмите ↵ Enter. Замените C:\ImagePath\image.iso на путь к вашему ISO-файлу.
Если у вас есть ISO-файл с играми, смонтируйте его и работайте с ним как с настоящим диском.
-
4
Смонтируйте образ диска (BIN/CUE-файл).
Введите imgmount D C:\ImagePath\image.cue -t iso и нажмите ↵ Enter. Замените C:\ImagePath\image.cue на путь к вашему CUE-файлу. BIN-файл должен иметь то же имя и располагаться в той же папке, что и CUE-файл.
Если у вас есть BIN/CUE-файл с играми, смонтируйте его и работайте с ним как с настоящим диском.
-
5
Смонтируйте дисковод.
Введите mount A A:\ -t floppy и нажмите ↵ Enter.
Если у вас есть дисковод (для дискет), смонтируйте и работайте с ним.
-
6
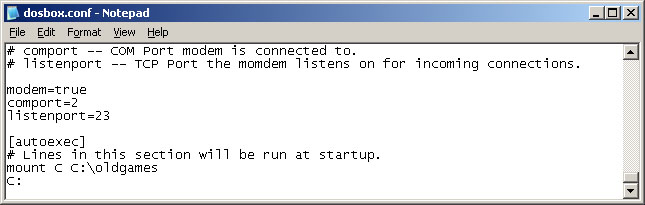
Настройте автомонтирование (при запуске DOSBox). Для этого в текстовом редакторе (например, в Блокноте) откройте файл dosbox.conf.
- Windows — C:\Users\имя пользователя\AppData\Local\DOSBox\dosbox-версия.conf
- Mac — /Macintosh HD/Users/ имя пользователя/Library/Preferences/DOSBox версия Preferences
- В конце файла dosbox.conf вставьте следующие строки:
Часть 3
Запуск игры
-
1
Отобразите список папок. Каждая игра хранится в соответствующей папке, а все игры — в папке DOSGAMES. Введите dir, чтобы отобразить все папки с играми. Если вы смонтировали диск или образ диска, будет отображен список папок на диске.
-
2
Введите .cd directory, чтобы открыть папку с нужной игрой.
-
3
Введите .dir, чтобы отобразить все файлы в папке с нужной игрой.
-
4
Найдите файл, запускающий игру.
ЕХЕ-файл, как правило, носит имя самой игры. К примеру, исполняемый файл «Принца Персии» будет называться POP.EXE.
В большинстве случаев это ЕХЕ-файл, но может быть и СОМ- или ВАТ-файл.
-
5
Запустите игру. Введите имя EXE-, COM- или BAT-файла, включая расширение, и нажмите ↵ Enter.
-
6
Настройте производительность игры при помощи сочетаний клавиш. Помните, что старые игры на новых компьютерах могут работать крайне медленно.
- Нажмите Ctrl+F8, чтобы увеличить число пропускаемых кадров. Это увеличивает производительность игры, но ухудшает качество картинки.
- Нажмите Ctrl+F7, чтобы уменьшить число пропускаемых кадров.
- Нажмите Ctrl+F12, чтобы ускорить игру за счет выделения ей больших ресурсов процессора. Вы можете контролировать ресурсы процессора, нажав Ctrl+⇧ Shift+Esc и перейдя на вкладку «Эффективность». Если после этого вам все еще нужно ускорить игру, увеличьте число пропускаемых кадров.
- Нажмите Ctrl+F11, чтобы замедлить игру за счет сокращения ресурсов процессора.
- Даже после настройки параметров производительности не все игры будут нормально работать в DOSBox.
-
7
Переключитесь в полноэкранный режим. Для этого нажмите Alt+↵ Enter. Чтобы выйти из этого режима, еще раз нажмите Alt+↵ Enter.
Часть 4
Использование специальной программы
-
1
Если вы не хотите или не умеете работать с командной строкой, скачайте специальную программу (программу пользовательского интерфейса). Такая программа использует интерфейс Windows, позволяя пользователю загружать, запускать и настраивать игры без использования командной строки.
- Одной из самых популярных программ является D-Fend Reloaded, которую можно скачать на сайте dfendreloaded.sourceforge.net.
- Программа D-Fend Reloaded включает файлы DOSBox.
-
2
Запустите D-Fend Reloaded (после установки этой программы). В левой панели отобразятся установленные игры.
-
3
Добавьте игры. Для этого перетащите архив с игрой в окно D-Fend Reloaded. Архив будет автоматически распакован, а игровые файлы — помещены в нужное место.
-
4
Запустите игру. Для этого дважды щелкните по игре в левой панели. Цветовая схема вашей системы временно изменится, чтобы соответствовать цветам старых игр.
Что такое DOSBox и для чего он нужен.
В принципе, на вопрос, который рано или поздно себе задаёт любой любитель даунгрейда, старых компьютерных безделушек и древних игр: «Что такое DOSBox?», можно ответить одной фразой: «DOSBox — это самый распространённый эмулятор операционной системы MS-DOS». DOSBox программно эмулирует старый процессор Intel 286/386 с его наборами команд, а также работу с портов, что позволяет полноценно использовать возможности древней операционки. При этом обеспечивается поддержка звука, джойстика, сетевых интерфейсов. Реализована русская раскладка клавиатуры, а в некоторых сборках (не официальных) обеспечивается запуск DOS игр в реальном 3D графическом режиме с использованием ускорения от 3Dfx Glide! Это обозначает полноценную эмуляцию видеокарт 3Dfx VooDoo и возможностей полноценной трёхмерной графики в MS-DOS играх. Стоит добавить, что существуют версии DOSBox для Windows, BeOS, Linux, MacOS.
Даунгрейд — это хорошо. Старые машины сами по себе вызывают трепет и воспоминания давно прошедших дней, когда компьютеры были большими, как деревья. Но время не стоит на месте, и вот уже приобрести старую машину для возвращения в фантастический мир прошлого уже сложнее, чем накопить деньжат на новую. Что же делать, если запустить старую DOS игру хочется, а соответствующего железа нет в наличии? Выход очень простой — DOSBox.

Эмулятор MS-DOS — DOSBox.
DOSBox — замечательный программный продукт, который практически без какой-либо сложной установки и после достаточно простой настройки позволяет Вам вернуться в старые добрые времена господства DOS. Перечислим основные плюсы сего чуда.
Запускаем игры через DOSBox. Способ №1
После запуска DOSBox вы увидите примерно такое вот окно:

Теперь подключаем виртуальный диск C (это наш каталог Games). Для этого пишем команду mount С и путь к каталогу. Если вы работаете в Windows и делали все по инструкции это будет D:\DOSBox\Games\ то есть получится:
mount С D:\DOSBox\Games\
В Linux получится:
mount С ~/DOSBox/Games/
Об успешном подключении сообщит строка «Drive C is mounted as local directory«:

Теперь переходим на диск C. Вводим С:
Переходим в папку с игрой, у меня это dyna:
cd \dyna\
И наконец, запускаем игру:
dyna.exe

Стоит помнить, что кроме *.exe, исполняемыми могут быть файлы с расширением *.bat и *.com
1 Скачивание и установка DosBox

Загрузка не займет много времени, а установка и вовсе ничем не отличается от самых простых программ. Вам нужно указать директорию установки и согласиться с лицензионным соглашением.

Теперь начинается самое интересное: вам нужно создать будущую корневую папку. В дальнейшем, вы представите эту папку, как диск C вашей виртуальной машины. Создать его можно в любом месте, главное, запомните путь к папке.

Назовите её так, чтобы не забыть, для чего она предназначена. Например, dosgames.

Для примера будет скачана игра Dune 2

Содержимое архива, который загрузится на ваш компьютер, нужно распаковать в папку dosgames или любую другую, которую вы создали для корневого каталога.

- Теперь зайдите в данную папку и создайте в ней другую с названием скачанной игры. Переместите содержимое архива в нее.
- Таким образом, вы имеете такой каталог: Папка, которая станет корневой – внутри нее папка с названием игры – в ней содержимое архива.
- Посмотрите внимательно на содержимое архива, в нем обязательно должен быть файл setup.exe и *название игры*.exe
Закройте папки.

Build DOSBox
- After downloading the source code, open the Visual Studio solution: dosbox\visualc_net\dosbox.sln
- Allow it to automatically convert to the latest version.
- Right click the dosbox project in the Solution Explorer and open its Properties.
- When editing the properties, edits will have to be made for each configuration you may want to build. In the top left there is an option for Debug, Release and All Configurations. The Release build is most commonly used, but All Configurations will let you conveniently edit both at once wherever the two configurations have the same options.
- Click the drop down triangle on Configuration Properties > C/C++ > General > Additional Include Directories and edit this list. Add the appropriate include path for each library prepared above. Keep in mind that paths are relative to the dosbox\visualc_net folder.
- Edit Configuration Properties > Linker > General > Additional Library Directories and add the path to each library (.lib) file prepared above.
- Edit Configuration Properties > Linker > Input > Additional Dependencies to add or remove libraries. (You will have to select either the Debug or Release configuration for this, as the Debug build uses a different list of libraries than the Release.)
- Remove zlib.lib and libpng.lib if not using these. Rename libpng.lib as libpng16.lib if you are using it.
- Remove sdl_net.lib if not using it.
- Add an entry for SDL_sound if using it.
- Remove curses.lib if not using it.
- Find dosbox\src\platform\visualc\config.h and open it (in the solution explorer it is under dosbox \ Source Files \ visualc).
- C_SSHOT to 0 if not using zlib/libpng.
- C_MODEM and C_IPX to 0 if not using SDL_net.
- Add #define C_SDL_SOUND if using SDL_sound.
- C_DEBUG to 1 if using the PDCurses.
- After all of this is set up, you may build the dosbox project. Choose a Debug or Release configuration (recommend: Release) and use the build menu to build the solution. One of the following will be built:
- dosbox\visualc_net\Release\dosbox.exe
- dosbox\visualc_net\Debug\dosbox.exe
- Finally, take the SDL.dll and SDL_net.dll files prepared above and place them in the same directory as dosbox.exe. It should now be ready to run.
Disney Sound Source
The Disney Sound Source was an external audio device that connected to a PC via a Parallel Port, also known as the Printer Port. An enhanced version of the Covox Speech Accelerator with «Mickey Mouse» ears on top, the device was surprisingly capable of producing polyphonic audio and voice. The sound quality is distinctive and tinny, though by no means high quality. One notable game that supported the device was Sierra’s King’s Quest 6 which managed to provide an audio experience similar to the Sound Blaster audio card.
The Disney Sound Source became popular due to its brand name and ease of configuration: There are no Base Address, IRQ, or DMA settings because it connects to any available Parallel Port. However, applications that utilize a printer might lock up if they try to talk to this device by mistake, so if you are having parallel port trouble and are not using this device for audio, you may want to consider disabling it.
A Windows driver exists (as with the PC Speaker) that can let the device work as an audio device in Windows 3.11.
The Disney Sound System is configured under the speaker category. As mentioned before, it has no special configuration. (And does not even have a rate setting.)
DOSBox-X supported platforms and releases
DOSBox-X is a cross-platform DOS emulator, so all major host operating systems are officially supported, including:
-
Windows (XP or higher), 32-bit and 64-bit
-
Linux (with X11), 32-bit and 64-bit
-
macOS (Mac OS X) Sierra 10.12 or higher 64-bit
-
DOS (MS-DOS 5.0+ or compatible)
For running DOSBox-X in a real DOS system (MS-DOS or compatible), you can find the HX-DOS package that makes use of the freely-available HX DOS Extender. Type DOSBOX-X to run it from a DOS system. There is also the DOS LOADLIN package which can run from within DOSBox-X itself in addition to a DOS system. Note, however, that not all features of DOSBox-X that are supported in other platforms can be supported in the real DOS environment.
The full source code is officially provided with each DOSBox-X release, which may be compiled to run on the above and possbily other operating systems too. You can also get the latest development source code from the repository directly. See also the BUILD page for information on building/compiling the DOSBox-X source code.
Монтирование директорий как дисков в DosBox
Теперь приступим к созданию и подключению директории на компьютере в качестве виртуального диска внутри DosBox. Хотелось бы заметить что это может быть любая директория и на любом из подключенных дисков/томов.
Пример команды, которую нужно выполнить в консоли уже запущенной программы DosBox:
mount C D:/DOSGames
где:
- mount — название команды, которую нужно выполнять
- C — название (буква), которое будет присвоено доступному в DosBox виртуальному диску
- D:/DOSGames — путь к папке «DOSGames», которая размещается на диске D (пример для MS Windows).
После запуска будет выведено оповещение что диск с буквой «C» подмонтирован и для него используется директория «D:/DOS_Games». Таким образом можно подмонтировать несколько виртуальных дисков с директориями — на одном хранить программы, на другом документы и т.п.
Подключаемая директория должна существовать, также хочу заметить что в путях можно использовать разделитель слеш (unix) «/» вместо обратного (win) «\» не зависимо от того под какой ОС вы запускаете DosBox.
Еще пример, команда для монтирования в качестве диска X (внутри DosBox) директории /tmp/DOSTEST (из Linux системы):
mount X /tmp/DOSTEST
Alternate methods for running a game
The steps described above are closely aligned with how DOS Based operating systems behave natively. However modern operating system allow for more user friendly (although less authentic) ways of playing your favorite games. If the steps above seem tedious or confusing you can try some of these other guides. In most cases these guides will still require you to setup a working DOSBox environment.
- Using Frontends
- Creating desktop shortcuts
NOTE: If you have problems with launching the game, unrecognizable errors being spit out, saving settings, or having the game drop out while running it, one thing to try is to make sure all the files are not set to Read Only. In Windows, select the folder of the game, right click and hit properties, uncheck Read Only if it is checked, and apply to all sub folders.
Файлы и папки DOSBox.
Перечислим все папки и файлы, которые появятся при стандартной установке DOSBox на жёстком диске.
В директории C:\Program Files (x86)\DOSBox-0.74-2 :
- Documentation — содержиться документация на английском языке.
- Video Codec — необходимые файлы и инструкция по видеозахвату. Позволяет снимать и сохранять видимое изображение в окне DOSBox или в режиме полного экрана со звуком или без него.
В рабочей директории пользователя:
DOSBox\Capture.
В директории В директории C:\Program Files (x86)\DOSBox-0.74-2 и вложенных директориях:
- DOSBox.exe — собственно программа-эмулятор DOS.
- SDL.dll — поддержка Simple DirectMedia Library (http://www.libsdl.org). Не стандартный интерфейс для подключения CD-ROM, джойстика и т.п.
- SDL_net.dll — для поддержки модемов (ipx support).
- stderr.txt, stdout.txt — текстовые лог-файлы, куда перенаправляется информация с консоли DOSBox (DOSBox Status Window). Стандартный запуск DOSBox вызвает отображение двух консольных окон: окно эмуляции системы MS-DOS и окно отображающее процесс работы эмулятора. При запуске DOSBox с параметром -noconsole консоль (сonsole) работы самого эмулятора не проявиться, отобразиться только консольное окно, непосредственно эмулирующее виртуальную машину DOS. В принципе, файлы stderr.txt, stdout.txt создаются в любом случае, просто при параметре -noconsole они не будут удаляться при прекращении работы программы DOSBox.
- DOSBox 0.74 Manual.txt — инструкция пользователя на английском.
- DOSBox 0.74 Options.bat — батник, который отобразит файл конфигурации DOSBox при помощи текстового редактора notepad, встроенного в Windows. В случае внесения изменений необходимо сохранить изменённый файл настроек в какубю-либо директорию. Как его загрузить — расскажем в статье, посвящённой настройкам DOSBox.
- Reset KeyMapper.bat — запуск батника позволяет выставить по умолчанию настройки расклада клавиатуры.
- Reset Options.bat — батник выставляет настройки DOSBox по умолчанию.
- Screenshots & Recordings.bat — запускает захват основного экрана эмуляции DOS.
- uninstall.exe — анинсталировать DOSBox из системы.
В рабочей директории пользователя и вложенных директориях:
- dosbox-0.74-2.conf.
- аудио и видео файлы (при использовании возможности видео перехвата).
Usage
Problems with colors and fullscreen drawing in Mac OS X
Q. Using Mac OS X 10.5.3 without a problem (MOO) and when upgraded to 10.5.4 MOO started flashing rainbow colors instead of the normal background in full screen mode (works fine in windowed mode.) I have a warning about the quickdraw capability being deprecated in my console window. Any suggestions?
A. Go to your users home directory e.g. /Users/asc/Library/Preferences and open «DOSBox 0.73 Preferences». In the section edit the parameter «output» so that it says: «output=opengl». Afterwards restart DOS Box. Colors and drawing issues should now be gone.
No backslash key
Q. My backslash key is mapped to ‘]’ with DOSBox on Windows. Is there a workaround?
— Driver fix on Windows XP
Right click My Computer, select Properties. On the Hardware tab, select Device Manager. Find your keyboard, right click, Update driver. Select No, not this time, then Install from a list or specific location (Advanced). Select Don’t search. You arrive to a screen where compatible drivers are listed. Changing from Microsoft Natural PS/2 driver to PC/AT Enhanced PS/2 driver reportedly solved this issue. You can experiment with any other compatible device you find on the list. If you are using an USB keyboard try the keyboard manufacturer’s drivers.
— Driver fix on Windows Vista
Click on the Windows button, right click on Computer, select Properties. Next, select Device Manager in the top left corner, and Continue on the User Account Control screen. Find your keyboard under Keyboards. Right click on the keyboard entry, select Update Driver Software…. Then select Browse my computer…, and Let me pick…. Here you can change your current driver to another compatible one, or use the disk provided by your manufacturer.
— Workaround using DosBox Keymapper
Press CTRL-F1 to enter the keymapper and select the backslash with your mouse. Press the DELETE button that will show up on your screen. Then press ADD to bind backslash to another key. Simply press an unused key to bind it to this. Press SAVE and then EXIT to return to the main screen.
Trapped mouse cursor
Q. My cursor is trapped within the DOSBox window when I click inside. How do I get the cursor out?
A. DOSBox will capture your mouse when you click inside the display window (and you have autolock=true set in the Dosbox.conf). Simply press CTRL-F10 to release the mouse.
Gnome scripting
Q. I have set Gnome to load DOSBox when I click on .COM files. How do I script it to exit DOSBox when I quit from the game?
A. With -exit as commandline parameter for DOSBox.
Hard drive/CDROM access
Q. How do I access my hard drive/cdrom in DOSBox?
A. See the information on the MOUNT command, or type intro mount or intro cdrom in DOSBox for the basics.
Accessing ISO images
Q. I have an ISO image I made of files for backup purposes. How do I access it in DOSBox?
A. See the information on the IMGMOUNT command
Swapping CD images
Q. How do I unmount or change images? I need to swap CD images in the drive.
A. You may assign more than one image file to IMGMOUNT, to swap images use CTRL-F4. You can also unmount images by using the -u switch. See IMGMOUNT for more information.
CD Audio tracks
Q. I have created an image from a CD that includes CD audio tracks, when I access it in DOSBox only the first (data) track is available.
A. Be sure to use the bin/cue format for mixed mode CDs (CDs with a data and audio tracks) and always pass the cue file to IMGMOUNT.
Gibberish
Q. When I write it turns out > or when i write å ä ö or any other non standard us character. How can I fix this for my keyboard?
A. Use the KEYB command to change your .
No «:» symbol
Q. I can’t find the «:» symbol anywhere in my dosbox. I am using Vista on a laptop. Please advice me how to fix the problem.
A. Use the left shift instead of the right shift. A number of keys are affected by this problem. For a workaround for other keys like «\», see the second answer.
Scrolling up/down
Q. How do you/I scroll up to see text that is not visible in the DOSBox window? Certain apps will print a long string of text, and you can’t see it all.
A. Unlike the DOS window in Windows 2000, XP and Vista, DOSBox exactly emulates a full screen DOS session. Hence it doesn’t support scrolling up and down. However, MS-DOS included a program to allow you to ‘press any key’ to scroll down called MORE.COM. This is how to do it on Windows:
- Put it in C:\C
- Edit C:\Program Files\Dosbox\dosbox.conf in Notepad
- Go to the bottom of the file, where it reads . Add to it or change it to read: MOUNT C C:\C PATH=%PATH%;C:\
- Save it, close DOSBox and then re-open DOSbox.
- Now, say you wanted to use this command:C:\> type readme.txtInstead type this:C:\> type readme.txt | more
Features that DOSBox-X is unlikely to support at this time
DOSBox-X aims to be a fully-featured DOS emulation package, but there are
some things the design as implemented now cannot accomodate.
-
Pentium II or higher CPU level emulation.
DOSBox-X contains code only to emulate the 8088 through the Pentium Pro.
Real DOS systems (MS-DOS and compatibles) also work best with these CPUs.If Pentium II or higher emulation is desired, consider using Bochs
or QEMU instead. DOSBox-X may eventually develop Pentium II emulation,
if wanted by the DOSBox-X community in general. -
Emulation of PC hardware 2001 or later.
The official cutoff for DOSBox-X is 2001, when updated «PC 2001»
specifications from Microsoft mandated the removal of the ISA slots
from motherboards. The focus is on implementing hardware emulation
for hardware made before that point.Contributers are free to focus on emulating hardware within the
timeframe between 1980 and 2000/2001 of their choice. -
Windows guest emulation, Windows XP or later.
DOSBox-X emulation, in terms of running Windows in DOSBox-X, will
focus primarily on Windows 1.0 through Windows Millenium Edition,
and then on Windows NT through Windows 2000. Windows XP and later
versions are not a priority and will not be considered at this time.If you need to run Windows XP and later, please consider using
QEMU, Bochs, VirtualBox, or VMware. -
Any MS-DOS system other than IBM PC/XT/AT, AX, Tandy, PCjr, and PC-98.
Only the above listed systems will be considered for development
in DOSBox-X. This restriction prevents stretching of the codebase
to an unmanageable level and helps keep the code base organized.It would be easier on myself and the open source community if
developers could focus on emulating their platform of interest in
parallel instead of putting everything into one project that,
most likely, will do a worse job overall emulating all platforms.
However, if adding emulation of the system requires only small
minimal changes, then the new system in question may be considered.You are strongly encouraged to fork this project and implement
your own variation if you need to develop MS-DOS emulation for
any other system or console. In doing that, you gain the complete
freedom to focus on implementing the particular MS-DOS based
system of interest, and if desired, the ability to strip away
conflicting IBM PC/XT/AT emulation and unnecessary code to keep
your branch’s code manageable and maintainable.If you are starting a fork, feel free to let me know where your
fork is and what system it is emulating, so I can list it in
this README file for others seeking emulation of that system. To
help, I have added machine and video mode enumerations as «stubs»
to provide a starting point for your branch’s implementation of
the platform. A stub implemented so far is «FM Towns emulation»
(). -
Cycle-accurate timing of x86 instructions and execution.
Instructions generally run one per cycle in DOSBox-X, except for I/O
and memory access.If accurate emulation of cycles per instruction is needed, please
consider using PCem, 86Box, or VARCem instead. -
Full precision floating point emulation.
Unless using the dynamic core, DOSBox and DOSBox-X emulate the FPU
registers using the «double» 64-bit floating point data type.The Intel FPU registers are 80-bit «extended precision» floating point
values, not 64-bit double precision, so this is effectively 12 bits of
precision loss and 5 bits of range loss (64 to 53 mantissa bits and 16
to 11 exponent bits). This slight loss of precision is perfectly fine
considering DOSBox’s original goal in supporting DOS games, but may
cause problems in other cases that need the full precision.It is known at this time that this lack of precision is enough to
cause otherwise straightforward comparisons against integers to
fail in DOS applications originally written in QBasic or Turbo Basic.
There are such DOS games written that check their file size using
a floating point compare that will fail in this manner. To run these
games, you will need to disable FPU emulation () to force
the QBasic/TurboBasic runtime to use software emulation instead.
Подготовка
Естественно, сначала не забываем про такую мелочь, как установка эмулятора. В Linux дистрибутивах все как обычно банально и упрощено до одной строчки. На примере Ubuntu это делается при помощи терминала и строчки:
sudo apt-get install dosbox
Пользователи Windows и дистрибутивов, которые по какой-либо причине не могут установить DOSBox из репозитория, могут скачать нужный файл с официального сайта.
Дальше предлагаю сразу создать структуру каталогов, куда мы будем складывать игры. В принципе это не обязательно, если вы не планируете устанавливать много игр, но я предпочитаю делать так. На самом деле ничего сложного выдумывать не нужно: в корне одного из разделов жесткого диска, например на диске D в Windows или домашнем каталоге пользователя в Linux, создаем папку «DOSBox» и уже в ней создаем еще две папки — «Apps» если Вы планируете пользоваться приложениями и «Games«, непосредственно для игр.
Теперь пришло время скачать архив с игрой. Этот вопрос вы уже решаете сами, сайтов в интернете с таким добром полно. После скачивания распаковываете папку с игрой в каталог Games и можно приступать к ее запуску.
Origin and history of the DOSBox-X project
DOSBox-X started as a fork of the original DOSBox project sometime
in mid-2011. It was started out of a desire to improve the emulator
without having to fight with or worry about submitting patches
upstream.
As its developers have made it clear, DOSBox’s main focus is on
DOS games. This is evident by the fact that much of the code is
somewhat accurate code with kludges to make DOS games run,
instead of focusing on the actual behaviors of real DOS systems.
Jonathan Campbell, the DOSBox-X project maintainer wanted to make
various changes to the source code, but many of them were non-game
related, and thus were unlikely to be accepted by the DOSBox developers.
Since then, Jonathan Campbell has been modifying the source code over
time to improve emulation, fix bugs, and resolve incompatibilities
with Windows 95 through ME. He has added options so that DOSBox-X
by default can emulate a wider variety of configurations more
accurately, while allowing the user to enable various techniques or
hacks if needed to run their favorite DOS games or programs. He has
also been cleaning up and organizing the code to improve stability
and portability where possible.
The original DOSBox project was not written by one programmer. It
has been under development since late 2000 with patches, fixes,
and improvements from members all over the Vogons forums. Despite
not having a major official release since DOSBox 0.74 over 10
years ago, the project is still in semi-active development today
in the form of DOSBox SVN. Meanwhile, some of the changes themselves
incorporated code from other projects.
The DOSBox-X project is also helped by its other developers and
contributors such as Wengier, aybe, Allofich, and rderooy, who have
done significant work to improve the DOSBox-X project, including
adding new features, fixing bugs, creating the documentation,
maintaining the website, and porting code from other projects.
See also the CREDITS page for crediting of the source code.
Other Useful features
Quick Start for Windows
Windows users have an option of dragging the EXE of their DOS game onto the DOSBox program (or shorcut pointing to the DOSBox program). This will automatically start the game. If this doesn’t work, then I would recommend reading the rest of this article.
Automatically Mounting Your DOS Games folder
You can save yourself some time by having DOSBox automatically MOUNT your folders and change the drive to C:. In original DOS based operating systems a file called AUTOEXEC.BAT contained any commands that the user wanted executed every time the computer booted up. This functionality is simulated by the section of the dosbox.conf file.
For DOSBox versions older than 0.73 browse into program installation folder and open the dosbox.conf file in any text editor. For version 0.73 go to Start Menu and click on «Configuration» and then «Edit Configuration». Then scroll down to the very end, and add these lines:
Now those commands will be executed automatically when starting! If you’re having trouble with that, make sure it looks like this (look at the bottom):
Contributing to DOSBox-X
We encourage new contributors by removing barriers to entry.
Ideas and patches are always welcome, though not necessarily accepted.
If you really need that feature or change, and your changes are not
accepted into this main project (or you just want to mess around with
the code), feel free to fork this project and make your changes in
your fork.
As joncampbell123 only has limited time to work on DOSBox-X, help is
greatly appreciated:
- Testing
- Features of DOSBox-X, such as its commands and functions
- The normal operation of DOS games and applications
- Software or hardware emulation accuracy, helped by for example demoscene software
- Windows 1.0/2.x/3.x & Windows 9x/ME guest system support
- Developments of new DOS software
- Bug fixes, patches, improvements, refinements
- Suggestions, ideas, assistance of other users, and/or general conversation
- Platform support (Windows, Linux, macOS, DOS, but others are welcome)
- Documentation, language file translation, and software promotion
- Notes regarding DOS and Win3.x/9x games, applications, hacks or weird tricks, etc.
See the CONTRIBUTING page for more contribution guidelines.
If you want to tweak or write some code and you don’t know what to work on,
feel free to visit the issue tracker to get some ideas.
For more descriptions on the source code, please take a look at the
DOSBox-X source code description page. Information on
building on the source code can be found in the BUILD page.
Information about the debugger is also available in the
DOSBox-X Debugger page.
See also the CREDITS page for crediting information.
2 Как открыть игру в DosBox
Вам предстоит не самая лёгкая настройка, однако, если вы хоть немного знакомы в Dos командами, задача значительно упрощается. Остальным пользователям лучше просто следовать инструкции в статье, а также учиться методом проб и ошибок, так как в данной среде вы не можете практически ничего испортить.
Запустите клиент DosBox.

- Сразу же вы увидите приветственное окно и многим знакомую командную строку.
- Впишите в неё такую команду: mount C C:\название корневой папки.
- Первое слово “mount С” устанавливает корневой каталог С. Далее, вы пишите название диска, на котором расположена ваша созданная папка и ее название.

- Вы задали свою корневую папку. Теперь перейдите внутрь нее. Для этого пропишите команду С:
- Нажмите Enter и диск Z сменится на С.

Вы в корневой папке, значит далее вам нужно зайти внутрь папки с игрой. В данном случае она называется dune2
Обратите внимание, что в названии не должно быть пробелов. Пропишите: cd название папки

Теперь вам нужно выбрать файл из данной папки, чтобы настроить игру. Настройка всегда происходит в приложении Setup. Пропишите: setup.exe

- Нажав Enter, вы увидите такое окно. Это и есть настройка игры. Каждая старая игра настраивается немного своеобразно, но в целом алгоритм остается тем же.
- Нажмите любую клавишу, чтобы продолжить.

В таком окне нужно выбрать первый пункт, то есть, нажать клавишу 1.

Выбор звуковой карты выглядит именно так. Вам нужно выбрать пункт “Sound Blaster Pro”, который в данной игре стоит под цифрой 3.

Выделите игре 1 Мб памяти, нажав на клавишу 1. Это нужно, чтобы она работала без нареканий.

Хотите вы использовать мышь или нет – ваше сугубо личное дело. Если вы нажмете 1, то мышка заработает, если же цифру 2, то погрузитесь в мир олд скула без компьютерных мышей.

Проверьте введенные вами данные, если все верно, то нажмите Esc.

- Теперь вы можете запускать саму игру. Для этого введите команду: название игры.exe
- Точное название этого файла вы можете узнать в папке с игрой внутри корневого каталога.

Вот и всё. Вам доступны все старые игры, которые запускаются в Dos окружении. Вы можете использовать параметры игры, ее настройки – абсолютно всё, что было в ней десятки лет назад.
