Программа diskdigger для андроид: восстановление без root-доступа
Содержание:
- News for July 2017
- Сохранение фото с флешки на источнике
- Описание приложения
- DiskDigger for Android FAQ
- Lost your files? Don’t panic! Dig them up with DiskDigger.
- Как работает программа DiskDigger
- News for January 2021
- Descarga DiskDigger gratis en Español (última versión)
- Digging deeper
- Dig Deeper
- News for October 2017
- The move to shareware
- News for August 2017
- DiskDigger for Android updates!
- Приступая к восстановлению фото
News for July 2017
Sat, 07/08/2017 — 19:14 — Dmitry Brant
 Just a quick (but substantial) update to DiskDigger for Windows! Here’s what’s new in the latest version:
- Improved scanning of disk images (.VHD, .VDI, and raw disk images).
- Better workflow for saving and restoring sessions when using Dig Deeper mode: the «Restore session» button now appears in the Advanced tab when selecting the types of files to recover. Once you select the session to restore, DiskDigger will resume scanning from where the session left off.
- Improved recovery logic for FAT32 and exFAT partitions when using Dig Deep mode.
- Improved user interface for right-to-left languages, such as Hebrew and Arabic.
Download the new version and recover your lost files with ease.
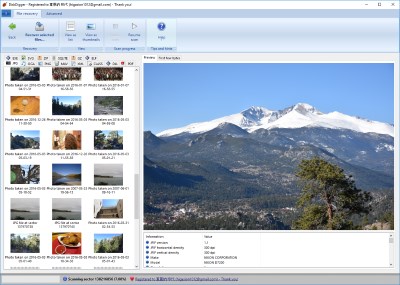
Сохранение фото с флешки на источнике
Когда файлы будут выбраны, просто нажмите на кнопку “Save Selected Files” (Сохранить выбранные файлы) вверху. Для удобства, легко создать новую папку на рабочем столе и сохранить найденные фото туда.
Примечание: не сохраняйте восстанавливаемые фото на тот же источник (флешку, usb-накопитель), с которым вы работаете в этот момент!
DiskDigger rus приступит к сохранению файлов с карты памяти (флешки) в указанный файловый источник.
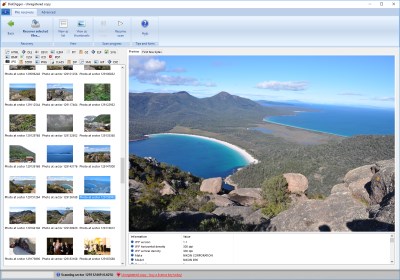
Процесс сохранения файлов в DiskDigger
Когда сохранение окончится, можно закрыть программу, перейти в папку с ранее удаленными на флешке фото и смотреть на восстановленные данные и радоваться возвращенным к жизни данным.
Описание приложения
С помощью этой программы вам будет максимально легко управлять файлами на своем телефоне. Как только вы запустите приложение, перед вами откроется список всех системных папок, а также разделов карты памяти. Таким образом, вы получаете доступ не только к пользовательским данным, но и тем файлам, которые для обычного владельца смартфона надежно скрыты и недоступны. И сделать вы с ними можете что угодно. Программа позволяет как удалять файлы, недоступные для этого в обычном режиме, так и восстанавливать их. Последнее будет очень полезно, если вы случайно навредили своему смартфону и хотите исправить эту ситуацию.
Вам даже не придется самостоятельно искать нужные вам данные. Программа полностью автоматически сканирует память вашего смартфона, чтобы подобрать файлы, которые могу быть восстановлены. Это делает приложение значительно более удобным и простым в использовании. Результатом сканирования станет простой и удобный список файлов и папок, в котором вам уже нужно будет выбрать именно то, что вы искали. Следующим шагом нужно будет просто выделить нужные файлы или же просто нажать на кнопку «Выбрать все», а затем выполнить нужное вам действие. Также, прямо из интерфейса программы файлы можно отослать на электронную почту, сохранить, загрузить и так далее. Правда, стоит иметь в виду, что во время восстановления лучше не пользоваться смартфоном, чтобы избежать возникновения ошибок.
DiskDigger for Android FAQ
Here are a few frequently-asked questions about the DiskDigger app for Android:
-
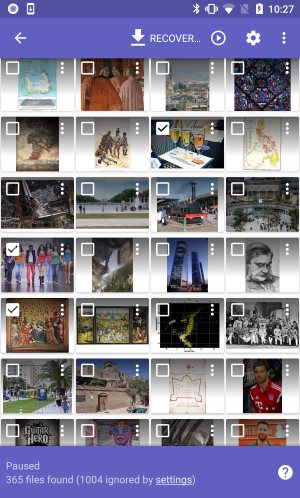
Why do some photos recovered with DiskDigger appear lower-quality or pixelated?
On a non-rooted device, DiskDigger is limited to recovering images from your thumbnail caches, which means that the images will likely be lower-quality than the original photos or videos. This limitation applies to both the Free and Pro versions of the app, and cannot be avoided. Recovering the full-resolution original versions of the photos or videos is only possible by rooting your device.Note: Even with a rooted device, there is no guarantee that the original files will be recoverable, since it’s possible for the photos or videos to be fragmented or overwritten by new data.Note 2: If the photos are saved on an external microSD card, then you should remove the card from your device and connect it directly to your PC using a card reader, and scan it using DiskDigger for Windows.
-
Why is DiskDigger recovering thumbnails of videos, but not the videos themselves?
See previous answer.
-
What is a «rooted» device?
- Basically, «rooting» allows apps to gain administrative access to your device (what’s known as «root access»). For an app like DiskDigger, this is necessary for low-level access to the internal memory of your device, in order to perform a thorough scan of the memory. Without root access, this is not possible to do.
- By default, Android devices are not rooted for various reasons. Many of them are good reasons, such as reducing the risk of malware (imagine if a malicious app had full access to your internal memory). But unfortunately this also means that well-intentioned apps are blocked from running, as well.
- For more information, read the Wikipedia article on rooting.
-
How do I root my phone or tablet?
Click here for the simplest way to root your device. Otherwise, there are various guides and tutorials on the web for rooting most models of Android devices. The rooting procedure varies for different devices, so make sure to search for a tutorial for your specific model. Important: make sure the rooting procedure does not involve wiping your device’s memory, since this would defeat the purpose of trying to recover data from it.
-
How do I know if my device is rooted?
If you don’t know, then it’s probably not rooted. See previous question.
-
My device is rooted, but DiskDigger still can’t get superuser privileges.
- Are you sure the device is rooted?
- Did you accidentally press «Deny» when the superuser request appeared?
-
My device’s storage fills up to 100% while using DiskDigger!
This can sometimes happen if you turn on detailed logging in the SuperSU app. Please go to the settings of the SuperSU app, and turn logging to the most minimal setting.
-
Why does DiskDigger show me photos that I don’t recognize / don’t remember saving?
These are probably photos from your browser cache (from websites you have browsed in the past), or from social media apps that cache images (from user profiles, news stories, ads, etc.) on the device.
Copyright 2010-2021 Defiant Technologies, LLC.Privacy policy.
Lost your files? Don’t panic! Dig them up with DiskDigger.
DiskDigger is a tool that undeletes and recovers lost files from your hard drive, memory cards, USB flash drives — you name it! Whether you accidentally deleted some documents or photos from your computer, reformatted your camera’s memory card, or want to see what files are lurking on an old USB drive, DiskDigger is here for you. See the complete list of features to learn more.
DiskDigger has already helped millions of users around the world recover their lost files. What can it help you find today? Download it now and see for yourself!
Works with Windows 10, Windows 8, Windows 7, Windows Vista, Windows XP, and Linux.
Как работает программа DiskDigger
C некоторыми программными функциями мы разобрались, теперь давайте рассмотрим те особенности приложения Digger’а, которых нет в других подобных программах для реанимирования диска. Следует полагать, вы уже скачали diskdigger pro и запустили программу, чтобы перейти к дальнейшему обзору функционала.
Режим сканирования Digging deep
В этом режиме можно возвратить файлы на ваш диск. Программа сканирует файловую систему и ищет пометки: при удалении файлов система могла их пометить “можно удалять”, таким образом, ничто не мешало их перезаписать заново. Впрочем, если вам повезет, то вы еще успеете “выкопать” драгоценную удаленную информацию.
- FAT — используется на дисках, большинстве накопителей usb и карт памяти до 4 Гб, старых жестких дисках (FAT16)
- FAT32 – также используется на старых жестких дисках и большинстве флеш-брелоков, карточках памяти с 4 Гб на борту и больше.
- NTFS — популярная система на новых жестких дисках
- exFAT – задействована на современных HDD и флешках, usb-дисках.
К счастью, список выше покрывает потребности большинства пользователей ПК, так что в дальнейшем инструкция будет эффективна для всех читателей.
Поэтому главное правило: процесс восстановление эффективен только в тех случаях, если файлы были удалены недавно. Или, более точно: вероятность успешного восстановления пропорциональна времени, прошедшему после его стирания.
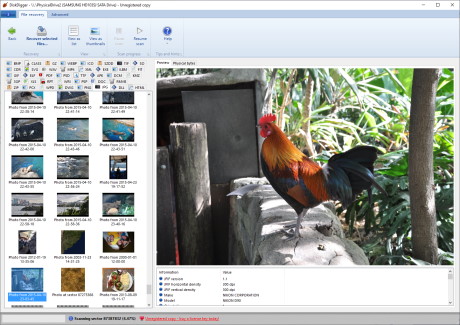
Определение типов файлов, удаленных с флэшки, для дальнейшего их поиска
Режим Digging deeper
Этот режим делает процесс восстановления удаленных файлов с флешки гораздо более эффективным благодаря тому, что он независим от файловой системы. Это значит, что программа физически сканирует диск, каждый его сектор, в поисках известных файловых форматов.
Этот режим восстановления флешки имеет как свои достоинства, так и недостатки. Главный “плюс” – независимость от файловой системы, в которой разбит диск
Посему, это может быть и FAT, и NTFS, и HFS, и ext2, и проч и проч., что неважно. DiskDigger сканирует слои глубже файловой системы, что дает ему особое преимущество как то возможность сканирования любого свободного файлового пространства вне файловой системы, которое в режиме dig deep попросту недоступно
Что до недостатков, то для digging deeper – это длительное время сканирования, требуемое для полного прохождения процесса. Если вы сканируете карту памяти или флешку, это еще не будет заметно, однако при сканировании целого жесткого диска, операция может затянуться на несколько часов. Конечно же, все это весьма относительно и зависит только от ценности файлов, которые вы пытаетесь реанимировать.
Еще один недостаток этого метода – ограниченный набор файловых типов, подвластных восстановлению. Поскольку неизвестно, что за файловая система сканируется в текущий момент, данные будут восстановлены побайтово, без определения файлового формата. Это же означает ,что DiskDigger не заботит структура типов файлов, и поиск файловых шаблонов будет отличаться для каждого из форматов. К счастью, DiskDigger поддерживает достаточно широкий перечень форматов, в большинстве случаев подходящих под задачи большинства пользователей.
Последний недостаток этого подхода – невозможность восстановления файлов после дефрагментации файловой системы. Поскольку ее тип не определен, DiskDigger не сможет достать важную для восстановления информацию, а только воссоздаст первый фрагмент стертого файла флеш-карты. Большинство файлов, впрочем, и содержат только один фрагмент, но в некоторых случаях, файловая система выберет разделение файла на два или более фрагментов. Главное правило здесь такое: чем больше файл, тем вероятнее, что он был дефраментирован.
В этом коротеньком руководстве я расскажу о программе для восстановления данных с флешки, DiskDigger Pro, которую можно использовать для сканирования и дальнейшего сохранения файлов с flash, sd карты и других носителей.
На самом деле, далеко не любая программа для восстановления данных может использоваться для работы с флешкой. Это связано с тем, что usb-flash не всегда определяется через usb-порт компьютера. Кроме того, многие программы попросту не поддерживают ту или иную модель флеш-накопителя, поэтому восстановление данных не представляется возможным. Pro-версия DiskDigger является исключением.
В том случае, если вы удалили одну или несколько фотографий с карты памяти / флешки, или же случайно отформатировали карту, DiskDigger поможет возвратить большинство – если не все – фотографии, которые вы потеряли.
News for January 2021
Mon, 01/18/2021 — 00:29 — Dmitry Brant
 It’s time for another important update to DiskDigger for Windows! Here is what’s new in the latest version:
- Improved accuracy and efficiency of detecting certain raw camera formats, including Nikon (NEF) and Canon (.CR2).
- Revamped and improved recovery of .MP3 audio files. Will now recover a wider range of .MP3 files from different sources and devices.
- Added support for recovering .AAC audio files.
- Added an advanced option to perform a more thorough search for .MP3 or .AAC audio. After selecting «Dig deeper» mode (when selecting the types of files to search for), go to the Advanced tab and select the «Extra deep MP3 search» option. This option is still experimental and is not selected by default, since it can produce false positives.
- Added another advanced option to start the scan from a specific sector on the disk. When selecting the types of files to scan, go to the Advanced tab and enter the custom sector number in the «Starting sector to search from» text box.
Download DiskDigger for Windows now to search any of your hard drives, USB drives, or memory cards for deleted files!
And if you need to recover files from your Android device, try the DiskDigger app from the Google Play Store! Stay tuned for updates to the app, which will make recovering data even simpler and more effective.
Descarga DiskDigger gratis en Español (última versión)
Este programa es compatible con los sistemas operativos principales y puedes descargarlo a través de los siguientes enlaces:
Descargar DiskDigger para Windows PC
- Descarga DiskDigger para Windows
- Sigue el asistente de instalación
- Descarga Microsoft NET Framework
- Sigue el asistente de instalación
- Abre DiskDigger haciendo doble clic
- Haz doble clic para abrirla
- Elige el tipo de archivo a recuperar
- Presiona buscar y espera a que analice tu PC
- Cuando veas el archivo que quieres recuperar haz clic sobre “Guardar como…”
Descargar DiskDigger para Android
- Descarga DiskDigger para Android
- Sigue el asistente de instalación
- Abre la App de DiskDigger
- Elige el tipo de archivo a recuperar
- Presiona buscar y espera a que analice tu dispositivo
- Cuando veas el archivo que quieres recuperar haz clic sobre “Guardar como…”
Descargar DiskDigger para macOS
- Descarga DiskDigger para macOS
- Sigue el asistente de instalación
- Descarga Mono para macOS
- Sigue el asistente de instalación
- Abre DiskDigger haciendo doble clic
- Elige el tipo de archivo a recuperar
- Presiona buscar y espera a que analice tu equipo
- Cuando veas el archivo que quieres recuperar haz clic sobre “Guardar como…”
Digging deeper
The «dig deeper» mode causes DiskDigger to become a powerful data carver, and carve out whatever files it can find on the disk, independent of the file system. Data carving refers to physically scanning every single sector on the disk, and looking for traces of known file types.
This mode also has some advantages and disadvantages. The main advantage is that it’s independent of the file system that’s on the disk, so the disk can be formatted as FAT, NTFS, HFS, ext2, or anything else; it doesn’t matter. DiskDigger scans «underneath» the file system, which gives it an additional advantage of being able to scan any free space on the disk outside of the file system, which the «dig deep» mode cannot do.
The main disadvantage of digging deeper is the time it takes to complete the scan. If you’re scanning a memory card or USB drive, it shouldn’t be too bad, but if you’re scanning an entire hard drive, be prepared for a several-hour job. Of course the burden of the time spent on the scan is subjective, and depends on the value of the files you’re trying to recover.
Another disadvantage of this mode is that only a limited number of file types can be recovered. Since we’re not aware of the file system, we have no way of knowing what types of files are present, so the only thing we have to go on are the actual bytes that we see on the disk. This means that DiskDigger has to be aware of the structure of the types of files we need to recover, and search for patterns of bytes specific to each file format. Fortunately, DiskDigger supports a fairly wide variety of file types which should cover most cases.
The only other disadvantage of this approach is that it’s not possible to recover files that have been fragmented by the file system. Since it’s not aware of the file system, DiskDigger has no way of knowing whether or not a certain file has been fragmented. So, technically, when digging deeper, DiskDigger will only recover the first fragment of a file. Most files consist of a single fragment anyway, but in some cases, the file system will choose to split a file into two or more fragments. A rule of thumb is: the larger a file is, the more likely it is that it’s been fragmented.
Dig Deeper
- Scan (carve) entire disk for traces of specific file types.
- Supported file types include:
- Photos and images:
- JPG — Pictures stored in digital cameras and on the Web (Joint Photographic Experts Group)
- PNG — Portable Network Graphics
- GIF — Graphics Interchange Format
- BMP — Windows and OS/2 bitmap image
- TIFF — Tagged Image File Format
- ICO — Windows Icon
- ANI — Windows animated cursor
- CR2 — Canon raw image
- SR2 — Sony raw image
- NEF — Nikon raw image
- DCR — Kodak raw image
- PEF — Pentax raw image
- RAF — Fujifilm raw image
- RW2 — Panasonic/Lumix raw image
- LFP — Lytro raw image
- MPO — Images from 3D cameras (Multiple Picture Object)
- DNG — Adobe Digital Negative
- SVG — Scalable Vector Graphics
- HEIC/HEIF — High Efficiency File Format image
- PSD — Adobe Photoshop image
- RAS — Sun raster image
- PSP — Paint Shop Pro image
- Thumbcache — Windows thumbnail cache
- IFF — Amiga images and other media
- ART — AOL Art images
- WMF — Windows MetaFile
- EMF — Enhanced MetaFile
- WMZ, EMZ — Compressed MetaFiles
- DICOM — Medical imaging format
- WEBP — WebP images
- PCX — ZSoft PCX images
- CDR — CorelDraw images
- INDD — Adobe InDesign documents
- CP — Adobe Captivate documents
- AI — Adobe Illustrator documents
- Documents:
- DOC — Microsoft Word document (2003 and below)
- DOCX — Microsoft Word document (2007 and above)
- XLS — Microsoft Excel spreadsheet (2003 and below)
- XLSX — Microsoft Excel spreadsheet (2007 and above)
- PPT — Microsoft PowerPoint presentation (2003 and below)
- PPTX — Microsoft PowerPoint presentation (2007 and above)
- VSD — Microsoft Visio document
- PDF — Portable Document Format
- XML — eXtensible Markup Language
- HTML — HyperText Markup Language
- RTF — Rich Text Format
- WPD — WordPerfect document
- WPS — Microsoft Works document
- PUB — Microsoft Publisher document
- XPS — XML Paper Specification
- WRI — Old Windows Write document
- ODT, ODS, ODP, ODG — OpenDocument formats
- DPP — Serif DrawPlus document
- PPP — Serif PagePlus document
- Audio and video:
- MP3 — Audio format widely used in digital media players (MPEG layer 3)
- WMA — Windows Media Audio
- AVI — Audio Video Interleave
- WAV — Wave audio
- MID -Musical Instrument Digital Interface
- FLV — Adobe Flash Video
- WMV — Windows Media Video
- MOV — QuickTime video
- M4A — MPEG-4 audio
- M4V, MP4 — MPEG-4 video
- 3GP — Third Generation Partnership video
- F4V — Adobe Flash video based on MPEG-4 Part 12
- RM — RealMedia video
- RMVB — RealMedia video (variable bitrate)
- MKV — Matroska video
- MPEG — Motion Picture Experts Group
- AU — Sun Microsystems audio
- MTS, M2TS — MPEG2 Transport Stream
- R3D — RED Video Camera video
- APE — Monkey’s Audio file
- OFR — OptimFROG lossless audio
- PPM, PGM, PBM — Netpbm images
- WEBM — WebM videos
- Compressed archives:
- ZIP — Widely used compressed format developed by PKWARE
- RAR — Roshal ARchive, used by WinRAR
- 7Z — Compressed format used by 7-Zip
- GZ — Compressed format used by gzip
- SIT — Compressed format used by StuffIt for Mac
- ACE — WinAce archive
- CAB — Microsoft Cabinet archive
- SZDD — Compressed files created by COMPRESS.EXE from MS-DOS
- Miscellaneous:
- ISO — Images of optical media, such as CDs and DVDs
- EXE — Windows or MS-DOS executable file
- DLL — Windows or MS-DOS dynamic-link library
- MDB — Microsoft Access database (2003 and below)
- ACCDB — Microsoft Access database (2007 and above)
- PST — Microsoft Outlook Personal Folders file
- DBX — Microsoft Outlook Express data file
- XAC — GnuCash data file
- KMY — KMyMoney data file
- DWG — AutoCAD drawing
- DXF — Drawing Interchange Format
- CHM — Microsoft Compiled HTML Help file
- TTF, TTC — TrueType font
- CLASS — Java class file
- KMZ — Google Earth location data
- FIT — Garmin activity file
- WALLET — Armory Bitcoin wallet
- WALLET.DAT — Bitcoin Core wallet
- Photos and images:
News for October 2017
Mon, 10/09/2017 — 23:36 — Dmitry Brant
Time for some exciting updates to the DiskDigger app for Android! Here is what’s new in the latest version:
- You can now permanently delete selected items from the list of recoverable files. This will physically overwrite the selected files, making them virtually impossible to recover using any software tools, including DiskDigger. Delete files individually by tapping the overflow menu next to each file, or tap the checkbox to select multiple files, and tap the main overflow menu in the toolbar.
- The app now supports a wider range of rooted devices (for certain devices, the previous version of the app was not properly detecting them as rooted).
- The performance and memory usage of the app has been improved, leading to fewer out-of-memory errors, especially when working with large numbers of files.
- A lot of minor bugs and crashes have been fixed. This is the most stable release of the app to date.
- DiskDigger now has a minimum requirement of Android 4.0 (Ice Cream Sandwich). For older devices (Honeycomb and earlier), the previous version of the DiskDigger app will continue to be available on the Google Play Store, but these older devices will not receive further updates.
And as always, DiskDigger for Windows is there if you need to recover photos, documents, videos, or any other files from your PC, memory cards, USB drives, and most other storage media.
Sat, 05/22/2010 — 18:44 — Dmitry Brant
You may have noticed that DiskDigger is no longer as «free» as it used to be. This decision was a difficult one, and wasn’t made lightly. When it came down to it, the freeware+donation model just wasn’t sustainable anymore. So now, to get the full functionality of the program, you will need to purchase a license key for a very modest fee of $15.00, which is still a lot less than comparable utilities out there. I’m confident that this price is worth the vast improvements made in the new version of the program.
In a nutshell, the program is shifting more towards a «shareware» model. Here is exactly how it will work now:
- You can download the program, and distribute it freely to anyone else.
- When you run the program, it will operate normally. That is, it will find your deleted files, show you previews, etc.
- When you try to save the deleted files, the program will show a message box asking you to enter a license key.
- The program will actually let you continue without a license key (after a short delay), but it will keep popping up the message box for every file you try to save without a license key.
- When you buy a license key, you may use it on one (1) computer. For a different computer, you will have to buy another license.
Based on the above, you can technically recover all your files for free with DiskDigger. However, buying a license key makes it much more convenient, and is a great way to contribute to the project.
News for August 2017
Wed, 08/09/2017 — 22:10 — Dmitry Brant
 Time for another exciting update to DiskDigger for Windows! Here’s what’s new in the latest version:
- Support for recovering High Efficiency Image File Format files (.HEIC, .HEIF) when scanning in «dig deeper» mode.
- Support for recovering Bitcoin wallet files (Wallet.dat files from Bitcoin Core, and .Wallet files from Armory) when scanning in «dig deeper» mode.
- Enhanced support for recovering .MP4, .MOV, .3GP and similar video files, with better metadata detection.
- Enhanced support for recovering .M4A audio files, with metadata and album art previews.
- Improved detection of FAT32 and NTFS partitions on certain drives with 4 KB sectors, such as some newer hard disks and some models of iPods.
- Further improvements to saving and restoring of sessions when scanning in «dig deeper» mode.
- Improved ordering and sorting of recoverable files by date in «dig deeper» mode, for file types that contain dates in their metadata.
- Added a more emphatic warning when attempting to save recoverable files onto the same drive from which the files are being recovered. Remember: you must never recover files onto the same disk that is being scanned, since this has the risk of overwriting other files that haven’t yet been recovered.
Download the new version and see what DiskDigger can recover for you!
DiskDigger for Android updates!
Sun, 02/15/2015 — 16:20 — Dmitry Brant
I’m thrilled to announce the latest update to the Android versions of DiskDigger and DiskDigger Pro (for rooted devices only)! This update features a redesigned and improved user interface, improved performance, and more powerful filtering options:
- The user interface has been cleaned up and simplified to feature search results more prominently, while placing recovery options and settings into the Action Bar on top.
- You may select between a List or Grid view for viewing recoverable files, as well as small, medium, or large thumbnails, for optimal browsing of search results (tap the Settings icon in the Action Bar).
- Each search result now has an options menu for recovering the individual result, as well as a checkbox for selecting multiple recoverable files for recovery.
- Tapping on a search result will bring up a Preview window with an enlarged thumbnail and additional information about the recoverable file.
- You may now filter the search results by date, although this only applies to .JPG and .TIFF files (tap the Settings icon in the Action Bar).
DiskDigger for Android is available for free from the Google Play Store, and can recover photos (.JPG), images (.PNG), and videos (.MP4, .3GP). If you need to recover other types of files from your Android device, please try DiskDigger Pro!
Приступая к восстановлению фото
Перед началом работы с программой, убедитесь, что вы извлекли карту из камеры и не записали на нее больше фото до того момента, пока не закончите с восстановлением фото
Это очень важно, поскольку любая активность на флешке должна быть приостановлена. Если в область, где содержатся удаленные файлы, будут записаны новые данные, вероятность восстановления данных с флешки существенно уменьшится.
Извлеките карту памяти из камеры, вставьте ее в слот карты памяти на компьютере. Если же у вас такого слота нет, вы можете вставить карту в usb кард-ридер, и затем присоединить его через USB к ПК. Флешки некоторых камер подключаются напрямую к компьютеру, через кабель. Однако при этом не все данные оттуда может быть доступны для утилиты DiskDigger PRO. Поэтому предпочтительно, если вы все же достанете карту памяти и вставите ее в комп, как уже и было сказано выше. Все, на этом подготовительные работы закончились, и мы приступаем к освоению программы DiskDigger, желательно иметь дистрибутив на русском языке и pro-версию.