Cygwin последняя версия 1.7.17
Содержание:
- 5.2 Before You Begin Installing Cygwin
- apt-cyg — apt для Cygwin
- Cygwin 3.1
- Install Cygwin (without admin rights)
- Mirror site list
- Problems and solutions
- To set up wxWidgets using Cygwin
- [Window Tutorial] How to Install Cygwin on Windows
- Обзор Cygwin
- Установка Cygwin
- Возможности Cygwin
- Cygwin Скачать
- Unsorted complementary list
- Using Cygwin/X
- Rails
- Further Reading
- Аналоги Cygwin
5.2 Before You Begin Installing Cygwin
Before starting with the SSHD setup, ensure you are not using OpenSSH and MKSNT when using the Add Host Targets Wizard. To do so, perform the following checks:
-
Ensure and are not in your environment variable. If they are, remove them by doing the following:
-
Right-click on My Computer and go to Properties.
-
In the System Properties window, click Advanced.
-
In this tab, click Environment Variables.
-
Here, search for the system variable, select it, and if the and are present in click Edit.
-
In the Edit System Variable dialog box, delete these two values from then click OK.
-
-
Stop the SSH Daemon if it is running from , or any other vendor. If the SSH Daemon is running, stop it by doing the following:
-
Right-click on My Computer, and select Manage.
-
In the Computer Management window, in the left pane, expand Services and Applications, and select Services.
-
In the right pane, click the SSH Daemon/MKS Secure Shell service, then click the Stop button.
-
apt-cyg — apt для Cygwin
Как установить apt-cyg
Кроме показанного выше способа установки пакетов в Cygwin с помощью установщика самого Cygwin, имеется аналог программы apt (apt-get) для Cygwin, он называется apt-cyg.
Чтобы установить apt-cyg выполните следующие команды:
wget  https://raw.githubusercontent.com/transcode-open/apt-cyg/master/apt-cyg
install apt-cyg /bin
Если появится ошибка
то сделайте так:
curl  https://raw.githubusercontent.com/transcode-open/apt-cyg/master/apt-cyg  > apt-cyg
install apt-cyg /bin
Для нормальной работы apt-cyg нужны пакеты lynx и wget. Если они у вас отсутствуют, то может потребоваться установить их обычным способом, с помощью установщика Cygwin.
Теперь для установки новых пакетов вы можете использовать команду вида:
apt-cyg install ПАКЕТ
Например:
apt-cyg install libxml2
Справка по команде apt-cyg
НАЗВАНИЕ
apt-cyg — утилита управления пакетами
ИСПОЛЬЗОВАНИЕ
apt-cyg
ОПИСАНИЕ
apt-cyg — это утилита управления пакетами, которая отслеживает установленные пакеты в системе Cygwin. Вызов apt-cyg включает в себя указание операции с любыми потенциальными параметрами и целями для работы. Целью обычно является имя пакета, имя файла, URL-адрес или строка поиска. Цели могут быть предоставлены как аргументы командной строки.
ОПЕРАЦИИ
install
Установить пакет(ы).
remove
Удалить пакет(ы) из системы.
update
Загрузить новую копию главного списка пакетов (setup.ini) с сервера, определённого в setup.rc.
download
Получить пакет(ы) с сервера, но ничего не устанавливать/не обновлять.
show
Показать информацию о данном пакете(ах).
depends
Создать дерево зависимостей для пакета.
rdepends
Создать дерево пакетов, зависящих от названного пакета.
list
Найти в каждом локально установленном пакете имена, соответствующие регулярному выражению. Если в командной строке не указаны имена пакетов, будут опрошены все установленные пакеты.
listall
Будет искать каждый пакет в главном списке пакетов (setup.ini) на предмет имён, соответствующих регулярному выражению.
category
Отобразить все пакеты, входящие в указанную категорию.
listfiles
Список всех файлов, принадлежащих данному пакету. В командной строке можно указать несколько пакетов.
search
Найти загруженные пакеты, которым принадлежат указанные файлы. Путь может быть относительным или абсолютным, можно указать один или несколько файлов.
searchall
Поиск по cygwin.com, чтобы получить информацию о файлах о пакетах. Предоставленная цель считается именем файла, и поисковая система вернёт пакет(ы), содержащий этот файл.
mirror
Установить зеркало; полный URL-адрес места, где можно найти базу данных, пакеты и подписи для этого репозитория. Если URL-адрес не указан, отобразит текущее зеркало.
cache
Установит каталог кэша пакетов. Если файл не найден в каталоге кеша, он будет загружен. Принимаются пути в формах Unix и Windows, а также абсолютные или обычные пути. Если каталог не указан, отобразить текущий кеш.
ОПЦИИ
—nodeps
Укажите этот параметр, чтобы пропустить все проверки зависимостей.
—version
Вывести версию и выйти.
Cygwin 3.1
Основные изменения в v. 3.1
- FIFO теперь можно открывать несколько раз для записи.
- Добавлена поддержка 24-битного цвета в режиме совместимости xterm в Windows 10 или более поздней версии.
- Поддержка псевдо-консоли в PTY. Псевдоконсоль — это новая функция в Windows 10, которая предоставляет консольные API на виртуальном терминале.
- Устранен конфликт имен файлов заголовков.
- Поддержка чувствительных к регистру каталогов
- Добавлены новые инструменты chattr и lsattr для настройки и просмотра файлов в командной строке.
- Обновлена семантика переименования POSIX в NTFS, начиная с Windows 10.
Install Cygwin (without admin rights)
This documentation is based on Oliver Doepner’s IT blog. Thank you for your work Oliver.
- Download setup-x86_64.exe.
- Open command line window (WIN+R and type ).
- Go to the download directory, e. g.:
cd %USERPROFILE%\Downloads
- Run setup-x86_64.exe with the option:
setup-x86_64.exe --no-admin
- During installation select the package.
- After installation open a Cygwin Terminal via Windows desktop shortcut.
- If you are behind an internet proxy (for example on a company environment) create for internet access:
#!/usr/bin/env bash

export http_proxy=http://your.proxy.server:proxy_port
export https_proxy=http://your.proxy.server:proxy_port
export ftp_proxy=http://your.proxy.server:proxy_port
export no_proxy=localhost,.example.com
- Now you need a file called . Downlaod it via
wget -O /usr/local/bin/cyg-get https://gitlab.com/cogline.v3/cygwin/raw/master/cyg-get?inline=false
Alternatively, you can also create the file yourself.
#!/usr/bin/env bash # import proxy definition [[ -r /etc/profile.d/proxy.sh ]] && . /etc/profile.d/proxy.sh readonly SUCCESS= readonly ERROR=1 readonly E_WRONG_ARGS=2 get_current_version() { cd /usr/local/bin ] && rm setup-x86_64.exe wget -q http://cygwin.com/setup-x86_64.exe chmod u+x setup-x86_64.exe } main() { local all_parameters="$@" local params="--no-admin" local packages= while :; do case "$1" in install) params="${params} -q -P" shift # list of comma separated packages packages=$(echo $@|sed -e 's/\s\+/,/g') params="${params}${packages}" ;; remove) params="${params} -q -x" shift packages=$(echo $@|sed -e 's/\s\+/,/g') params="${params}${packages}" ;; update) params="${params} -q -g" get_current_version ;; # Unknonw option -?*) echo "unknown option: $1" exit $E_WRONG_ARGS ;; # Default case: If no more options then break out of the loop. *) get_current_version break esac shift done run /usr/local/bin/setup-x86_64.exe ${params} exit $SUCCESS } main "$@" - Make the script executable:
chmod ugo+x /usr/local/bin/cyg-get
- On the Windows desktop create a copy of the Cygwin terminal shortcut, rename it Cygwin Setup.
- Edit the shortcut target, replace:
mintty.exe -i /Cygwin-Terminal.ico -
with
mintty.exe -i /Cygwin-Terminal.ico /bin/bash -l -c 'cyg-get'
- Now test it and execute the desktop shortcut or run cyg-get from the Cygwin command
prompt.
Mirror site list
- Africa:
- Asia:
- China: mirrors.163.com (https), mirrors.neusoft.edu.cn (https), mirrors.ustc.edu.cn (https), mirrors.aliyun.com (https), mirrors.huaweicloud.com (https), mirrors.sjtug.sjtu.edu.cn (https)
- Hong Kong: mirror-hk.koddos.net (https, also rsync)
- Israel: mirror.isoc.org.il (https)
- Japan: ftp.iij.ad.jp (https, also ftp), ftp.jaist.ac.jp (https, also ftp), ftp.yz.yamagata-u.ac.jp (https, also ftp)
- Korea: ftp.kaist.ac.kr (https, also ftp, rsync), ftp.kr.freebsd.org (ftp)
- Philippines: mirror.rise.ph (http, also ftp)
- Singapore: download.nus.edu.sg (https)
- Taiwan: ftp.ntu.edu.tw (http, also ftp), ftp.twaren.net (ftp)
- Australasia:
- Australia: mirror.internode.on.net (http, also ftp), mirror.aarnet.edu.au (https)
- New Caledonia: mirror.lagoon.nc (http, also ftp, rsync)
- New Zealand: ucmirror.canterbury.ac.nz (http)
- Canada:
- Alberta: mirror.cpsc.ucalgary.ca (https)
- Manitoba: muug.ca (https, also ftp)
- Ontario: cygwin.mirror.rafal.ca (http, also ftp), mirror.csclub.uwaterloo.ca (https, also ftp)
- Quebec: cygwin.mirror.globo.tech (http)
- Europe:
- Austria: mirror.easyname.at (https, also ftp, rsync)
- Belarus: ftp.byfly.by (https, also ftp, rsync), mirror.datacenter.by (https, also ftp, rsync)
- Belgium: cygwin.cu.be (https)
- Bulgaria: mirrors.netix.net (https, also ftp, rsync)
- Czech Republic: ftp.fit.vutbr.cz (http, also ftp)
- Denmark: mirrors.dotsrc.org (https, also ftp), cygwin.mbwarez.dk (https)
- Finland: ftp.funet.fi (ftp)
- France: mirrors.filigrane-technologie.fr (https)
- Germany: ftp-stud.hs-esslingen.de (https, also ftp), ftp.fau.de (https, also ftp, rsync), ftp.inf.tu-dresden.de (https, also ftp, rsync), linux.rz.ruhr-uni-bochum.de (https, also ftp), mirror.checkdomain.de (https, also ftp), www.gutscheinrausch.de (https), mirror.clientvps.com (https)
- Hungary: ftp.fsn.hu (https, also ftp)
- Italy: sourceware.mirror.garr.it (https)
- Netherlands: ftp.snt.utwente.nl (https, also ftp, rsync), mirror.koddos.net (https, also rsync)
- Norway: cygwin.uib.no (https, also ftp, rsync), cygwin.cathedral-networks.org (https), cygwin.viem-it.no (https, also rsync), mirror.terrahost.no (https)
- Poland: sunsite.icm.edu.pl (ftp)
- Portugal: ftp.eq.uc.pt (https, also ftp), ftp.rnl.tecnico.ulisboa.pt (https, also ftp)
- Sweden: ftp.acc.umu.se (https, also ftp, rsync)
- UK: www.mirrorservice.org (https, also ftp), cygwin.mirror.uk.sargasso.net (https)
- United States:
- California: mirrors.sonic.net (https, also ftp), mirrors.kernel.org (https)
- Georgia: www.gtlib.gatech.edu (http)
- Idaho: mirrors.syringanetworks.net (http, also ftp, rsync)
- Illinois: mirror.steadfast.net (https, also rsync), mirror.team-cymru.com (http, also rsync)
- New Jersey: cygwin.mirror.constant.com (http)
- New York: mirror.clarkson.edu (https), mirrors.rit.edu (https)
- Oregon: cygwin.osuosl.org (https, also ftp, rsync)
- Pennsylvania: cygwin.mirrors.hoobly.com (http)
- Utah: mirrors.xmission.com (https, also ftp)
- Virginia: mirror.cs.vt.edu (http)
Last updated: 2021-09-25 06:18 UTC; Mirror size: 170G
Problems and solutions
$’\r’: command not found
The problem is that shell scripts such as
may fail:
	  $ export PTII=c:/user/ptII
	  $ $PTII/bin/vergil
	  c:/user/ptII/bin/vergil: line 30: $'\r': command not found
	  c:/user/ptII/bin/vergil: line 40: $'\r': command not found
	  c:/user/ptII/bin/vergil: line 43: $'\r': command not found
	  c:/user/ptII/bin/vergil: line 48: $'\r': command not found
	  c:/user/ptII/bin/vergil: line 67: syntax error near unexpected token `$'in\r''
	  ':/user/ptII/bin/vergil: line 67: `    case "`uname -s`" in
The solution is to set bash to ignore carriage returns ‘\r’,
Another possible solution is to create a that contains
	    export SHELLOPTS
	    set -o igncr
See also:
- — The 2006 Cygwin announcement that covers this.
- This problem is similar to the Cygwin CR/NL
problems. What has changed is that the Cygwin installer appears
to no longer offer the possibility of selecting DOS as the default
file type. -
— discussion about the issue.
-
— info about why paths like do not use .
-
— Cygwin manual for .
Another possibility is to use perl to convert the \r\n characters to \n:
perl -i -pne "s/\r\n/\n/g" configure
*** target pattern contains no ‘%’. Stop.
The problem is that if contains a colon, such as
export PTII=c:/Users/Administrator/ptII
Then newer versions of GNU make will fail.
Under Windows, must be set using syntax because tools like
do not understand
A workaround is to download cygwin-make-3.80.tar.gz:
	    cd /usr/bin
            wget https://ptolemy.berkeley.edu/ptolemyII/ptII10.0/cygwin-make-3.80.tar.gz
	    mv make.exe make.old.exe
	    tar -zxf cygwin-make-3.80.tar.gz
	    rm cygwin-make-3.80.tar.gz
See Bug 55 — GNU Make 3.81 is broken under Windows
To set up wxWidgets using Cygwin
- get wx sources in one way or another
- alternatively, get sources via svn:
there are more detailed install instructions for cygwin inside the sources you just downloaded, see
wxWidgetsX.Y/docs/msw/install.txt
Below an abbreviated version of the process described in install.txt
For cygwin the Linux (typical) install instructions should suffice but you will need to have X11 support (precomplied binaries and lib are available from Cygwin setup/updates)
 cd /path/to/downloaded/wxWidgetsX.Y
 mkdir build-debug
 cd build-debug
 ../configure --with-X11
 make
 make install
 # you may need to also export the path to the libraries
 echo "export LD_LIBRARY_PATH=$LD_LIBRARY_PATH:/usr/local/lib" >> ~/.bashrc
For cygwin you may also want to use «configure» with some additional parameters.
 cd $WXWIN
 mkdir build-debug
 cd build-debug
 ../configure --with-msw --enable-debug --enable-debug_gdb --disable-shared
 make
 make install # This step is optional, see note (6) below.
 cd samples/minimal
 make -f minimal.unx
 ./minimal.exe
configure parameters (examples)
 ./configure --with-msw --enable-debug --enable-debug_gdb --disable-shared
 ./configure --with-msw --enable-unicode
- use —disable-precomp-headers if Cygwin doesn’t support precompiled headers
- see ‘./configure —help’ for more details; configure is not covered here
- If compiling fails with » Error 1″, use the built-in jpeg support. Example:
./configure --with-msw --enable-debug --enable-debug_gdb --disable-shared --with-libjpeg=builtin
- You may have to fix dependencies by running again setup.exe of Cygwin and installing the missing packages.
- If you don’t configure with «—disable-shared», you will be unable to compile contrib libraries.
- Make sure the path to wxWidget directory doesn’t contain a space or the make will fail.
- After you successfully configured you need to make wxWidgets:
make
How can you see if you are successful? install.txt tells which files should be build (see ‘Where Compiled Files are Stored’). In subdir ‘lib’ named after compiler, e.g.
cygwxbase294u_gcc_custom-4.dll
[Window Tutorial] How to Install Cygwin on Windows
https://youtube.com/watch?v=XKJzRg2JR50
How to Install Cygwin on Windows
Cygwin — это бесплатное приложение, которое предоставляет подобную среду UNIX в операционной системе Windows. Cygwin состоит из библиотек системных вызовов UNIX и многих приложений GNU. Компиляторы, инструменты для разработки, комплекты инструментов разработки, GNU emacs, TeX и LaTeX, OpenSSH (клиент и сервер) и многое другое упаковываются в различные модули, которые можно загрузить и использовать на вашем ПК с ОС Windows.
Обзор Cygwin
Cygwin действует как уровень эмуляции, предоставляя функциональные возможности системного вызова POSIX (Portable Operating System Interface) и набор инструментов, которые обеспечивают внешний вид Linux. С установленным Cygwin пользователи имеют доступ ко многим стандартным утилитам UNIX. Cygwin может помочь вам выполнить все команды UNIX на ПК с Windows, что всегда вызывает озабоченность у разработчиков, особенно разработчиков, работающих на серверах Linux.
Совместимость POSIX от Cygwin не очень хорошо вписывается в собственный API Windows. Если вы смешиваете вызовы POSIX с вызовами Windows в своей программе, возможно, вы увидите неравномерные результаты. В частности, сигналы Cygwin не будут работать с функциями Windows, которые допускают имена файлов, которые могут быть смущены поддержкой Cygwin для длинных имен файлов.
В этой статье я расскажу о ее установке и перечислении некоторых общих функций Cygwin и родной UNIX задачи, которые могут быть выполнены на ПК с Windows с помощью этого приложения.
Установка Cygwin
Установка Cygwin начинается с загрузки исполняемого файла и его запуска. Ниже приведены серии снимков экрана, которые помогут вам пройти полную установку.
1) Убедитесь, что вы используете версию Windows, поддерживаемую Cygwin, и что у вас достаточно свободного места на диске. Рекомендуется минимум 5 ГБ, так как полная установка Cygwin может весить около 5 ГБ.
2) Запустите исполняемый файл, а затем выберите опцию «установить из Интернета». Это позволяет программе загружать полный репозиторий с сервера на локальный компьютер.

3) Выберите каталог по умолчанию. C: Cygwin, это всегда рекомендуется. Нажмите «Далее».

4) Выберите тип подключения к Интернету. Выберите «Прямое соединение». Нажмите Далее.

5) Выберите ближайший зеркальный сайт, с которого можно загрузить пакеты Cygwin. Любой будет делать.

6) Выбор пакетов: Это критическая часть. На этом этапе вам нужно выбрать нужные приложения. Приложения или пакеты можно выбрать, просто щелкнув метку по умолчанию рядом с именем пакета. Если вы совершенно не знакомы с UNIX, это наиболее часто используемые пакеты:

- opennssh
- keychain (для пар ключей ssh)
- gv
- ghostscript
- emacs
- vi
- grace
- tcsh
- gnu compilers
- tetex
- aspell
- gnuplot
- rsync
7) Как только вы нажмете дальше, начнется установка. Это занимает некоторое время, может быть около 30 минут в зависимости от скорости загрузки. Запустите Cygwin, щелкнув командный файл.

Возможности Cygwin
- Cygwin является бесплатным / открытым исходным кодом. Он может быть изменен с использованием существующего исходного кода, доступного для загрузки.
- Вы можете использовать команды bash на Cygwin. Установите компиляторы, SDK и инструменты на нем.
- Интеграция буфера обмена — интеграция буфера обмена между буфером X и буфером обмена Windows. Поддерживает только текст.
- Удаленные клиенты. Удаленные клиенты могут запускаться и отображаться в сеансе Cygwin / X либо через telnet, либо через туннелирование X11 через ssh, используя пакет openg Cygwin.
- Выполнять клиентские серверные приложения с использованием двух разных экземпляров Cygwin на том же ПК.
Cygwin Скачать
Загрузить Cygwin здесь .
Видео проведет вас через шаги установки Cygwin.
https://youtube.com/watch?v=XQKOQiiivyY

Вы можете получить доступ к Marketplace, загрузить, установить приложения WP7 на Windows Phone из Индии, используя этот трюк; до такого времени вы можете получить к нему доступ с вашего Windows Phone.

Классическая оболочка добавляет меню «Пуск» и «Пуск» к Windows 8.1 | 8. Он также позволяет вам запускать экран запуска и добавлять классические функции Windows Explorer и Internet Explorer в Windows 8.

В этом сообщении перечислены часто задаваемые вопросы (FAQ) о загрузке и установке приложений в Windows Phone 7 Marketplace.
Unsorted complementary list
Darwin/Mac OS X
The existing Darwin binaries have been built through buildbot in 2013 and links
to them can be found on the dedicated
page.
Rubenvb
Rubenvb has built a number of toolchains including some for less common setups.
They are split into two categories: toolchains targeting
Win32
or
Win64.
GCC with the MCF thread model
GCC with the MCF thread model is a series of x86
and x64 native toolchains built by LH_Mouse. The MCF thread model involves the
mcfgthread library to provide minimum
yet complete C++11 thread support. Disregarding POSIX or Windows XP
compatibility, it implements (hopefully the most) efficient mutexes and
condition variables that are competitive with even native slim reader/write
(SRW) locks and condition variables since Windows Vista.
Store of binaries on SourceForge
A very large number of other binaries and sources are hosted in the File
Release System on Sourceforge which
might have what you are after.
Using Cygwin/X
The X Window System, version 11 (often «X11», or simply «X») is the standard
graphical environment under Unix and GNU/Linux; it is also available for other
platforms, including Mac OS X and MS-Windows. X applications («clients»)
exchange data with an X server (another application). The X server receives
and interprets instructions from the clients for displaying the clients’
windows, and it collects and transmits keyboard and mouse input events to the
clients. The xorg packages available with Cygwin (collectively,
«Cygwin/X») provide a high-quality X server, a large set of standard X clients,
and a complete set of development tools that can be used to compile X clients
that run under MS-Windows.
Important: X clients cannot run unless they can connect to a running
X server. The X server must be started first. When you use Cygwin/X, its
X server (Xwin) runs on your PC, under MS-Windows. Once Xwin is running, you
can launch and interact with X clients on your PC or on any other networked
computer (which can be running MS-Windows, GNU/Linux, Mac OS X, Unix, or any
other OS that can run X client software).
Since Xwin is a complete window system, it has a «root» (background) window on
which X clients’ windows are displayed. Xwin can run in «rootless» mode, in
which its root window is invisible, allowing the MS-Windows desktop and
application windows to be visible, and allowing the X clients’ windows to be
moved, resized, closed, and reopened using the same methods as for native
MS-Windows applications. Use startxwin to run Xwin in rootless
mode.
On Cygwin 1.7, startxwin is /usr/bin/startxwin.exe,
and it must be started from a Cygwin window (not a DOS box or a
desktop shortcut). On Cygwin 1.5, startxwin
is c:\cygwin\usr\X11R6\bin\startxwin.bat, and if you create a
desktop shortcut to this batch file, you can click on it to launch
Xwin.
If you prefer, you can run the command startx in a Cygwin window to
launch Xwin; using this method, Xwin opens a root window on the desktop, and
all X client windows are contained within Xwin’s root window.
When you launch Xwin, it starts an xterm (terminal emulator) client:
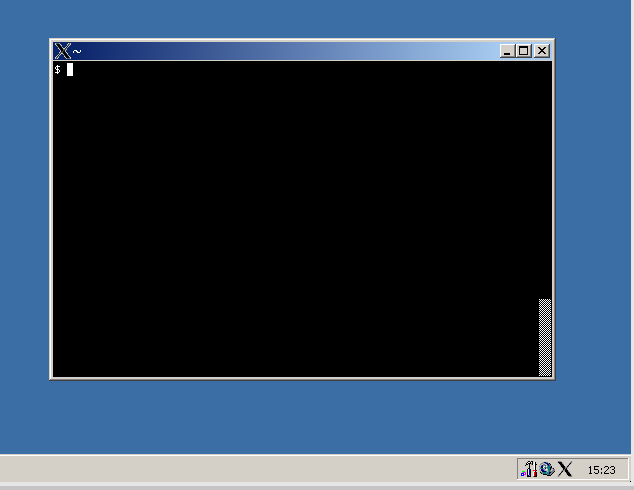
Within this window, just as in a Cygwin terminal window, you are running the
GNU bash shell. An important difference is that you can launch other
X clients from an xterm without additional preparation.
You can access xterm‘s menus by pressing and holding the Ctrl
key while clicking the left, middle, or right mouse buttons. Use these menus
to enable the scrollbar (as shown in the screen shot above) or to change the
character size, among other possibilities.
While the X server is running, its icon («X») appears in the Windows system
tray (see above). You can click on this icon to force the X server to exit,
but doing so will also force any X clients to exit; normally you should
exit from all X clients before stopping the server.
Rails
- Start a Cygwin shell as administrator and run
apt-cyg install make gcc4 sqlite3 libsqlite3_0 libsqlite3-devel
- Look at the RubyGems
site and check what the latest version is. Here I assume it’s 1.8.10.Still as administrator, run
wget http://production.cf.rubygems.org/rubygems/rubygems-1.8.10.tgz
tar xvfz rubygems-1.8.10.tgz
cd rubygems-1.8.10
ruby setup.rb
cd ..
rm rubygems-1.8.10.tgz
rm -rf rubygems-1.8.10
- Still as administrator, run
gem install rails sqlite3-ruby
- Now open a Cygwin shell as a regular user. Run
rails new firstapp
cd firstapp
rails server
Point your browser to http://localhost:3000. If you get the
Rails greeting screen, the installation was successful.
Further Reading
Readers who are familiar with GNU/Linux or Unix may not need much more
information than what is given above to begin using Cygwin productively. The
environment is so Unix-like that it’s easy to forget that it is all running
under MS-Windows. The Cygwin project documentation highlights the important
differences between Cygwin and other Unix(-like) environments.
Those who are new to Unix may find the additional resources listed below
to be helpful while they are becoming familiar with the Unix way of doing
things, which is quite different from the MS-Windows model. Almost anything
you learn while using Cygwin is directly transferrable to GNU/Linux. If
your experience encourages you to make the leap to GNU/Linux, you might
want to start with a live CD distribution such as
Knoppix, which allows
you to run a full GNU/Linux distribution without writing anything to your
hard disk.
-
Cygwin
Documentation. The Cygwin project maintains several useful
documents here, including:- Cygwin User’s
Guide - Cygwin FAQ
- Cygwin API Reference
-
Cygwin Package
List. Look here to see if your favorite GNU/Linux application is
available as a Cygwin package.
- Cygwin User’s
-
UNIX Tutorial for Beginners. Although written for UNIX,
almost all of this excellent tutorial from the University of Surrey is
applicable to Cygwin. The final section (tutorial 8) describes features of
csh, an alternative to bash. -
The Linux
Terminal — a Beginner’s Bash. This clearly written guide from the Malta
Linux Users’ Group covers some of the same material as the previous resource,
and fills in the gaps with discussion of the bash shell. Skip the
sections about creating a user account and how to access the terminal window,
which are GNU/Linux-specific; the remainder is a gentle introduction to
bash and to the organization of a typical Unix file system (which is
an accurate description of the Cygwin root directory hierarchy with the
exception of /dev, which is not present under Cygwin). -
-h or --help. These command-line options are
interpreted by most Unix applications as a request for a usage summary; they
are the Unix equivalents of /?. For example, type «mkdir
--help» at a bash prompt to get a usage summary for the
mkdir command. Usage summaries are usually very brief and are most
useful to help recall information you have learned from some other source. -
. These are the
standard, (almost) universally available, cryptically concise, on-line
reference documents for Unix programs. Type «man program» at
a bash prompt to see the man page for
program. McGill University maintains a
gentle introduction to reading man pages (this seems to be
off-line as of early 2008; another introduction to man pages
is here). -
Google is your friend!
One of the most efficient ways to get help with common Unix questions is
by using the name of a command or the text of an error message as a Google
search term. -
Cygwin mailing
lists and unofficial newsgroups can also be useful sources of
information.
|
If you would like help understanding, using, or downloading content, please see our Frequently Asked Questions. If you have any comments, feedback, or particular questions regarding this page, please send them to the webmaster. Comments and issues can also be raised on PhysioNet’s GitHub page. Updated Tuesday, 17 April 2018 at 18:24 EDT |
PhysioNet is supported by the National Institute of General Medical Sciences (NIGMS) and the National Institute of Biomedical Imaging and Bioengineering (NIBIB) under NIH grant number 2R01GM104987-09. |
Аналоги Cygwin
- VMware Workstation
- WD SmartWare
- Glary Utilities Pro
- Realtek Ethernet Controller Driver
- Joxi
- RadioSure
2019, Win10Programs — Каталог популярных программ для Windows 10.
Эта статья будет полезна начинающим пользователям Cygwin. Начнем с того, что нам для начала нужно ответить на простой вопрос. Что же такое Cygwin? Cygwin — это UNIX-подобная среда и интерфейс командной строки для Microsoft Windows. В системе Microsoft Windows уже существует подобный интерфейс cmd. Вызвать командную строку можно сочетанием клавиш Win+R. Но зачастую большую часть работы Windows пользователям приходится делать вручную. По другую сторону Linux пользователь уже давно написал bash-скрипт и сидит пьет пиво в сторонке от автоматизированного рабочего процесса.
Так что же мешает сделать это и в ОС Windows? Правильно, абсолютно ничего не мешает. Но для этого нужны дополнительные программы и библиотеки. Программа Cygwin расширяет возможности стандартной командной строки Windows, позволяя автоматизировать некоторые процессы и разрабатывать программы для Linux и других систем.
Выбираем нужную версию, скачиваем и запускаем исполнительный файл setup-x86.exe и setup-x86_64.exe соответственно.
 Окно установки 64 битной версии программы
 Окно выбор способа установки
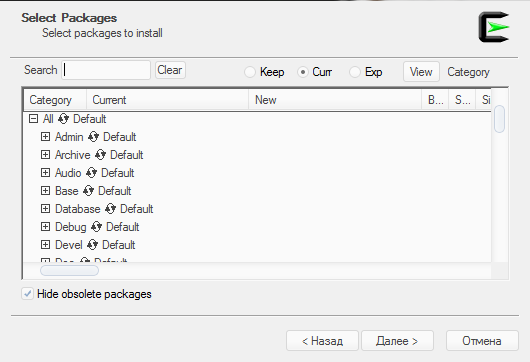 Окно выбора пакетов
Окно установки 32 битной версии программы выглядит точно так же как и 64 битной. Следующим шагом будет окно выбора. Откуда устанавливать или скачивать программу. Всего есть три варианта. Первый вариант Install from Internet (downloaded files will be kept for future re-use) установка из интернета причем загруженные файлы будут храниться до следующего повторного использования. Второй вариант Download Without Installing скачать без установки. Третий вариант Install from Local Directory установка из локального каталога. Т.к. у нас нет локальной копии и нам нужно установить то выбираем первый вариант. Следующее окно будет выбор пути установки. Рекомендую выбрать системный диск, к примеру у меня путь установки Cygwin это C:cygwin64. Следующее окно это выбор пути где будут храниться временный файлы которые будут скачиваться в процессе установки. У меня это C:cygwin64package. Потом нужно выбрать как скачивать через прокси или напрямую. Следующим шагом будет выбор репозитория скачки выбираем любой попавшийся или тот что по умолчанию и жмем Далее. После нажатия кнопки далее начнется процесс скачивания основных конфигов. Следом вы сможете выбрать что устанавливать. Чтобы выбрать пакет нужно нажать Skip около названия пакета. Список пакетов которые вам пригодятся:
- gcc-core (в разделе Devel)
- gcc-g++ (в разделе Devel)
- make (в разделе Devel)
- cmake (в разделе Devel)
- automake (в разделе Devel)
- wget (в разделе Web)
- libiconv (в разделах Devel и Libs)
- openssh (в разделе Net)
- nano (в разделе Editors)
- bash (из раздела Base)
- base-cygwin (из раздела Base)
- base-files (из раздела Base)
- cygwin (из раздела Base)
- file (из раздела Base)
- gzip (из раздела Base)
- login (из раздела Base)
- mintty (из раздела Base)
- openssl (из раздела Base)
- run (из раздела Base)
- tar (из раздела Base)
- vim-minimal (из раздела Base)
- cron (из раздела Admin)
- shutdown (из раздела Admin)
- git (все пакеты из раздела Devel)
Также рекомендую полностью установить раздел Perl и Python. После этого жмем далее и произойдет установка нужных пакетов и их зависимостей. После конца установки можно будет запустить сам Cygwin и начать работу.

Мне не симпатизировал ни цвет фона, ни встроенный шрифт и цвет текста поэтому я кастомизировал его. На этих словах я закончу эту статью.
Данная статья не подлежит комментированию, поскольку её автор ещё не является полноправным участником сообщества. Вы сможете связаться с автором только после того, как он получит приглашение от кого-либо из участников сообщества. До этого момента его username будет скрыт псевдонимом.