Manual backup
Содержание:
- A. Installing VirtualBox (freeware) on your Mac
- Instalar CopyTrans Manager en su iPod
- Command line reference
- Main screen overview
- Manual Backup to a folder/iTunes
- Transfer photos from PC to iPhone without iTunes
- CopyTrans Simple version
- Importing bookmarks to your iPhone
- Transfer entire iPhone music library to PC
- Connect to device over USB cable or WiFi
- Smart Backup to iTunes
- Edit iPhone bookmarks with CopyTrans Contacts
- Alternative way: Running CopyTrans on your Mac using Parallels Desktop
- B. Installing CopyTrans programs in Windows on your Mac
- CopyTrans and Mac formatted iPods
- Customizing the backup structure
- Transfer photos from PC to iPhone with iTunes
- Transfer selected tracks from iPhone to iTunes
- How to export Internet Explorer/Edge bookmarks?
A. Installing VirtualBox (freeware) on your Mac
-
First, download Windows image file (.iso) from the Microsoft website (you can use any version of Windows, however, Windows 10 is recommended).
-
Download VirtualBox on your Mac. Make sure to select the latest Mac version from the list available for download and then install it.
-
Open VirtualBox and click on the “New” button in order to create a new virtual machine. Type in the new system name in “Machine Name”. Select “Microsoft Windows” as the OS type. Finally select the OS version (in this case, Windows 7) and click “Continue”.
-
Next, you will need to allocate the amount of RAM memory for your new virtual PC (512-1024 Mb for Windows 7 and 1518-2048 Mb for Windows 10 is enough). Click “Continue”.
-
Choose “Create a virtual hard drive now” and click “Continue”. Next, choose “VDI (VirtualBox Disk Image)” and click “Continue”.
Now, select “Dynamically allocated” and click “Continue”. Finally, type a name for the new virtual hard drive and select the size (20-25 GB is sufficient). Click on the “Create” button.
-
Next, you will need to download and install the latest version of the VirtualBox Extension Pack from the VirtualBox binaries list. Once you have the Virtual Manager window open, click on the virtual machine you just created and click on the “Settings” button. From the new “Settings” window, navigate to the “Ports” tab and tick the “Enable USB 2.0 (EHCI) Controller” option. Click “OK”. Your virtual PC is now ready.
-
If you have a CD/DVD of Windows operating system: Insert your Windows installation CD in your Mac. Your Windows system will appear in VirtualBox Manager’s window on the left. Double click on the Windows system entry in order to run (please ignore any errors you might get during the startup process). Your virtual machine will now boot from the Windows installation CD. Make sure to follow the installation instructions in order to install Windows.
If you have Windows ISO file: Select your newly created virtual machine, click “Change”. Then go to the “Storage” tab and click “Controller: SATA”. To insert the ISO file, click Disk plus sign and select your ISO file. In the tab “System” set the boot order “DVD” – “disk” fixed.
After installing Windows you must configure your internet connection. If your internet connection was not configured automatically, you will need to manually configure it from Windows’ Control Panel. To do so in Windows, go to “Start Menu > Control panel > View network status and tasks”. Click on the red cross under “View your basic network information and set up connections”. Windows will now try to configure your network connection.
Once you have your Windows Internet connection up and running, your virtual PC is ready to use.
Instalar CopyTrans Manager en su iPod
Instalando CopyTrans Manager en tu iPod o llave USB, puedes escuchar la música que tienes en tu iPod, ver las películas y los vídeos en cualquier momento, en cualquier computador con Windows. (Cuidado con respetar los derechos de autor.)
Para instalar CopyTrans Manager en tu iPod o llave USB (excepto iTouch y iPhone), sigue los pasos siguientes:
-
Descarga la versión ZIP
Descargar CopyTrans Manager
-
Abre el iPod en iTunes et active el uso en modo disco.
-
Examina el disco de tu iPod con al Explorador Windows.
-
Extrae CopyTransManager.exe en una carpeta en tu iPod.
CopyTrans: para pasar música de tu iPhone al PC
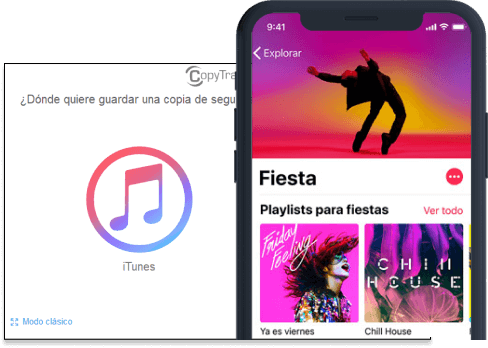
Si necesitas guardar la música de tu iPhone o iPad en tu PC o en iTunes, usa nuestro programa – CopyTrans
Ventajas
️ Hace Copia de Seguridad de música en iTunes, PC o Disco duro con unos pocos clics
️ Transfiere música, vídeos, listas de reproducción y pelis
️ Guarda música sin duplicados
️ Copia de Seguridad de toda la biblioteca o de las pistas elegidas
Con CopyTrans puedes:
- Pasar música de iPhone a PC
- Hacer copia manual
- Hacer copia inteligente
- Seguir la guía completa: Primeros pasos con CopyTrans
CopyTrans Photo: manejar fotos de tu iPhone
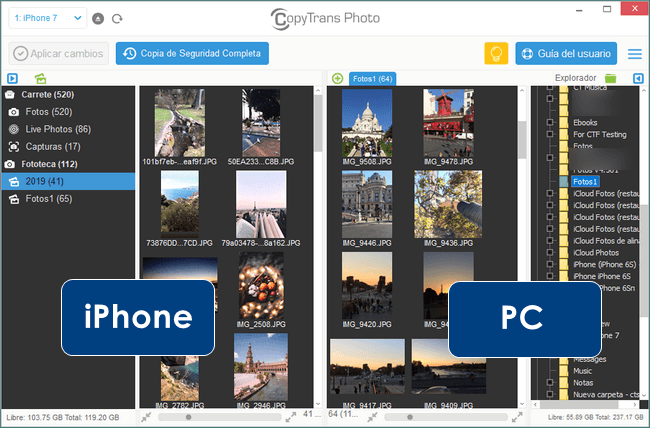
Todos lo sabemos, que gestionar las fotos y los vídeos de tu iPhone es una tarea bastante complicada y no te deja muchas opciones, pero aquí tienes tu CopyTrans Photo. Este programa facilita mucho la vida para los usuarios de dispositivos iOS.
Ventajas
️Puedes usar la aplicación para copiar álbumes de un lado a otro, manteniendo la estructura del álbum;
️La función “Copia de Seguridad Completa” reconoce fotos existentes y no crea duplicados;
️El programa puede editar y guardar correctamente las fotos en vivo en un PC, por lo que si vuelves a copiar imágenes en vivo al iPhone, no perderán esta función;
️CopyTrans Photo es compatible con todas las versiones de iOS, iTunes y Windows.
Con CopyTrans Photo puedes:
- Pasar fotos de iPhone a PC
- Pasar fotos de PC a iPhone
- Borrar fotos iPhone
- Convertir HEIC a JPG
- Pasar Películas al iPad
- Seguir la guía completa: Primeros pasos con CopyTrans Photo
Command line reference
To import contacts to your iDevice (application must be activated):
-
CopyTransContacts [/import] [’options’] source_directory
-
CopyTransContacts [/import] [’options’] file1 file2 file2
– import contacts to first connected iOS device (will wait until device is connected)
– import all contacts in directory instead of individual files (only valid on import)
– import all contacts in directory and its subdirectories instead of individual files (only valid on import)
– on import, will add duplicates (if /silent is used, this is the default behaviour, otherwise will prompt)
– on import, duplicates will be overwritten
– on import, duplicates will be skipped
– clear device contacts before import
NOTE: exit code will be set to non zero if import fails.
Examples:
Import all contacts contained in a directory –
CopyTransContacts /import /directory /silent «c:\My dir with contacts»
Import multiple vcard files –
CopyTransContacts /import /silent «c:\My dir with contacts\contact1.vcf» «c:\My dir with contacts\contact2.vcf»
To export contacts from your iDevice (application must be activated):
CopyTransContacts [/export] [’options’] dest_directory
– export all contacts from first connected iOS device to directory
– don’t export groups
– export to directory with device name
– possible export profiles (use only one, default is /ios) include /ios, /android, /icloud, /outlook, /gmail, /yahoo, /hotmail, /thunderbird, /win_contacts, /win_address_book, /excel.
NOTE: exit code will be set to non zero if all export fails. That is, if even one contact is exported, and all other fail, exit code will be set to zero.
Example:
Export to directory for reimport on other iOS device –
CopyTransContacts /export /quit /silent /ios «c:\My exported contacts\»
To activate CopyTrans Contacts:
CopyTransContacts [/activate] [’options’] “first_name” “last_name” activation_code
– activate application, must be followed by firstName lastName activationCode
Note: exit code will always be zero (on success or failure).
Example:
CopyTransContacts /activate /quit /silent «David E.» «James» FFFF-FFFF-FFFF-FFFF-FFFF-FFFF
Misc:
– displays command line reference.
– do not open main program window
– quit after operation execution (if /silent is specified, will be done by default)
Main screen overview
Once your device is connected, you will be taken to the main CopyTrans Filey screen. It contains several important elements. Let’s have a look:
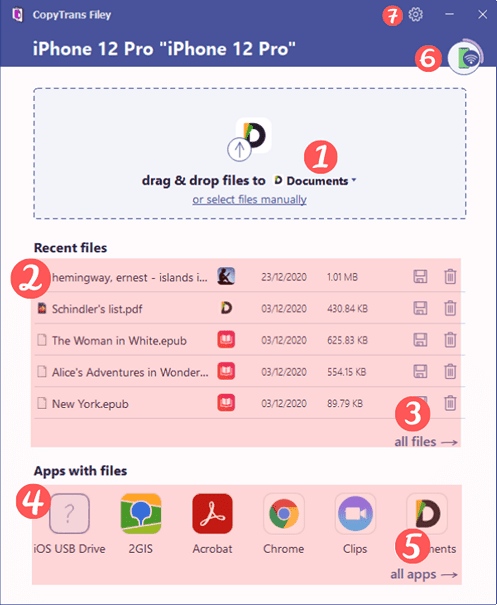
- Drag-and-drop zone: contains a drop-down list where you can select an app for file transfer;
- Recent files: shows the latest files uploaded to your device sorted by date;
- All files: leads to a window listing ;
- Apps with files: shows some applications that contain files on your device;
- All apps: leads to a window listing ;
- Device icons: allow you to switch between your iOS devices;
- Settings: opens the .
TIP:The circular progress bar around the iPhone icon fills as you use more device space.

And this is just the beginning! Read on for more tricks to pull using CopyTrans Filey.
Manual Backup to a folder/iTunes
If you don’t want to back up all of your library at once, or you need to change some export parameters, Manual backup feature is your choice.
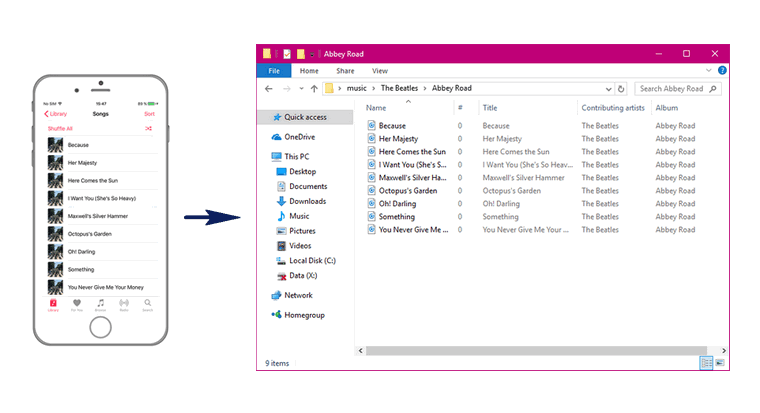
CopyTrans “Manual Backup” transfers all chosen music files, track information, artworks and playlists to iTunes. You decide what to transfer. Full control and 100% customizable.
Here’s the detailed guide on Manual backup.
Do a manual backup to a folder, when:
- you want to keep a backup of your iPod;
- you want to update an existing folder backup;
- you want to import tracks from a folder into iTunes later;
- you want to create a backup CD/DVD of my iPhone;
- you do not want to transfer all your iPod tracks to a folder.
Do a manual backup to iTunes, when:
- you do not want to transfer all your iPod tracks to iTunes;
- you don’t want CopyTrans to automatically update all track information in iTunes;
- you want to keep the track information which is already in iTunes.
Transfer photos from PC to iPhone without iTunes
Looking for an easy way to add photos to iPhone without iTunes?
For this specific purpose we have created CopyTrans Photo. It lets you see all your photos in chronological order and quickly add the ones you need.
Described below is a guide how to transfer photos and videos from computer to iPhone, as well as to directly manage your Photo Library. Let’s get to it:
-
To import photos from PC to iPhone, download CopyTrans Photo from the following page:
-
Start CopyTrans Photo and connect your iPhone (iPad or iPod touch). You will see your iPhone photos on the left, and PC photos and folders on the right.
-
From the far right pane, select a PC folder from where you want to copy photos. Then select the photos you wish to transfer to iPhone. TIP: To select multiple photos, press and hold the CTRL key and click on the individual photos. To select all photos, press CTRL + A.
-
Next, choose the iPhone album on the left where to add photos from computer.
NOTE: Look for your images in “FROM MY MAC” section. Due to Apple limitations, Camera Roll stores only photos or albums that were created on the iPhone.
-
To transfer photos from computer to iPhone, just drag and drop the selection anywhere within the iPhone photo pane – basically from right to left.
TIP: You can also drag and drop entire folders from PC to iPhone. -
Finally, click on the “Apply changes” button to confirm transferring photos from PC to iPhone.
That’s it! You will find your images in “From my Mac” album. This is how to transfer pictures from computer to iPhone without iTunes!
Why people choose CopyTrans Photo:
Convenient way to manage photos and videos on your iPhone from PC;
Preservs original quality and EXIF data;
Preservs album structure;
;
Works offline;
Compatible with the latest iOS, iTunes, and Windows versions;
ProRAW Apple format compatible.
Still have questions on how to transfer pictures from laptop to iPhone?
Check out our comparison table that lists the features of both iTunes and CopyTrans Photo when it comes to transferring photos between your iPhone, iPad and a Windows PC.
Makes it pretty straightforward, doesn’t it?
| Manage iPhone/iPad photos | iTunes | CopyTrans Photo |
| Transfer photos and videos from PC to iPhone | ✓ | ✓ |
| Transfer photos, videos and albums from iPhone to PC | ✗ | ✓ |
| Transfer photos, videos and albums from one iPhone to another iPhone/iPad | ✗ | ✓ |
| View iPhone photos, videos and albums on PC | ✗ | ✓ |
| Delete selected photos and videos from iPhone | ✗ | ✓ |
| Play Camera Roll videos | ✗ | ✓ |
| Retrieve lost PC photos from iPhone | ✗ | ✓ |
| Transfer photos from multiple PC locations to iPhone | ✗ | ✓ |
| Copy photos to iPhone from multiple PCs without replacing previously transferred photos | ✗ | ✓ |
| Organize iPhone photos from your PC | ✗ | ✓ |
| Transfer photos from iPhone to Android | ✗ | ✓ |
| Transfer photos from Android to iPhone | ✓ | ✓ |
CopyTrans Simple version
CopyTrans Simple version is a very user-friendly mode that allows you to export all your music from iPhone (iPod, iPad) to iTunes or a folder on your PC. This way is customization- and hassle-free. If you need a quick way to transfer all of your music, choose Simple mode.
-
If you want to copy all your music to iTunes, open CopyTrans and click on the ‘iTunes’ button.
-
If you want to copy all your music to a folder on your PC, open CopyTrans and click on the ‘Folder’ button.
-
Then select the folder you want to back up to and press OK.
If you want to select specific tracks, not to back up your whole music library, choose Classic mode.
Importing bookmarks to your iPhone
Now that you’re all set with importing bookmarks to your PC and have them stored in a file, let’s have fun! We will import the bookmarks to iPhone. To make sure the process is smooth and effective, we will need an application by CopyTrans – CopyTrans Contacts. We created it specially so that you have full control over your contacts, messages, notes, etc. Read about the program’s features and download to try it here:
IMPORTANT: Managing bookmarks used to be one of CopyTrans Contacts main functions. However, due to little demand it is now disabled by default. You can still enable bookmark management in settings – .
After you’ve made sure the Bookmarks are enabled in CopyTrans Contacts, importing them is child’s play. Do it in 2 steps:
Run CopyTrans Contacts and connect your iPhone. Let your entire iPhone data load and click on the star icon on the left-hand side pane.
Click on “Import bookmarks”, navigate to the folder where you saved your bookmarks, and click “Open”.
Your web browser bookmarks from your PC are now imported to your iPhone.
This is how you can easily import bookmarks from PC to iPhone using CopyTrans Contacts. If you want to them as well, see the next part of our guide.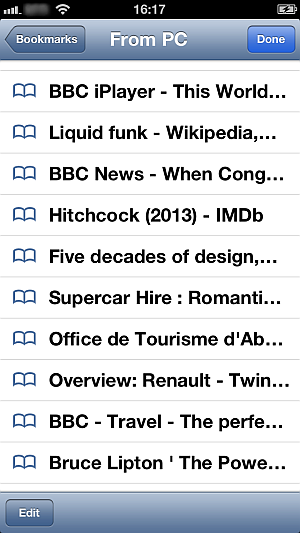
Transfer entire iPhone music library to PC
If you want to transfer your entire music library to a folder on your PC, this is the best way to go. Here is how to proceed:
-
If you don’t have CopyTrans already, download and install the application:Download CopyTrans
-
Launch CopyTrans and connect your device.
If your iDevice is not recognized, please follow these troubleshooting tips.
-
Switch to the Classic mode in the bottom-left corner.
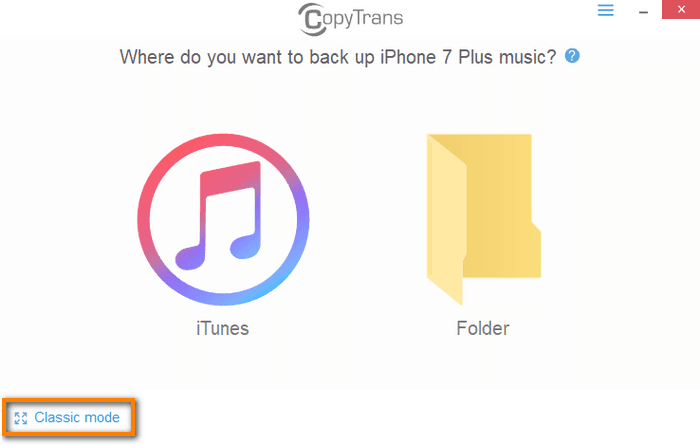
In the Classic mode, select the tracks you wish to transfer. If you want to transfer your entire library, don’t select any tracks.
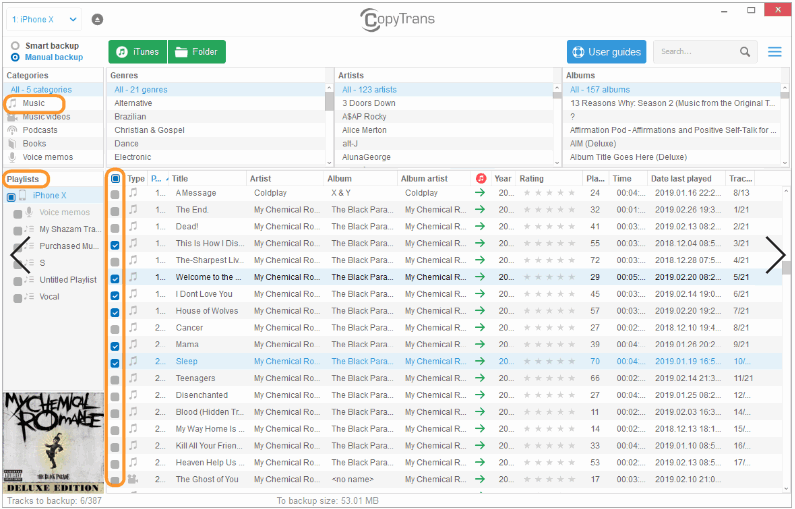
Once the tracks have been selected, click on the green “Folder” button at the top.

Next, you will be asked to choose the folder where you want to transfer your music. You may also choose to customize other export details, such as folder structure or the way the files will be named. To do so, just click on “Customize”. When in doubt, see our .
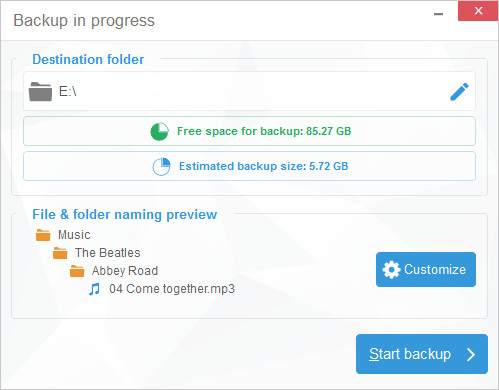
Click on “Start backup” and wait for the process to be completed.
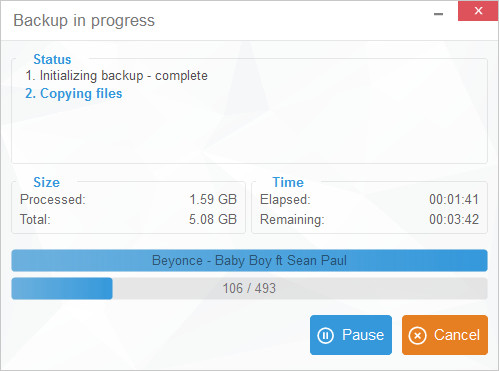
Congratulations! Your iPhone music now safely resides on your PC, together with all your playlistst and track info. Here is the full list of all .
Connect to device over USB cable or WiFi
In this section, we explain the setup process.
If you don’t have iTunes or iOS drivers installed on your computer – here is the first screen CopyTrans Filey will greet you with:
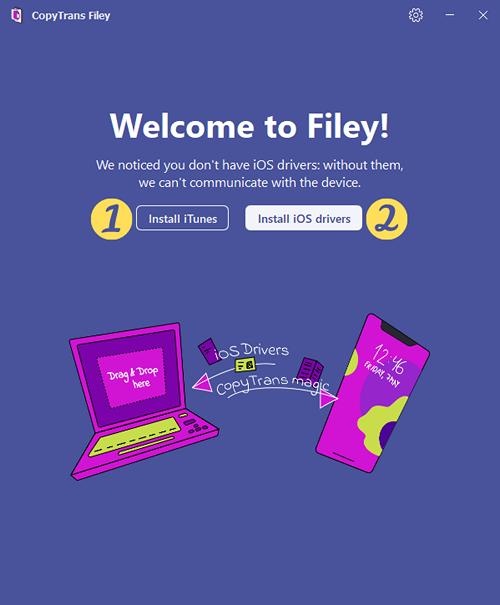
At this point, you have two options:
- Install iTunes: clicking on this button will start the download of Apple iTunes installation file from apple.com;
- Install iOS drivers: this button will lead you to our article explaining how to install iOS drivers on your PC without installing iTunes.
Once the installation is complete, restart the application.
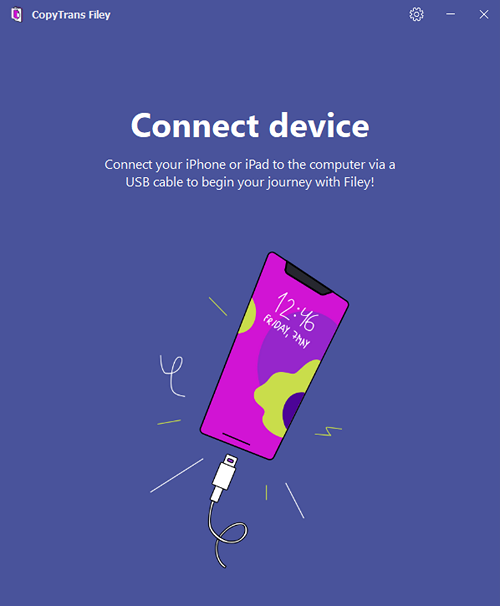
To establish initial connection with CopyTrans Filey, connect your device using a USB cable.
If you want the program to create a WiFi bond between your device and PC, make sure to allow connecting over WiFi, then click the “Let’s go” button.
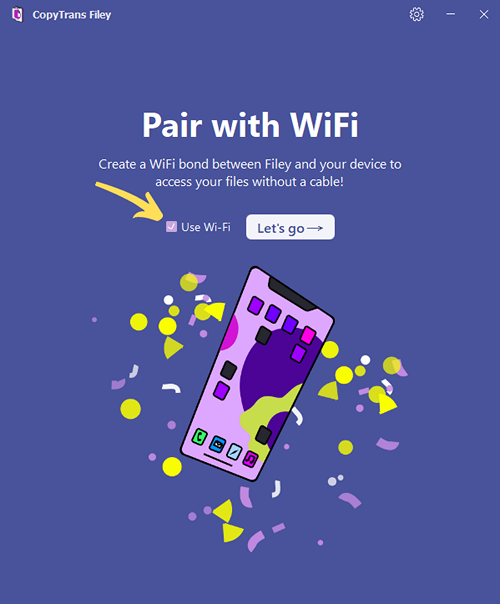
If you missed this step by mistake, you can always enable WiFi connection later in Settings.
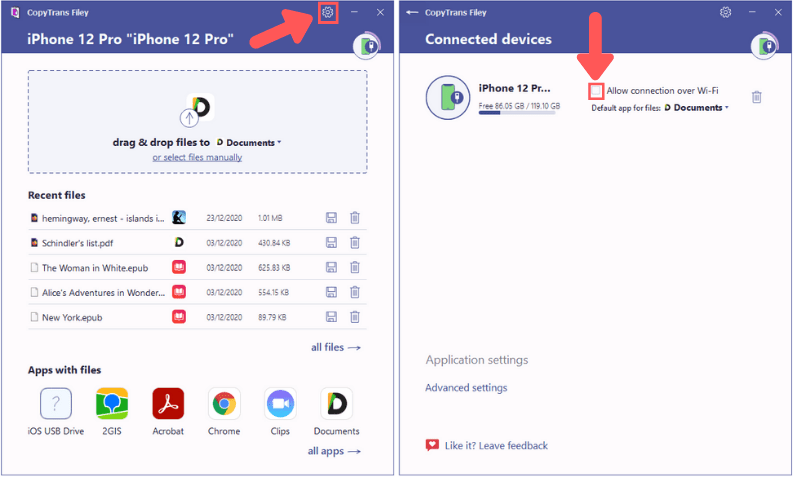
That’s it. The initial setup has finished. Bear with us for a detailed overview of all CopyTrans Filey features.
NOTE:For a successful wireless connection, make sure your iPhone and PC are on the same WiFi network.
Smart Backup to iTunes
Smart backup feature allows you to back up your entire iPhone/iPod/iPad music library to iTunes in one click. The app automatically transfers all tracks, related information, artworks and playlists to iTunes. CopyTrans decides what needs to be transferred, and it the result is duplicate free.
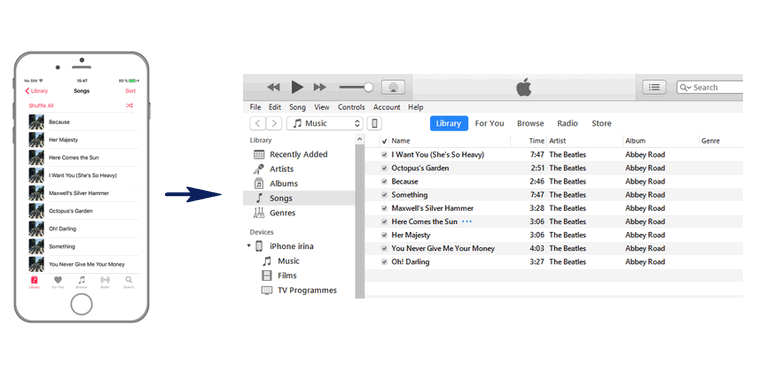
Here’s a detailed guide on Smart backup with CopyTrans.
Do a smart backup when:
- Your iTunes is empty, because:
– your PC crashed;
– you reinstalled Windows;
– you bought a new PC;
– you accidentally wiped your iTunes;
– your computer was stolen.
Some of your tracks are missing in iTunes, because:
– you accidentally deleted some iTunes tracks;
– you downloaded new music to your iPhone that is not in iTunes yet;
– you added new tracks to your iPod using another PC;
– you used CopyTrans Manager to add tracks to your iPod.
Your iTunes tracks/playlists are not up-to-date in iTunes, because:
– you changed playcounts or ratings on your iPod;
– you edited some tracks on your iPod Touch;
– you created new playlists on your iPhone;
– you edited your “On-the-go” playlist.
You want to move tracks from one iPod to another one, because:
– your family uses multiple iPods/iPhones;
– you purchased or won an iPod with music on it.
Edit iPhone bookmarks with CopyTrans Contacts
Along with other functions, CopyTrans Contacts will allow you to edit bookmarks imported from web browsers. It may come useful if you want to change a couple of details after importing the bookmarks to your iPhone. Before proceeding with instructions, make sure you have the app on your PC. Read about the program’s features and download to try it here:
IMPORTANT: Managing bookmarks used to be one of CopyTrans Contacts main functions. However, due to little demand it is now disabled by default. You can still enable bookmark management in settings – .
If the bookmarks section is already enabled, let’s start editing.
Run the program and connect your iPhone.
From the main CopyTrans Contacts window click the star icon on the left-hand side pane. Your iPhone bookmarks will now show up.
Select the bookmark folder on the left from where you wish to edit iPhone bookmarks. Next select the bookmark entry you want to edit, and click the “Edit bookmark” button.
You can now make changes to the iPhone bookmark title and URL. When ready, click “Apply changes”.
The changes will be applied directly to your iPhone bookmarks.
This is how to easily edit iPhone bookmarks using CopyTrans Contacts.
How to enable bookmarks in CopyTrans Contacts
-
First of all, disable the Safari app on your iPhone. Otherwise, your bookmarks will be unavailable in CopyTrans Contacts. Here’s how to do it: on your iPhone, open Settings > Apple ID > iCloud > scroll down to the Safari app and set the toggle to OFF.
You’ll be suggested to choose what you would like to do with the previously synced iCloud Safari data on your iPhone. Select “Keep on my iPhone”.
-
Now you will need CopyTrans Contacts. Don’t connect your device just yet.
-
In the main CopyTrans Contacts window, choose “More” and then choose “Settings”.
-
Click on the Advanced settings button.
-
Find a line that reads “bookmarks.load.active”. Notice that the value column would say “no” by default.
-
Change the value to “yes”.
-
Plug in the device. You should be all set now! Now you can or your bookmarks with CopyTrans Contacts.
Conclusion
Importing and editing bookmarks from web browsers becomes increasingly more tricky as Apple adds more limitations in higher iOS versions. However, CopyTrans Contacts still gives you a good shot at doing so – try it and share the result with us!
Alternative way: Running CopyTrans on your Mac using Parallels Desktop
This section provides an alternative to VirtualBox which also allows you to run Windows on your Mac computer.
-
Download Windows image file (.iso) from the Microsoft website.
-
Download and install Parallels Desktop.
-
Run Parallels Desktop, select “Install Windows or another OS from DVD or image disk”. Select .iso file from the list and continue. Next, click on “Like a PC”. Leave all further settings as they are per default. Parallels desktop will now install Windows automatically. That’s it, your Windows is now ready for use on your Mac.
-
Next, you will need to install the iOS drivers for your Windows system to correctly recognize your iPhone, iPad, or iPod Touch. To install the iOS drivers, please read this article Install iPhone, iPod Touch and iPad drivers without installing iTunes.
-
When in Windows on your Mac, open “Internet Explorer” and follow the CopyTrans installation instructions.
-
At the end of the installation procedure, run the CopyTrans program of your choice.
-
Connect your iPhone to your Mac and choose “Windows 7” in the newly-opened window.
Voilà! You can now use CopyTrans programs from Parallels Desktop.
B. Installing CopyTrans programs in Windows on your Mac
-
Next, you will need to install the iOS drivers for your Windows system to correctly recognize your iPhone, iPad, or iPod Touch. To install the iOS drivers, please read this article Install iPhone, iPod Touch and iPad drivers without installing iTunes.
-
When in Windows on your Mac, open “Internet Explorer” and follow the CopyTrans installation instructions.
-
At the end of the installation procedure, run the CopyTrans program of your choice.
-
Connect your iPhone, iPad, or iPod Touch to your Mac using your USB cable, and attach it to your virtual Windows machine by navigating to “Devices > USB Devices” in the VirtualBox VM top menu.
You can now use the CopyTrans programs on your Mac in order to manage your iPhone, iPad, or iPod.
CopyTrans and Mac formatted iPods
CopyTrans software is designed for Windows computers. Nevertheless, it still has a way with Mac software.
-
If you want to use CopyTrans with Mac formatted iPod, no need to install third party software to teach your PC how to read HFS+ formatted drives. CopyTrans knows how to do it all by itself. To backup your Mac formatted iPod, simply follow .
-
If you want to backup your iPod to a Mac computer, you can use our partner software compatible with Mac called PhoneView. Alternatively, you can use the CopyTrans programs on a Mac computer from a virtual Windows machine.
Thank you for reading our guide! If you have any further questions left, please see our list of user guides for CopyTrans.
Customizing the backup structure
Whether you use Manual backup to transfer your tracks to iTunes or to PC, CopyTrans allows you to tweak the settings a bit and get the result you want. See what you can do below:
If you export to a folder on your PC, you will see a standard customization window: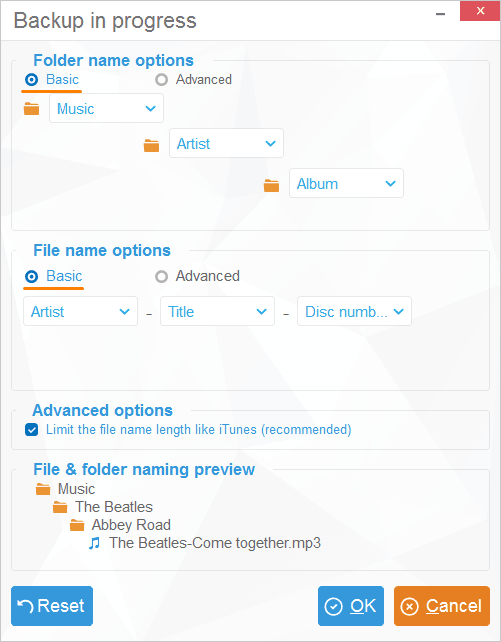
In this window,
-
“Folder name options” allows you to set the number and structure of subfolders for the music you export. If you want all the tracks to appear in one folder, just set the first folder to “Music” and leave the other fields blank. To categorize your music by albums, select Music first, choose “Albums” for the next field and leave the last one blank.
-
“Import iPhone playlist” allows you to name all the exported files in the same way. If you want the names to start with the artist and then show the track name, choose “Artist” for the first field and “Title” for the second.
-
“Limit the file name length like iTunes” sets a maximum of 96 characters for any file name.
-
“File & folder naming preview” allows you to see how the exported files and folders will be organized on your PC under the current settings.
If you feel that the dropdown options are not for you, you can choose advanced customization options. The window will then look like this:
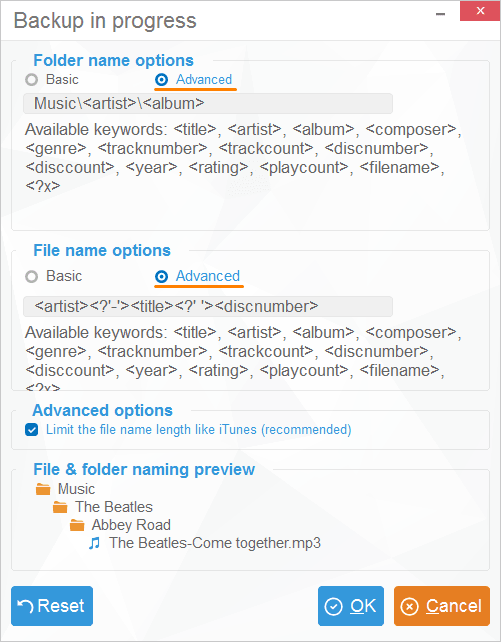
By playing with the tags CopyTrans provides and putting them in the right order with the dividers you need, you can construct pretty much any export layout!
After you have set the parameters to your liking, you can press “OK” and .
If you export to iTunes, your customization window will look like this: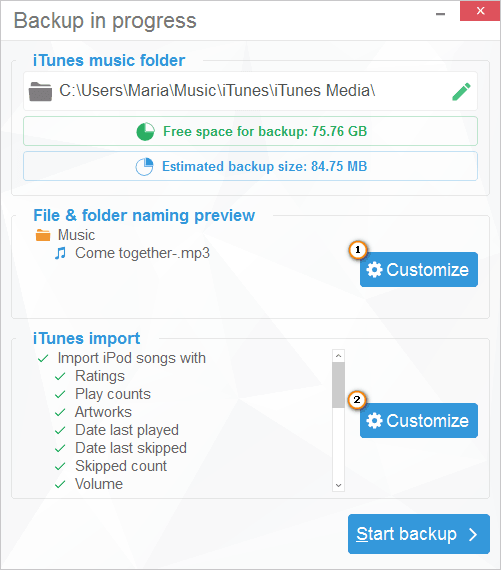
Under “iTunes music folder” you can specify where to export your library. CopyTrans finds the folder automatically, so only change it if you are sure you’re doing the right thing.
“File & folder naming preview” will take you to standard customization options ().
“iTunes import” customization button will spawn the following window:
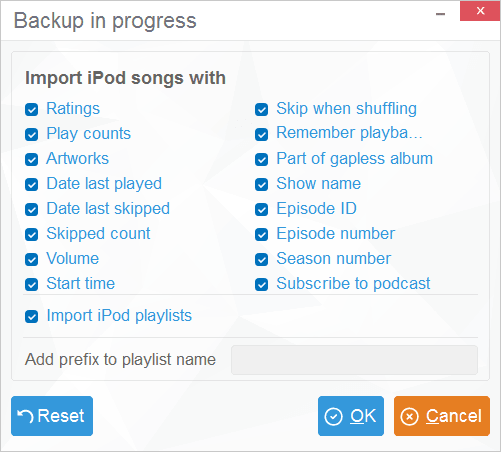
In this window, you can
-
Select the type of track info that should be exported to iTunes;
-
Choose whether to import your playlists;
-
Add a prefix to all your playlists (e.g. 11-10-2009 Rock or David Rock), to mark the playlists from this specific export.
After you have set the parameters to your liking, you can press “OK” and .
Transfer photos from PC to iPhone with iTunes
Choose to stick with iTunes? – No worries
Alternatively, you can use iTunes to sync pictures to iPhone. The obvious disadvantage of this method is that you cannot properly manage the photos and albums you transfer to iPhone. Moreover, your existing library will be overwritten and substituted with the new content that you sync with iTunes.
To transfer photos from PC to iPhone with iTunes:
- Launch iTunes and connect your iPhone to PC with a USB cable.
Click on the device icon in the top-left corner of iTunes window.

From the panel on the left, choose “Photos”.
Tick the box “Sync photos” and choose the folder from which to import photos to your iPhone (Copy photos from -> Choose folder).
Click on “Done” and wait until iTunes finishes syncing your photos.
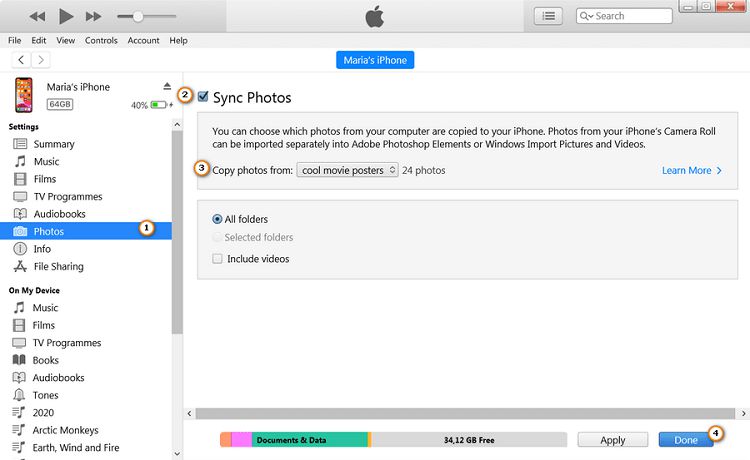
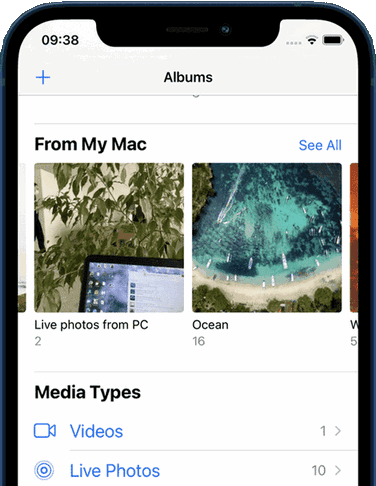
Well done! The photos now reside on your iPhone. To browse through them, navigate to “From my Mac” album.
Transfer selected tracks from iPhone to iTunes
For a seamless and fast transfer of your iPhone music to iTunes, we recommend using the Smart Backup option in CopyTrans. But if you need a little more control over the copied files, Manual Backup is just for you. Here is how to use it:
-
If you don’t have CopyTrans already, download and install the application:Download CopyTrans
-
Launch CopyTrans and connect your device.
If your iDevice is not recognized, please follow these troubleshooting tips.
-
Switch to the Classic mode in the bottom-left corner.

CopyTrans will then load your music library. Next to each track, you will see its status:
- • This track is not in iTunes. Track should be transferred.
• This track is in iTunes, but is not up-to-date. Track should be updated.
• This track is in iTunes and up-to-date. It will not be transferred.
When the loading is complete, select the tracks for transfer (you can also select all the tracks).
Once the tracks to transfer have been selected, click the “Backup to iTunes” button in the top-right corner.
Check that the export folder is correct and customize the export if you want to. When in doubt, see our
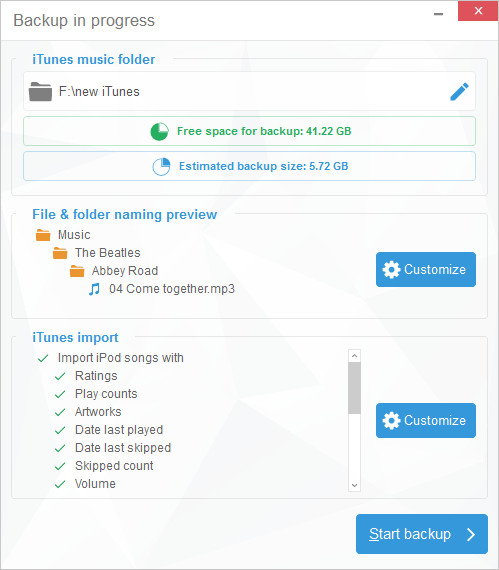
Click on “Start Backup”. The backup to iTunes will then begin. The progress bar in a transfer window will indicate how many songs are already transferred.

Once you the backup is finished, you will see a detailed summary of the transfer. All chosen tracks, track information, artworks, and playlists are now in iTunes exactly the way you wanted them to. If you’re interested, here is the full list of all .
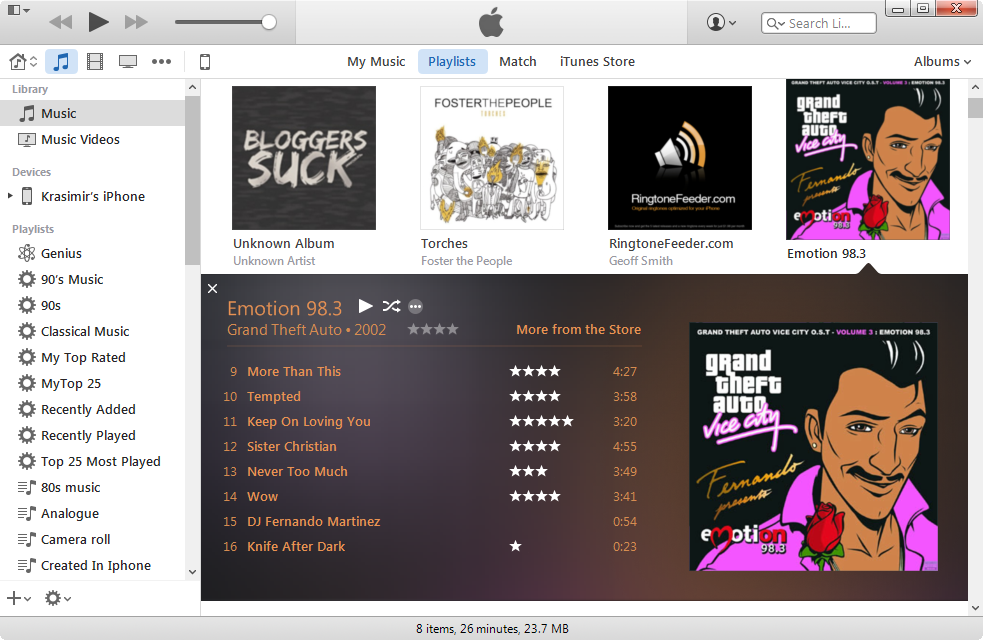
Enloy your newly transferred iTunes library!
How to export Internet Explorer/Edge bookmarks?
-
In this tutorial, I will be using Microsoft Edge. Run Edge and go to Settings.
-
Once done, click on “Import from another browser”. Yes, I know what you think, but trust me on this.
-
The option will take you to another menu where you need to find “Export to a file”. Click on it and choose a location on your PC to save your Internet Explorer bookmarks.
If you are working in Internet Explorer, click on the star icon, then click on a little arrow next to “Add to favorites” button. Then, select “Import and export” and follow through the wizard in order to save your Internet Explorer favorites to a file on your computer. 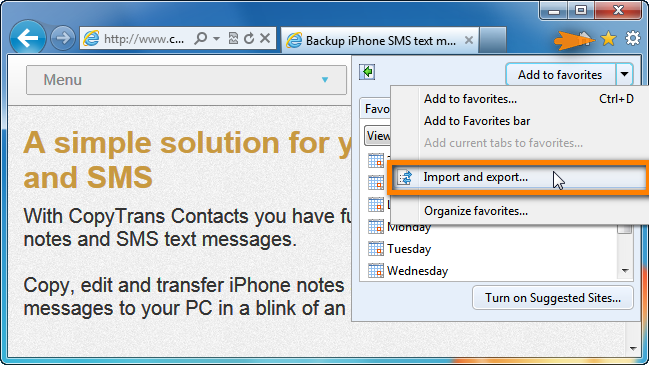
If you are ready, !