Обработка цифровых фотоснимков — nikon capture nx-d 1.6.1
Содержание:
- Интерфейс, панели инструментов
- Decent 4K and touch support, but pen control and keyboard shortcuts could be better
- Обработка цифровых снимков — Nikon Capture NX-D 1.5.2
- Key Features
- Capture NX-D recognizes your ViewNX-i edits, thankfully
- Другие элементы интерфейса
- Straighten and Perspective Control
- PhotoInstrument 6.2.620 + Portable [2013, Графические редакторы]
- Инструмент обрезки
- Медленная отрисовка деталей фото
- NIKON RELEASES NEW RAW IMAGE PROCESSING AND ADJUSTMENT SOFTWARE, CAPTURE NX-D
- Picture Control Parameters
- Noise reduction controls depend upon your chosen camera
- Unsharp Mask
- Экспорт в файл JPEG
- Некоторые выводы по работе с бета-версией Capture NX-D
Интерфейс, панели инструментов
Правая панель инструментов: сложно отличить заголовки панелей одну от другой – вся лента справа превращается в бесконечный перечень инструментов. Для новичка, который делает только первые шаги в работе с RAW-конвертерами эта нескончаемая лента движков, регулировов и списков превратится к кошмар.
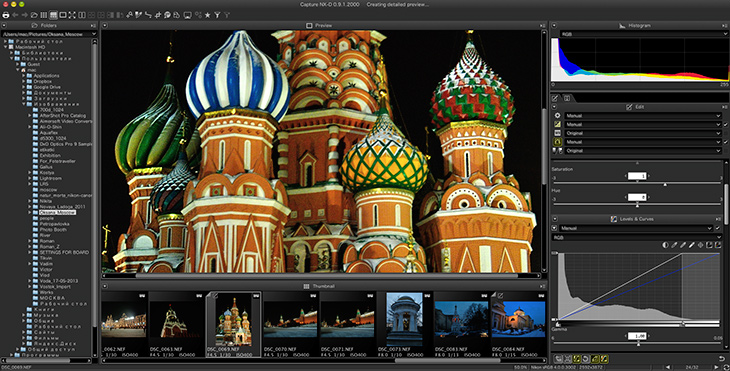
Скриншот 7. Правая панель инструментов может и вот так растягиваться вширь
Браузер фотографий можно поместить слева, освободив место на экране для более удобного редактирования вертикальных фото. Некоторые палитры можно осводить (Undock), пустив их в свободное плавание по экрану, как это сделано с гистограммой на скриншоте 8. Это будет полезно, например, при работе с двумя мониторами.

Скриншот 8. Браузер фотографий можно поместить слева
Decent 4K and touch support, but pen control and keyboard shortcuts could be better


Click or tap for the full-sized ACR version; here for CaptureNX-D version
Thankfully, support for 4K displays and touch-screens are both decent, albeit with the same minor glitches when switching monitor resolutions as for ViewNX-i.
Pen support is rather hit-and-miss, though: It works well for some things like adjusting sliders or using the retouch brush. But it has a tendency to cause problems with scrollbars located near the right of the screen, so you won’t want to use a pen to navigate that lengthy Edit panel.
And unlike ViewNX-i, Capture NX-D doesn’t follow some of the usual Windows conventions for keyboard shortcuts. You can’t quickly tab or shift-tab to navigate between sliders, for example, leaving you reaching for the mouse or touchpad more often than should be the case.
Also, sometimes moving a slider to its limit will cause the values of other related sliders to be reset, even if you never let go of the mouse button to apply your change. A minor annoyance, but a frustrating one if you’re trying to fine-tune an adjustment near that limit.
Обработка цифровых снимков — Nikon Capture NX-D 1.5.2

Программное обеспечение для обработки снимков Capture NX-D позволяет реализовать весь потенциал Вашей цифровой фотокамеры и объектива Nikon, создавая изображения с качеством, не имеющим себе равных, которое предусмотрено нашими разработчиками. Оно предлагает функции, специально разработанные для последующей обработки изображений RAW, и предоставляет их в интуитивной, легкой в обслуживании форме. В дополнение к обработке изображений RAW, оно может использоваться для повышения качества изображений JPEG и TIFF, сделанных цифровыми фотокамерами Nikon, посредством регулировки яркости, кривых контрастности, тонирования и других возможностей.Системные требования:• ОС: Microsoft Windows 7, 8.1, 10. Поддерживаются 64- и 32-разрядные издания (рекомендуется 64-разрядное); работает в качестве родного 64-разрядного приложения на 64-разрядных системах.• ЦП: Celeron или Pentium Dual-Core 2,4 ГГц или более мощный процессор или серия Core i 1,6 ГГц или более мощный процессор (рекомендуется Core i5 или более мощный процессор).• ОЗУ: 32-разрядное издание: 4 ГБ, 64-разрядное издание: 4 ГБ или более.• HDD: Для установки требуется не менее 800 МБ свободного пространства на жестком диске (рекомендуется 2 ГБ или более).• Монитор: Разрешение: 1366×768 пикселей или более (рекомендуется 1920×1080 пикселей или более).Торрент Обработка цифровых снимков — Nikon Capture NX-D 1.5.2 подробно:Поддерживаемые фотокамеры:• Z 7 и Z 6• Все цифровые зеркальные фотокамеры Nikon, начиная с D1 (выпущенные в 1999 г.) по D850 (выпущенные в сентябре 2017 г.) и D3500• Все фотокамеры Nikon 1 начиная от V1 и J1 (выпущенные в 2011 г.) по J5 (выпущенные в апреле 2015 г.)• Все фотокамеры COOLPIX, начиная с COOLPIX E100 (выпущенные в 1997 г.) и заканчивая моделями, выпущенными в сентябре 2018 г., а также COOLPIX A1000 и COOLPIX B600• KeyMission 360, KeyMission 170, KeyMission 80Поддерживаемые типы файлов:Все изображения NEF/NRW (RAW), JPEG и TIFF, созданные с помощью поддерживаемых цифровых фотокамер или с помощью программного обеспечения Nikon.Изменяется с версии 1.5.1 на 1.5.2:• Исправлены следующие проблемы:- Приложение внезапно прекращало работу при некоторых условиях.- При выборе варианта Specify size (Указать размер) в диалоговом окне пакетной обработки кнопка Start (Начать) становилась доступной с задержкой.- Изменение длины изображения в диалоговом окне Convert Files (Преобразовать файлы) иногда не соответствовало изменению ширины.- Все изменения в изображениях в формате NEF/NRW (RAW), сделанные с включенным параметром NEF/NRW + JPEG, отменялись при сохранении файлов в формате JPEG.- Пакетная обработка и преобразование файлов не возобновлялись после приостановки.- Приложение иногда не запускалось.- Артефакты изображения («шум») увеличивались на изображениях, сохраненных в других форматах.- Функция выравнивания теперь работает должным образом.- Файлы, сохраненные с качеством изображения «99», были больше, чем файлы, сохраненные с качеством изображения «100».- Части изображений в формате NEF (RAW), снятых с использованием Z 6, иногда отображались неправильно после сохранения изображений с использованием функции обработки NEF.Русификация:Для русификации интерфейса скопируйте (с заменой) два файла CNXDStr.nlf и PrintLang.nlf (из папки RUS) в папку с установленной программой (путь по умолчанию: C:\Program Files\Nikon\Capture NX-D\CommonData). Рекомендую сделать бэкап оригинальных файлов, что бы в дальнейшем (при необходимости) была возможность вернуть всё на место.Русификатор от версии 1.5.1 с небольшой доработкой под 1.5.2.
Скриншоты Обработка цифровых снимков — Nikon Capture NX-D 1.5.2 торрент:
Скачать Обработка цифровых снимков — Nikon Capture NX-D 1.5.2 через торрент:

nikon-capture-nx-d-1_5_2.torrent (cкачиваний: 155)
Key Features
Color Control Point:
Enhancements for hue, brightness and saturation are as simple as placing a Color Control Point on your image, then adjusting the length of the sliders. For example, Color Control Points are remarkably convenient for changing the color of flowers to better effect against green surrounding foliage.

- Enhancements for hue, brightness and saturation are as simple as placing a Color Control Point on your image, then adjusting the length of the sliders. For example, Color Control Points are remarkably convenient for changing the color of flowers to better effect against green surrounding foliage.

- Two Color Control Points were used to enhance color and brightness of flower petals and the background.
Selection Control Point:
This new function enables you to apply enhancements such as Unsharp Mask or D-Lighting to a specific area with just a click of the mouse. There is no need for precision selection or masks — the Selection Control Point recognizes the areas you want to modify. The enhancement effect can easily be adjusted, allowing you to apply your chosen effect as you would with intuitive masking.

- D-Lighting brightens the shadow areas, and Selection Control Point applies the effect only to the bright subjects and their surroundings seen through the opening between foliage and water.

- Tone Curve adjusts the brightness and contrast, and Selection Control Point applies the effect only to the man and his surroundings.
Auto Retouch Brush:
To simply achieve more natural-looking results, Auto Retouch Brush lets you remove dust spots on an image using a mouse click and stroke to match the surrounding color and tones. This can also be used to remove facial blemishes, imperfections on flowers, or other unwanted objects within the frame.

Shadow/Highlight Adjustments:
Using the slider at , you can adjust shadows by and blown out highlights by .
Workspaces:
Four workspaces are provided: Browser, Metadata, Multi-Purpose and Edit, and your window composition can be easily switched among them.
Quick Fix:
A combination of frequently used tools including , , , , and in a single window.
Simultaneous opening of multiple settings:
You can open multiple image processing settings at the same time and make parallel process adjustments of multiple details.
Functions to help you realize your desired results:
Straighten, Black/White Control Points, Neutral Control Points, Red-Eye Control Points, Selection Tools, Batch Processing, 16-bit Image Compatible, Vignette Control*, Auto Color Aberration Control*, Distortion Control Function*, Noise Reduction, Active D-Lighting (NEF only), D-Lighting, LCH Editor, Image Dust Off (NEF only), Fisheye Image Transformation, Color Booster Function, Color Management, Highlight/Shadow Display, Picture Control Compatibility (NEF only)
*Can be applied to images captured by Nikon SLR cameras with a D/G type lens.
Capture NX-D recognizes your ViewNX-i edits, thankfully


Click or tap for the full-sized ACR version; here for CaptureNX-D version
Given that Nikon offers two editing apps and neither offers everything provided by the other, you’ll likely be switching back and forth between apps quite a bit. Thankfully, Capture NX-D stores its adjustments in the same sidecar format as does ViewNX-i, and can also recognize edits made in that app.
What this means is that you can, should you wish, stick with the more approachable of the two programs for the bulk of your editing, switching to Capture NX-D only for the more challenging edits towards the end of your editing workflow.
For those controls which are shared by the two programs, things function pretty similarly, if not always identically. (I noticed some subtle variations in images processed by the pair, even if opened and converted in NX-D without any edits beyond those already made and stored in the sidecar created by NX-i.)
Другие элементы интерфейса
Некоторые блогеры утверждяют, что в основе Capture NX-D лежит движок SilkyPix, так это или нет – сложно сказать, хотя при желании какие-то схожие элементы найти не трудно. Интерфейс выполнен в элегантных черных тонах и вполне красив, удобен и прост.
О том, что то или иное фото было обработано, сигнализирует маленький загнутый уголок в левом верхнем углу карточки с миниатюрой фото. Если внести какие-либо корректировки, в дополнение к загнутому уголку рядом с ним появляется значок кисточки. При повторном открытии программы значка кисточки нет, только загнутый уголок.
Очень неудобно ставить оценки – ма-а-а-ленькая циферка появляется внутри звездочки. Неужели сложно для фото с рейтингом 3 вывести три звездочки, для фото с рейтингом 5 – пять звездочек, или это тоже чей-то патент? Пользоваться подобным рейтингом практически невозможно, так как рассмотреть, какая именно циферка внутри звездочки очень сложно. Также предлагаются цветовые метки, которые тоже представляют собой квадратик с разными циферками внутри, от 0 до 9. В результате путаница только усиливается.
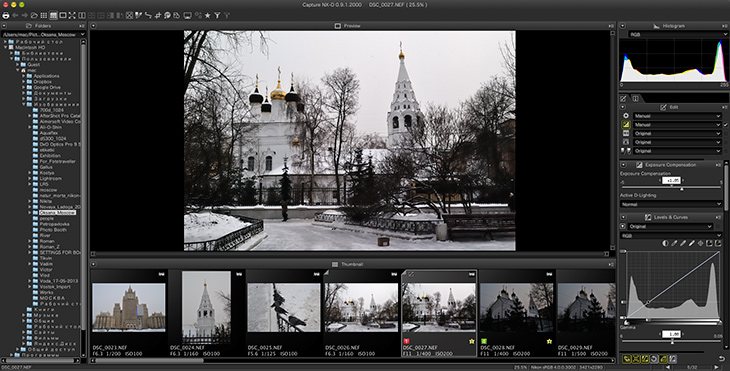
Скриншот 14. Уголок и кисточка, оценки и цветовые метки
На скриншоте показаны варианты отображения пиктограмм:
- фото DSC_0026.NEF обработано ранее, оно имеет загнутый уголок
- фото DSC_0027.NEF обработано только что, оно имеет загнутый уголок и пиктограмму кисточки
- Также на фото DSC_0027.NEF и DSC_0028.NEF показаны различные варианты цветовых меток и рейтинга
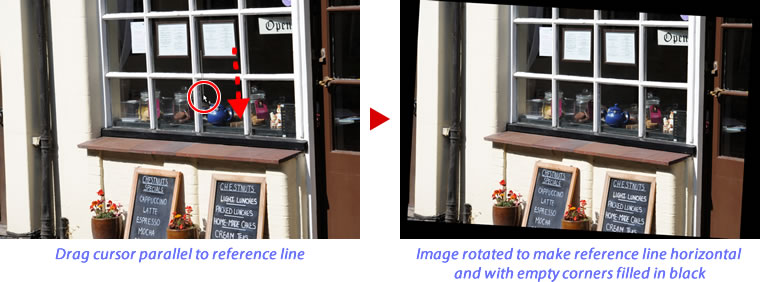
Straighten and Perspective Control
Straighten pictures or correct for the effects of perspective.
Straighten
Straighten pictures by up to ±10°. Choose lower values to rotate the picture to the left, higher values to rotate it to the right. To hide the effects of straightening, remove the check from the Straighten checkbox.
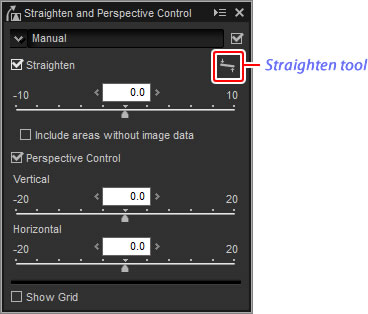
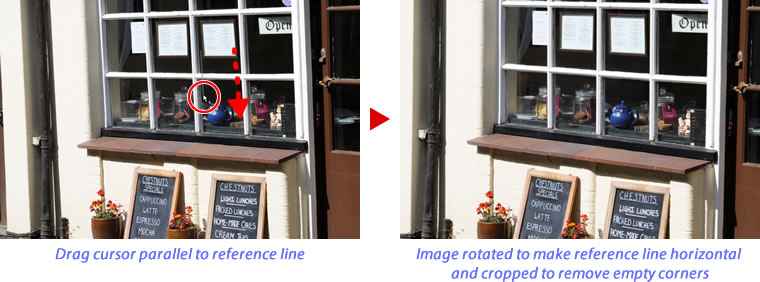
To straighten pictures manually, click the straighten tool in the image adjustment palette and drag the cursor parallel to a line in the preview (this option can not be used with ). The image will be rotated by up to ±10° to make the reference line horizontal or vertical, and the degree of rotation will be displayed in the text box in the image adjustment window. Unless Include areas without image data is selected, the image will automatically be cropped to remove any empty corners.
Select this option to fill empty corners with black.
Perspective Control
Correct the effect of perspective on, for example, photos taken with the camera angled up to frame a tall building. Perspective can be adjusted vertically and horizontally by up to ±20.

PhotoInstrument 6.2.620 + Portable [2013, Графические редакторы]
Год выпуска: 2013Жанр: Графические редакторыРазработчик: PhotoInstrumentСайт разработчика: http://www.photoinstrument.com/Язык интерфейса: Мультиязычный (русский присутствует)Тип сборки: Standard + PortableРазрядность: 32/64-bitОперационная система: Windows XP, Vista, 7. 8Описание: PhotoInstrument — удивительно легкий редактор для обработки портретов цифровых фотографий.Здесь есть все чтобы сделать себя неотразимым(ой),от очистителя кожи до придания гламурного вида «глянцевых журналов»,программа включает в себя инструменты для: ретуширования, удаления красных глаз, сглаживания морщин, …
Программы / Программы для работы с Мультимедиа / Графические редакторы, 3D моделирование
Подробнее
Инструмент обрезки
При кропе предлагаются несколько вариантов соотношения сторон – 3:2, 5:4, 16:9, 6:6, 4:3, однако отсутствует вариант «Оригинальное соотношение сторон». Другими словами, пользователь либо должен точно знать соотношение сторон своих фотографий, либо вычислить это соотношение, узнав в EXIF ширину и высоту своей фотографии, либо применить метод «научного тыка» и подобрать нужное соотношение сторон.
Как применить кроп? Нажатие на Enter не срабатывает. Двойное нажатие кнопки мыши не срабатывает. Единственный вариант – в верхней панели инструментов «отключить», то есть отжать кнопку кропа. Фото обрежется. Повторное нажатие на этот инструмент позволить отредактировать параметры кропа.
Одновременной обрезки и вращения (как в Lightroom 5) не предусмотрено, это отдельные инструменты.
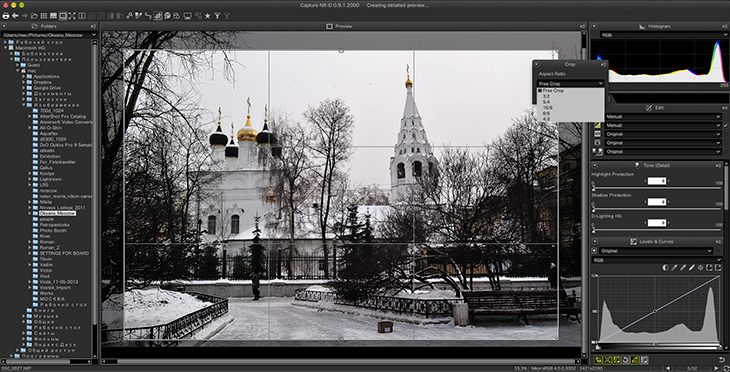
Скриншот 9. Работа инструментом обрезки (Crop)
Медленная отрисовка деталей фото
Отрисовка деталей каждой фотографии происходит чрезвычайно медленно. Сперва грузится размытое фото, потом участки изображения начинают медленно прорисовываться по квадратам. То же самое касается отображения 1:1. Размер кэша у программы можно задать в настройках, однако даже задав максимум – 16Gb –, создается ощущение, что кэш работает как-то не правильно. Повторная прорисовка деталей одного и того же фото происходит при каждом обращении к нему, даже если детализированный вариант был открыт и прорисован програмой буквально 5 минут назад.
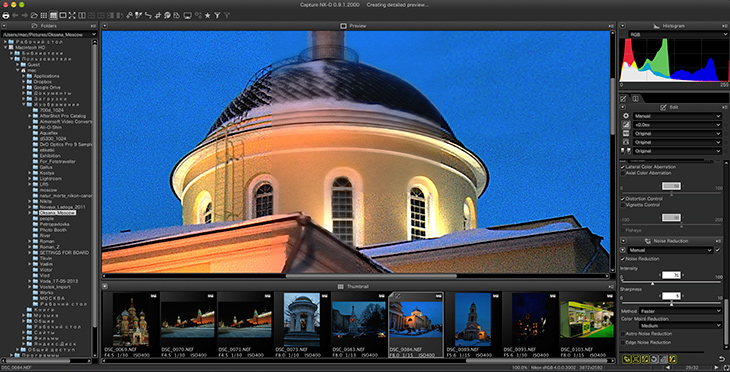
Скриншот 6. Отрисовка деталей фото при работе с инструментом снижения шума
Особенно медленно работает инструмент снижения шума – для просмотра результата его работы я ждал примерно 10 минут. Пока при работе с бета-версией желательно этот инструмент не использовать, иначе работа с фото превратится в кошмарную пытку. Метод Better Quality лучше даже и не пытаться включать.
NIKON RELEASES NEW RAW IMAGE PROCESSING AND ADJUSTMENT SOFTWARE, CAPTURE NX-D
MELVILLE, NY (February 24, 2014) – Nikon Corporation is pleased to announce that a beta version of Capture NX-D will be available free of charge beginning today. Capture NX-D is new software for processing and adjusting RAW images captured with Nikon digital cameras.
Capture NX-D is a free software application that will replace the current Capture NX 2 application. RAW images (NEF or NRW file extension) captured with Nikon D-SLR cameras, Nikon 1 advanced cameras with interchangeable lenses, and Nikon COOLPIX compact digital cameras can be loaded into the application for processing and adjustment of images. In addition to RAW images, the application can also be used to adjust JPEG and TIFF files.
During the period that Capture NX-D is available as a beta version, Nikon will invite users to try the software, and will collect feedback about the user experience and the application from those using it. Nikon will then use this feedback to improve the application prior to its official release.
The new software will support many functions needed by professional photographers, including batch image processing, filtering and an enhanced user interface with a variety of displays and floating palettes that are ideal for multiple monitors. Additionally, photographers will also have the ability to adjust parameters including exposure and white balance in RAW files, and can adjust tone curves, brightness, and contrast, as well as functions for correcting lateral color aberration and vignetting in JPEG and TIFF files. The software also features a new “sidecar” format, which retains and saves the adjusted image as a separate file.
Nikon will continue to update and provide support for the current Capture NX 2 application while the beta version of Capture NX-D is available. Once the official version of Capture NX-D is released, Capture NX 2 will no longer be supported with updates.
To download the beta version of Nikon’s Capture NX-D, please visit http://beta.nikonimglib.com/ to sign up.
Capture NX-D System Requirements (Beta Version)
WindowsOS: 32- or 64-bit version of Windows 7, 64-bit version of Windows 8.1Processor: Pentium-compatible CPU (Core i5 or better recommended)RAM (memory): 2 GB or more (4 GB or more recommended)Hard-disk space: 800 MB or more required for installation (2 GB or more recommended)Screen resolution: 1280 × 768 pixels or moreOther: As the beta version is available only via download, an Internet connection is required
Picture Control Parameters
After choosing a , choose a Picture Control and adjust Picture Control parameters. The parameters available vary with the camera used and the color reproduction process and Picture Control selected.
Recent Picture Controls
- The parameters below are available when Latest picture control is chosen as the color reproduction process or if the picture was taken with a camera that supports only the most recent Picture Controls and only Camera compatible can be selected. Fine-tune settings using the sliders or select Auto to let Capture NX-D adjust settings automatically (note that Auto produces results that may vary with exposure and the position and size of the subject in the frame).
- Quick sharp
- Quickly adjust levels for balanced Sharpening, Mid-range sharpening, and Clarity, or select Auto to let the camera adjust sharpening automatically. Except when Auto is selected, you can also make manual adjustments to the following individual parameters:
◆ Sharpening: Control the sharpness of details and outlines.
◆ Mid-range sharpening: Adjust sharpness according to the fineness of the patterns and lines in mid-tones affected by Sharpening and Clarity.
◆ Clarity: Adjust overall sharpness and the sharpness of thicker outlines without affecting brightness or dynamic range.
- Contrast
- Adjust contrast. Choose lower values for less contrast, higher values for more contrast.
- Brightness
- Adjust brightness without losing detail in highlights and shadows.
- Saturation
- Control the vividness of colors. Choose lower values for less saturation, higher values for more saturation. This option is not available with the Monochrome Picture Control.
- Hue
- Adjust hue. This option is not available with the Monochrome Picture Control.
- Filter Effect
- Simulate the effects of color filters when using the Monochrome, Sepia, Blue, Red, or Pink Picture Control.
- Toning
- Choose a tint when using the Monochrome Picture Control.
- Adjust Saturation
- Choose the saturation of the tint used with the Monochrome, Charcoal, Graphite, Binary, and Carbon Picture Controls. Does not apply to black-and-white images.
Click Reset to reset all sliders. Note that Contrast and Brightness can not be adjusted for Picture Controls that use a custom curve.
Creative Picture Controls
An Effect level slider is displayed when a Creative Picture Control such as Dream, Morning, or Pop is selected. Use the slider to choose the effect level.
Earlier Picture Controls
If the color reproduction menu offers a choice between Latest picture control and Camera compatible, the parameters listed below will be available when Camera compatible is selected. Fine-tune settings using the sliders or select Auto to let Capture NX‑D adjust settings automatically (note that Auto produces results that may vary with exposure and the position and size of the subject in the frame).
- Quick adjust
- Drag the slider left or right to mute or heighten the effect of the selected Picture Control. Quick adjust affects all Picture Control settings simultaneously and cancels any changes made separately to the individual parameters. It is not available with neutral, flat, or monochrome Picture Controls.
- Sharpening
- Control the sharpness of outlines. Choose higher values for more sharpening.
- Clarity
- Adjust clarity (this option is available only with pictures taken using cameras that support the Clarity parameter).
- Contrast
- Adjust contrast. Choose lower values for less contrast, higher values for more contrast.
- Brightness
- Adjust brightness without losing detail in highlights and shadows.
- Saturation (non-monochrome only)
- Control the vividness of colors. Choose lower values for less saturation, higher values for more saturation.
- Hue (non-monochrome only)
- Adjust hue.
- Filter Effect (monochrome only)
- Simulate the effects of color filters on monochrome photographs.
- Toning (monochrome only)
- Choose the tint used in monochrome photographs.
- Adjust Saturation (monochrome only)
- Choose the saturation of the tint used in monochrome pictures. Does not apply to black-and-white images.
Click Reset to reset all sliders. Note that Contrast and Brightness can not be adjusted for Picture Controls that use a custom curve.
The “AUTO” Picture Control
The parameters for the AUTO Picture Control can be set values of from A−2 to A+2.
Noise reduction controls depend upon your chosen camera
Another point of potential confusion – especially if you’re using multiple different camera models – is that the available noise reduction controls change depending upon which camera you’re using, something I didn’t realize until long after I’d selected images from the Nikon Z6 for my comparisons.
| Capture NX-D’s noise reduction controls vary by camera model, which explains the wasted space in the panel above. With a different camera, further controls might be placed there. |
It turns out that some cameras – the Z6 included – allow only a four-step control over noise reduction including the kinda-sorta «off» position, with no option to fine-tune how noise is handled beyond that.
I could tell something was amiss, however, both from the fact there was a greyed-out method dropdown, and also from the good couple of inches of wasted space between the strength dropdown and edge/astro NR checkboxes.
Turning to the PDF manual – which thankfully was accessible from the Help menu – set me straight. (And incidentally, kudos to Nikon for making that manual easy to locate. Canon’s DPP offers no help at all, and its manual a struggle to find. But I digress…).
If your camera supports it – and Nikon doesn’t state which models do – that method dropdown will give you a choice of faster, better quality, or «better quality 2013» denoising algorithms. Selecting one of these will give you a 100-step intensity slider and 10-step sharpness slider, in theory allowing you to fine-tune your noise reduction much more than the software will allow you to with Z6 raw files.
Unsharp Mask
Increase sharpness by making edges more distinct. The contrast of edges is increased while other areas are left untouched.
- Delete
- Delete the currently-selected mask from the unsharp mask list.
- Move Up/Move Down
- Move the currently-selected mask up or down in the unsharp mask list.
- Unsharp mask list
- A list of unsharp masks, identified by color channel, intensity, halo width, and threshold (e.g., “Red, 50%, 10%, 0”). Masks apply in the order listed; to change the order, use the up/down buttons.
- Color
- Choose the color channel to which the unsharp mask applies.
- Intensity
- The amount edge contrast will be increased.
- Radius
- The greater the radius, the wider the edges in the sharpened image will appear.
- Threshold
- The limit at which sharpening will be applied. If the threshold is zero, sharpening will apply to all pixels in the image. Increasing the threshold increases the amount of contrast that must be present between pixels before the mask will be applied, with the result that only more distinctly contrasting edges will be affected.
Экспорт в файл JPEG
Инструмент экспорта одного фото в JPEG пока не слишком функциональный. Качество сжатия JPEG настраивается как-то непривычно – есть шкала от 1 до 5, нет шаблонов наименования файлов.
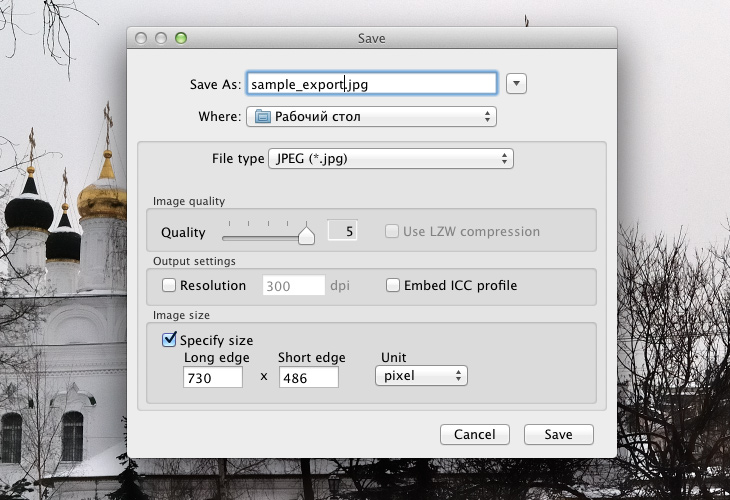
Скриншот 10. Настройка параметров экспорта в JPEG
Скриншот 11. Результат экспорта фотографии в JPEG, 203 Kb
Есть серийный экспорт в JPEG сразу нескольких файлов, называется он Batch Process. Тут уже настроек значительно больше, и именование файлов сделано вполне наглядно, удобно и функционально. Понравился движок, регулирующий количество цифр в номере – несомненно, это шутка программистов.
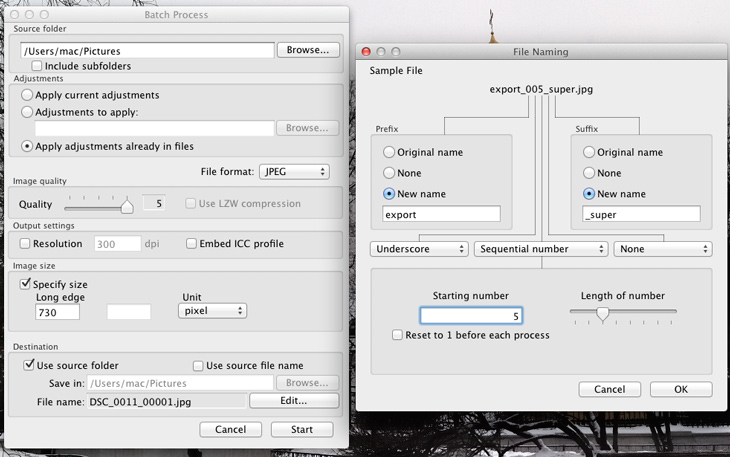
Скриншот 12. Настройка серийного экспорта в JPEG (Batch Process)
Некоторые выводы по работе с бета-версией Capture NX-D
Наличие бесплатного функционального, простого и удобного RAW-конвертера для пользователей Nikon несомненно послужит популяризации формата RAW.
Программа целиком и полностью оправдывает свое название – это именно сырая бета-версия (скорее даже альфа-), которая годится исключительно для знакомства с программой.
Чрезвычайно огорчает отсутствие инструмента локальных корректировок U-point.
Огорчает также отсутствие инструмента ретуши.
Пока не рекомендуется использовать Capture NX-D в реальной работе.
Разработчикам предлагается обратить внимание на перечень недоработок, выявленный при тестировании бета-версии.
* * *
Автор обзора: Константин Биржаков, март 2014 г.
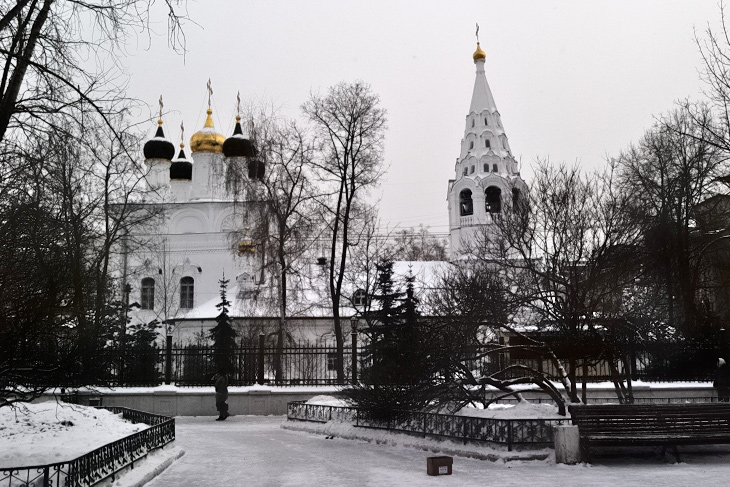
При работе над обзором автор использовал фотографии: Оксана Швецова, 2013. Снято на Nikon D3000.