Установка сервера аpache 2.4
Содержание:
- Verify
- Running Apache as a Service
- Настройка Apache
- Apache2
- Debugging and Source Code
- Спектакль
- Advanced Installation Topics
- Testing the Installation
- Настройка виртуальных хостов Apache
- Overview for the impatient
- Архитектура Apache
- Apache Directory Studio 2.0-0-M176 released posted on July 24th, 2021
- 1С:Предприятие Бухгалтерия переход с редакции 2.0 на 3.0. Практика перевода информационной базы для работы в управляемом приложении. Промо
- ШАГ 1 развертывание дистрибутива Apache
- Безопасность
- История создания Apache
- Apache Directory Studio 2.0-0-M6 released posted on March 14th, 2013
- Upgrading
- The current stable release is Apache 2.4
Verify
It is essential that you verify the integrity of the downloaded files using the PGP and SHA2 signatures.
Please read
Verifying Apache HTTP Server Releases
for more information on why you should verify our releases. This page provides detailed instructions
which you can use for POI artifacts.
The PGP signatures can be verified using PGP or GPG. First download the
KEYS
file as well as the .asc signature files for the relevant release packages. Make sure you get these
files from the main distribution directory, rather than from a mirror.
Then verify the signatures.
Batch check of all distribution files:
find . -name «*.sha256» -type f -execdir sha256sum -c {} \;
find . -name «*.sha512» -type f -execdir sha512sum -c {} \;
find . -name «*.asc» -exec gpg —no-secmem-warning —verify {} \;
Sample verification of poi-bin-3.5-FINAL-20090928.tar.gz
% gpg —import KEYS
gpg: key 12DAE9BE: «Glen Stampoultzis <glens at apache dot org>» not changed
gpg: key 4CEED75F: «Nick Burch <nick at gagravarr dot org>» not changed
gpg: key 84B5A42E: «Rainer Klute <rainer.klute at gmx dot de>» not changed
gpg: key F5BB52CD: «Yegor Kozlov <yegor.kozlov at gmail dot com>» not changed
gpg: Total number processed: 4
gpg: unchanged: 4
% gpg —verify poi-bin-3.5-FINAL-20090928.tar.gz.asc poi-bin-3.5-FINAL-20090928.tar.gz
gpg: Signature made Mon Sep 28 10:28:25 2009 PDT using DSA key ID F5BB52CD
gpg: Good signature from «Yegor Kozlov <yegor.kozlov at gmail dot com>»
gpg: aka «Yegor Kozlov <yegor at dinom dot ru>»
gpg: aka «Yegor Kozlov <yegor at apache dot org>»
Primary key fingerprint: 7D77 0C77 6CE7 754E E6AF 23AA 6934 0A02 F5BB 52CD
% gpg —fingerprint F5BB52CD
pub 1024D/F5BB52CD 2007-06-18
Key fingerprint = 7D77 0C77 6CE7 754E E6AF 23AA 6934 0A02 F5BB 52CD
uid Yegor Kozlov <yegor.kozlov at gmail dot com>
uid Yegor Kozlov <yegor at dinom dot ru>
uid Yegor Kozlov <yegor at apache dot org>
sub 4096g/7B45A98A 2007-06-18
Running Apache as a Service
You can install Apache as a service automatically during the
installation. If you chose to install for all users, the
installation will create an Apache service for you. If you specify
to install for yourself only, you can manually register Apache as a
service after the installation. You have to be a member of the
Administrators group for the service installation to succeed.
Apache comes with a utility called the Apache Service Monitor.
With it you can see and manage the state of all installed Apache
services on any machine on your network. To be able to manage an
Apache service with the monitor, you have to first install the
service (either automatically via the installation or manually).
You can install Apache as a Windows NT service as follows from
the command prompt at the Apache subdirectory:
If you need to specify the name of the service you want to
install, use the following command. You have to do this if you
have several different service installations of Apache on your
computer. If you specify a name during the install, you have to
also specify it during any other -k operation.
If you need to have specifically named configuration files for
different services, you must use this:
If you use the first command without any special parameters except
, the service will be called
and the configuration will be assumed to be .
Removing an Apache service is easy. Just use:
The specific Apache service to be uninstalled can be specified by using:
Normal starting, restarting and shutting down of an Apache
service is usually done via the Apache Service Monitor, by using
commands like and or via normal Windows service management. Before
starting Apache as a service by any means, you should test the
service’s configuration file by using:
You can control an Apache service by its command line switches,
too. To start an installed Apache service you’ll use this:
To stop an Apache service via the command line switches, use
this:
or
You can also restart a running service and force it to reread
its configuration file by using:
By default, all Apache services are registered to run as the
system user (the account). The
account has no privileges to your network
via any Windows-secured mechanism, including the file system, named
pipes, DCOM, or secure RPC. It has, however, wide privileges locally.
Never grant any network privileges to
the account! If you need Apache to be able
to access network resources, create a separate account for Apache as
noted below.
It is recommended that users create a separate account for running
Apache service(s). If you have to access network resources via Apache,
this is required.
- Create a normal domain user account, and be sure to
memorize its password. - Grant the newly-created user a privilege of and . On Windows NT 4.0 these privileges are granted via
User Manager for Domains, but on Windows 2000 and XP you probably
want to use Group Policy for propagating these settings. You can
also manually set these via the Local Security Policy MMC snap-in. - Confirm that the created account is a member of the Users
group. - Grant the account read and execute (RX) rights to all document
and script folders ( and
for example). - Grant the account change (RWXD) rights to the
Apache directory. - Grant the account read and execute (RX) rights to the
binary executable.
It is usually a good practice to grant the user the Apache
service runs as read and execute (RX) access to the whole Apache2.2
directory, except the subdirectory, where the
user has to have at least change (RWXD) rights.
If you allow the account to log in as a user and as a service,
then you can log on with that account and test that the account has
the privileges to execute the scripts, read the web pages, and that
you can start Apache in a console window. If this works, and you
have followed the steps above, Apache should execute as a service
with no problems.
Error code 2186 is a good indication that
you need to review the «Log On As» configuration for the service,
since Apache cannot access a required network resource. Also, pay
close attention to the privileges of the user Apache is
configured to run as.
When starting Apache as a service you may encounter an error
message from the Windows Service Control Manager. For example,
if you try to start Apache by using the Services applet in the
Windows Control Panel, you may get the following message:
You will get this generic error if there is any problem with
starting the Apache service. In order to see what is really causing
the problem you should follow the instructions for Running Apache
for Windows from the Command Prompt.
Настройка Apache
Уже прошло то время, когда конфигурация Apache хранилась в одном файле. Но оно и правильно, когда все распределено по своим директориям, в конфигурационных файлах легче ориентироваться.
Все настройки содержатся в папке /etc/apache/:
- Файл /etc/apache2/apache2.conf отвечает за основные настройки
- /etc/apache2/conf-available/* — дополнительные настройки веб-сервера
- /etc/apache2/mods-available/* — настройки модулей
- /etc/apache2/sites-available/* — настойки виртуальных хостов
- /etc/apache2/ports.conf — порты, на которых работает apache
- /etc/apache2/envvars
Как вы заметили есть две папки для conf, mods и site. Это available и enabled. При включении модуля или хоста создается символическая ссылка из папки available (доступно) в папку enable (включено). Поэтому настройки лучше выполнять именно в папках available. Вообще говоря, можно было бы обойтись без этих папок, взять все и по старинке свалить в один файл, и все бы работало, но сейчас так никто не делает.
Сначала давайте рассмотрим главный файл конфигурации:
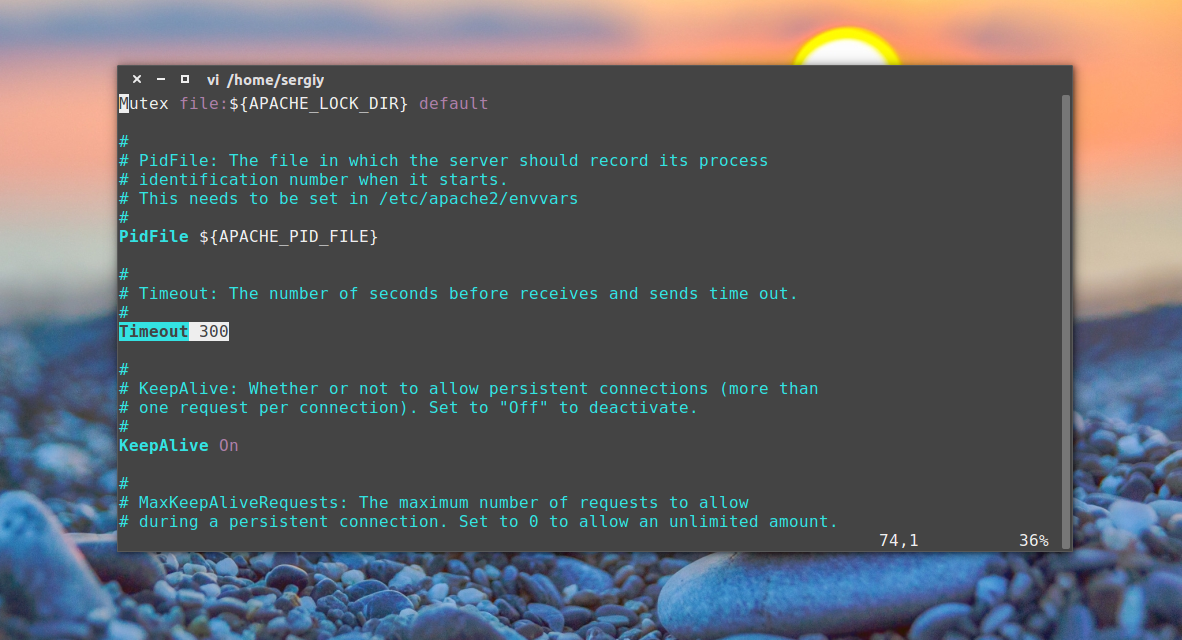
Timeout — указывает как долго сервер будет пытаться продолжить прерванную передачу или прием данных. 160 секунд будет вполне достаточно.
KeepAlive On — очень полезный параметр, позволяет передавать несколько файлов, за одно соединение, например, не только саму html страницу, но и картинки и css файлы.
MaxKeepAliveRequests 100 — максимальное количество запросов за одно соединение, чем больше, тем лучше.
KeepAliveTimeout 5 — таймаут соединения, обычно для загрузки страницы достаточно 5-10 секунд, так что больше ставить не нужно, но и рвать соединение раньше чем загрузились все данные тоже не нужно.
User, Group — пользователь и группа, от имени которых будет работать программа.
HostnameLookups — записывать в логи вместо ip адресов доменные имена, лучше отключить, чтобы ускорить работу.
LogLevel — уровень логирования ошибок. По умолчанию используется warn, но чтобы логи заполнялись медленнее достаточно включить error
Include — все директивы include отвечают за подключение рассмотренных выше конфигурационных файлов.
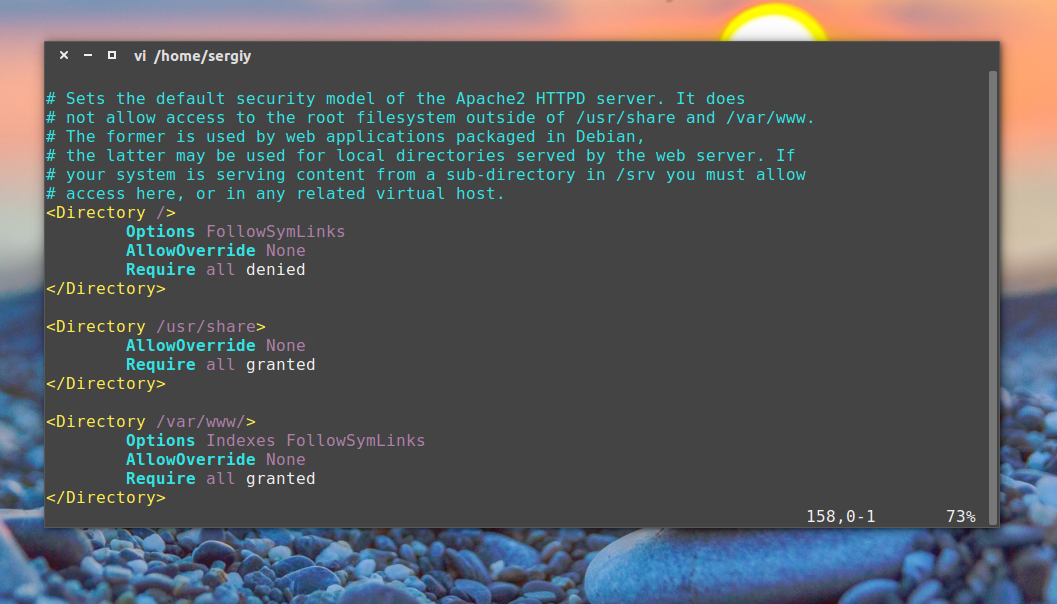
Директивы Directory отвечают за настройку прав доступа к той или иной директории в файловой системе. Синтаксис здесь такой:
Здесь доступны такие основные опции:
AllowOverride — указывает нужно ли читать .htaccess файлы из этой директории, это такие же файлы настроек и таким же синтаксисом. All — разрешать все, None — не читать эти файлы.
DocumentRoot — устанавливает из какой папки нужно брать документы для отображенияа пользователю
Options — указывает какие особенности веб-сервера нужно разрешить в этой папке. Например, All — разрешить все, FollowSymLinks — переходить по символическим ссылкам, Indexes — отображать содержимое каталога если нет файла индекса.
Require — устанавливает, какие пользователи имеют доступ к этому каталогу. Require all denied — всем запретить, Require all granted — всем разрешить. можно использовать вместо all директиву user или group чтобы явно указать пользователя.
Order — позволяет управлять доступом к директории. Принимает два значения Allow,Deny — разрешить для всех, кроме указанных или Deny,Allow — запретить для всех, кроме указанных. Теперь мы можем запретить доступ к директории для всех: Deny from all, а затем разрешить только для приложения от losst.ru: Allow from losst.ru.
Здесь все эти директивы не используются, поскольку нас устраивают значения по умолчанию, но вот в файлах .htaccess они могут быть очень полезны.
У нас остался файл /etc/apache2/ports.conf:
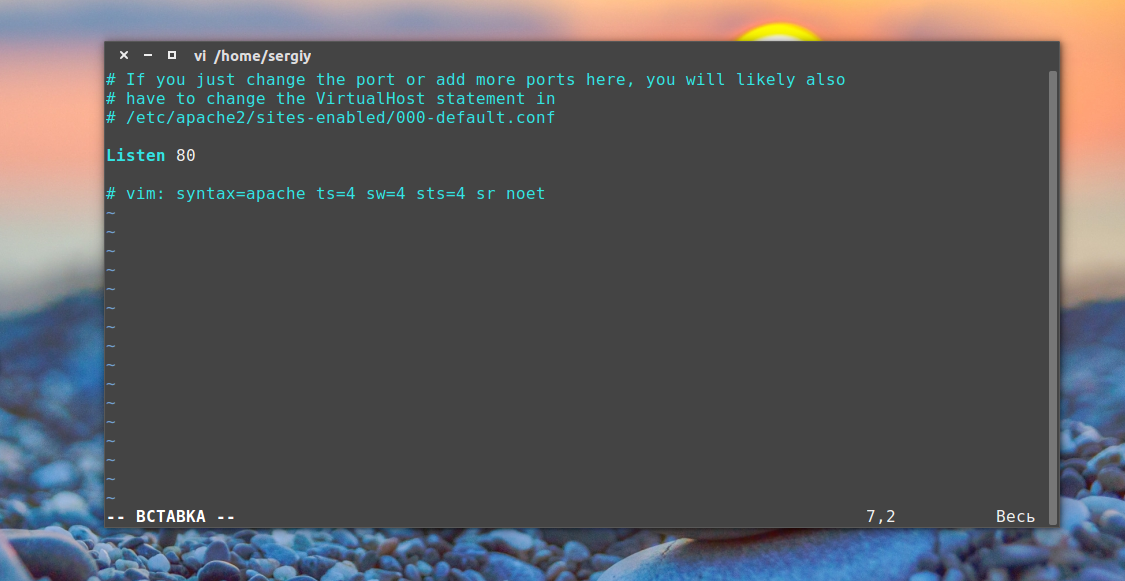
В нем только одна директива, Listen, которая указывает программе на каком порту нужно работать.
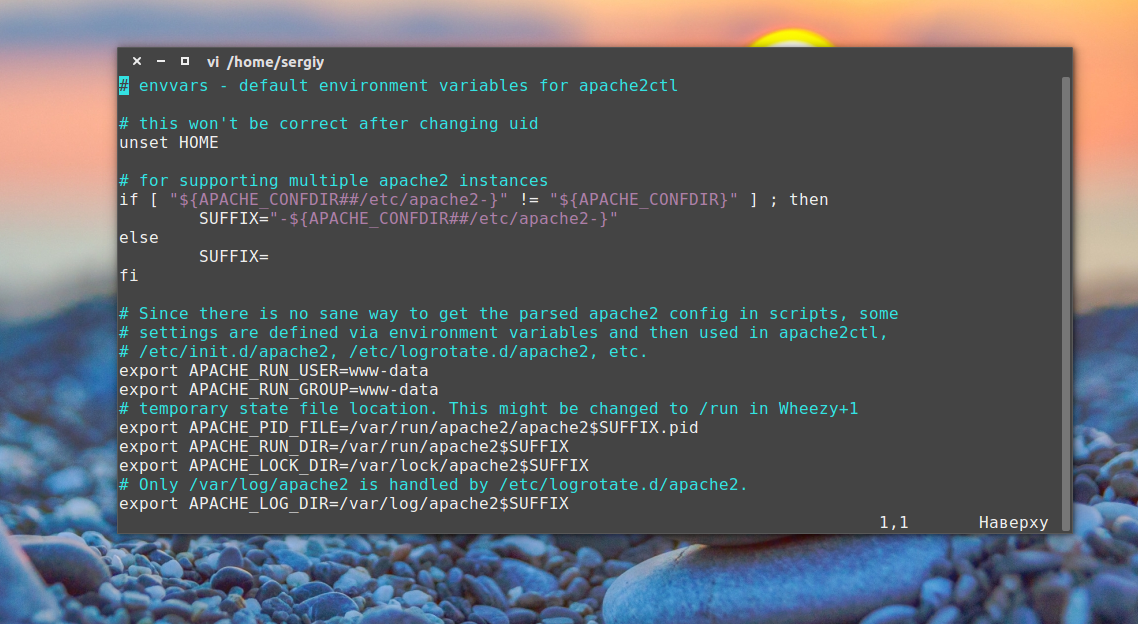
Последний файл /etc/apache2/envvars, его вы вряд ли будете использовать, в нем указанны переменные, которые можно использовать в других конфигурационных файлах.
Дальше поговорим немного о htacess. Совсем немного.
Apache2
Для поддержки файла .htaccess, который используется многими сайтами, необходимо установить и настроить веб-сервер Apache.
Настройка
Заходим в настройки портов:
И редактируем следующее:
мы настроили прослушивание на порту 8080, так как на 80 уже работает NGINX. Также мы закомментировали прослушивание по 443, так как и он будет слушаться NGINX.
Запрещаем mpm_event:
по умолчанию, apache2 может быть установлен с модулем мультипроцессовой обработки mpm_event. Данный модуль не поддерживает php 7 и выше.
Разрешаем модуль мультипроцессовой обработки :
Разрешаем модуль :
Разрешаем модуль :
Разрешаем модуль :
Разрешаем автозапуск и запускаем службу:
в разделе Server API мы должны увидеть Apache.
Debugging and Source Code
You can find a corresponding -win32-x86-symbols.zip archive of the
debugging databases in the
directory, these are typically not needed. This -win32-x86-symbols.zip
archive can be unpacked into the Apache installation directory, providing
all of the .pdb diagnostic files allowing most Win32 debugging tools
(and the Dr. Watson utility) to produce useful crash analysis.
You will find the source code package in the
/dist/httpd/ source tree. The -win32-src.zip file
contains only source and build files, and contains
no binary executable files.
This binary release was created with Visual Studio 6.0, using a more recent
Platform SDK for the ldap api. It includes zlib1.dll for mod_deflate.so.
If you want to build against OpenSSL, that is available in source code
form at http://www.openssl.org/source/.
Спектакль
Вместо реализации единой архитектуры Apache предоставляет множество модулей многопроцессорной обработки (MPM), которые позволяют ему работать в любом процесс-базовый режим, гибридный (технологический и нить) или режим гибридного события, чтобы лучше соответствовать требованиям каждой конкретной инфраструктуры. Поэтому важен выбор MPM и конфигурации. В тех случаях, когда необходимо идти на компромисс в производительности, Apache предназначен для уменьшения и увеличить пропускная способность по сравнению с простой обработкой большего количества запросов, что обеспечивает последовательную и надежную обработку запросов в разумные сроки.[требуется разъяснение]
Что касается доставки статических страниц, серия Apache 2.2 была признана значительно медленнее, чем nginx и лак. Чтобы решить эту проблему, разработчики Apache создали Event MPM, который сочетает использование нескольких процессов и нескольких потоков для каждого процесса в одном асинхронный цикл на основе событий.[требуется разъяснение] Эта архитектура, реализованная в серии Apache 2.4, работает не хуже, чем веб-серверы на основе событий, согласно Джим Ягельски и другие независимые источники. Однако некоторые независимые, но значительно устаревшие тесты показывают, что он по-прежнему вдвое медленнее, чем nginx, например
Advanced Installation Topics
One feature of the installer, «Build Headers and Libraries», can be
ignored by most users, but should be installed if compiling third party
modules. The «APR Iconv Code Pages» can similarly be omitted by most
users, unless using or a third party
module which relies on APR internationalization features.
There are requests to ship a .zip file from time to time. There is
no point in the ASF consuming additional storage, mirroring and bandwidth
for this purpose, because the .msi installer allows the installation
artifacts to all be unpacked using the network
installation option. Using this command against any .msi will result
in an exploded tree of all of the individual files and components.
The installation options above can be customized by users familiar
with msiexec.exe options and silent installation. The actual installer
sources are available in the httpd/httpd/win32-msi/ tree of the httpd
project subversion respository. For reference, some of the more common
variables which may be modified are;
- (toggle to «Yes»)
- (choose between Null and «1»)
- (toggle to «OnlyCurrentUser»)
- (default «ProgramFilesFolder\Apache Software Foundation\Apache2.2\»)
- (default «100», refer to list below)
- (toggle to «1»)
- (default «80»)
- (default «443»)
- (default «Apache2.2», no spaces!)
- (default «Apache2.2», include spaces)
- (default «Typical»)
The installation level of various features, which may be individually
toggled, include;
Testing the Installation
After starting Apache (either in a console window or as a
service) it will be listening on port 80 (unless you changed the
directive in the
configuration files or installed Apache only for the current user).
To connect to the server and access the default page, launch a
browser and enter this URL:
Apache should respond with a welcome page and you should see
«It Works!». If nothing happens or you get an error, look in the
file in the subdirectory.
If your host is not connected to the net, or if you have serious
problems with your DNS (Domain Name Service) configuration, you
may have to use this URL:
If you happen to be running Apache on an alternate port, you
need to explicitly put that in the URL:
Once your basic installation is working, you should configure it
properly by editing the files in the subdirectory.
Again, if you change the configuration of the Windows NT service
for Apache, first attempt to start it from the command line to
make sure that the service starts with no errors.
Настройка виртуальных хостов Apache
Было бы не совсем удобно, если на одной физической машине можно было размещать только один сайт. Apache может поддерживать сотни сайтов на одном компьютере и выдавать для каждого из них правильное содержимое. Для этого используются виртуальные хосты. Сервер определяет к какому домену приходит запрос и отдает нужное содержимое из папки этого домена.
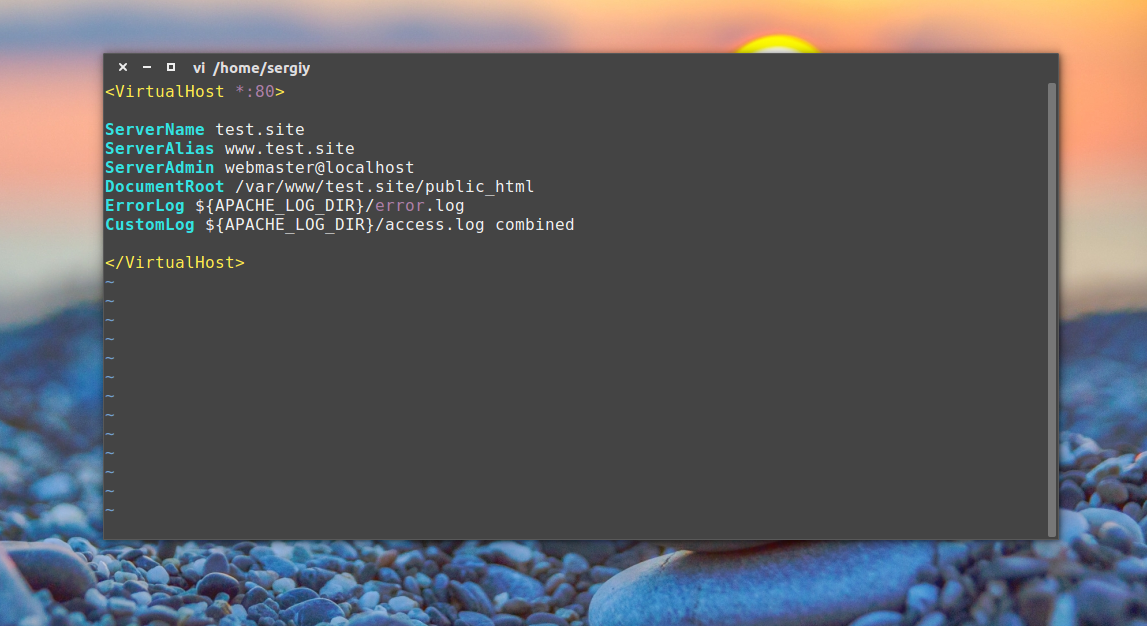
Настройки хостов Apache расположены в папке /etc/apache2/sites-available/. Для создания нового хоста достаточно создать файл с любым именем (лучше кончено с именем хоста) и заполнить его нужными данными. Обернуть все эти параметры нужно в директиву VirtualHost. Кроме рассмотренных параметров здесь будут использоваться такие:
- ServerName — основное имя домена
- ServerAlias — дополнительное имя, по которому будет доступен сайт
- ServerAdmin — электронная почта администратора
- DocumentRoot — папка с документами для этого домена
Например:
Виртуальные хосты, как и модули нужно активировать. Для этого есть специальные утилиты. Чтобы активировать наберите:
Здесь test.site — имя файла виртуального хоста. Для отключения тоже есть команда:
Настройка виртуальных хостов Apache завершена и на публичном сервере это все бы уже работало, но если вам нужна настройка Apache на домашней машине, то вы ваш новый сайт не откроется в браузере. Браузер не знает такого сайта. И откуда ему знать? DNS службы не могут ничего сообщить об этом доменном имени. Но в системе Linux мы можем сами указать ip адреса для доменных имен в файле /etc/hosts. Поэтому добавляем в конец файла такие строки:
Вот, ну теперь будет работать, открывайте браузер, проверяйте.
Overview for the impatient
- Installing on Fedora/CentOS/Red Hat Enterprise Linux
-
sudo yum install httpd
sudo systemctl enable httpd
sudo systemctl start httpd
Newer releases of these distros use
rather than . See the
Fedora project’s documentation for platform-specific notes. - Installing on Ubuntu/Debian
-
sudo apt install apache2
sudo service apache2 start
See Ubuntu’s documentation for platform-specific notes.
- Installing from source
-
Download the latest release from NN must be replaced with the current version
number, and PREFIX must be replaced with the
filesystem path under which the server should be installed. If
PREFIX is not specified, it defaults to
.Each section of the compilation and installation process is
described in more detail below, beginning with the requirements
for compiling and installing Apache httpd.
Архитектура Apache
Apache состоит из ядра и модулей. Ядро выполняет основные функции: обработка конфигурационных файлов, работа с протоколом HTTP, система загрузки модулей. Оно может работать самостоятельно без модулей, но тогда функционал программы будет крайне ограничен. Ядро создала команда компании Apache Software Foundation без вмешательства сторонних разработчиков.
Как можно расширить функционал веб-сервера? Для этого выпускаются модули. Модуль — это код, который расширяет функционал ядра. Они бывают статические и динамические. Статические добавляются к ядру ещё до загрузки программы, то есть пользователь выбирает программу определенной сборки. Динамические можно добавить на этапе загрузки программы при помощи встроенного модуля mod_so.
Модули отвечают за определенные возможности программы. Это может быть поддержка различных языков программирования, повышение безопасности, аутентификация пользователя, исправление ошибок и другие дополнительные функции. Таким образом, Apache — это конструктор, который можно собрать так, как нужно пользователю. Для этой программы существует более 500 модулей. Например, Multi-Processing Module (MPM) — модуль системного уровня. С его помощью можно оптимизировать Apache в условиях конкретной операционной системы.
Apache Directory Studio 2.0-0-M176 released posted on July 24th, 2021
The Apache Directory Team is pleased to announce the release of Apache
Directory Studio 2.0.0-M17, the next milestone release of the version 2.0 of its Eclipse based LDAP Browser and Directory client.
You can download Apache Directory Studio 2.0.0-M17 as a standalone RCP application for macOS, Linux and Windows here: https://directory.apache.org/studio/downloads.html
You can also install it directly in Eclipse using this update site: https://directory.apache.org/studio/update/
The full release notes can be found here: https://directory.apache.org/studio/changelog.html
1С:Предприятие Бухгалтерия переход с редакции 2.0 на 3.0. Практика перевода информационной базы для работы в управляемом приложении. Промо
Из информационного выпуска 1С № 16872 от 08.07.2013г. стало известно об относительно скором необходимом переходе на редакцию 1С:Бухгалтерия 3.0. В данной публикации будут разобраны некоторые особенности перевода нетиповой конфигурации 1С:Бухгалтерия 2.0 на редакцию 3.0, которая работает в режиме «Управляемое приложение».
Публикация будет дополняться по мере подготовки нового материала. Публикация не является «универсальной инструкцией».
Update 3. Права доступа. 14.08.2013
Update 4. Добавлен раздел 0. Дополнен раздел 4. Добавлен раздел 7. Внесены поправки, актуализирована информация. 23.11.2013.
1 стартмани
ШАГ 1 развертывание дистрибутива Apache
Сборка Apache 2.4.23 x64 от Apache Haus поставляется в zip архиве и не имеет инсталлятора Windows, поэтому считается портативным (portable) вариантом дистрибутива Apache. Portable версия имеет ряд удобств и позволяет разместить дистрибутив в любом каталоге файловой системы и самостоятельно настроить запуск Apache так как вам нужно.
Рекомендую для разрешения дистрибутива Apache выбрать каталог, путь к которому будет содержать только EN символы и не будет иметь пробелов, т.к. этот путь станет для Apache значением ServerRoot директивы, в которой задается домашняя директория WEB сервера.
В примерах этой статьи и скринкаста дистрибутив Apache будет развернут в директорию «Z:\WebDevelopment\Apache24» и, соответственно, ServerRoot директива будет определена как «Z:/WebDevelopment/Apache24».
Формат значения пути в директиве ServerRoot следующий:
- слеши прямые и одинарные;
- завершающего слеша нет;
- если есть пробелы, то путь должен быть в кавычках («path_to»),
- на Linux значение чувствительно к регистру символов.
Структура дистрибутива Apache
Сборка Apache 2.4.23 x64 от Apache Haus имеет следующую структуру каталогов:
|Apache24....................Домашняя директория Apache - ServerRoot
    |-- bin..................Директория с бинарниками Apache
    |    `-- ...
    |    `-- ApacheMonitor.exe...Программа монитор для управления Apache как Windows службой
    |    `-- httpd.exe...........Главный исполняемый файл web сервера Apache
    |    `-- ...
    |-- cgi-bin.......Директория обработчика для CGI program
    |-- conf..........Директория с конфигурационными файлами Apache
    |    `-- extra....Директория с дополнительными конфигами Apache, которые подключаются в httpd.conf
    |        |    `-- httpd-ahssl.conf
    |        |    `-- httpd-autoindex.conf
    |        |    `-- httpd-dav.conf
    |        |    `-- httpd-default.conf
    |        |    `-- httpd-deflate.conf
    |        |    `-- httpd-info.conf
    |        |    `-- httpd-languages.conf
    |        |    `-- httpd-manual.conf
    |        |    `-- httpd-mpm.conf
    |        |    `-- httpd-multilang-errordoc.conf
    |        |    `-- httpd-proxy-html.conf
    |        |    `-- httpd-ssl.conf
    |        |    `-- httpd-userdir.conf
    |        |    `-- httpd-vhosts.conf
    |    `-- original........Директория исходных конфигов от Apache, добавлена в сборку для справки
    |    `-- ssl.............Директория для SSL сертификатов
    |    `-- charset.conv....Конфиг установки кодировки, подключаются в httpd.conf
    |    `-- httpd.conf......Главный конфиг Apache в данной сборке от Apache Haus
    |    `-- magic...........Конфиг скриптов для модуля mime_magic
    |    `-- mime.types......Конфиг установки MIME типов
    |    `-- openssl.cnf.....Конфиг OpenSSL
    |-- error................Директория с конфигами страниц ошибок для Apache
    |-- htdocs...............Директория и хост по умолчанию с документацией от Apache Haus
    |-- icons................Директория с иконками
    |-- include..............Директория служебных скриптов Apache
    |-- lib..................Директория вспомогательных библиотек
    |-- logs.................Директория файлов журналов Apache
    |-- modules..............Директория модулей Apache
    |-- ABOUT_APACHE.txt
    |-- CHANGES.txt
    |-- INSTALL.txt
    |-- LICENSE.txt
    |-- NOTICE.txt
    |-- OPENSSL-NEWS.txt
    |-- OPENSSL-README.txt
    |-- README.txt
|-- readme_first.html......Краткий help от Apache Haus, лежит в корне zip архива
Данная сборка Apache 2.4.23 x64 от Apache Haus для Windows является полным дистрибутивом WEB сервера и содержит все необходимые исполняемые и конфигурационные файлы для полноценной работы Apache как веб сервера, включая и использование https соединения. Соответственно, установил эту сборку и настроив ее, вы получаете полный, со всеми модулями, web сервер Apache, который можете использовать не только для разработки и тестирования, но и для продуктивного хостинга сайтов на Windows.
В zip архиве данной сборки так же вложен файл readme_first.html, который содержит краткое описание компонентов данной сборки и их версий. Так же, в этом файле приведены краткие инструкции от Apache Haus по установке Apache, VC14, инсталляции Apache как системной службы и даны необходимые ссылки.
Безопасность
Apache, как и другое серверное программное обеспечение, можно взломать и использовать. Основным инструментом атаки Apache является Slowloris, который использует ошибку в программном обеспечении Apache.[нужна цитата] Он создает множество сокетов и поддерживает каждый из них в рабочем состоянии, отправляя несколько байтов (известных как «заголовки keep-alive»), чтобы сервер знал, что компьютер все еще подключен и не испытывает сетевых проблем. Разработчики Apache обратились к Slowloris с несколькими модулями, чтобы ограничить наносимый ущерб; модули Apache mod_limitipconn, mod_qos, mod_evasive, мод безопасности, mod_noloris и mod_antiloris были предложены как средства уменьшения вероятности успешной атаки Slowloris. Начиная с Apache 2.2.15, Apache поставляет модуль mod_reqtimeout в качестве официального решения, поддерживаемого разработчиками.
История создания Apache
Apache — это сокращение от «a patchy server», что переводится как сервер с патчами. Такое название появилось из-за происхождения программы. Все началось с разработки веб-сервера CERN HTTPd и NCSA HTTPd в Национальном центре суперкомпьютерных приложений (NCSA). Позднее к проекту подключились другие авторы, которые стали накладывать свои патчи. Патч ― это информация, кусок кода или программный модуль, который исправляет недочёты разработчиков. Их ещё называют заплатки. В 1995 году Брайан Белендорф объединил все патчи и создал команду разработчиков, которая выпустила первую версию Apache. Релиз Apache 1.0 прошёл в декабре 1995 года, но популярной эта программа стала только через год. Далее группа разработчиков расширялась, и они создали Apache для различные операционные системы (Linux, BSD, Mac OS, Microsoft Windows, Novell NetWare, BeOS).
В 1998 году появилась версия Apache 1.3, а в 1999 году была создана некоммерческая организация Apache Software Foundation. В марте 2000 года состоялась первая конференция для разработчиков ApacheCon. На ней была представлена версия Apache 2.0. Она отличалась новой модульной структурой. Это предоставило широкие возможности для функционала программы. На данный момент последней версией является Apache 2.4.
Apache Directory Studio 2.0-0-M6 released posted on March 14th, 2013
The Apache Directory Team is pleased to announce the release of Apache Directory Studio 2.0.0-M6, the sixth milestone release of the version 2.0 of its Eclipse based LDAP Browser and Directory client.
You can download Apache Directory Studio 2.0.0-M6 as a standalone RCP application for Mac OS X, Linux and Windows here: https://directory.apache.org/studio/downloads.html
You can also install it directly in Eclipse using this update site:
https://directory.apache.org/studio/update/2.x/
Here are a few highlights of this new version:
- The integrated Apache Directory LDAP API has been upgraded to the latest version (1.0.0-M16).
- The LDAP Servers plugin has been updated with the latest and greatest ApacheDS (version 2.0.0-M11).
Here are the release notes for Apache Directory Studio 2.0.0-M6:
Bug
- DIRSTUDIO-861 — Errors with DNs containing non-ASCII values on Active Directory
- DIRSTUDIO-873 — Kerberos encryption types are not saved correctly
- DIRSTUDIO-876 — Integer Editor should focus on the value text field upon opening
- DIRSTUDIO-878 — Generation of the user guides as PDF and standalone HTML is broken
- DIRSTUDIO-879 — Flags for an attribute type in the Schema Browser are not correctly rendered on OS X
- DIRSTUDIO-889 — Error “Changes could not be saved to the connection” when saving server configuration on stock server and studio
Improvement
DIRSTUDIO-872 — The list of possible Kerberos encryption type should be available
Task
- DIRSTUDIO-874 — Remove all ApacheDS and Apache Mina libraries plugins from trunk in ‘/libraries’
- DIRSTUDIO-877 — Update ApacheDS schema files to the latest version
- DIRSTUDIO-867 — References of old projects and packages name ‘org.apache.directory.shared’ still present in the code
Upgrading
The first step in upgrading is to read the release announcement
and the file in the source distribution to
find any changes that may affect your site. When changing between
major releases (for example, from 2.0 to 2.2 or from 2.2 to 2.4),
there will likely be major differences in the compile-time and
run-time configuration that will require manual adjustments. All
modules will also need to be upgraded to accommodate changes in the
module API.
Upgrading from one minor version to the next (for example, from
2.2.55 to 2.2.57) is easier. The
process will not overwrite any of your existing documents, log
files, or configuration files. In addition, the developers make
every effort to avoid incompatible changes in the
options, run-time configuration, or the
module API between minor versions. In most cases you should be able to
use an identical command line, an identical
configuration file, and all of your modules should continue to
work.
To upgrade across minor versions, start by finding the file
in the directory of
your installed server or at the root of the source tree for your
old install. This will contain the exact
command line that you used to
configure the source tree. Then to upgrade from one version to
the next, you need only copy the file to
the source tree of the new version, edit it to make any desired
changes, and then run:
You should always test any new version in your
environment before putting it into production. For example, you
can install and run the new version along side the old one by
using a different and a
different port (by adjusting the directive) to test for any
incompatibilities before doing the final upgrade.
You can pass additional arguments to ,
which will be appended to your original
options:
The current stable release is Apache 2.4
The -win32-x86-no_ssl.msi packages do not contain any cryptographic software,
such as OpenSSL, mod_ssl, nor https: enabled utilities.
The -win32-x86-openssl-(version).msi package includes an https: enabled
abs.exe utility, mod_ssl.so TLS/SSL protocol module, and a binary
distribution of the specified version of OpenSSL. Please review the
carefully before
downloading, using or redistributing this package.
Older Releases
Looking for an older version? Please, don’t. There
have been a number of essential bug and security fixes with the evolving
support for Apache under Win32. Most critically, there were several
denial of service, arbitrary code execution and other vulnerabilities
affecting Win32 in previous releases. Please, avoid all earlier versions.
That said;
Only current, recommended releases are available from www.apache.org
and the mirror sites. Older releases, and their corresponding debugging
-symbols.zip packages, can be obtained from the archive site.