Openproject gdpr compliance and an open commitment to data privacy, and security
Содержание:
- Onboarding variables:
- Operation and upgrading
- Testing
- Help and feedback
- Result
- Step 2: PostgreSQL database configuration
- Help and feedback
- FAQ regarding OpenProject BIM edition
- SUSE Linux Enterprise Server (SLES) Installation
- Full-text extraction not supported
- История и статус
- Docker-based installation
- Generate the plugin
- About OpenTX versions
- OpenTX downloads
- Step 3: Apache2 web server
- Help and feedback
- Upgrade notes for 8.x to 9.x
- Migration
- How can I migrate from Bitnami to OpenProject?
- How can I migrate from Jira/Confluence to OpenProject?
- How can I migrate from Community Edition or Enterprise on-premises to Enterprise cloud?
- How can I migrate from Enterprise cloud to Enterprise on-premises?
- How can I migrate from Community Edition to Enterprise on-premises?
- How can I migrate from Enterprise on-premises to Community Edition?
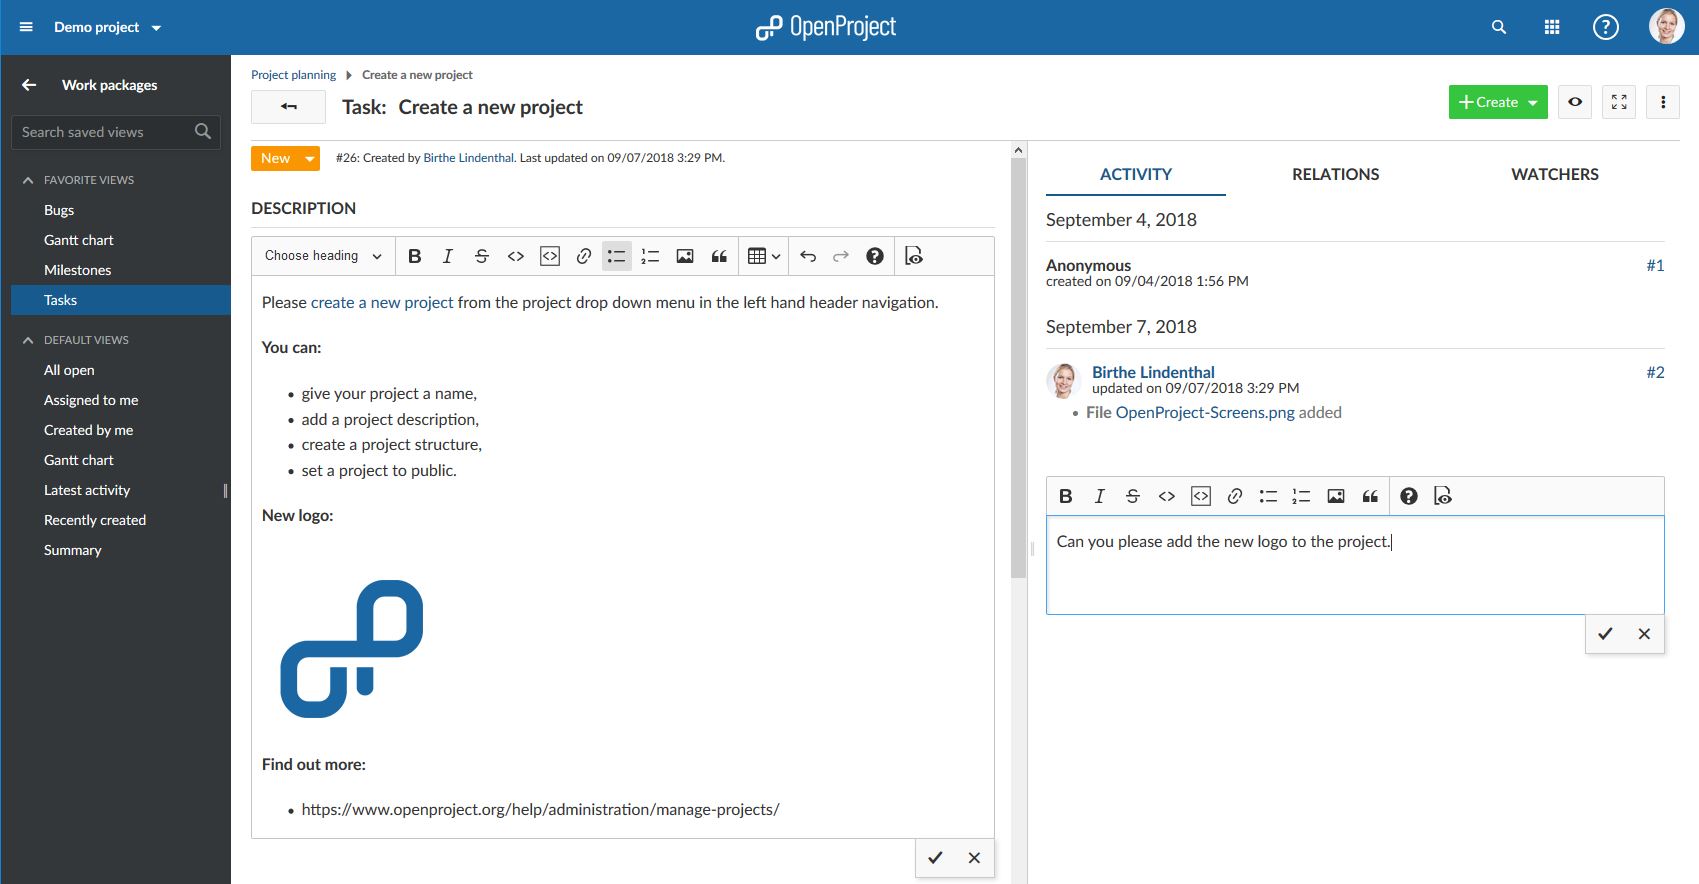
- Create a new project
- Security badge
- How to … in OpenProject?
- I cannot log in. Resetting my password seems to have no effect. What do I do?
- How can I reverse changes?
- How can I increase or decrease the number of users in OpenProject?
- How can I add a RACI matrix in OpenProject?
- How can I create a PDF file with an individual and consolidated projects report?
- How can I receive the OpenProject newsletter?
- All-in-one container
- What is new in OpenProject 8.0?
Onboarding variables:
Enterprise Limits
If using an Enterprise token there are certain limits that apply. You can configure how these limits are enforced.
default: false
If you set to true, new users cannot be invited or registered if the user limit has been reached. If it is false then you can still invite and register new users but their activation will fail until the user limit has been increased (or the number of active users decreased).
Configured in the like this:
Or through the environment like this:
Backup enabled
default: true
If enabled, admins (or users with the necessary permission) can download backups of the OpenProject installation via OpenProject’s web interface or via the API.
There are further configurations you can use to adjust your backups.
Per default the maximum overall size of all attachments must not exceed 1GB for them to be included in the backup. If they are larger only the database dump will be included.
As usual this can be override via the environment, for example like this:
Show community links
If you would like to hide the homescreen links to the OpenProject community, you can do this with the following configuration:
Operation and upgrading
My OpenProject instance is slow but my RAM isn’t fully used. What can I do?
Set a higher number of web workers to allow more processes to be handled at the same time. Find out more here and about system requirements here.
I don’t receive emails. Test email works fine but not the one for work package updates.
Use a browser to call your domain name followed by “health_checks/all” (e.g. https://myopenproject.com/health_checks/all). There should be entries about “delayed_jobs_backed_up” and “delayed_jobs_never_ran”. If PASSED is written behind it, everything is good.
If the health check does not return satisfying results, have a look if the background worker is running by entering on the server. If it is not running, no entry is returned. If it is running an entry with “jobs:work” at the end is displayed.
If the worker is not running please try a restart with . If that doesn’t help it could be that the worker is scaled to 0 for some reason, so please try . If that doesn’t help either, please have a look at your logs, which are accessible with .
Another approach would be to restart OpenProject completely, especially after changing the configuration of your SMTP server: .
For some updates of OpenProject, the database layout needs to be adapted to support new features and fix bugs. These changes need to be carried out as part of the update process. This is why it is important to always run as part of the update process.
Please also have a look at our upgrade guide.
Are you using the packaged installation or are you running OpenProject using docker? If the former you may have to run . Leave everything the same but select git integration.
Once that’s done all you have to do is enable automatic creation under /settings/repositories (Administration -> System Settings -> Repositories) and enable repositories by default under Administration -> System Settings -> Projects in the project modules if you want new projects to automatically get a git repository.
For existing projects you can enable the module in the project settings (Project Settings -> Modules) and then configure the repository under Project Settings -> Repository where you choose git and then “Git repository integrated into OpenProject”.
Mind, that repository integration in the sense that you will be able to checkout the repository through OpenProject does only work in the packaged installation, not docker.
Testing
Please add tests to your code to verify functionality, especially if it is a new feature.
Pull requests will be verified by TravisCI as well, but please run them locally as well and make sure they are green before creating your pull request. We have a lot of pull requests coming in and it takes some time to run the complete suite for each one.
If you push to your branch in quick succession, please consider stopping the associated Travis builds, as Travis will run for each commit. This is especially true if you force push to the branch.
Please also use in your commit message to suppress builds which are not necessary (e.g. after fixing a typo in the ).
Help and feedback
If you did not find what you were looking for
Search in docs
If you need help from the community or want to support others
Post on OpenProject forum
If you are eligible for professional support and have more questions
Request support
If you find an easily fixable error or need for improvement in the documentation
Edit this page
If you would like to suggest bigger updates or improvements to this documentation
Create an issue
If you want to contribute to translate this documentation to another language
Translate on crowdin
If there’s something you don’t like or understand about this feature
Create an issue
If you want to propose a new feature that OpenProject does not offer yet
Submit feature proposal
To further help OpenProject to shape and test new features
Join beta testing
To view OpenProject premium features and pricing
View pricing page
If you want to try all premium features in the OpenProject Cloud Edition 14 days for free
Free trial OpenProject Cloud Edition
If you want to try all premium features in your on premise Community installation 14 days for free
Free trial OpenProject Enterprise Edition (on premise)
Result
With this last step confirmed, the OpenProject wizard will complete, and apply all the configuration options that you have just selected. This might take a few minutes depending on your machine and internet connection, as OpenProject might need to install additional packages (such as the web server, database) depending on your selections.
In case this process crashes or exits with an obvious error, please keep the output and send your configuration from (removing any passwords from it) to us at support@openproject.com , or reach out to the community forums.
When this process completes, it will have started the internal application and web servers, the background jobs to process work-intensive jobs, and set up the connection to the database.
You should be able to reach the OpenProject instance by visiting your installation at .
You can then log in using the default user/password combination:
- username =
- password =
Step 2: PostgreSQL database configuration
OpenProject requires a PostgreSQL database to store your data. This wizard step allows you to choose an option for the PostgreSQL database connection:

The dialog allows you to choose from three options:
Install a new PostgreSQL server and database locally (default)
Choose this option if you want OpenProject to set up and configure a local database server manually. This is the best choice if you are unfamiliar with administering databases, or do not have a separate PostgreSQL database server installed that you want to connect to.
Use an existing PostgreSQL database
Choose this option if you have a PostgreSQL database server installed either on the same host as the OpenProject package is being installed on, or on another server you can connect to from this machine.
The wizard will show you multiple additional steps in this case to enter the hostname, username & password as well as the database name for the PostgreSQL database.
Skip (not recommended)
The wizard will not try to connect to any database. You will have to specify a database manually through the environment variable. If you choose skip and did not set a , the configuration process will fail.
You can set this parameter yourself to a PostgreSQL database URL.
Help and feedback
If you did not find what you were looking for
Search in docs
If you need help from the community or want to support others
Post on OpenProject forum
If you are eligible for professional support and have more questions
Request support
If you find an easily fixable error or need for improvement in the documentation
Edit this page
If you would like to suggest bigger updates or improvements to this documentation
Create an issue
If you want to contribute to translate this documentation to another language
Translate on crowdin
If there’s something you don’t like or understand about this feature
Create an issue
If you want to propose a new feature that OpenProject does not offer yet
Submit feature proposal
To further help OpenProject to shape and test new features
Join beta testing
To view OpenProject premium features and pricing
View pricing page
If you want to try all premium features in the OpenProject Cloud Edition 14 days for free
Free trial OpenProject Cloud Edition
If you want to try all premium features in your on premise Community installation 14 days for free
Free trial OpenProject Enterprise Edition (on premise)
FAQ regarding OpenProject BIM edition
Is there a way to use OpenProject BIM for free, too?
Yes, (only) as part of the Community Edition you can use OpenProject BIM for free. Please have a look here to find out how to activate the BIM modules in your on-premises installation.
Does clicking on a BCF-issue zoom you to the appropriate location in the model?
Yes, the so-called camera position is stored in the BCF-issues, so that exactly the same camera position is assumed when you click on the BCF-issue. These are called viewpoints. If you have several models, e.g. architecture and technical building equipment, these must be activated (made visible) before you click on the BCF-issue. In the same way, BCF-elements of the model can be hidden or selected via the viewpoint.
In our introductory video to the OpenProject BIM Edition the basics are shown very well. In particular, the integration of BCF management into the rest of the project management of a construction project is the strength of OpenProject.
Can I add photos from my mobile/phone to BIM issues?
Yes. Take a photo with your camera and save it on your phone. Then open the correct work package in your browser or create a new one. Append the photo as an attachment to the work package.
SUSE Linux Enterprise Server (SLES) Installation
SLES 12
Add the OpenProject package source:
Download the OpenProject package:
Then finish the installation by reading the section.
Note: On SLES12 full-text extraction for attachments by default.
Full-text extraction not supported
For some distributions we do not provide the required dependencies for full-text extraction of attachments. If you need this feature, please install the required dependencies () manually. For more information, please see the plaintext gem. Once installed, check to see if OpenProject is able to pick up these dependencies.
After you have successfully installed the OpenProject package, you can now perform the initial configuration of OpenProject, using the wizard that ships with the OpenProject package.
История и статус
Марк О’Брайен, Ховард Кац и Лоран Кретьенно разработали OpenProj в компании Projity в 2007 году. Он вышел из бета-версии с версией 1.0 10 января 2008 года.
В конце 2008 года Projity была приобретена Silver Lake Partners (частной инвестиционной компанией) через свою тогдашнюю дочернюю компанию Serena Software .
В ноябре 2008 года поддержка и развитие OpenProj оказались приостановленными. Несколько более поздних коммитов в CVS с регрессами, но без улучшений. Он больше не совместим с Microsoft Project.
Serena / Projity также разработала программное обеспечение для проектов « Программное обеспечение как услуга» (SaaS), Projects On Demand. (Услуга «Проекты по запросу» закончилась 11 июня 2011 г.)
В 2012 году основатели OpenProj объявили, что они разделили кодовую базу OpenProj и начали другую реализацию.
Серена объявила и разместила в Интернете, чтобы избежать загрузки OpenProj и вместо этого загрузить ProjectLibre .
Первоначальный выпуск ProjectLibre состоялся в августе 2012 года. ProjectLibre был полностью переписан и, таким образом, технически перестал быть форком.
Docker-based installation
If you are using docker-compose, then the data volumes are managed by Docker and you should have a look at the official Docker documentation for instructions on how to backup.
If you are using the all-in-one container, then you can simply backup any local volumes that you chose to bind-mount with the option when launching the container. For instance if you launched the container with:
Then you would need to backup the folder (for instance to S3 or FTP server).
Dumping the database
When using docker-compose you can simply dump the database from the database container.
This assumes that the database container is called . Find out the actual name on your host using .
All-in-one container
If you need a regular dump of the database you can get one using like this:
Where is the name of your OpenProject container. If you don’t know it you can find it using .
Generate the plugin
You can generate a new plugin directly from OpenProject. Think of a good name and a place (in your filesystem) where the plugin should go. In this example, we have a directory right next to the directory. Then do
This generates the plugins into the directory . The new plugin is a rails engine, which can be published as a gem.
You may want to update the generated plugin’s gemspec ().
Example Plugin
There is an example plugin which does some of the basic things (adding menu items, hooking into views, defining a project menu, etc.) and provides further info in its README.
Instead of generating a new plugin you can also just clone the example plugin and adapt it.
About OpenTX versions
OpenTX versions are delivered as sets of major and minor releases. Major releases represent big steps with lots of feature changes and new functionality, which require changes in the way model data is stored and thus breaks compatibility with the previous one. Minor releases within a major one will fix bugs, correct functionality that needs changes, add new functionality that doesn’t require breaking compatibility, or remove features that are deemed useless.
As we are dependent on user feedback, a major release will start as “unstable” and will go through several rounds of refinement based on the gathered user experiences, which can initially cause radical changes in the way a feature operates between minor versions. Once things have settled and we have decent documentation available that major version will become “stable” i.e. its features will be frozen, and from that moment on any new minor versions would only be released to fix bugs that may be discovered.
We recommend “normal users” not to jump on a new major revision straight away as following the minor revisions of an unstable branch requires careful attention to the changelog to find out about things that may have changed and could potentially break existing setups, and documentation is usually not ready yet. They should thus stick with “stable” versions. Advanced users who want to be on the bleeding edge, want to provide feedback and/or suggest modifications, can find their way without documentation and can follow the evolution closely are welcome to do so during the unstable period, of course at their own risk.
Currently, the supported major versions of OpenTX are:
- OpenTX 2.2
- OpenTX 2.3
Major releases are independent, OpenTX companion 2.0.x will download firmware 2.0.x, OpenTX companion 2.1.x will download firmware 2.1.x etc. Updates between major versions are manual, you need to download the required companion yourself, no updates will be automatically offered. When upgrading from one major version to the next it is recommended to backup both your current firmware and settings, and to thoroughly check all of your models’ functions still operate correctly after the built-in upgrade procedure has completed. Downgrading models and settings is not possible, so should you want to switch back to an older major version you will need to either reload your backup or start from scratch again.
You can check the release history of OpenTX on this page.
OpenTX downloads
OpenTX 2.3 branch
Latest OpenTX major version with added support for the FrSky X10 Express, X9D+ 2019, X-Lite S/Pro, X9 Lite and Jumper T12 radios, the new FrSky ACCESS system, and lots of new features including significant latency improvements with FrSky radios/modules. Please read this page for more details about other changes. As usual with each major release new SD card contents are needed, information is on the page.
OpenTX 2.2 branch
Previous major version, now stable and still supported for normal use, but no new features or bugfixes will be implemented. 2.2 added support for the FrSky Horus X12S and X10 and Taranis Q X7 radios (plus X-Lite starting with 2.2.2). This version drops support for AVR-based radios, for those see 2.1 below. Please read this page for more details about other changes. As usual with each major release new SD card contents are needed, information is on the page.
OpenTX 2.2.4
(2019-07-11)
Nightly builds
The nightly builds are automatic builds that are build every day. As
during development, critical bugs might be introduced, these versions
should not be used for flying. Additionally a backup of EEPROM
should be done before flashing these firmware. The nightly builds are
only intented to verify if bugfixes/new features work as expected. We
provide no changelogs for these builds. To get a rough idea about the
changes you can look at the
git commit log.
macOS nightly builds,
Windows nightly builds
and
Linux nightly builds
OpenTX 2.1 branch
Deprecated, no more support will be given but firmware downloads are still available for the time being. It is the last version to support AVR-based radios (9X/9XR with stock board, Gruvin9x, DIY MEGA2560). 2.1 introduced completely new telemetry handling compared to 2.0, and also requires a different sound pack (see below). The original upgrade notes from 2.0 to 2.1 can be found here.
This branch is the first to support the FrSky Taranis X9E (tray version).
OpenTX 2.1.9
(2016-09-15)
OpenTX 2.0 branch
Deprecated, no more support will be given but firmware downloads are still available for the time being. 2.0 introduced the Virtual Inputs system.
This branch is the first to support the FrSky Taranis X9D+ and the Turnigy 9XR-Pro.
OpenTX 2.0.20
(2016-09-15)
OpenTX 1.x branch
This branch is the first to support the original FrSky Taranis X9D, and is now deprecated. Firmware downloads are not possible anymore, the below companion is only provided for reference.
companion9x v1.52
(2014-01-10)
Firmware downloads are exclusively available from within OpenTX Companion’s “Download” dialog. OpenTX Companion needs to be configured for the proper radio type and with the firmware options you choose, so that a customised firmware file with these options can be prepared for you by our build server and downloaded to your PC. OpenTX Companion is then used to load the firmware to your radio.PLEASE NOTE that the firmware you run on the radio and companion you use on the PC to edit settings must be of the same branch!
Sound packs
Sound packs can be downloaded either through companion (the Download dialog will point you to the correct directory for the selected radio type), or from the links below:
Sound packs for OpenTX 2.0Sound packs for OpenTX 2.1SD card contents for OpenTX 2.2, with sound packsSD card contents for OpenTX 2.3, with sound packs
Step 3: Apache2 web server
OpenProject comes with an internal ruby application server, but this server only listens on a local interface. To receive connections from the outside world, it needs a web server that will act as a proxy to forward incoming connections to the OpenProject application server.
This wizard step allows you to auto-install an Apache2 web server to function as that proxy.

The available options are:
Install Apache2 web server (default)
We recommend that you let OpenProject install and configure the outer web server, in which case we will install an Apache2 web server with a VirtualHost listening to the domain name you specify, optionally providing SSL/TLS termination.
In case you select to auto-install Apache2, multiple dialogs will request the parameters for setting it up:
Domain name

Server path prefix
If you wish to install OpenProject under a server path prefix, such as , please specify that prefix here with a leading slash. For example: . If OpenProject should respond to as specified in the previous dialog, simply leave this dialog empty and confirm by pressing .

SSL/TLS configuration
OpenProject can configure Apache to support HTTPS (SSL/TLS). If you have SSL certificates and want to use SSL/TLS (recommended), select Yes.
In that case, you will be shown three additional dialogs to enter the certificate details:
- The absolute SSL certificate path
- The absolute SSL private key path
- The path to the Certificate Authority bundle for the certificate (optional, leave empty unless needed)

External SSL/TLS termination
If you terminate SSL externally before the request hits the OpenProject server, you need to follow the following instructions to avoid errors in routing. If you want to use SSL on the server running OpenProject, skip this section.
If you have a separate server that is terminating SSL and only forwarding/proxying to the OpenProject server, you must select “No” in this dialog. However, there are some parameters you need to put into your outer configuration.
- If you’re proxying to the openproject server, you need to forward the HOST header to the internal server. This ensures that the host name of the outer request gets forwarded to the internal server. Otherwise you might see redirects in your browser to the internal host that OpenProject is running on.
- In Apache2, set the directive
- In NginX, use the following value:
- If you’re terminating SSL on the outer server, you need to set the header to let OpenProject know that the request is HTTPS, even though its been terminated earlier in the request on the outer server.
- In Apache2, use
- In Nginx, use
- Finally, to let OpenProject know that it should create links with ‘https’ when no request is available (for example, when sending emails), you need to set the following setting: followed by an . This ensures that OpenProject responds correctly with secure cookies even though it was not configured for https in the server configuration.
Skip (not recommended)
The installer will not set up an external web server for accessing. You will need to either install and set up a web server such as Apache2 or Nginx to function as the web server forwarding to our internal server listening at by proxying.
Only choose this option if you have a local Apache2 installed that the OpenProject package may not control, or need to use a different web server such as Nginx. Please note that not all functionality (especially regarding Repositories) are supported on Nginx.
When installing with an existing Apache2, you can take a look at the source of our installation templates for guidance on how to set up the integration.
Here’s an exemplary configuration that might work for you.
For a minimal nginx config, please see this gist as as starting point.
Please note: If you reconfigure the OpenProject application and switch to , you might run into errors with the Apache configuration file, as that will not be automatically remove. Please double-check you removed references to the if you do reconfigure.
Help and feedback
If you did not find what you were looking for
Search in docs
If you need help from the community or want to support others
Post on OpenProject forum
If you are eligible for professional support and have more questions
Request support
If you find an easily fixable error or need for improvement in the documentation
Edit this page
If you would like to suggest bigger updates or improvements to this documentation
Create an issue
If you want to contribute to translate this documentation to another language
Translate on crowdin
If there’s something you don’t like or understand about this feature
Create an issue
If you want to propose a new feature that OpenProject does not offer yet
Submit feature proposal
To further help OpenProject to shape and test new features
Join beta testing
To view OpenProject premium features and pricing
View pricing page
If you want to try all premium features in the OpenProject Cloud Edition 14 days for free
Free trial OpenProject Cloud Edition
If you want to try all premium features in your on premise Community installation 14 days for free
Free trial OpenProject Enterprise Edition (on premise)
Upgrade notes for 8.x to 9.x
These following points are some known issues regarding the update to 9.0.
MySQL is being deprecated
OpenProject 9.0. is deprecating MySQL support. You can expect full MySQL support for the course of 9.0 releases, but we are likely going to be dropping MySQL completely in one of the following releases.
For more information regarding motivation behind this and migration steps, please see this blog post. In the post, you will find documentation for a mostly-automated migration script to PostgreSQL to help you get up and running with PostgreSQL.
Package repository moved into opf/openproject
The OpenProject community installation is now using the same repository as the OpenProject development core.
Please update your package source according to our installation section.
You will need to replace with together with a change from to in order to perform the update.
If you have currently installed the stable 8.x release of OpenProject by using the package source, you will need to adjust that package source.
APT-based systems (Debian, Ubuntu)
- Update the reference to in to .
- Update the reference to in to .
- Perform the Upgrade steps as mentioned above in Upgrading your OpenProject installation
YUM-based systems (CentOS, RHEL)
- Update the reference to in to .
- Update the reference to in to .
- Perform the Upgrade steps as mentioned above in Upgrading your OpenProject installation
SUSE Linux Enterprise Server 12
- Update the reference to in to .
- Update the reference to in to .
- Perform the Upgrade steps as mentioned above in Upgrading your OpenProject installation
Migration
How can I migrate from Bitnami to OpenProject?
To migrate from Bitnami to Enterprise cloud please provide these:
- data as database dump (.sql file)
- attachment folder
You can use the first two steps of . Please contact us to discuss your migration.
To migrate from Bitnami to Enterprise on premises please use . We offer (paid) installation support to help you migrate to OpenProject (for the Enterprise on-premises edition). Please contact us to request it.
How can I migrate from Jira/Confluence to OpenProject?
At the moment there are these ways to migrate:
- our API
- our Excel sync
- Using a Markdown export app you can export pages from Confluence and paste them (via copy & paste) into OpenProject in e.g. the wiki. This should preserve at least most of the layout. Attachments would then have to be added manually.
For more information please contact us.
How can I migrate from Community Edition or Enterprise on-premises to Enterprise cloud?
We will need a database dump from you which we will upload to your new Enterprise cloud. Please contact us to plan the migration and get more instructions.
How can I migrate from Enterprise cloud to Enterprise on-premises?
We will provide a database dump which you can upload into your Enterprise on-premises edition. This way you can keep all your data.
How can I migrate from Community Edition to Enterprise on-premises?
If you you will receive an Enterprise token. Use it to activate the Enterprise premium features. For detailed activation instructions please refer to the Enterprise activation guide. You can keep your data that you created in the Community Edition.
How can I migrate from Enterprise on-premises to Community Edition?
If you cancel your subscription for Enterprise on-premises you will be downgraded to Community Edition automatically as soon as the subscription period ends. You can keep all your data but won’t be able to use the and won’t be eligible for support any more.
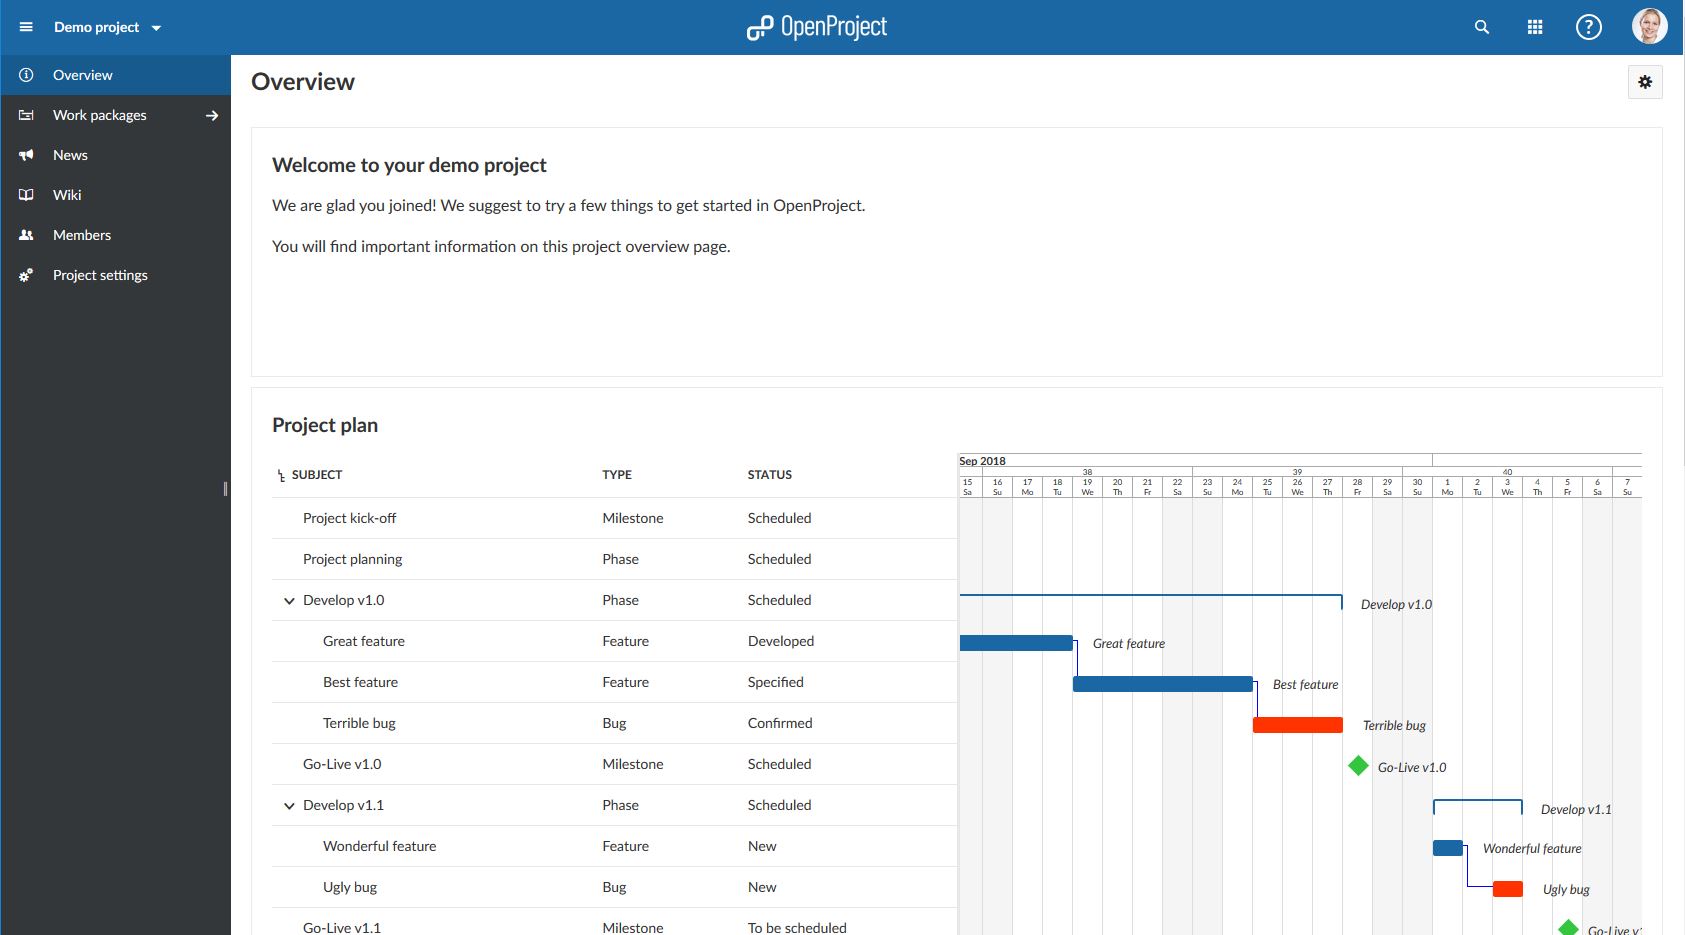
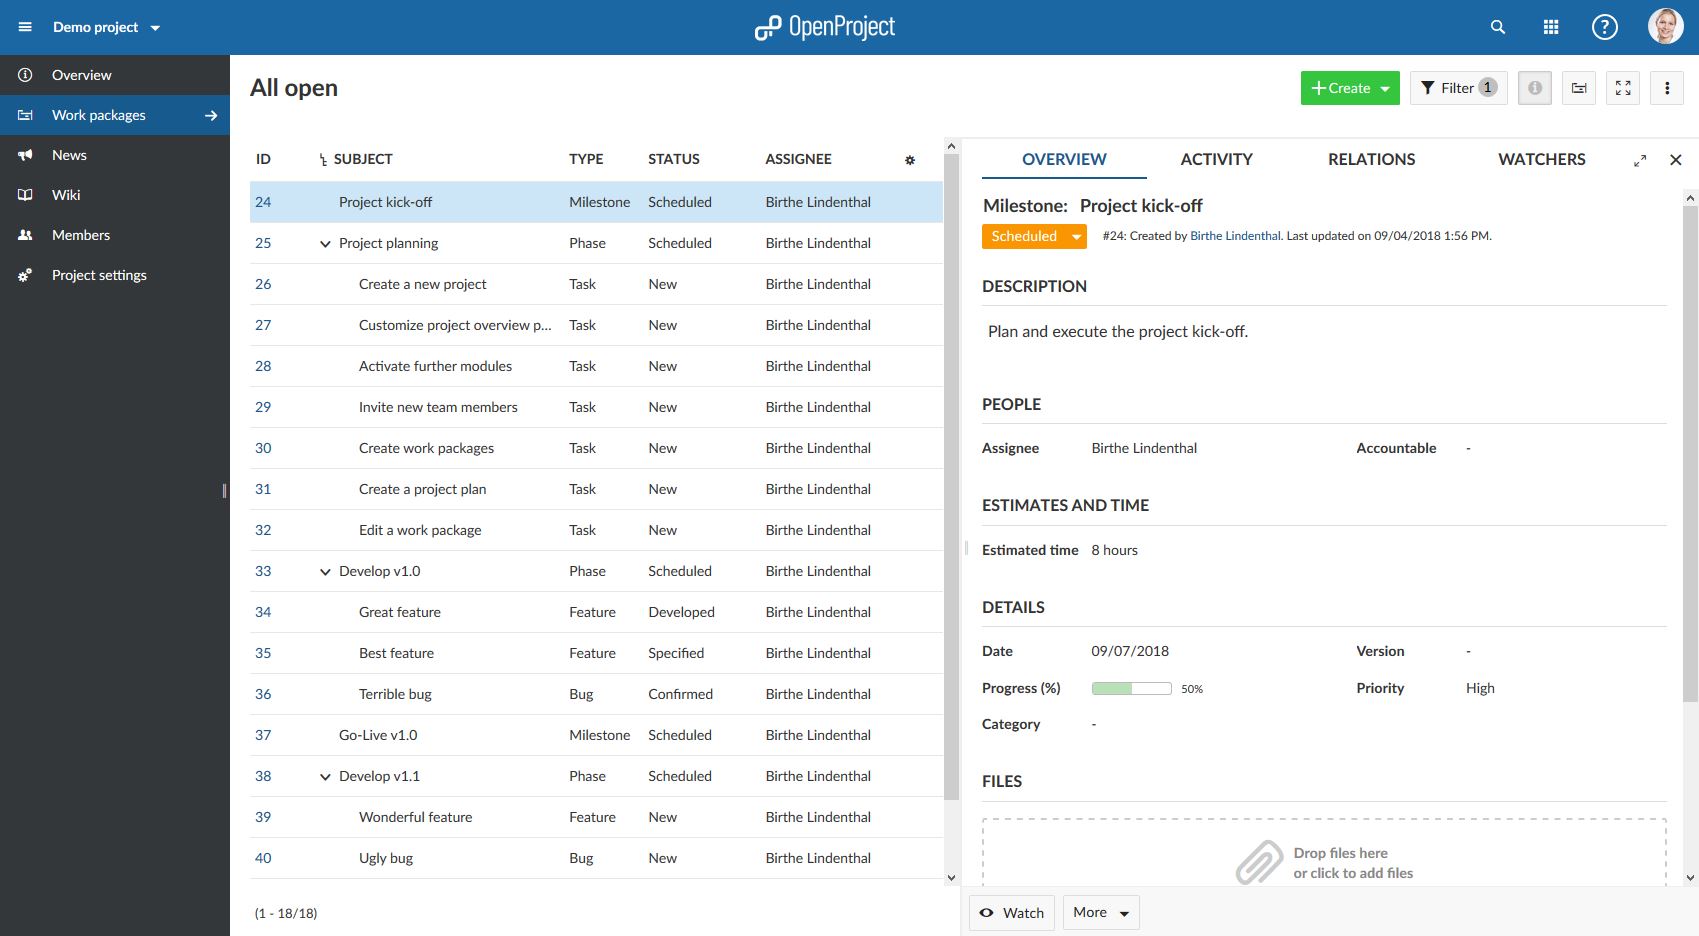
Create a new project
To create a new project, click the green button + Project directly on the system’s home screen in the Project section.

Alternatively, you can use the green + button in the header menu to create a new project.

- You can either create a completely new project, create a subproject of an existing project or create a (sub)project from a template. For the latter option, choose a using the drop-down menu.
- Enter a name for your project and click the blue Create button.
- The Advanced Settings allow for further configuration, e.g. description, URL, etc.

By default, creating a new project will set you as project admin, regardless of whether you copied a project, used a template or created a project from scratch. Now, you can get started working on your project.
To configure further project information, see the documentation for project settings.
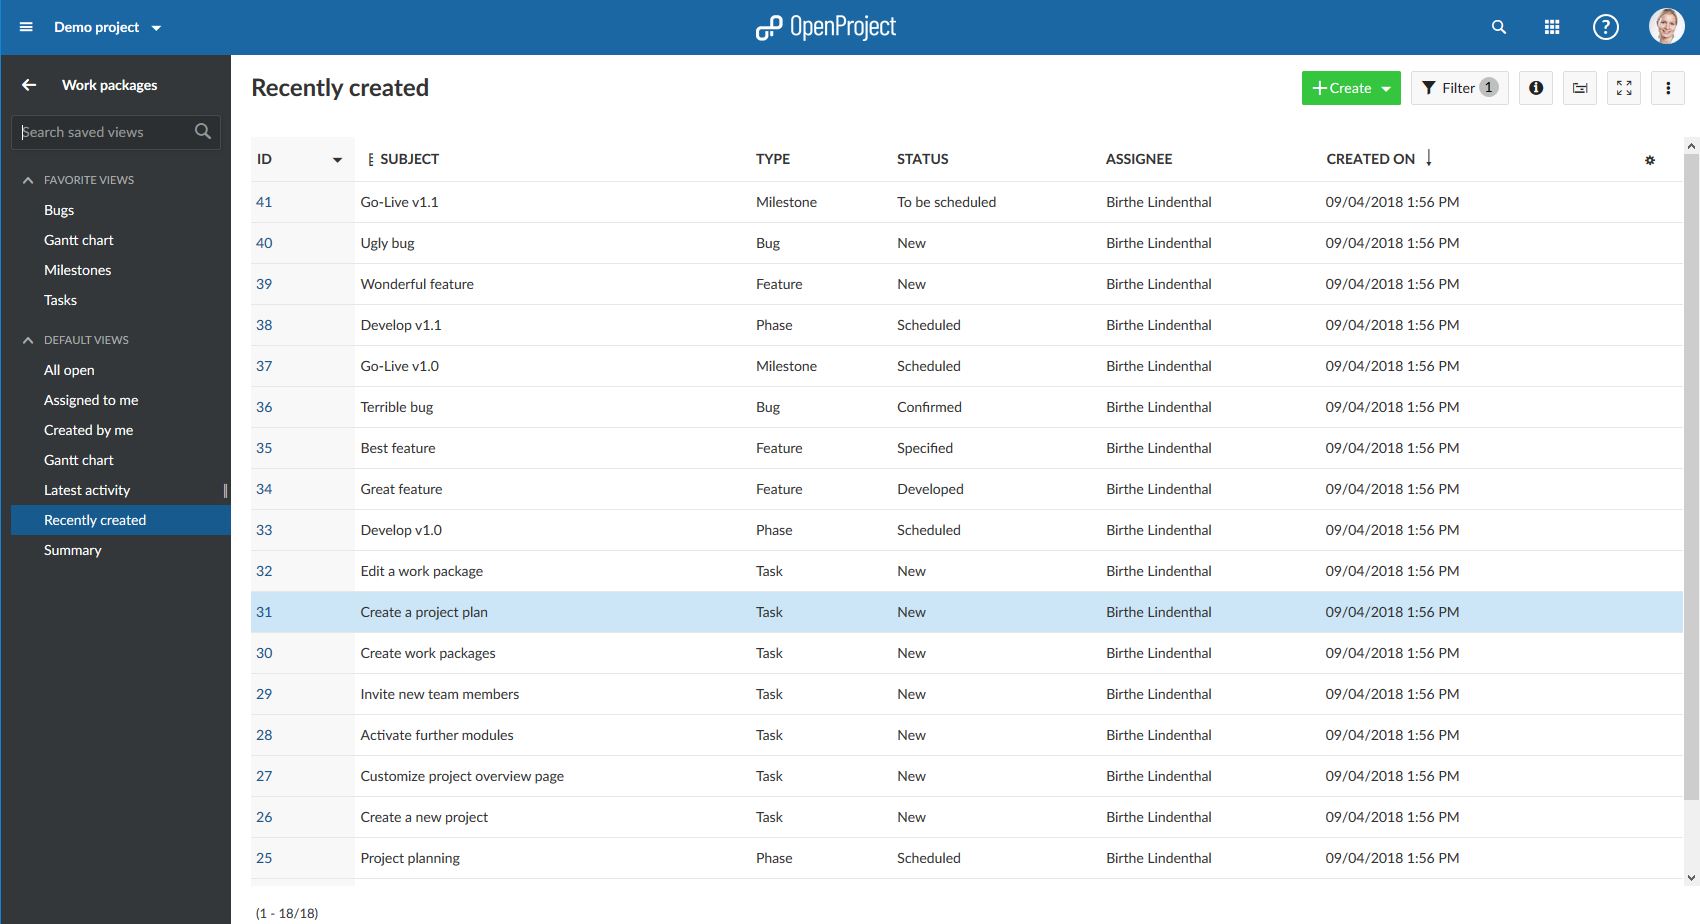
View all projects
To view all your projects in which you are a member, click on the View all projects link in the Select a project drop-down menu.

You will see a list with all your projects and their details.
Security badge
OpenProject now provides a release indicator (security badge) that will inform administrators of an OpenProject installation on whether new releases or security updates are available for your platform.
If enabled, this option will display a badge with your installation status at Administration > Information right next to the release version, and on the home screen. It is only displayed to administrators.
The badge will match your current OpenProject version against the official OpenProject release database to alert you of any updates or known vulnerabilities. To ensure the newest available update can be returned, the check will include your installation type, current version, database type, enterprise status and an anonymous unique ID of the instance. To localize the badge, the user’s locale is sent. No personal information of your installation or any user within is transmitted, processed, or stored.
To disable rendering the badge, uncheck the setting at Administration > System settings > General or pass the configuration flag .
How to … in OpenProject?
Most of this kind of questions will be answered in the respective sections for each topic (see links below). However, there may be some FAQ that do not really fit elsewhere:
I cannot log in. Resetting my password seems to have no effect. What do I do?
Ask your system admin to .
If you are the system administrator of an on-premises installation (Enterprise on-premises or Community Edition) please have a look at .
How can I reverse changes?
This is not possible per se, there’s no Ctrl+Z option or anything similar.
Please use these resources to find out about the latest changes and re-do them manually: The , the or the Activities module.
How can I increase or decrease the number of users in OpenProject?
You can invite new users in the system administration as long as you have enough licenses.
If you are using the Enterprise cloud, you can easily upgrade or downgrade the number of users by navigating to Administration -> Billing -> Manage subscription and choosing the new amount of users which you need in your system. Find out more here.
How can I add a RACI matrix in OpenProject?
You can add project custom fields of the type “user” to your projects and track the respective persons there.
On a work package level you could use “Assignee” for “Responsible”, “Accountable” for “Accountable” and add custom fields for “Consulted” and “Informed”. For the latter one you could also just set the person as watcher instead.
How can I create a PDF file with an individual and consolidated projects report?
To create and print/export reports you can…
- use the : Filter for e.g. phases and milestones (which would make sense to use in your projects in this case). Then use the . This will give you an overview over all projects’ work packages (or all projects’ milestones and phases, respectively).
- use the Wiki module to document your project reports. The Wiki pages is optimized for being printed using your browser’s print feature. You could even insert a work packages list there. If you want to use the Wiki we suggest setting it up in a (global) parent project.
The projects overview is not optimized for export via PDF, yet. Nevertheless, you can try to use your browser’s print feature.
Please go to https://www.openproject.org/newsletter/ and submit your data to receive our newsletter. Another option would be to agree to receive the newsletter when creating your account.
All-in-one container
Quick Start
The fastest way to get an OpenProject instance up and running is to run the following command:
This will take a bit of time the first time you launch it, but after a few minutes you should see a success message indicating the default administration password (login: , password: ).
You can then launch a browser and access your new OpenProject installation at http://localhost:8080. Easy!
To stop the container, simply hit CTRL-C.
Note that the above command will not daemonize the container and will display the logs to your terminal, which helps with debugging if anything goes wrong. For normal usage you probably want to start it in the background, which can be achieved with the flag:
Note: We’ve had reports of people being unable to start OpenProject this way because of an and permissions to write to . If you run into this, a workaround seems to be to add to your run command, even if you run in detached mode.
What is new in OpenProject 8.0?
WYSIWYG text editor
A new text editor makes working with texts in OpenProject much easier. With the visual editor, you can easily format text, insert images, create tables and add macros (e.g. a table of contents). This new editor enables you to easily copy and paste content from Word documents into OpenProject or to insert screenshots and other images with copy and paste. The new text editor is available in all parts of OpenProject (e.g. wiki pages, meetings, news, and work package descriptions).
New design
OpenProject has a new logo and a new default color theme. The header menu has a different blue color, while the side menu is now displayed in a dark tone. Users of the Cloud Edition and Enterprise Edition can of course adjust the logo and color theme.
OpenProject 8 introduces a new side navigation for projects. For wiki pages and the work package page you can now see all the subpages and saved views in the side menu. This makes it a lot easier to navigate between different pages. Default views, such as Recently created or Assigned to me, let you have important information at your fingertips.
Embedded work package tables
Work package tables can now easily be added within a work packages description, wiki pages, meetings, and the project overview page. You can also include a Gantt chart view. When embedding a work package table you have full control over which work packages to be displayed and which columns should be shown. This functionality enables a better overview of important information at a sight, e.g. the current project status. You can also include e.g. important work packages (e.g. child elements) directly within the description of a parent work package.