Convert mp4 to jpg for free. large mp4 files are supported
Содержание:
Part 3 Top 3 Best Video to JPG Converters [PC]
#1. DVDVideoSoft
It is a Windows based video to JPG and PNG converter, and you can have it on Windows 10, 8, 7, Vista, XP SP3. In DVDVideoSoft, you can extract pictures from a video file by frames and seconds.
How to extract all frames from a video via DVDVideoSoft?
- Step 2. Set extract by frames / seconds / every frame / total frames from video under Extract area.
- Step 3. Name a video to jpeg file folder and set a destination route for it.
- Step 4. Tap on the Convert button in the bottom right area.
By finishing the whole process, you’ll have turned a video into frames. If you have set extract up to 100 pics from the video, you may need to wait patiently as it’ll take a long time to create your requested frames and the conversion process really kills time.
 Free Video to JPG Converter
Pros:
- • Easy to use.
- • Lightweight: 26.9 MB.
- • Support to convert MOV/MP4 video to JPG and PNG.
Cons:
- • No other modifications available.
- • No Mac version available.
- • Very slow conversion speed.
#2. VLC media player
How to convert video to JPG in VLC?
- Step 1. In VLC, you can click the Media option in the top-left toolbar and import your video files.
- Step 2. After the video imported, you can play it for a while. After you find the frame you desire, then pause the video.
- Step 3. Move to the Video option in the top menu area, then scroll down to the last tab Take Snapshot and click it.
By doing this, you’ll convert an MP4 to an image sequence. Repeat the process until you convert all needed JPG pictures from the video.
 VLC Media Player
Pros:
- • Crop, aspect ratio can be modified to fit individual needs
- • Zoom option can be adjusted
Cons:
- • You have to snapshot the JPG file one by one with several clicks
- • The conversion speed is slow
#3. Adobe Photoshop
How to convert video to image sequence in Photoshop?
- Step 1. Launch Photoshop, import the video file you’ve got: File.
- Step 2. Open. After importing the video file in it, define the start and end time of video frames which are to be converted in JPG format.
- Step 3. After you define the video length in the timeline, you can do as follows: go to File.
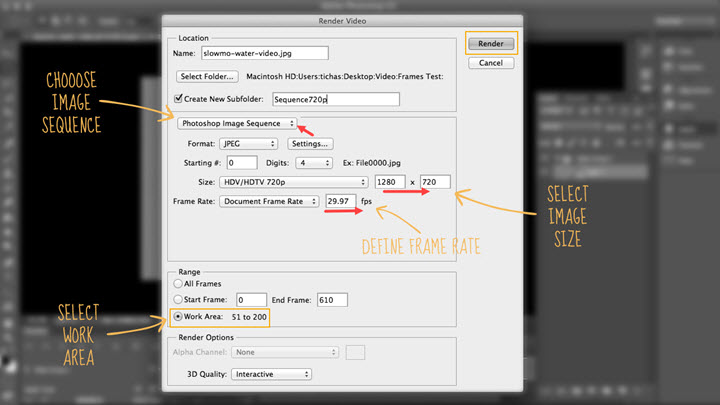
- Step 4. Export > Render Video, pick up Photoshop Image Sequence option.
- Step 5. Define an image size under Size and set a frame rate under Frame Rate .
- Step 6. select Work Area under Range tab > click Render on the top right corner side.
 Adobe Video to Image Sequence
Pros:
• A wide range of output picture formats.
Cons:
Part 2: Easy Steps to Convert MP4/MOV to JPG/PNG
VideoProc offers you 3 ways to convert MP4/MOV/MKV/WEBM to JPG/PNG:
- 1. Automatically convert videos to pictures precisely by frames.
- 2. Manually press the screenshot icon to capture still frames.
How to convert video to jpg files precisely frame by frame?
Step 1. Load the Source Video.
Click Video > +Video to load the source video.
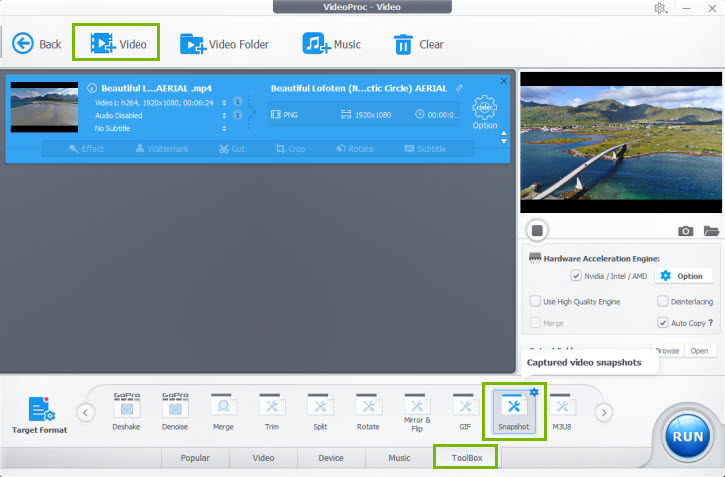
Step 2. Open the Snapshot Window.
Click ToolBox to find Snapshot and then click the wheel-like icon besides it to open the video snapshot window.
 Snapshot in Toolbox
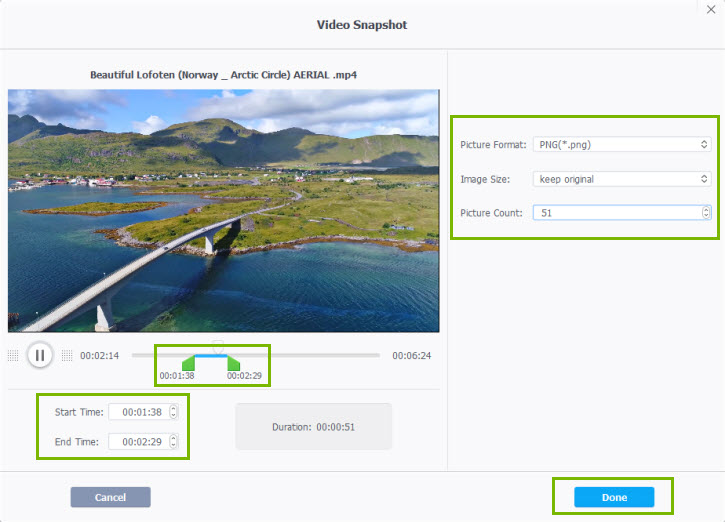
Step 3. Customize Export Settings.
- Choose PNG as the picture format if you want to convert video to PNG. Otherwise, choose JPEG.
- Set the preferred image size, (keep original is recommended).
- Customize the picture count (how many pictures you’d like to capture from the video). Then click Done.
Tips: you can drag the green bar to locate the starting time and ending time.
Step 4. Start the Conversion.
Click Run to start capturing snapshots from the video.
Tips: The output folder will pop up, once the job is finished, and you can find your snapshots folder, by which you can find all the pictures converted from a video.
 Advanced Setting in VideoProc
How to Convert Video to JPG via Screenshotting?
- Step 1. Click the play button to preview the video.
- Step 2. Click the camera icon when you see your preferred frame.
Then, you can click the Folder icon by camera icon to open the output picture folder to check the captured video snapshot.
Video to JPG FAQ Page
Q: How do I convert iPhone Video to JPEG?
A: If you are using an iPhone product, you can do a screenshot in 2 ways as follows:
1. Press the home button and the power button at the same time anytime you find the proper frame. By doing this, your desired frame will be kept in the local Photos library where you can go check them later.
2. When you find some desired clips, specify the location and pause the fame, you can have the AssistiveTouch for help: tap the button on your screen > Device > More > Screenshot. You may have to repeat the whole process until you’ve got all the desired frames in Photos.
Q: How to get an image from a video on a mobile phone?
A: If you are Android phone users, things may be a little bit confusing as each Android phone setting may vary from brand to brand. In most conditions, however, you can press the power button for a few seconds > then tap screenshot. If that doesn’t work, you can hold the power and the volume down button simultaneously for a couple of seconds to get a screenshot. In some Android phones, you may need to pull down the notification panel and tap on the icon.
Q: How many file formats of video can be imported in VideoProc?
A: There are over 370 kinds of video file formats import-supported in VideoProc, just name a few of them: MPEG, MP4, MKV, AVI, WMV, WebM, MOV, M4V, FLV, 3GP, h.264/AVC, h.265/HEVC, and many more.
Q: When do the video to JPG conversion, am I supposed to customize the picture size?
A: definitely YES. In VideoProc, when converting the video to JPG, you can change and set the picture size in various file sizes: 480×320, 640×480, 720×480, 960×640, 1280×720, 1920×1080.
Part 4 3 Free Online Video to JPG Converters
Some of you may don’t want to add any additional software and wish to convert video to JPG by using an online video to JPG converter. There are some of the most common shortcomings of web-based MP4/MOV to JPG/PNG converters that you should know.
They rely high on your network conditions, so the conversion speed can be extremely slow. Many users also complain that online converters don’t allow them to choose a separate output folder, which may mix the output file with other files. On top of that, owing to the fact that they will upload your unprotected files to the cloud, the safety and security of your privacy cannot get guaranteed. Still, need to reach out to an online video to jpg converter? There are reviews on the top 3 best video to JPG file converter in hopes of bringing you a good reference.
#1. ACONVERT
How to convert video to JPG with ACONVERT?
- Step 1. In ACONVERT, you can press Choose Files to add a video file from your local file folder.
- Step 2. Choose the target format you desire > click on the Convert Now button.
Notice that there’s a limitation on the file size you import, so make sure that your file size is under 200M or it will be rejected to upload.
 Aconvert Video to JPG Converter
Pros:
- • Various kinds of target format provided.
- • No software download and installation needed.
Cons:
- • The video size should not exceed 200M.
- • Default settings, no customization on the picture allowed.
- • Your computer may be attacked by viruses.
- • Too many ads
#2. Filezigzag
 Filezigzag Convert Video to JPG
How to convert videos to JPG via Filezigzag?
- Step 1. Loading your source video from the PC.
- Step 2. Choose JPG as the output picture format.
- Step 3. Enter your email address. (the output file will be sent to this mail).
Pros:
- • Relatively large output picture formats options.
- • Support the simple editing of output images such as changing the size of pictures.
Cons:
- • Slow response speed.
- • Not support the batch conversion
#3. Online Convert
 Online Convert Tool
How to convert video to JPG via Online Convert?
Step 1. Import the video from your hard drive, Google Drive, Dropbox or URL.
Step 2. Set output quality and compress grade. If you need a high-quality outcome, there you can choose «best quality» for quality settings, and «low» for compress grade.
Step 3. Press Start Conversion to start to convert video to picture.
Pros:
- • Can read and output tons of media formats.
- • Boast advanced options to adjust picture and video quality.
Cons: