Скачать авс видео эдитор бесплатно на русском
Содержание:
- Introduction
- Обзор редактора
- Step 2: Install AVS Video Converter
- Step 5: Create a disc menu (optional)
- Step 2: Set the effect application area
- Attributes tab
- Timeline/Storyboard Toolbar
- Timeline View
- Step 4: Add voice comments or background music
- Step 3: Adjust the rotation angle if necessary
- Video Overlay Toolbar
- Step 1: Set the added photos order and adjust their properties
- Audio files properties window
- Step 4: Playback the file to make sure the desired result is achieved
- Step 3: Apply text and video effects
- Trajectory tab
- Step 1: Download AVS Video Converter
- Step 2: Add transitions between your photos
- Особенности
- Два в одном
- Video files properties window
- Функционал
- Основы монтажа
- Step 1: Select the Rotate effect and add it to the timeline
Introduction
If you imported a video record from your smartphone or digital camera and discovered that it had been shot in an incorrect orientation, you can easily fix this issue with AVS Video Editor and then watch your video in a comfortable mode on any device.
You can rotate the entire video or a certain scene only in a desired direction, changing its orientation from the landscape to the portrait one and vice versa. You can also get an original effect rotating the video clip by an arbitrary number of degrees and setting the fade in and fade out effect areas.
After you import your video into the application and add it to the timeline, please follow the steps below to rotate your footage.
Обзор редактора
Программа довольно простая с понятным интерфейсом, даже начинающим будет легко с ней работать. Обладает большим набором инструментов, которые позволяют записывать видео с экрана или камеры, а затем редактировать его. Функция полезна для записи роликов для блога, обучающих уроков и т.д., так как записывается трансляция экрана, его отдельная часть или выделенный участок
Во время записи можно использовать инструменты рисования для выделения важной информации или надписи. Открывается в редакторе, где его можно подправить, настроить переходы, эффекты, текст, меню, записать голос.
Step 2: Install AVS Video Converter
Find the AVSVideoConverter.exe file you have just downloaded (it will be located in the directory specified at ) and double-click it to launch the installer.
If you are using Windows 8 or later and install AVS4YOU software for the first time, Windows SmartScreen may warn you in case it does not recognize the application you try to run. The following warning appears:
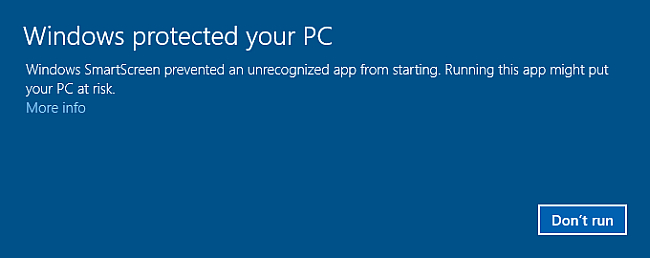
Click the More info link. The information about the application and its publisher will be displayed.
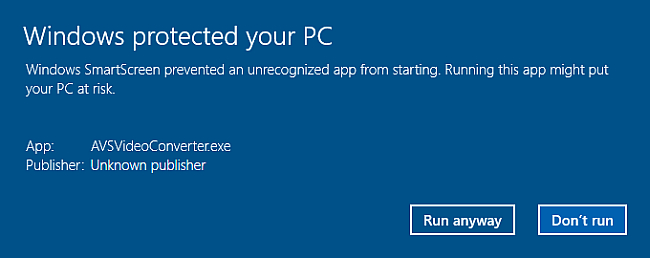
Press the Run anyway button to bypass the SmartScreen warning.
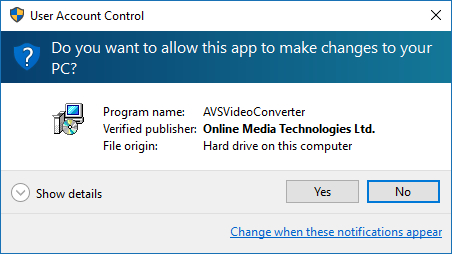
In the consent prompt window, click Yes to start the installation process.
-
Select a language for the interface. The 11 language options available are: English, French, German, Spanish, Italian, Japanese, Dutch, Korean, Polish, Danish and Russian. Choose your language and press OK.
-
In the new window press Next to pass over to the next step.
-
Read through the Licence Agreement page and, if you agree with the terms of the agreement, tick the I accept the agreement option and press Next to proceed with the installation.
-
Select the directory to which you’d like to install the program. The default location is Local Disc C:\Program Files\AVS4YOU\AVSVideoConverter.
Note: the best parameter of selecting a directory for the installation is the availability of empty space on the disk you choose. AVS Video Converter requires minimum 138,6 Mb for its installation.
After you have specified the directory, press Next to continue.
-
Untick the Create desktop icon option if you do not wish an AVS Video Converter icon on the desktop.
Note: if you’re using OS Windows XP SP2/3 with Windows Media Player earlier than 11.00 you’ll be offered to Install Windows Media Format 11 Series Runtime files. Leave this option checked for correct work with WMV files.
If you tick the Integrate into the Windows Explorer context menu box, you will be able to right-click any video file found in Windows Explorer and choose the option in the context menu. It’s also possible to select the output format for your file at once. After that the AVS Video Converter program will start with the desired input file and chosen output format.
Click Next to go on with the installation.
-
Review the installation parameters set and, if satisfied, click Install to start installing AVS Video Converter on your computer.
Wait till the software is installed.
Next uncheck the Launch AVS Video Converter option if you do not wish to start the program right now and click Finish.
That’s all. Now, follow Start >> All Programs >> AVS4YOU >> Video >> AVS Video Converter to launch the software. You can also access the program by clicking on its desktop icon provided you ticked the Create Desktop Icon option during installation (see Step 2, ).
Now you can use the product you have just installed. You are welcome to visit the Guides section to find instructions on how to perform the most popular tasks with our software or contact our support team via the support form. They will be glad to answer any question or advise you on any trouble you might experience with the software.
[]
If you intend to create your slideshow in the DVD or Blu-ray formats, you can additionally make a disc menu for it. Click the Disc Menu central button. Make sure that the Disc Menu Enabled option is checked. Double-click the desired menu style preset in the Files and Effects area to apply it to the slideshow.
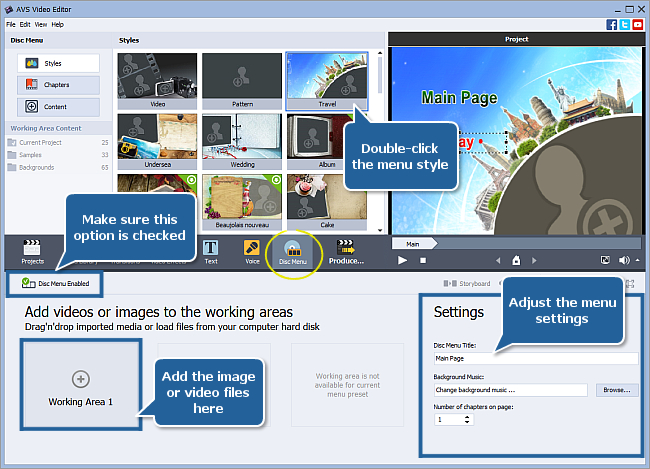
Drag and drop images or videos from the Files and Effects area to the available Working Areas at the bottom part of the program window. Select the Disc Menu Title, change Background Music or set the Number of chapters on page in the appropriate boxes of the Settings section.
You can also split your slideshow into thematic chapters. To add a chapter click the Chapters button on the left side of the program window, put the timeline cursor to the needed place on the Timeline and click the Add button on the Timeline Toolbar.
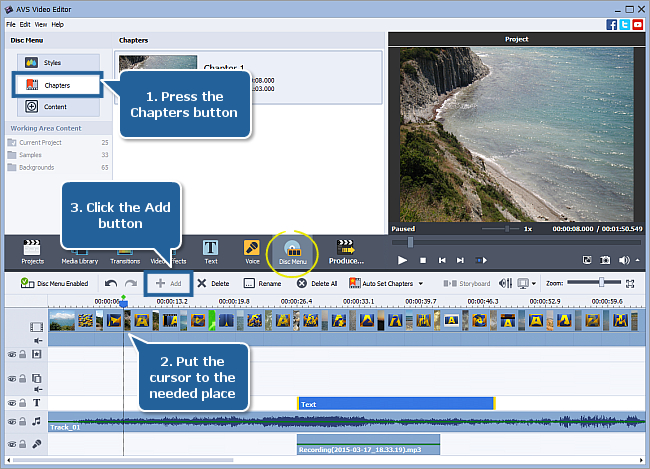
To preview your created menu return to the Styles view mode and use the Preview Area controls.
[]
Step 2: Set the effect application area
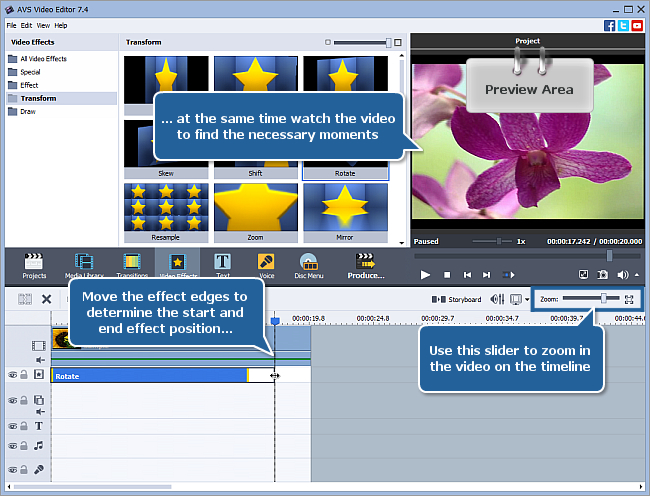
The Rotate effect is now placed at the current cursor position on the timeline and occupies the standard room within the video effects line.
Whether you want to apply the effect to the entire video or to its certain part only, you might need to change the effect duration. To do that quickly and easily, just drag the effect boundaries.
Hover the mouse pointer over the left effect edge until it turns into the bidirectional black arrow and drag it to the left or right without releasing the mouse button to find the beginning of the scene you want to apply the effect to. While moving the arrow, have a look at the Preview Area. As soon as you find this certain moment, release the mouse button. Then do the same with the right effect edge to find the moment, when the necessary scene ends.
You can use the Zoom slider to zoom in the video on the timeline in order to find the exact moments easily.
[]
Attributes tab
Draw section
The Draw section comprises three tabs: Common, Mask and Frame settings. Switch between these tabs to modify the overlay properties.
- The Common tab allows you to make your image transparent and apply the Chromakey effect.
- Transparency — the transparency of the video or image used for the overlay (can differ from — not transparent video — to 100 — full transparency).
- Chromakey — activate this checkbox to apply a composite effect which allows you to add video overlay that will be half transparent so that only part of it will be visible and all the rest will disappear to reveal the video underneath. You can specify its value using the Chromakey slider.
- Append Color — select the color to be transparent. You can select the color that forms the area you would like to be transparent from the drop-down list clicking the black arrow or you can pick a color from the image. To do that click the color field and move the color picker to find the appropriate color. You can also zoom in the image to select colors with more precision. If you don’t like the result use the Reset all colors button to discard the changes.
-
The Mask tab offers you a wide range of invisible layers which can be placed over your video or image object.
-
The Frame tab includes various photo frames which make your video or image object more attractive.
It’s also possible to change the angle of the Video Overlay effect. Click the green circle (visible when the overlay is selected with the mouse) with the left mouse button, the mouse cursor will change into a round arrow — — click the mouse button and, without releasing it, drag it to change the video overlay orientation.
You can also change the Video Overlay box size using the black squares on its boundaries (the mouse button will look like this when you hover it over one of the black squares — click the mouse button and, without releasing it, drag it to change the video overlay size).
Animation section
You can choose the effect used when the overlay appears in your video clicking the drop-down menu beside the Fade in Effect caption and selecting the necessary effect from the list of available ones. The same is done for the Fade out Effect.
The duration of the Fade in and Fade out for the video overlay is set on the preview slider. You can set Fade-in and Fade-out boundaries by dragging the cursor of the slider area to the place where you want the Fade-in area to end and hit the button. The Fade-in area will be marked. Then drag the same cursor to the place on the slider area where you want the Fade-out area to begin and press the button. After that the Fade-out area will be marked.
It’s also possible to direct the mouse cursor at the edge of the slider area and drag the boundaries inwards or outwards. If you want to set the Fade-out effect, drag the right edge of the slider area to the left. To apply the Fade-in effect, drag the left edge of the slider area to the right (see the figure below)

[]
Timeline/Storyboard Toolbar
When you select a line with video or effect certain buttons will be available on the Timeline/Storyboard Toolbar:
Note: the Toolbar buttons differ depending on the element selected and can be present or absent for various elements. Some buttons can be grouped together into the More Options drop-down menu.
| Button | Name | Description |
| Split | Use this button to split the video into two parts at the current cursor position. This button is only available if a video clip is selected on the Timeline. | |
| Delete | Use this button to delete the currently selected element (video clip with the adjacent transition, video effect, text, video overlay or audio mix) from the Timeline/Storyboard. | |
| Delete All | Use this button to delete all the elements (both video clips and transitions) from the Storyboard. | |
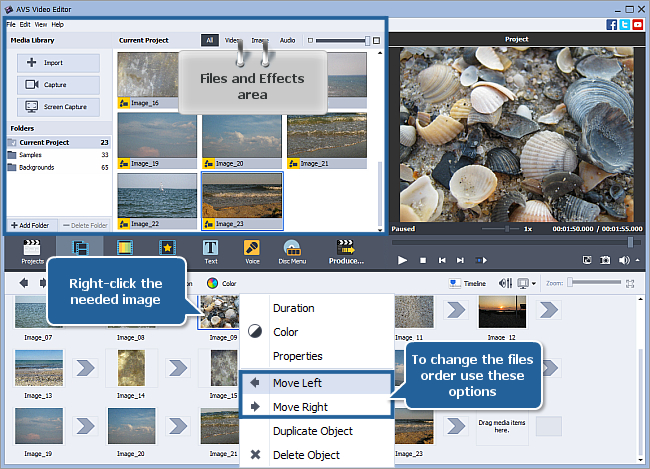
| Move Left | Use this button to move the video clip towards the beginnig of the movie (i.e. to the left part of the Storyboard). This button is only available if a video clip is selected on the Storyboard. | |
| Move Right | Use this button to move the video clip towards the end of the movie (i.e. to the right part of the Storyboard). This button is only available if a video clip is selected on the Storyboard. | |
| Undo | Use this button to reverse the latest performed command. If this option is not available, there is no action to undo. | |
| Redo | Use this button to repeat your latest performed command or action. | |
| Trim | Use this button to edit your video clips and video overlay effect duration. See the Trimming Video section for more information on this option. This button is only available if a video clip or video overlay effect is selected on the Timeline/Storyboard. | |
| Speed | Use this button to change the playback speed of your video. This button is only available if a video clip is selected on the Timeline/Storyboard. | |
| Color | Use this button to adjust the tonal range, color, and sharpness of your video. This button is only available if a video clip is selected on the Timeline/Storyboard. | |
| Audio | Use this button to apply some audio effects to the audio track of your video. This button is only available if a video clip is selected on the Timeline/Storyboard. | |
| Stabilization | Use this button to make the video image more stable and reduce jittering or blurring caused by shaky motions of a camera. This button is only available if a video clip is selected on the Timeline/Storyboard. | |
| Video Effects | Use this button to edit a video effect applied directly on the main video. This button is only available if a video clip with an applied effect is selected on the Timeline/Storyboard. | |
| Transition | Use this button to edit the selected transition duration. This button is only available if a transition is selected on the Timeline/Storyboard. | |
| Edit Effect | Use this button to open the Properties window to edit the applied effects. This button is only available if a video effect is selected on the Timeline. | |
| Duration | Use this button to edit the selected element duration on the Timeline. This button is only available if a video effect or text is selected on the Timeline. | |
| Edit Text | Use this button to open the Properties window to edit text. This button is only available if a text is selected on the Timeline. | |
| Edit Overlay | Use this button to open and edit the video overlay Properties window. This button is only available if a video overlay is selected on the Timeline. | |
| Change Color | Use this button to open the Color window and edit the selected color or add a new one. This button is only available if a background image is selected on the Timeline. | |
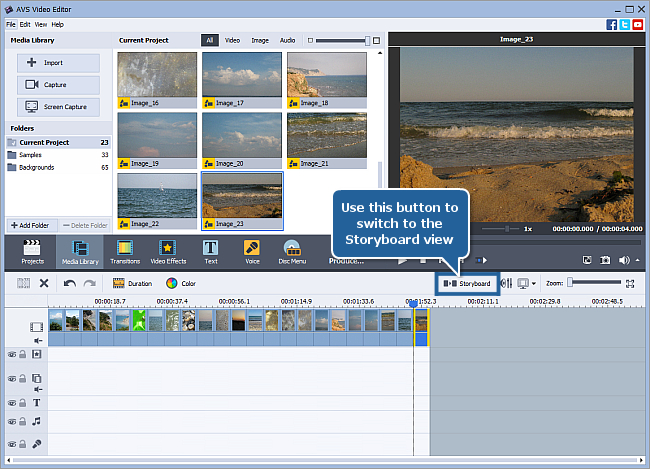
| Storyboard | Use this button to switch to the Storyboard view. | |
| Timeline | Use this button to switch to the Timeline view. | |
| Volume and Balance | Use this button to open the Volume and Balance window and these audio settings. | |
| Project aspect ratio | Use this button to change the Project aspect ratio if needed. By clicking the black arrow you will see these variants: 4×3, 16×9 and Custom. | |
| Zoom | Use the Zoom slider to zoom in and out the video and the effects on the Timeline. Click the Zoom to fit button to disable zooming. This option is disabled when you switch to the Storyboard view. |
[]
Timeline View
The Timeline view allows you to achieve accuracy and precision in applying effects and editing your videos.

AVS Video Editor allows you to apply one or several effects to your media file. For details on a specific effect, please refer to respective chapters. The Timeline view displays all the possible editing options simultaneously. You can see the Video Effects, Text, Video Overlay and Audio Mix lines used to edit your video clip.
- To expand any effect applied to the video you need to press the ‘+’ button near it, to collapse it press the ‘-‘ button.
- To hide the audio track of the main video or the video overlay use the button, to display it use the button.
- To include an effect or a media file into your output video or to exclude it from it the Enable/Disable line button is used.
- To block the line while applying effects to other lines, use the Lock/Unlock line button.
[]
Step 4: Add voice comments or background music
If you want to add voice commentaries to any of your pictures click the Voice central button. Make sure that the microphone is connected to your PC sound card. Set the recording options in the Voice Record panel, put the timeline cursor to the needed place on the Timeline and click the Start Recording button. The button will change to the the Stop Recording button. Click it to stop the recording process.
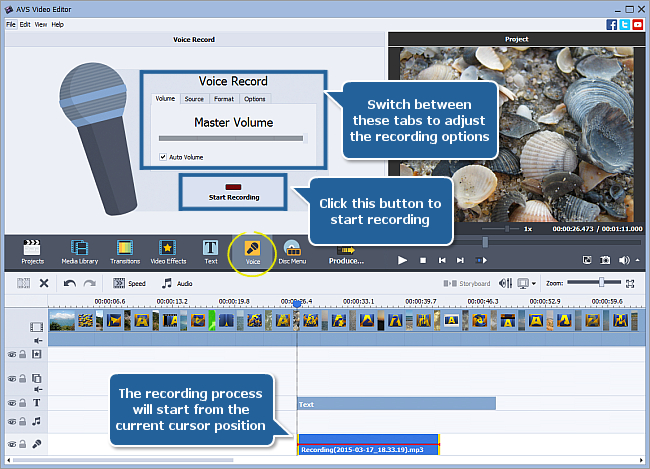
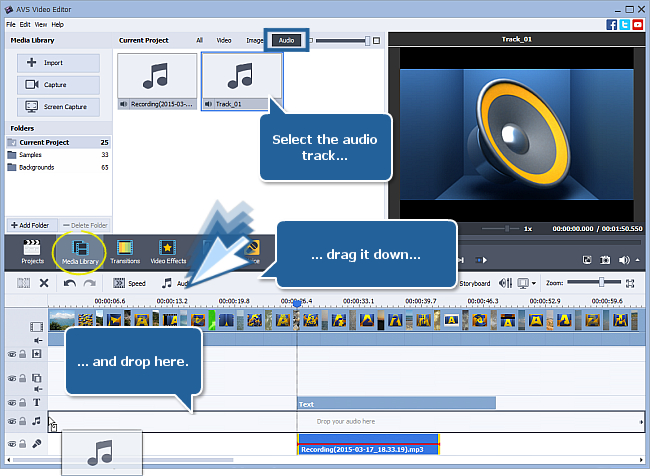
To add an audio track as background music click the Media Library central button and select the Audio category at the top of the interface. Drag-and-drop one of the previously imported tracks from the Files and Effects area to the line for audio mix of the Timeline.
[]
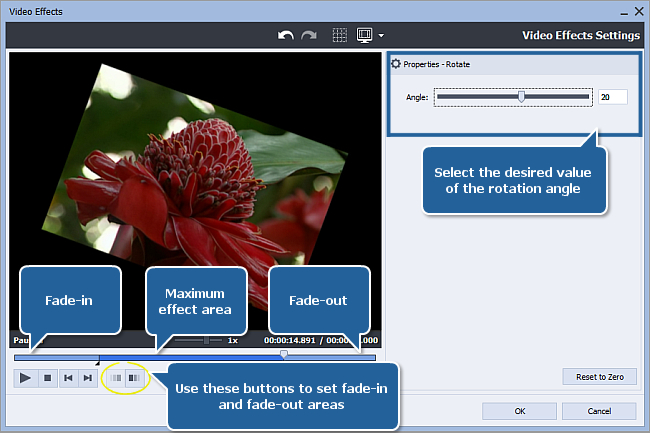
Step 3: Adjust the rotation angle if necessary
By default, the rotation angle value is set to 180 degrees. It allows to rotate your video by 180 degrees clockwise (to the right). If you want to change the rotation angle, click the Edit Effect button above the timeline to open the Video Effects window. Drag the Angle slider or type in the necessary numeric value into the entry field on the right:
- to rotate your video by 90 degrees clockwise (to the right), set this parameter to 90,
- to rotate the video image by 90 degrees counterclockwise (to the left), set this parameter to — 90,
- to rotate your footage by 180 degrees counterclockwise (to the left), set this parameter to — 180,
- to rotate a video clip by any number of degrees, enter the value you need. You can try different values to choose the one that suites you best.
The value corresponds to the original video orientation. You can also click the Set to Zero button to discard the changes.
To make the effect gradually appear and disappear in the video, click with the mouse within the blue bar shown in the figure below and press the button. Therefore, the Fade-in area will be marked. To set the Fade-out area, click with the mouse in another place and press the button.
[]
Video Overlay Toolbar
You can use the Video Overlay Toolbar over the preview area to additionally manage the overlay. It has the following buttons:
| Undo | Use this button to undo the latest performed action. | |
| Redo | Use this button to redo the latest undone action. | |
| Show Grid | Use this button to show or hide the vertical/horizontal grid lines. This might be helpful if you want to align the overlay in the video. | |
| TV Safe Zone | Use this button to show or hide the borders of the 4:3 CRT display, 4:3 LCD display and 16:9 LCD widescreen display so that you could see if the video and all its elements will be displayed correctly on a screen of your display/TV set during the playback. |
[]
Step 1: Set the added photos order and adjust their properties
Press the Storyboard button on the Timeline Toolbar to switch to the Storyboard view that represents the sequence of your added photos.
To change the images order right-click one of the images on the Storyboard and use the Move Left / Move Right options from the express menu.
Note: in the Files and Effects area you can rotate your photos right-clicking them and selecting the Rotate Clockwise or Rotate Counterclockwise option from the express menu. When you use this option a new rotated image will be created in the Files and Effects area but the photo added to the Storyboard will not change. You will need to add the rotated image to the Storyboard manually.
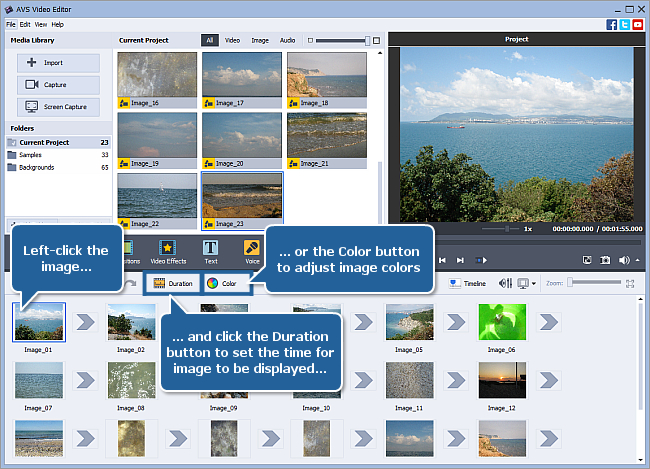
Set the length of time that each photo will be displayed on the screen. Select the needed image and click the Duration button on the Storyboard Toolbar. In the opened Duration window input the needed value and click OK.
Note: if you want to set the same duration for all the images in the slideshow, you can do it BEFORE you add them to the Timeline/Storyboard area using the Settings window. Select the Settings… option from the Edit section of the Top Menu. In the appeared Settings window open the Edit tab and set the needed value in the Image/color box of the Default durations section.
If you need to adjust the image brightness, contrast or some other parameters select the needed image on the Storyboard and press the Color button on the Storyboard Toolbar to open the Color Corrections window. To learn more about all the available settings please refer to our online help page.
[]
Audio files properties window
File:
- File name — the name and the path of the selected file.
- File size — the size of the file measured in kilobytes/ megabytes/ gigabytes.
- Date modified — the date and time the file was changed and re-written.
Audio:
- Channels — number of channels in the audio file (mono — one channel, stereo — two channels, quadro — four channels, 4.1 — five channels, 5.1 — six channels, 6.1 — seven channels, 7.1 — eight channels).
- Sample rate — the sampling frequency specified in hertz.
- Bitrate — the number of data points used to approximate the true wave form (kilobits per second).
- Codec — the codec used to encode the audio file.
- Duration — the length of the audio file (hours:minutes:seconds).
[]
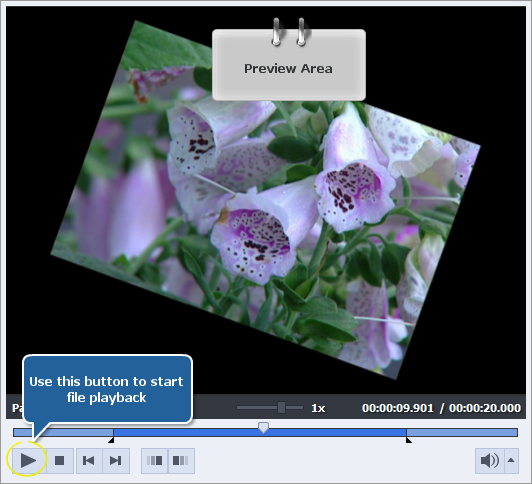
Step 4: Playback the file to make sure the desired result is achieved
Now you can preview your video with the applied effect to make sure you got the necessary result. Please, press the button within the Preview Area of the same window to start playback.
If you are completely satisfied with the result, click the OK button to accept all the changes and close the Video Effects window. Then you can save the current project, as well as the edited video file into one of the supported formats. To learn more about it, read the How to save the project and the video in AVS Video Editor? guide.
You have done a good job! Now you can upload your resulting movie to YouTube, Facebook, or any other service and share your creative work with others.
[]
Step 3: Apply text and video effects
Press the Timeline button to switch to the Timeline view.
Click the Text central button. Select the desired text preset from the Files and Effects area. Drag and drop the selected preset to the text effects line of the Timeline.
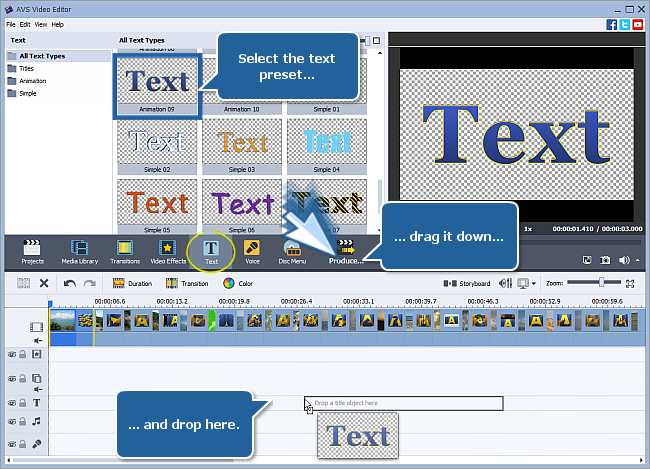
To adjust the text duration left-click one of the text block borders with the yellow stripes and without releasing the left mouse button drag it to the needed position. Double-click the text block to open the text properties window. In the preview area of the opened window double-click the default text and input your own one.
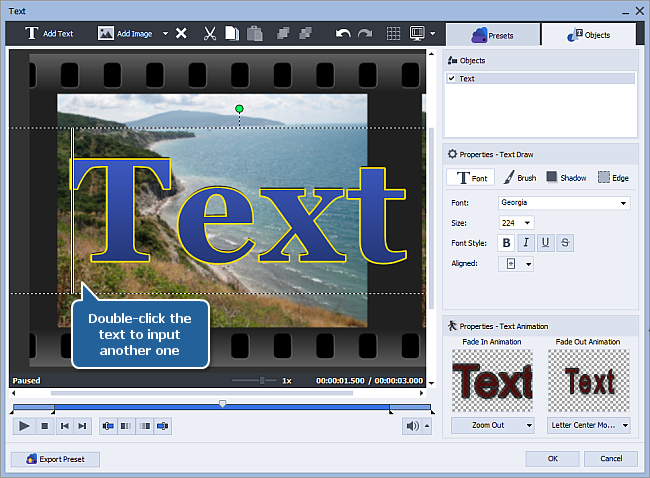
To learn more about the text adjustments see the online help page.
You can also apply video effects to your slideshow. To learn how to do that please refer to our guide.
[]
Trajectory tab
The Trajectory tab is used to change the path of the video overlay throughout the movie image. You can select one of the presets from the list:
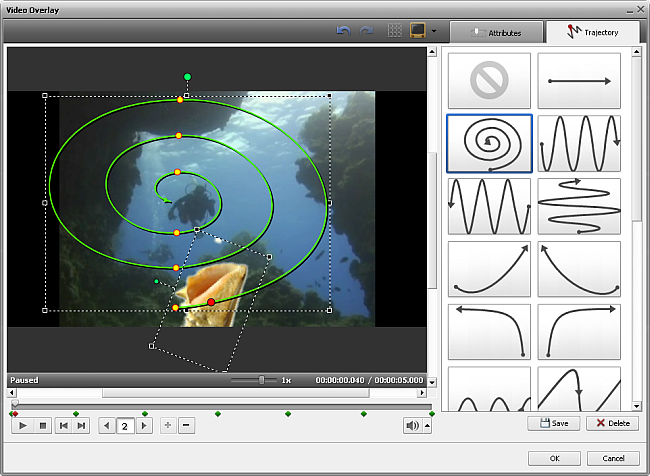
The selected preset will be displayed in the preview area with the chosen trajectory drawn (the green line). The small yellow circles show the overlay time stamps when the trajectory changes direction, the red one marks the current overlay position. You can use the following buttons under the preview area to manage the trajectory:
| Playback | Is used to start video file playback. Once you click it, it will turn into the Pause button to let you pause the playback when needed. | |
| Frame Back | Is used to step one frame back in the video. | |
| Frame Forward | Is used to step one frame forward in the video. | |
| Navigation | Is used to navigate through the trajectory time stamps. The lets you quickly go to the previous time stamp of the trajectory and the to the next one. The digit field shows the current time stamp number. | |
| Add Time Stamp | Is used to add a new time stamp at the current overlay position. You can change the trajectory at this time stamp after that clicking it with the mouse and dragging it to the desired position. | |
| Remove Time Stamp | Is used to delete the currently selected time stamp. The trajectory will be changed to a straight line connecting the two time stamps before and after the deleted one. |
The necessary time stamp can be selected not only using the Navigation buttons, but also with the mouse. To do that, click a rhombus representing the necessary time stamp with the mouse (the mouse cursor will turn into a hand):

After that you can either delete the selected time stamp, or alter the trajectory, or change the time stamp position on the timeline. Click it with the mouse and, without releasing the mouse button (the cursor will turned into a closed hand), move the time stamp left or right changing its position:

You can also change the direction of your trajectoty using the time stamps. Click it with a left mouse button (the cursor will look like this — ), then without releasing the mouse, drag it to a new position.
[]
Step 1: Download AVS Video Converter
Open our website www.avs4you.com, go to Downloads page and select a product you need from the list. In our case it will be AVS Video Converter. Left-click the Download now button.
AVS Video Converter
Download now
Current Version: 12.1.3.670Release Date: 10/27/2020 File Size: 81.10 MBPlatforms: Windows 10, 8.1, 8, 7, XP, 2003, Vista (no Mac OS/Linux support)
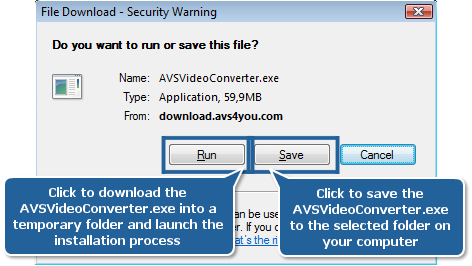
Select Save in the opened window to save the AVSVideoConverter.exe file to your computer, or select Run to download the file into a temporary folder and launch the installation process right away. After you press the Save button, a new window will be opened where you’ll be offered to select a directory to which you would like to save the installation .exe file. Select any you like and press OK. Wait till the download is completed.
Note: if you reinstall the software frequently, it’s better to save the .exe file to your PC rather than to install from the website. In this case you’ll have a copy of the installation file and will be able to use it any time you need to reinstall without having to visit www.avs4you.com. You will have to go through the download procedure once again, however, if you want to have a newer version installed on your PC.
[]
Step 2: Add transitions between your photos
In the Storyboard view press the Transitions central button. All the available transitions will be displayed in the Files and Effects area. They are also sorted by categories on the left side of the program window.
To add some particular transitions first select the place between two images on the Storyboard where you want a transition to be added, then right-click the transitions in the Files and Effects area and add them one by one with the help of Add or Replace Transition option.
To use one and the same transition between all your photos select the Apply Transition to All option from the express menu. To apply transitions randomly use the Apply Random Transitions option.
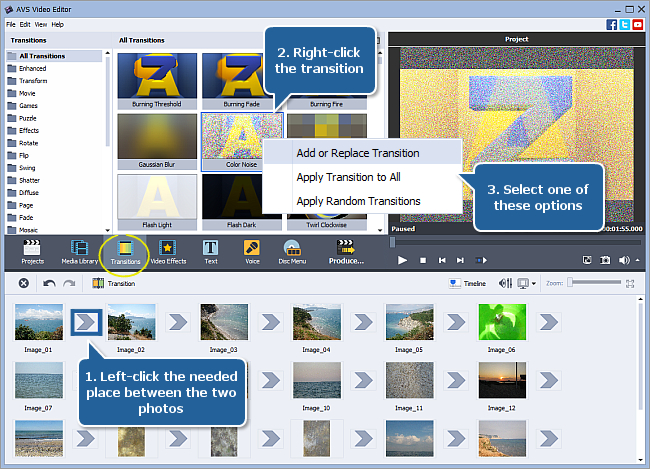
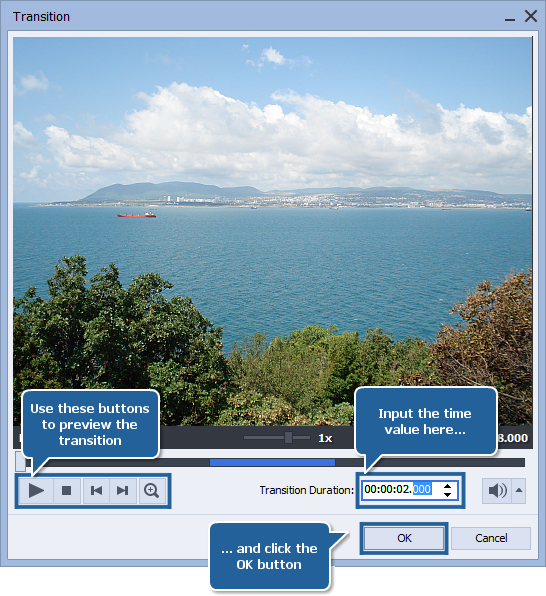
Adjust the transition duration by selecting the needed transition on the Storyboard and clicking the Transition button on the Storyboard Toolbar. In the opened Transition window input the needed value in the Transition Duration field and click OK. In this window you can also preview the selected transition.
[]
Особенности
Множество переходов, фильтров, эффектов предлагает данная утилита, а это значит, что стоит посвятить немного времени творческому процессу, чтобы в результате получилось качественное слайд-шоу или видео.
Программа AVS Video Editor работает не только со снимками, но и с видео контентом, представленным в различных форматах.
Стоит запустить программу, выбрать материал, чтобы начать монтировать новый фильм. Вы можете захватывать видео, накладывать на него спецэффекты, вырезать, копировать, вставлять и склеивать. Далее потребуется лишь наложить эффекты, фильтры, чтобы записать конечный вариант в любой видеоформат.

Кроме того, в AVS Video Editor вы сможете создать и записать DVD – диски. В случае необходимости вы можете готовое видео адаптировать для воспроизведения на мобильных телефонах, для iPod и других портативных гаджетов. Причем редактированию подвергается не только видеодорожка, но и аудио.
Здесь также имеется ряд спецэффектов и переходов, множество настроек, которые позволят вам добиться нужного звучания. Причем звуковые треки можно будет записывать и с внешних устройств.
Подкупает и то, что вы можете скачать AVS Video Editor бесплатно. Запустите программу и включите функцию автоматического определения сцен. В этом случае вы не только сэкономите себе время, но и получите сцены, которые можно легко перемещать, редактировать. При нарезке у вас не возникнут ошибки файлов.
Благодаря тому, что интерфейс программы AVS Video Editor представлен на русском языке, вы быстро найдете нужные вам клавиши, которые отвечают за те или иные действия.
Также многие пользователи оценили, что даже этот интерфейс можно менять по своему усмотрению. В программе представлено несколько цветовых схем, из который вы сможете выбрать ту, которая вас больше всего устраивает. Для этого надо кликнуть на стрелку, которая находится в правом верхнем секторе окна, и выбрать вариант из предложенного списка.
AVS Video Editor придется по нраву и новичкам, и профессионалам. Ведь почти что все параметры здесь можно настроить вручную, тем самым добиваясь нужного вам эффекта. Также в софт встроена дополнительная утилита Audio-Editor, которая позволит вам отдельно микшировать звуковые дорожки, чтобы затем их использовать в вашем фильме.
Два в одном
Узнаете, как собрать несколько видео в кадре, а также добавить картинку. Чтобы ее добавить, необходимо зайти в «Эффекты», выбрать «Изображение» и перетащить его на дорожку. Затем нажимают кнопку «Править эффект». В открывшемся окне выбирают изображение, а также настраивают место его отображения, прозрачность и фон. Два видео в одном кадре очень популярный спецэффект и делается он очень легко. Выбирают два файла. Тот файл, который должен быть второстепенным перемещают на строку для наложения. Он сразу же отобразиться в окне предпросмотра. Затем его настраивают по длине и переходят к редактированию (перемещают, изменяют размер, накладывают маску, рамку).
Video files properties window
File:
- File name — the name and the path of the selected file.
- File size — the size of the file measured in kilobytes/ megabytes/ gigabytes.
- Date modified — the date and time the file was changed and re-written.
Video:
- Size — the size of the video clip image (width and height) measured in pixels.
- Aspect ratio — the relationship of screen width to height. You can view the Original aspect ratio of the video or select the Custom option from the list and set the necessary width and height values for this particular video clip before adding it to the timeline.
- Framerate — the number of video frames displayed every second.
- Bitrate — the number of bits transferred per second.
- Codec — type of format used to code the video information into the video file.
- Duration — the length of the video clip (hours:minutes:seconds).
Audio:
- Channels — number of channels in the audio track (mono — one channel, stereo — two channels, quadro — four channels, 4.1 — five channels, 5.1 — six channels, 6.1 — seven channels, 7.1 — eight channels).
- Sample rate — the sampling frequency specified in hertz.
- Bitrate — the number of data points used to approximate the true wave form (kilobits per second).
- Codec — the codec used to encode the video clip soundtrack.
- Duration — the length of the video clip soundtrack (hours:minutes:seconds).
[]
Функционал
Если вы решите скачать AVS Video Editor бесплатно для Windows 10, 8, 7, то получите софт, который позволит быстро и качественно сделать нужный вам ролик или даже полноценный фильм.
С помощью программы можно:
- редактировать видео, даже если оно в формате HD,
- объединять видеоматериалы, снимки и треки в один фильм,
- создавать треки, используя разные шрифты, размеры, эффекты, цвета,
- корректировать цвета изображения,
- захватывать любую часть экрана, что актуально, если надо сделать видео-урок,
- использовать захваты видео и звука с любых внешних устройств,
- записывать Blu-ray, DVD, DVD+/-RW, DVD+/-R, DVD-RAM, CD-R/RW,
- создавать меню, добавлять и настраивать фоновую музыку для него.
Утилита имеет:
- временную шкалу, которая позволяет делать процесс редактирования более точным,
- встроенную технологию кэш-видео, делающую процесс обработки более быстрым,
- поддержку всех форматов видео,
- оптимизацию видео контента,
- поиск в автоматическом режиме нужной части,
- все необходимые для редактирования средства,
- варианты цветовой смены интерфейса.
Основы монтажа
Здесь рассказывается о монтировании видео для YouTube. Для начала загружают файл, который будет обрабатываться. Сначала корректируют цвет, для этого переходят в соответствующую вкладку. В настройках можно подправить яркость, контраст, насыщенность, температуру, гамму, тон. Также можно скорректировать звук во вкладке «Аудио». Вкладка «Стабилизация» предназначена для удаления черных полос по бокам экрана или сверху, «Скорость» дает возможность увеличить или уменьшить темп воспроизведения файла. Вырезать не нужные фрагменты можно с помощью кнопки «Разделить». При сохранении они склеятся, и вырезанной части будет незаметно. Также можно добавить музыку, титры и текст. Сохранить медиа для быстрой загрузки необходимо в формате .wmv, указав разрешение 1280×720.
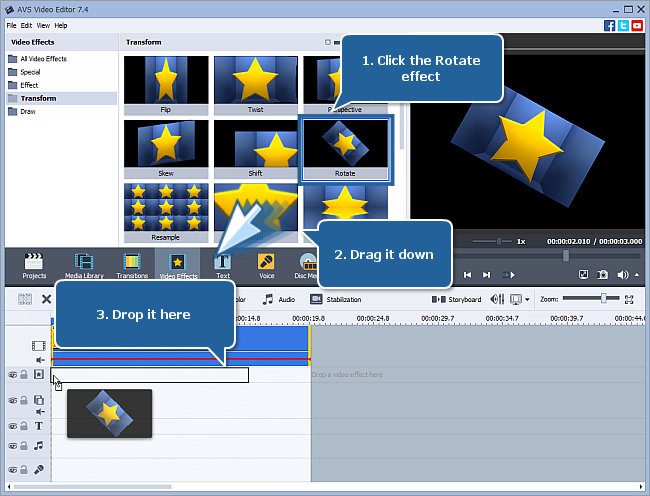
Step 1: Select the Rotate effect and add it to the timeline
To rotate your video just apply the Rotate effect. It allows you to change the entire video image orientation.
Press the Video Effects central button within the main window of AVS Video Editor.
All of the available effects will be displayed within the Files and Effects Area. To find the necessary video effect more easily, select the Transform group from the effects groups displayed on the left.
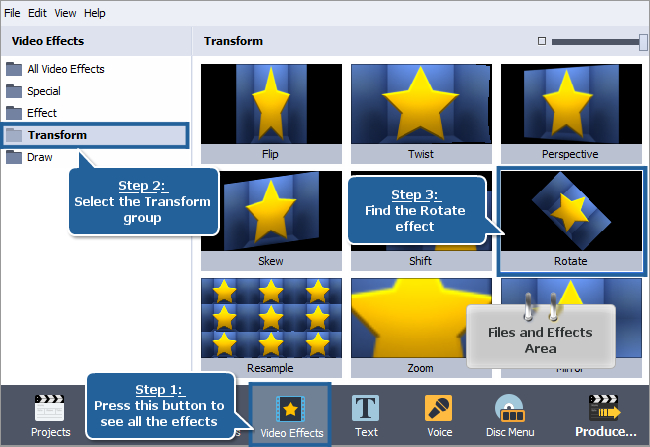
To add the Rotate effect to the timeline, right-click it and choose the only available option of the express menu — Add or Replace Video Effect. After doing this, the effect will be displayed on the timeline.
Alternatively, you can simply drag-and-drop the effect to the Video Effects line of the timeline.
[]