Capture and apply windows, system, and recovery partitions
Содержание:
- Фабричные образы в Windows 8.1 Update и технология WIMBoot
- Восстановление среды Windows Recovery Environment с помощью утилиты reagentc
- См. также
- Как войти в безопасный режим Windows и другие параметры загрузки системы
- How to disable Windows Recovery Environment on Windows 10
- What is $WinREAgent folder in Windows 10
- Управление средой восстановления Windows (Windows RE)
- How to Delete WINRETOOLS Partition in Windows 10?
- Как работают точки отката в Windows 10?
- Использование среды восстановления с загрузочного накопителя
- Точки отката Windows 10
- Step 3: Using TBWinRE
- What is Windows RE
- It’s NOT RECOMMENDED to delete WINRETOOLS partition and others
- How to fix Winre.wim errors in just few steps?
- Доступ к файлам на дисках компьютера из среды восстановления Windows RE
- Восстановление загрузчика Windows 10 – способ второй
- Step 1: Download and Extract the TBWinPE/RE Builder Files
- Фабричные образы в Windows 8 и 8.1
Фабричные образы в Windows 8.1 Update и технология WIMBoot
Технология WIMBoot позволяет Windows запускаться и задействовать в работе файлы прямо из сжатого образа. На системном разделе теперь в рамках применения образа создается набор файлов-указателей (Pointer files), ведущих в install.wim, но их объем намного меньше распакованного образа.
Сравнивая диаграммы, вы заметите целый ряд изменений:
- Место распакованного образа с файлами Windows заняли файлы-указатели.
- Раздел Recovery переименован в раздел Images, хотя это условность, которую ОЕМы могут и не соблюдать.
- Раздел Windows RE приказал долго жить, а файл winre.wim отправился прямиком на раздел Images.
- Наряду с install.wim на разделе Images есть еще и custom.wim.
Восстановление среды Windows Recovery Environment с помощью утилиты reagentc
Отключение и включение WinRE
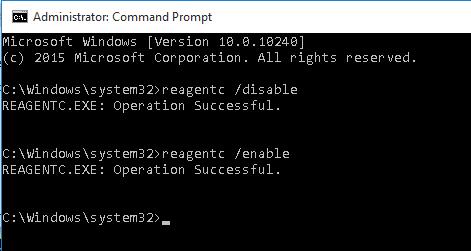
Попробуйте из основной Windows отключить и включить режим WinRE, выполнив в командной строке с правами администратора следующие команды: reagentc /disablereagentc /enable
Для исправления нужно перезагрузится и вручную отключить о включить WinRE.
При появлении ошибки “ REAGENTC.EXE: Unable to update Boot Configuration Data ”, исправьте сначала проблему с загрузчиком Windows (инструкция для UEFI и BIOS компьютеров).
Если вы получите сообщение, “ REAGENT.EXE: образ среды восстановления Windows не найден ”, вероятно удален файл winre.wim или раздел System Restore.

Проверка записей WinRE в файле конфигурации BCD
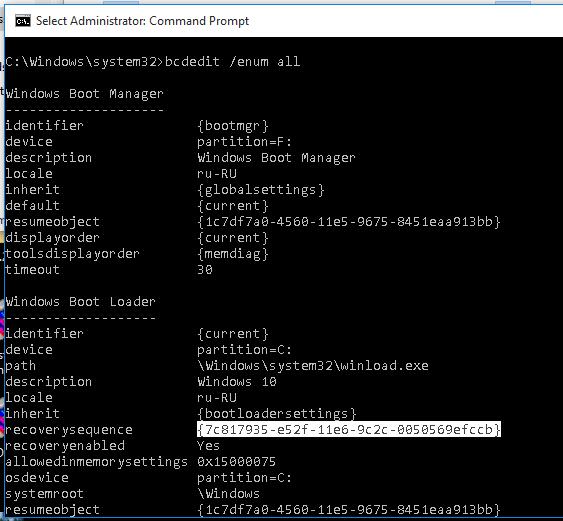
Проверьте, что в конфигурации загрузки BCD (Boot Configuratin Data) имеются корректные записи для загрузки среды WinRE.
Выведите текущие записи в BCD:
bcdedit /enum all
В списке вариантов загрузки найдите секцию Windows Boot Loader, с идентификатором identifier= . В нашем примере эта запись выглядит таким образом:
Найдите и запомните значение GUID в атрибуте recoverysequence (в нашем примере это ).
Далее нужно найти секцию конфигурации загрузки, у которой значение идентификатора (identifier) равно полученному выше GUID, а в описании поля (description) указано Windows Recovery Environment. Эта запись может выглядеть так:
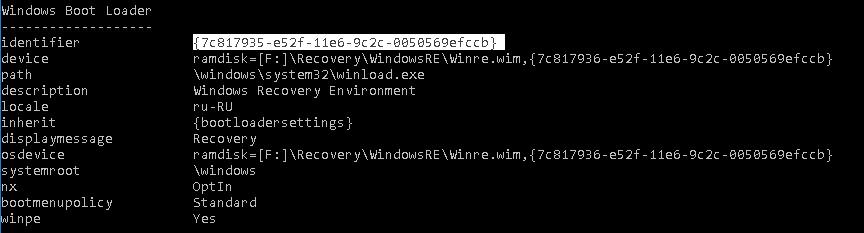
Если такая запись не найдена, ищите другую запись BCD с другим GUID в качестве идентификатора, с текстомWindows Recovery Environment в поле description, у которой в значениях device и osdevice указан путь к файлу Winre.wim.
Путь к wim файлу может указывать на другой диск (к примеру, ). Если такая секция найдена, можно привязать эту запись загрузчика для загрузки WinRe в качестве среды восстановления для текущей системы. Скопируйте GUID найденной записи и замените его в следующей команде:
bcdedit /set recoverysequence
Местоположение файла Winre.wim
Убедитесь, что файл Winre.wim находится по указанному пути. Как правило, он хранится в одном из следующих местоположений (папки скрытые): каталоге C:WindowsSystem32Recovery, на отдельном скрытом разделе System Reserved, либо на OEM разделе восстановления от производителя (убедитесь, что вы его не удаляли). В нашем примере он должен находится на диске F: в каталоге RecoveryWindowsREWinre.wim.
Затем проверьте путь к wim файлу, который указан в файле ReAgent.xml (находится в каталоге C:WindowsSystem32Recovery либо в каталоге Recovery на разделе восстановления). Откройте файл конфигурации с помощью любого редактора и проверьте значение атрибута reagentc /disablereagentc /enable
Сброс настроек в файле ReAgent.xml
Если методики выше не помогли вам восстановить работоспособность WinRe, можно попробовать сбросить настройки среды восстановления в файле ReAgent.xml (предварительно сделайте его копию).
См. также
| Тип содержимого | Ссылки |
|---|---|
|
Оценка продукта |
|
|
Развертывание |
Создание загрузочного диска USB | Создание загрузочного компакт-диска, DVD-диска, ISO или VHD | Установка на жесткий диск (неструктурированная или не ОЗУ) | Загрузка в UEFI или в устаревшем режиме BIOS | Загрузка в режим UEFI или устаревший режим BIOS | Использование одного USB-ключа для WinPE и WIM-файла (WIM) |
|
Операции |
Подключение и настройка | Добавление драйверов | политика сети SAN (служба хранилища) | Создание приложений | Оптимизация и сжатие изображения |
|
Устранение неполадок |
Сетевые драйверы: инициализация и добавление драйверов | Отладка приложений |
|
Средства и параметры |
Wpeinit и Startnet. cmd: использование сценариев | запуска WinPE Указание букв диска с помощью сценария | Добавление пакетов (Справочник по дополнительным компонентам) |
|
Параметры командной строки |
CopyPE | Drvload | Макевинпемедиа | «+ +» |
|
технологии на основе Windows PE |
программа установки Windows | среда | восстановления Windows Набор средств диагностики и восстановления (DART) |
Как войти в безопасный режим Windows и другие параметры загрузки системы
Параметры загрузки доступны только при запуске среды восстановления с локального диска (способы входа ), поскольку при загрузке с установочного диска запускается не операционная система, а чистая среда восстановления.
Функциональных клавиш даже не хватило для всех вариантов, но за F10 скрывается лишь вход в… среду восстановления 🙂 Большинство параметров должны быть знакомы вам по Windows 7, но есть и новшества.
Наличие этого пункта не означает, что функция присутствует на вашем ПК. Технология ELAM (Early Launch Antimalware) работает в связке с еще одной мерой — защищенной загрузкой UEFI (Secure Boot), предназначенной для борьбы с буткитами. Антивирусный драйвер запускается первым и оценивает безопасность других драйверов. На основе этой информации ядро Windows решает, инициализировать ли их.
ELAM доступна сторонним разработчикам антивирусного ПО, однако драйвер должен быть подписан Microsoft в рамках программы сертификации, иначе ядро его не запустит.
Экран с параметрами загрузки можно отображать при каждом запуске Windows, что бывает удобно для тестирования или отладки. Достигается это одной командой:
bcdedit /set {globalsettings} advancedoptions true
How to disable Windows Recovery Environment on Windows 10
To disable WinRE on Windows 10, use these steps:
- Open Start.
- Search for Command Prompt, right-click the top result, and select the Run as administrator option.
-
Type the following command to confirm WinRE is enabled and press Enter:
Source: Windows Central
-
Type the following command to enable the recovery environment and press Enter:
Source: Windows Central
-
(Optional) Type the following command to confirm WinRE has been disabled and press Enter:
Source: Windows Central
After completing these steps, users will be able to access the startup settings. However, the recovery options, such as «System Restore,» «Command Prompt,» «System Image Recovery,» and «Uninstall Updates» won’t be available until you re-enable the feature.
If the environment isn’t working, you can use the above steps to enable and disable WinRE a few times to see if that fixes the issue.
More Windows 10 resources
For more helpful articles, coverage, and answers to common questions about Windows 10, visit the following resources:
- Windows 10 on Windows Central – All you need to know
- Windows 10 help, tips, and tricks
- Windows 10 forums on Windows Central
It doesn’t end
The semiconductor crisis is worsening and industries are clashing
Countries and companies are scrambling to boost chip output and combat the ever-worsening global semiconductor shortage. However, solutions aren’t materializing fast enough to avoid having entire industries at each other’s throats.
Tools of destruction
Halo Infinite: These are the weapons you can use during the beta
There are plenty of tools of destruction that players have at their disposal during the Halo Infinite beta testing. Here’s a complete list of every weapon you can pick up and use.
Industry! Building things!
Intel’s two new Arizona chip factories have begun construction
It’s been in the works for a while, and it’s finally time for steel to be applied: Construction has begun on Intel’s $20 billion investment in new Arizona-based chip factories.
Touchdown!
The NFL is back! Check out these must-have Windows apps for football fans
After months of waiting through the offseason, the NFL is finally back this week. With these Windows 10 apps, you won’t miss a snap of the NFL action.
What is $WinREAgent folder in Windows 10
$WinREAgent folder is usually created during an upgrade or update and it is made use of in case a rollback is required.
It is created by the Windows Recovery Environment that works as a solution when the system fails to start. WinRE can repair the common issues that prevent the Windows operating system from booting successfully. Once its use is over, most of its content gets deleted.
It is a hidden folder and to see it, you have to make Windows show hidden files and folders.
If you see the folder now on a healthy system, you will see that it may contain another empty sub-folder named Scratch.
You will not find more details in the $WinREAgent folder except the size that shows only 0 bytes.
If you do decide to delete it, you can go ahead and delete it.
If you are facing issues while updating your system, then deleting the WinREAgent folder could be one of the solutions that can help you install the updates.
Some users have noticed that the $WinREAgent folder gets removed after they uninstalled the Windows 10 Update Assistant.
Unfortunately, there is no mention of this folder anywhere on the Microsoft websites – so if you do know anything more about it, please do add your comments below for the benefit of all.
Want to learn more about the following folders?
Управление средой восстановления Windows (Windows RE)
Среда восстановления Windows Recovery Environment (WinRE) представляет собой минимальную ОС на базе среды предварительной установки Windows Preinstallation Environment (WinPE) , в которую включен ряд инструментов для восстановления, сброса и диагностики ОС Windows. В том случае, если основная ОС по какой-то причине перестает загружаться, компьютер пытается запустить среду восстановления WinRE, которая в автоматическом (или ручном режиме) может помочь исправить возникшие проблемы.
В некоторых случаях компьютер не может загрузиться в среде Windows Recovery Environment из-за различных проблем. В этой статье мы рассмотрим основные способы восстановления среды WinRE на примере Windows 10 (для Windows 7 и Windows 8.1 процедура аналогична).
Причины, по которым среда WinRE перестает грузится или работает некорректно, в общем случае могут быть разными:
- Среда WinRE отключена на уровне настроек Windows.
- В хранилище конфигурации загрузки ( BCD ) отсутствуют записи для загрузки в режиме восстановления
- Файл с образом среды winre.wim отсутствует или перемещен
- Отсутствует или содержит некорректные данные файл конфигурации WinRE — ReAgent.xml
How to Delete WINRETOOLS Partition in Windows 10?
Note: ItвЂs highly suggested that you backup Windows related partitions in the event of system or hardware failure.
Today, we will take delete WINRETOOLS partition for example, and use the best free disk partition manager — AOMEI Partition Assistant Standard to delete Dell recovery partition in Windows 10/8/7:
1. Run this program after installing, right click the WINRETOOLS partition, and select Delete Partition at the dropdown menu.
2. Choose one of the delete methods, and click OK:
Delete partition quickly (delete partition without wiping data)
Delete partition and wipe data on it
3. Click Apply at the left upper corner to delete WINRETOOLS partition.
4. In the next window, press Proceed button to confirm the WinRE Tools partition deletion.
Tips:
The steps are the same as WINRETOOLS partition deletion if you want to delete Image or DELLSUPPORT partition.
AOMEI Partition Assistant Standard is designed for Windows Vista, XP, 7, 8, 8.1, and 10.
Now, you could download it now to have a shoot.
Как работают точки отката в Windows 10?
Создание точек отката
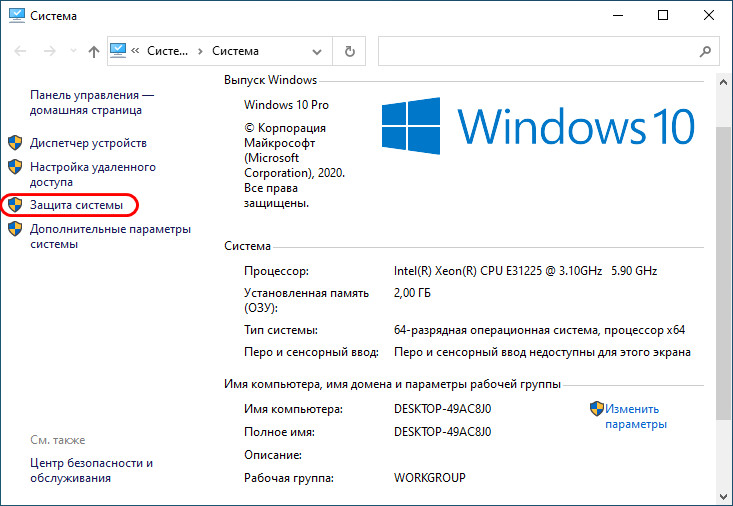
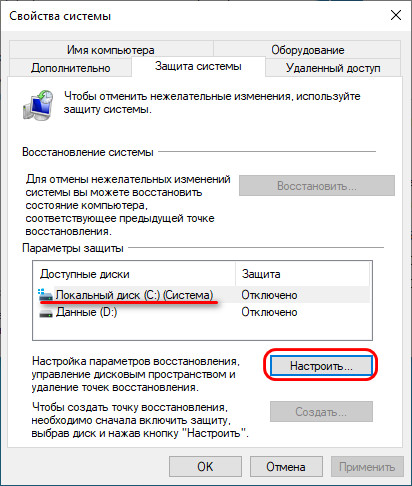
Функционал точек отката является классическим, и реализован он, соответственно, в панели управления – старом формате системных настроек. Можем отправиться в раздел этого функционала по быстрой ссылке из окна информации о системе, вызываемой клавишами Win + Pause. В этом окне кликаем ссылку «Защита системы».
Попадём в раздел свойств системы «Защита системы», где, собственно, и обитает функционал точек отката. Здесь смотрим графу «Параметры защиты»: в ней будут видны разделы нашего диска с отметкой о включении или отключении системной защиты, т.е. функционала точек отката. По умолчанию защита системы отключена, и для её включения кликаем раздел С, затем жмём «Настроить».
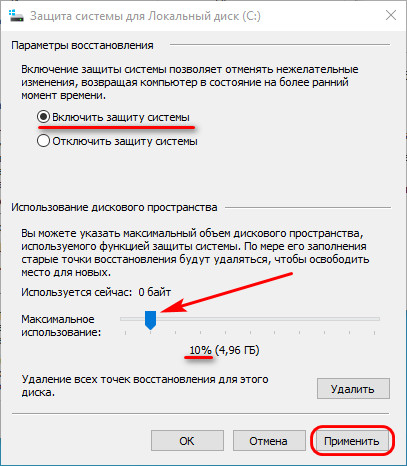
Включаем защиту вверху открывшегося нового окошка. Внизу ползунком отмечаем на шкале дискового пространства раздела С, какой его объём мы хотим отдать под хранение снимков точек. Мы отведём относительно немного, только 10%, нам этого должно хватить, и это оптимальный вариант, чтобы не захламлять раздел С. Новые снимки будут создаваться по принципу перезаписи старых снимков по кругу. По итогу настроек жмём «Применить».
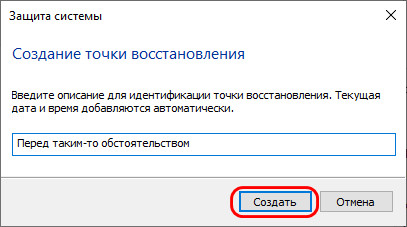
Теперь видим, что в графе «Параметры защиты» для раздела С включена системная защита. И мы можем приступить к созданию первой точки отката. Жмём внизу «Создать».

Называем точку, можем приурочить название к определённому обстоятельству, например, перед установкой драйвера или какой-то сомнительной сторонней программы. И жмём «Создать».
Немного ожидаем, пока точка создастся.
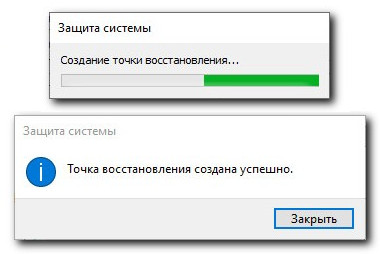
И вот, собственно, всё.
Использование среды восстановления с загрузочного накопителя
На случай внезапных неприятностей с операционной системой, а она может перестать загружаться даже в безопасном режиме, лучше всегда иметь под рукой загрузочную флешку или диск с образом ОС, откуда можно при необходимости также переустановить операционную систему. Это может быть также диск восстановления, который содержит все необходимые файлы и тоже создаётся заранее. Неплохо иметь в арсенале и накопитель с портативными утилитами для диагностики и устранения неисправностей, папка с таким софтом может быть также добавлена на загрузочную флешку с Windows RE. С помощью такого накопителя можно запустить среду восстановления Windows 7, 10 или другой версии, после чего восстановить ОС в исходное состояние, откатить к контрольной точке (она должна быть создана заранее), а также выполнять прочие действия. Загрузочный накопитель понадобится, в том числе в ситуации, когда среда восстановления Windows 10 не найдена.
Итак, следующий способ подразумевает использование диска или USB-флешки для запуска WinRE. Рассмотрим, как запустить среду восстановления с загрузочного носителя Windows 10:
- Загружаемся с накопителя, выставив необходимые настройки в BIOS/UEFI.
- Жмём «Далее» в первом окне установки Windows.
- В следующем окне в нижнем левом углу нажимаем «Восстановление системы».
- Выбираем нужную операционную систему из установленных и жмём «Далее».
- Эти действия позволяют попасть в среду восстановления Windows
В зависимости от того, работоспособна ОС или нет, вы можете выбрать любой из предоставленных способов запуска WinRE и восстановить систему, чтобы наладить её полноценное функционирование.
Точки отката Windows 10
У Windows 10 есть два штатных механизма бэкапа: полноценное резервное копирование в виде штатной функции архивации и функционал защиты системы — точки восстановления, они же снапшоты, они же точки отката. При полноценном резервном копировании мы делаем копию всего системного раздела С (а если у Windows есть отдельный загрузочный раздел, то делаем копию и его) и сохраняем всё это в файл-образ в месте, отличном от раздела С, где располагается копируемая система. Это может быть другой раздел диска, другой диск, сетевое хранилище, облако. Тогда как точки отката – это снимки состояния Windows, хранящиеся на том же разделе С, что и сама операционная система. И при повреждении данных на разделе С могут быть повреждены и сами точки. При создании полноценной резервной копии копируется всё содержимое системного раздела, включая наши профильные папки «Видео», «Документы», «Загрузки» и т.п. Тогда как точки отката не затрагивают области личных данных пользовательских учётных записей, а фиксируют состояние только самой Windows – её системные файлы, её функционал, установленные драйверы и сторонние программы.
Точки отката – это не основательное, а скорее дополнительное к резервному копированию решение по защите Windows. Если у нас есть резервная копия, скажем, не более чем месячной давности, перед проведением в системе рисковых операций можно ограничиться созданием точки отката. Не будучи решением основательным, тем не менее точки отката имеют свои преимущества.
Точки создаются мгновенно, нам не нужно долго ждать, как при создании резервной копии. Если восстановление к точке не решило нашу проблему, мы можем отменить само это восстановление и вернуться к состоянию Windows перед этим действом. Тогда как при резервном копировании для такой возможности нам нужно перед откатом намеренно создать копию актуального состояния системы. Восстановление к точке отката происходит быстрее, чем восстановление из полноценной резервной копии. При этом восстановление к точке отката, как и к резервной копии, созданной штатным средством архивации, может быть произведено не только в среде работающей системы, но также в среде восстановления, если Windows 10 в результате серьёзного сбоя не сможет загрузиться.
Точки отката могут быть созданы не только для возможности восстановления Windows, их можно создавать и для других разделов диска с нашими пользовательским данными. Но для возможности восстановления последних точки отката применяются редко, всё же наши личные данные – вещь серьёзная, если и бэкапить их, то точно более надёжными средствами.
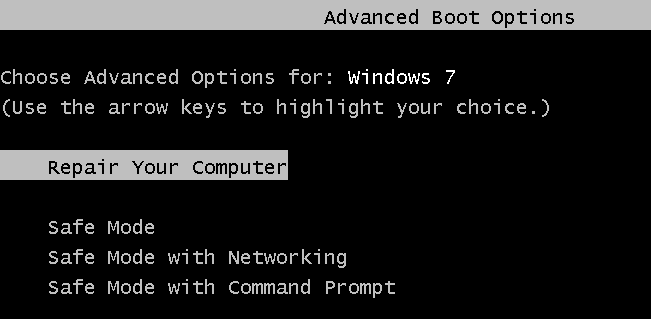
Step 3: Using TBWinRE
If you modified the installed Windows 7 Recovery Environment (WinRE), you can boot into it by using the Windows Advanced Boot Options menu accessed via F8 when booting Windows. Select the Repair Your Computer option.
If you modified the installed Windows 8 Recovery Environment (WinRE), you can boot into it by restarting into the recovery environment (e.g. press WinKey+I, click Power, hold down Shift and click Restart, click Troubleshoot).
If you modified the installed Windows 10 Recovery Environment (WinRE), you can boot into it by restarting into the recovery environment (e.g. press the Windows key, click Power, hold down Shift and click Restart, click Troubleshoot).
If the program was able to integrate Image for Windows into the menu you can select it in the Troubleshoot section. Otherwise, select Advanced options and then the Command Prompt. Image for Windows will be run by default and you can access the other Windows options by running the System Recovery Options program from TBLauncher.

If using the TBWinRE boot media, boot to either the TBWinRE CD or the TBWinRE UFD. Booting on both Legacy BIOS and UEFI systems is supported.
Booting into TBWinRE may take several minutes, depending on the system, startup options selected, and boot media type.
The TBWinRE desktop will look similar to the screenshots below. Please note that this type of build is a relatively plain WinRE build and does not include a taskbar or Windows-type shell. TBLauncher can be used to easily run the included programs or shut down or restart the system.
Depending on the mode set for TBLauncher and the version of Windows, either the System Recovery Options program or Image for Windows will be run automatically.
The screenshot below shows TBLauncher set to WinPE mode (the default). The System Recovery Options program can be run from TBLauncher if it’s needed.

The screenshot below shows TBLauncher set to WinRE mode (built using the Windows 7 RE). Note that when the System Recovery Options program runs you may need to enter your Windows user name and password and it may scan for compatible versions of Windows.

To exit TBWinRE, remove the TBWinRE boot media (if using a CD or UFD) and click either the Shut down or Restart button in TBLauncher.
Note: Some systems using the Windows 8 WinRE may exhibit a delay when shutting down or restarting. If this happens you can hold down the Shift key when clicking the button to force the action.
The TeraByte programs included in the build can be also run from a Command Prompt window by typing the program name and pressing ENTER: imagew, tbiview, tbimount, tbosdtw
What is Windows RE
The Windows Recovery Environment (WinRE) is a companion operating system installed alongside Windows 10, in a separate partition. It can help us with troubleshooting, recovery, or booting from external media, such as a USB stick. Windows RE can repair common issues that cause an unbootable operating system. Microsoft has also made it possible for the IT admin to customize it. They can add additional drivers, languages, diagnostic tools and can also include parts of Windows PE (Windows Preinstallation Environment). It is available on all Windows 10 and Windows Server installations.
Windows RE is preinstalled on the OS, so you don’t need to create a bootable USB or ISO when troubleshooting.
How to enter Windows Recovery Environment
Since Windows RE is preinstalled in Windows 10, you can boot into it. There are multiple ways to do it.
- If you are stuck on the login screen, click on the Shutdown button, and then choose to Restart holding down the Shift key.
- When inside Windows 10, go to Start > Settings > Update & security > Recovery > under Advanced Startup, click Restart now.
- You can use a recovery media to boot into Windows RE.
- Execute in an elevated command prompt and restart the device to boot into WinRE.
- Execute in an elevated command prompt and restart the device to boot into WinRE instead of Windows 10.
Some OEMs offer a hardware recovery button or combination to boot directly into Windows RE. It is useful when you are facing a BSOD, and you don’t have a recovery media.
After following any of these, you will have two options in the Boot Menu. The first is to boot into Windows RE, and second to boot normally into the Windows OS.
In Windows 10, the local copy of Windows RE gets an update as part of the OS updates. Usually, a newer version of the Windows RE image replaces the existing one.
Read: Could not find the Recovery Environment in Windows 10.
Windows RE can launch itself in emergency cases:
There are specific scenarios where the boot process can identify an issue. When it does that, it will boot the computer directly into Windows RE. They are:
- Two consecutive failed attempts to start Windows.
- When the computer abruptly shuts down more than twice and within two minutes of the boot process.
- Secure Boot error.
- BitLocker error on touch-only devices.
These tips should help you boot into the Windows Recovery Environment.
What can Windows RE do?
- Automatic repair and general troubleshooting.
- Troubleshoot startup or oot problems
- Complete reset for Windows 10 for desktop editions
- System image recovery for Windows Server 2016, Server 2012 R2 and Server 2012 only.
- And more!
Here, you will see options like:
- System Restore: Useful if you want to restore your Windows 10 PC.
- System Image Recovery: This lets you recover your Windows using a system image file.
- Startup Repair: Fixes startup problems
- Command Prompt: Using the CMD you can access the more advanced built-in Windows tools like SFC, DISM, ChkDsk, Regedit. Gpedit, etc.
- Startup Settings: It lets you change Windows startup options
- Uninstall Updates: This Lets you uninstall problematic updates
- UEFI Firmware settings
- Go back to the previous build.
Can I delete Windows RE tools partition?
If you open Disk Management Tool, you may see a Windows RE tools partition. This is the Windows Recovery Environment and you should not delete it as you never know when you may need it.
See this post if Windows RE is not working as expected and you receive Could not find the Recovery Environment message in Windows 10.
Related: How to access and use Advanced Startup options in Windows 10.
It’s NOT RECOMMENDED to delete WINRETOOLS partition and others
Is it safe to delete WINRETOOLS partition and other “extra” partitions? WINRETOOLS partition and other extra partitions are quite essentials for Windows 10/8/7 operating system.
If you delete or move WINRETOOLS partition to somewhere else, these partitions probably not function as designed, maybe you could not restore your Windows 10 to factory settings or could not troubleshoot problems if system has some problems, even could not boot your OS.
Absolutely, if you really want to use these storage space, I suggest you to make a system image before modifying system related files and create Windows recovery media, and then delete WINRETOOLS partition and other partitions.
How to fix Winre.wim errors in just few steps?
Remember, before taking any action related to system files perform a backup copy of your data!
Winre.wim file errors can be caused by various factors, so its is beneficial to try to fix them using various methods.
Step 1: Scan your computer for any malicious software
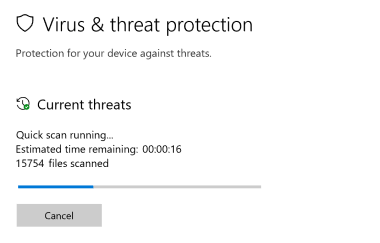
Windows files are commonly attacked by malicious software that prevents them from working properly. First step in addressing problems with Winre.wim file or any other Windows system files should be scanning the system for malicious software using an antivirus tool.
If by any chance you don’t have any antivirus software installed on your system yet, you should do it immediately. Unprotected system is not only a source of file errors, but, more importantly, makes your system vulnerable to many dangers. If you don’t know which antivirus tool to choose, consult this Wikipedia article – comparison of antivirus software.
Step 2: Update your system and drivers.
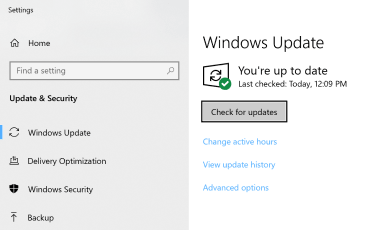
Installing relevant Microsoft Windows patches and updates may solve your problems related to Winre.wim file. Use dedicated Windows tool to perform the update.
- Go to the Windows «Start» menu
- Type «Windows Update» in the search field
- Choose the appropriate software program (name may vary depending on your system version)
- Check if your system is up to date. If any unapplied updates are listed, install them immediately.
- After the update has been done,restart your computer in order to complete the process.
Beside updating the system, it is recommended that you install latest device drivers, as drivers can influence proper working of Winre.wim or other system files. In order to do so, go to your computer or device producer’s website where you will find information regarding latest driver updates.
Step 3: Use System File Checker (SFC) tool
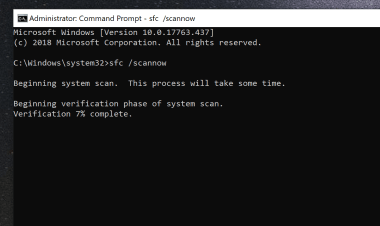
System File Checker is a Microsoft Windows tool. As the name suggests, the tool is used for identyfing and addressing system file related errors, including those related to Winre.wim file. After an error related to%fileextension% file has been discovered, the program attempts to automatically replace the Winre.wim file with properly working version. To use the tool:
- Go to the Windows «Start» menu
- Type «cmd» in the search field
- Locate «Command Prompt» result – don’t run it yet:
- Click the right mouse button and select «Run as Administrator» option
- Type «sfc /scannow» in console prompt to start the program and follow the instructions
Step 4: Restoring Windows system
Another approach is to restore system to previous state, before the Winre.wim file error occured. In order to restore your system, follow the instructions below
- Go to the Windows «Start» menu
- Type «System Restore» in the search field
- Start the system restore tool – it’s name may differ depending on version of the system
- The application will guide you through the process – read the messages carefully
- After the process has finished, restart your computer.
If all the above-mentioned methods failed and the Winre.wim file problem has not been resolved, proceed to the next step. Remember that the following steps are intended only for advanced users.
Доступ к файлам на дисках компьютера из среды восстановления Windows RE
Пользователь может получить из WinRE доступ к файлам на дисках компьютера, например, для копирования файлов на внешнее устройство (флешку).
- В среде восстановления Windows запустите командную строку.
- Выполните команду для запуска программы Блокнот:
notepad
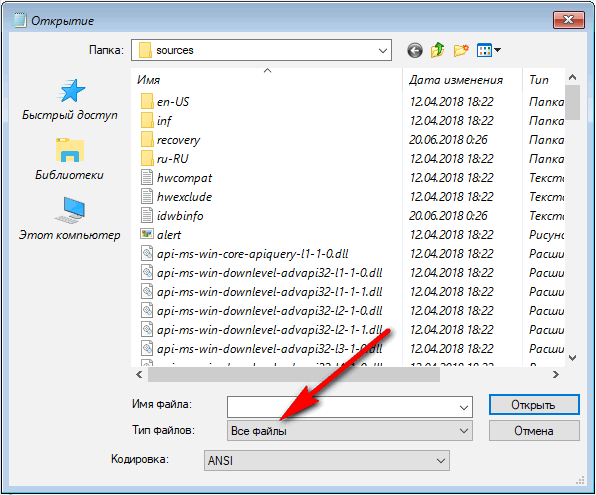
- В окне программы Блокнот, в меню «Файл» выберите «Открыть…».
- В параметре «Тип файлов» выберите «Все файлы».
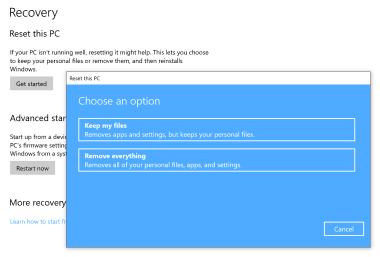
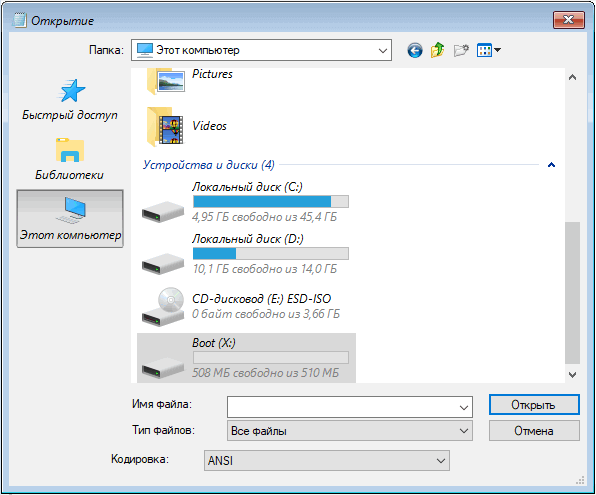
- Нажмите на «Этот компьютер» для получения доступа к дискам компьютера.
Прямой доступ к файлам в библиотеках: «Документы», «Видео», «Изображения», «Загрузки», «Музыка» и т. д., отсутствует. Откройте эти папки непосредственно с системного диска, из профиля пользователя.
Восстановление загрузчика Windows 10 – способ второй
Что же делать, если даже в ручном режиме мы не смогли восстановить загрузчик? Сейчас мы попробуем с этим разобраться следующим методом. Поехали.
Снова введите команду из предыдущего способа:
diskpart
list volume
При установленном режиме BIOS UEFI и установленной системой на раздел GPT можно заметить некий скрытый раздел с очень малым весом, обычно 100-300 Мб и файловой системой FAT32. Если бы был простой BIOS с диском MBR, то такой раздел весил был около 500 Мб.
Итак, вам нужно запомнить номер тома этого раздела, например, если написано Том 3, то запоминаем цифру 3.
Теперь приступим к вводу вот таких команд, после которых есть возможность восстановит загрузчик.
select volume M – (M – номер скрытого раздела)
format fs=fat32 – форматирование в FAT32 (вместо FAT32 можно написать ntfs)
assign letter=X – называем новый раздел буков X
exit – выход
Теперь выполняем эту команду:
bcdboot C:Windows /s X: /f ALL
Приступим к вводу этих команд с использованием утилиты Diskpart:
diskpart
list volume
select volume M – номер скрытого раздела.
remove letter=X – скрытые разделы не должны отображаться в системе, поэтому мы удалим букву раздела.
exit
Теперь закройте командную строку и перезагрузите ПК. Вы должны загрузится в рабочую систему с восстановленным загрузчиком.
Step 1: Download and Extract the TBWinPE/RE Builder Files
Note: If you are using the TBWinPE/RE Builder files installed with Image for Windows you can skip this step. If creating a customized build, you may find copying the files to an alternate folder with standard user-level permissions will make the process easier.
Download the TBWinRE ZIP file from the link below:http://www.terabyteunlimited.com/downloads/wp/tbwinre.zip
The download will be in the form of a ZIP file containing the TBWinPE/RE Builder program, TBWinRE CMD script, and supporting files.
Important Note: Since this file comes from another computer, Windows may block it. Whether this happens or not depends on the version of Windows and the security settings. If the file is blocked, it won’t work correctly. To check if the file is blocked, right-click on the downloaded file, select Properties from the pop-up menu, and see if an Unblock button or checkbox exists on the General tab. If it does, click the Unblock button or check the box, then click OK. An example of a blocked file is shown below:

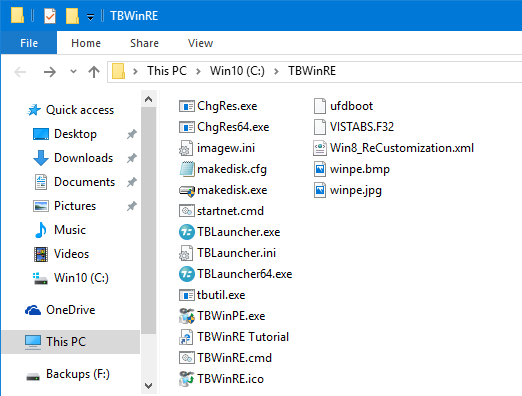
Extract the contents of this file to the folder from where you want to run TBWinPE/RE Builder. It is recommended that you create a new folder in the root of a drive (C:\TBWinRE, D:\TBWinRE, etc.) and extract the files there.
An example of the files extracted to the C:\TBWinRE folder is shown below:
Фабричные образы в Windows 8 и 8.1
Упрощенно говоря, вплоть до Update 1 изготовитель ноутбука или планшета создавал образ, копировал его на раздел восстановления, а потом применял этот же образ к разделу Windows. На диаграмме минимальная рекомендуемая конфигурация разделов в разметке GPT для ОЕМ-производителей, но они также могут создавать и другие разделы.
Эта картинка из документации к Windows 8.1 Update, и она несколько отличается от той, что на момент публикации материала еще присутствует в библиотеке TechNet применительно к Windows 8.1. Так, раздел ESP (Extended System Partition) ранее обозначался как , а раздел был первым, а не третьим. Однако на суть это не влияет.
Дубликаты находятся в:
- Сжатом фабричном WIM-образе на разделе Recovery. На диаграмме выше это install.wim.
- Распакованном образе, который составляет основу работающей Windows (например, папки Windows и Program Files). На диаграмме выше это Uncompressed Windows files.
Выход Windows 8.1 Update меняет эту ситуацию.